【OpenRR】RustでRobot!#06 「ロボットアームと軌道計画」
6-1. はじめに
こんにちは、Smile Roboticsの内山です。OpenRRにあるopenrr-plannerを用いてオフィスにあるUfactory Lite6を動かします。

とりあえずOpenRRを使って何かしたい場合は、openrr-appsがあり、それを使うことができますが、今回は使わずに行こうと思います。
6-2. 実装
6-2-1. 概要
雑ですが今回作ったものの構造はこのようなイメージです。赤い印がついているものを今回新しく実装しました。
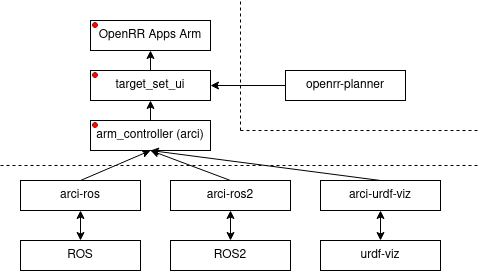
6-2-2. 具体的な実装
arm_controllerは、アームを動かすためのarciを用いて実装したレイヤです。ロボットアームを扱いたいので、arci::JointTrajectoryClientを用います。
arm_controller.rs
use arci::{Error, JointTrajectoryClient, WaitFuture};

pub struct ArmController<J>
where
    J: JointTrajectoryClient,
{
    client: J,
}

impl<J> ArmController<J>
where
    J: JointTrajectoryClient,
{
    pub fn new(client: J) -> Self {
        Self { client }
    }

    pub fn run(&self, positions: &[f64]) -> Result<WaitFuture, Error> {
        let mut target = vec![];

        for pose in positions {
            target.push(*pose);
        }

        self.client
            .send_joint_positions(target, std::time::Duration::from_millis(100))
    }

    pub fn get_feedback(&self) -> Vec<f64> {
        self.client.current_joint_positions().unwrap()
    }
}
アームを動かせてもどのように動かすかは、まだ実装できていません。今回はopenrr-plannerにExampleとしてあるCollisionAvoidAppを参考(流用)にして実装します。コードは適当に省略して載せています。この記事の一番下にGitHubのリンクを貼っておくので具体的な実装はそちらを参照してください。また具体的なopenrr-plannerの実装を知りたい場合はGitHubを参照してください。
target_set_ui.rs
...

pub struct TargetSetUI<J>
where
    J: JointTrajectoryClient,
{
    planner: JointPathPlannerWithIk<f64, RandomInitializeIkSolver<f64, JacobianIkSolver<f64>>>,
    obstacles: Compound<f64>,
    ik_target_pose: na::Isometry3<f64>,
    init_ik_target_pose: na::Isometry3<f64>,
    viewer: Viewer,
    window: Window,
    arm: k::SerialChain<f64>,
    end_link_name: String,
    reference_robot: Arc<k::Chain<f64>>,
    arm_controller: ArmController<J>,
}

impl<J> TargetSetUI<J>
where
    J: JointTrajectoryClient,
{
    pub fn new(client: J, urdf_path: &Path, end_link_name: &str) -> Self {

	// 構造体の初期化
	// 省略
        Self {
            planner,
            obstacles,
            ik_target_pose,
            init_ik_target_pose,
            viewer,
            window,
            arm,
            end_link_name,
            reference_robot,
            arm_controller,
        }
    }

    fn update_viewer(&mut self) {
        let robot = &self.reference_robot;
        let ja = robot.joint_positions();
        robot.set_joint_positions_clamped(&ja);
        robot.update_transforms();
        self.viewer.update(robot);
    }

    fn update_ik_target(&mut self) {
        if let Some(obj) = self.viewer.scene_node_mut("ik_target") {
            obj.set_local_transformation(na::convert(self.ik_target_pose));
        }
    }

    fn run_default_viewer_task(&mut self) {
        self.viewer.draw_text(
            &mut self.window,
            HOW_TO_USE_STR,
            FONT_SIZE,
            &na::Point2::new(TEXT_POSE.0, TEXT_POSE.1),
            &na::Point3::new(TEXT_COLOR.0, TEXT_COLOR.1, TEXT_COLOR.2),
        );
    }

    fn set_ik_target_to_eef(&mut self) {
        // IKの目標位置を手先位置にする
    }

    fn set_ik_target_to_init(&mut self) {
        // IKの目標位置を初期状態にする
    }

    pub fn run(&mut self) {
        self.update_viewer();
        self.update_ik_target();
        let mut plans: Vec<Vec<f64>> = Vec::new();

        while self.window.render_with_camera(&mut self.viewer.arc_ball) {
            self.run_default_viewer_task();
            if !plans.is_empty() {
                let positions = &plans.pop().unwrap();
                self.arm.set_joint_positions_clamped(positions);
                self.update_viewer();
                let _ = self.arm_controller.run(positions);
            }
            std::thread::sleep(std::time::Duration::from_millis(10));
            for event in self.window.events().iter() {
                if let WindowEvent::Key(code, Action::Press, mods) = event.value {
                    match code {
                        Key::Up => {
                            // UpキーでIKターゲットを上に更新。
                        }
                        Key::Down => {
                            // DownキーでIKターゲットを下に更新。
                        }
                        Key::Left => {
                            // 左キーでIKターゲットを左に更新。
                        }
                        Key::Right => {
                            // 右キーでIKターゲットを右に更新。
                        }
                        Key::B => {
                            // BキーでIKターゲットを後ろに更新。
                        }
                        Key::F => {
                            // FキーでIKターゲットを前に更新。
                        }
                        Key::G => {
                            // 指定したIKターゲットまでの軌道を計画し、実行。
                        }
                        Key::E => {
			    // IKターゲットを手先位置にする。
                        }
                        Key::I => {
                            // IKターゲットを初期状態にする。
                        }
                        _ => {}
                    }
                }
            }
        }
    }
}
実際はアプリケーションとして、src/binの中ににuviz_arm.rsとros_arm.rs、ros2_arm.rsがあります。今回はarm_controllerでJointTrajectoryClientを用いて実装しているので、arci-fooの中にあるJointTrajectoryClientトレイトが実装されたものの中から適したClientを利用します。
6-2-3. arci-urdf-viz
これより、urdf-viz用にはUrdfVizWebClientを実装します。
6-2-4. arci-ros
arci-rosの場合は、
と
にあります。後者はaction clientなので前者のRosControlClientを使います。
6-2-5. arci-ros2
これよりRos2ControlClientを実装します。
6-2-6. Appsの実装
別々に作りもしましたが、比較のためにまとめて実装します。#[cfg(feature = "...")]でfeatureの有無を分けます。
arm.rs
#[cfg(feature = "ros")]
use arci_ros::*;
#[cfg(feature = "ros2")]
use arci_ros2::*;
#[cfg(not(any(feature = "ros", feature = "ros2")))]
use arci_urdf_viz::UrdfVizWebClient;
use clap::Parser;
use openrr_apps_arm::{argument::CmdArgument, target_set_ui::TargetSetUI};

#[tokio::main]
async fn main() {
    let arg = CmdArgument::parse();

    let client;

    #[cfg(feature = "ros")]
    {
        arci_ros::init("lite6");
        client = RosControlClient::new(
            vec![
                "joint1".to_string(),
                "joint2".to_string(),
                "joint3".to_string(),
                "joint4".to_string(),
                "joint5".to_string(),
                "joint6".to_string(),
            ],
            "/ufactory/lite6_traj_controller",
            false,
        );
    }
    #[cfg(feature = "ros2")]
    {
        let ctx = r2r::Context::create().unwrap();
        let action_name = "/lite6_traj_controller";
        client = Ros2ControlClient::new(ctx, action_name);
    }
    #[cfg(not(any(feature = "ros", feature = "ros2")))]
    {
        client = UrdfVizWebClient::default();
        client.run_send_joint_positions_thread();
    }

    tokio::spawn(async move {
        tokio::signal::ctrl_c().await.unwrap();
        std::process::exit(0x0100);
    });

    let mut ui = TargetSetUI::new(client, &arg.urdf_path, &arg.end_link_name);

    ui.run();
}
どのClientを用いる場合でも、実行部分(ui.run())は変わらずに実装できます。
今回実装したすべてのファイルのうち、上記ファイルのfeatureで分けた部分以外は Client (ROS1/ROS2/urdf-viz)に全く依存せず に記述することが出来ています。
6-3. 実行
これはurdf-vizにあるシミュレーション上のロボットを操作した例です。IKターゲットを示すローカル座標系を追うようにしてアームが動いています。

ROS/ROS2対応しているUfactory Lite6の実機をROS/ROS2を用いて動かした例です。これも同様にウィンドウ上のシミュレーションの動きと同じように実機が動いています。
6-4. 終わりに
実装したものは次のリポジトリから見られます。
Discussion