macOSアプリで見かける自動アップデート機能を実装する
概要
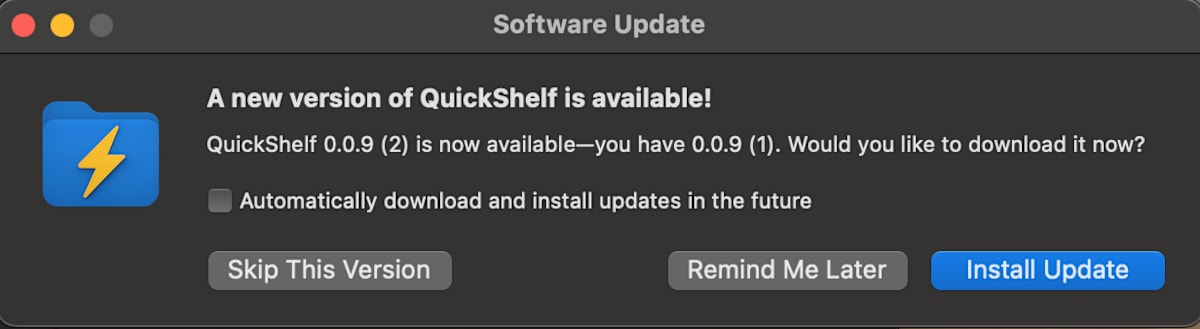
今回はmacOS向けのアプリで見かける、アップデートがあればお知らせしてくれる機能(👇のようなダイアログが出てお知らせしてくれる)を実装していきたいと思います。
宣伝
macOS向けのメニューバーアプリ「QuickShelf」を公開しているので、良ければ使ってみて下さい。メニューバー上で特定のディレクトリを保存しといて、いつでもそのディレクトリ配下のファイル等をDrag&Dropできるアプリになります。事務作業などでよくファイルアップロードする為にFinderを探している方は試してみて下さい。
今回はこのアプリに自動アップデート機能の実装を行なっていきたいと思います。
前提
- 直配布(非 App Store)
- 署名: Developer ID(Hardened Runtime 有効)でコード署名し、公証(notarize)して配布済み
実装方法
実装方法としては大きく以下の2つがある様です。今回は直配布(非 App Store)で自動アップデート機能を実装するので、フレームワーク Sparkle を使って実装を進めていきたいと思います。
1. フレームワークを使う Sparkle
macOS 向け定番の自動アップデートフレームワーク。ZIP/DMG などの配布と「Appcast(XML)」で差分更新も可能。EdDSA 署名 + Appleのコード署名で検証、サンドボックス対応。SwiftPMで導入可。
2. 自前実装(独自 updater + pkg/zip 配布)
自サーバでバージョン照会 → ダウンロード → 置換・再起動を自作。
ただし署名/公証、差分更新、安全な置換、ロールバック等を全部自分で担う必要があり、実務では Sparkle を使う方が安全・高速
Sparkle を使った実装
まずはセットアップから進めていきます。
Basic Setup
👆こちらを元に進めて行こうと思います。
全体の流れ
- プロジェクトにSparkleフレームワークを追加
- 署名鍵(EdDSA/ed25519)の作成
- appcast.xml の生成
1. プロジェクトにSparkleフレームワークを追加
「Xcode」 > 「File」 > 「Add Packages Dependencies…」から右上の検索窓に https://github.com/sparkle-project/Sparkle を入力します。

「App Package」でフレームワークを追加します。
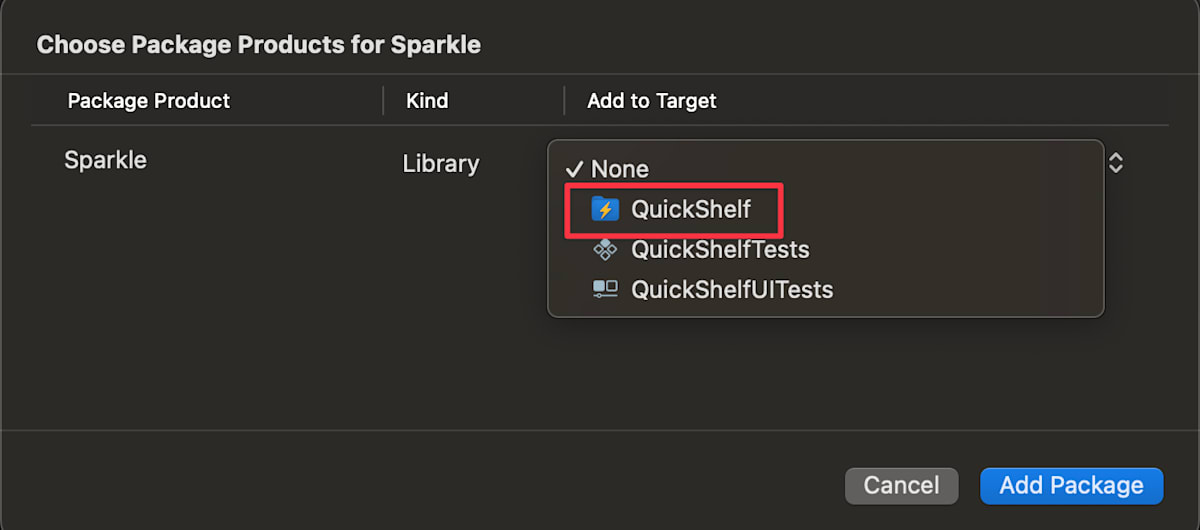
「Add to Target」でTargetの選択も設定しときます。
2. 署名鍵(EdDSA/ed25519)の作成
DerivedData/QuickShelf/SourcePackages/artifacts/sparkle/Sparkle/bin (アプリ名の箇所は適宜変更して下さい)に generate_keys が作成されていると思うので、こちらで署名鍵の作成を行います。
$ ./generate_keys --account com.xxxx
Generating a new signing key. This may take a moment, depending on your machine.
A key has been generated and saved in your keychain. Add the `SUPublicEDKey` key to
the Info.plist of each app for which you intend to use Sparkle for distributing
updates. It should appear like this:

    <key>SUPublicEDKey</key>
    <string>xxxxxxxxxxxxxxxxxxxxxxxxxxx</string>
※アカウントはデフォルトで ed25519 になるとの事なので --acount で指定してます
作成が行われたら自動でKeyChainにも書き込まれています。また秘密鍵をエクスポートしたり、インポートするにも generate_keys を使用します。
# エクスポート
./generate_keys --account com.xxxx -x /path/to/exported_private_key

# インポート
./generate_keys --account com.xxxx -f /path/to/exported_private_key
次に鍵を生成された時に出力された公開鍵👇を Info.plist に追記します。
    <key>SUPublicEDKey</key>
    <string>xxxxxxxxxxxxxxxxxxxxxxxxxxx</string>
Xcode 12以降は物理的な Info.plist を置かなくてもXcodeがビルド時に生成するので Info.plist はないかと思います。なので「Target」>「Info」で「+」で適当にKeyを追加し、そのままKeyを編集してあげます。

すると SUPublicEDKey が追加された Info.plist が作成されます。
3. appcast.xml の生成
次に現在配布している最新のrelease (DMG / ZIP) から appcast.xml を生成します。
./generate_appcast /path/to/releases/
すると /path/to/releases/appcast.xml が作成されているので enclosure url など必要な項目を修正してサーバーに設置します。
次に SUFeedURL を Info.plist に設定します。値は先ほど appcast.xml を設置したURLを設定すればOKです。
 <key>SUFeedURL</key>
 <string>https://xxxxx/appcast.xml</string>
サンドボックスアプリの場合の追加設定
Sparkle がサンドボックス環境で機能するには、アプリケーションが XPC サービスを呼び出し、アプリケーションの権限要件が満たされていることを確認する必要があります。
ここで登場した XPC サービスとは?
XPCは、基本的なプロセス間通信のための軽量なメカニズムを提供し、低レベルのプロセス間通信メカニズムにアクセスします
そのXPC サービスをSparkleでは以下の2つを使用している様です。
- Installer.xpc (Sparkle 2.2 より前の org.sparkle-project.InstallerLauncher.xpc)
- アプリケーションのサンドボックス外で更新プログラムをインストールできるようにするもの
- Downloader.xpc (Sparkle 2.2 より前の org.sparkle-project.Downloader.xpc)
- アプリ本体に
Outgoing Connectionsを付与できない場合に使用

- アプリ本体に
Installer.xpc の設定
Info.plist で SUEnableInstallerLauncherService = YES を設定する

.entitlementsファイルに以下を追加する
<key>com.apple.security.temporary-exception.mach-lookup.global-name</key>
<array>
    <string>$(PRODUCT_BUNDLE_IDENTIFIER)-spks</string>
    <string>$(PRODUCT_BUNDLE_IDENTIFIER)-spki</string>
</array>

Downloader.xpcの設定
こちらですが、ドキュメントに
ダウンローダーサービスの使用にはいくつかの欠点があり、考慮すべき点があります
となっているので、素直に「App Sandbox」>「Network」>「Outgoing Connections」にチェック入れても問題ない場合はそちらで対応した方が良いのかもしれません。
今回はチェックを入れて対応することにしました。
アプリに組み込む
次にメニュー内に「Check for Updates…」を設置しクリックしたらアップデートの確認を行うようにしたいと思います。
今回は Support/Updater ディレクトリを新規に作成しその中にアップデートチェックの実装を追加する形で進めていきたいと思います。
まずは Sparkle の SPUStandardUpdaterController を扱う AppUpdater クラスを作成します。
- Support/Updater/AppUpdater.swift
import Sparkle

final class AppUpdater {
    private let updaterController = SPUStandardUpdaterController(
        startingUpdater: true, updaterDelegate: nil, userDriverDelegate: nil
    )

    func checkForUpdates() {
        updaterController.updater.checkForUpdates()
    }
}
次に QuickShelfApp に NSMenuItem を追加し AppDelegate 経由で先ほど作成した AppUpdater のメソッドを呼ぶ様にします。
- QuickShelfApp.swift
private func popupContextMenu(for item: NSStatusItem) {
  // ...
  let updaterItem = NSMenuItem(
      title: "Check for Updates…",
      action: #selector(AppDelegate.checkForUpdates(_:)),
      keyEquivalent: ""
  )
  updaterItem.target = AppDelegate.shared
  menu.addItem(updaterItem)
  menu.addItem(.separator())
  // ...
}

class AppDelegate: NSObject {
    static let shared = AppDelegate()
    // ...

    private let updater = AppUpdater()

    @objc func checkForUpdates(_ sender: Any?) {
        updater.checkForUpdates()
    }
    // ...
}
ここまでで実行してます。実行してメニュの「Check for Updates…」を選択すると、
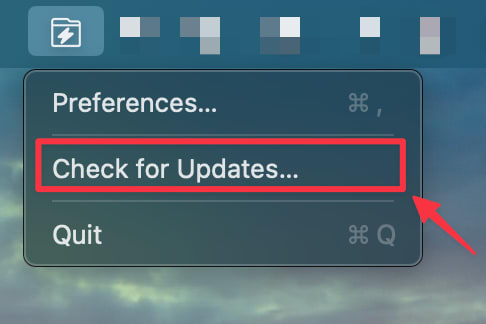
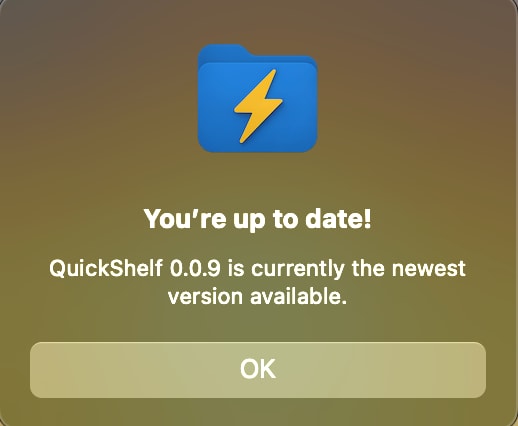
現在はアップデートが無い為、以下の様なダイアログが表示されるかと思います。
アップデートチェック中に以下のWarningが出る
実行するとコンソールログに以下のWarningが表示される場合があるかと思います。
Warning: Background app automatically schedules for update checks but does not implement gentle reminders. As a result, users may not take notice to update alerts that show up in the background. Please visit https://sparkle-project.org/documentation/gentle-reminders for more information. This warning will only be logged once.
gentle reminders 機能が実装されていません。そのため、ユーザーはバックグラウンドに表示される更新通知に気づかない可能性があります
ここでいう gentle reminders 機能とは一体何でしょうか…? ログに表示されていたドキュメントを読んでみます👇
「アップデートを見つけても即モーダルを前面に出さず、アプリ側の“さりげない合図”で気づかせる」ための仕組み。とくに バッググラウンドのアプリ(Dockに表示されない)で、他アプリの作業を邪魔せずに更新へ誘導できる
バックグラウンドのアプリで未実装の場合、警告のログが出るのかもしれません。今回は UserNotifications を使って「さりげない合図」を実装しようと思います。
新規に以下内容を実装します。
- Support/Updater/NotificationBridge.swift
import UserNotifications

final class NotificationBridge: NSObject, UNUserNotificationCenterDelegate {
    func configure() {
        UNUserNotificationCenter.current().delegate = self
    }
    func requestAuth() {
        // 結果のハンドリングは今回はスキップ
        UNUserNotificationCenter.current()
            .requestAuthorization(options: [.badge, .alert, .sound]) { _, _ in }
    }
    func postGentleUpdate(version: String) {
        let content = UNMutableNotificationContent()
        content.title = "Update available"
        content.body  = "Version \(version) is now available"
        UNUserNotificationCenter.current().add(
            UNNotificationRequest(identifier: "QS_UPDATE", content: content, trigger: nil)
        )
    }
    func clearGentleUpdate() {
        UNUserNotificationCenter.current().removeDeliveredNotifications(withIdentifiers: ["QS_UPDATE"])
    }
}
- Support/Updater/UpdaterDelegate.swift
import Sparkle

final class UpdaterDelegate: NSObject, SPUStandardUserDriverDelegate, SPUUpdaterDelegate {
    weak var updaterController: SPUStandardUpdaterController?
    private let notifier: NotificationBridge

    init(notifier: NotificationBridge) {
        self.notifier = notifier
    }

    // これを true にすると Gentle Reminders を使う宣言になる(必須)
    var supportsGentleScheduledUpdateReminders: Bool { true }

    func standardUserDriverShouldHandleShowingScheduledUpdate(_ update: SUAppcastItem,
                                                             andInImmediateFocus immediateFocus: Bool) -> Bool {
        // Sparkleに新しいスケジュールされた更新の表示の処理を任せるか?
        // 任せる場合 immediateFocus を返す
        return immediateFocus
    }

    // Sparkle が前面に出さない(= gentle に知らせる)ときに呼ばれる
    func standardUserDriverWillHandleShowingUpdate(_ handleShowingUpdate: Bool,
                                                   forUpdate update: SUAppcastItem,
                                                   state: SPUUserUpdateState) {
        guard !handleShowingUpdate else { return } // ユーザー発火などは Sparkle に任せる
        // ユーザー発火でない場合は通知でお知らせする
        if !state.userInitiated { notifier.postGentleUpdate(version: update.displayVersionString) }
    }
    // ユーザーがアップデートに注意を向けたら、通知をクリア
    func standardUserDriverDidReceiveUserAttention(forUpdate update: SUAppcastItem) {
        notifier.clearGentleUpdate()
    }
    // セッション終了時(スキップ/完了/エラー)
    func standardUserDriverWillFinishUpdateSession() {
        notifier.clearGentleUpdate()
    }
    // Sparkle が次回の定期チェックをスケジュールする時に通知許可を要求
    func updater(_ updater: SPUUpdater, willScheduleUpdateCheckAfterDelay delay: TimeInterval) {
        notifier.requestAuth()
    }
}
- Support/Updater/AppUpdater.swift
import Sparkle

final class AppUpdater {
    // 先ほどの NotificationBridge を保持
    private let notifier = NotificationBridge()
    // delegate を SPUStandardUpdaterController初期化時に渡す
    private lazy var delegate = UpdaterDelegate(notifier: notifier)
    private lazy var updaterController = SPUStandardUpdaterController(
        startingUpdater: true, updaterDelegate: delegate, userDriverDelegate: delegate
    )

    init() {
        // updaterController を渡さないと動かない
        delegate.updaterController = updaterController
        notifier.configure()
    }

    func checkForUpdates() {
        updaterController.updater.checkForUpdates()
    }
}
実装できたのでテストしてみたいと思います。今回はまだ運用が始まってない前提なので、直接appcast.xml のバージョンをあげてサーバーにアップロードして確認してみます。
defaults delete [アプリbundleId] SULastCheckTime
👆を実施するとアプリ起動時にアップデートチェックが走ります。チェックが走ると以下のようなダイアログが表示されます。

ちなみにこの時通知は表示されないです。👆のダイアログが「ユーザー発火」となりUpdaterDelegate.swiftで通知をスキップしている為です。テストの場合どうしても先にダイアログが走る為、通知のテストを行う場合UpdaterDelegate.swiftでスキップしている箇所をコメントアウトして確認が必要でした。
(コメントアウトしなくても確認できる方法ご存知の方教えて頂けると助かります 🙇)
まとめ
今回はmacOSアプリで見かける自動アップデート機能を実装してみました。Sparkleを使うと事前準備は少し手間ですが、
一度実装してしまえば簡単に自動アップデート機能を実装できるので便利だなと感じました。
参考URL
Discussion