ReactのComponentをSVG化 with foreignObject
概要
ReactのコンポーネントをforeignObjectを使ってSVG化できないか試した時のメモになります。
既に、vercelのsatori などでjsxをSVG化できたりするものがあるかと思いますが、場合によってはforeignObjectを使う方法もあるよという記事になります。
foreignObjectとは?
<foreignObject>SVG 要素は、異なるユーザーエージェントによって描画されるグラフィックコンテンツを持つ外部 XML 名前空間を含めることを可能にします。含まれた外部グラフィックコンテンツは、SVG 変換や合成の対象となります。
↓みたいな事が可能になります。※ 上記サイトのサンプルを少し修正しています。
<svg width="400px" height="300px" viewBox="0 0 400 300"
xmlns="http://www.w3.org/2000/svg">
<desc>This example uses the 'switch' element to provide a
fallback graphical representation of a paragraph, if
XHTML is not supported.</desc>
<!-- The 'switch' element will process the first child element
whose testing attributes evaluate to true.-->
<switch>
<!-- Process the embedded XHTML if the requiredExtensions attribute
evaluates to true (i.e., the user agent supports XHTML
embedded within SVG). -->
<foreignObject width="200" height="50"
requiredExtensions="http://www.w3.org/1999/xhtml">
<!-- XHTML content goes here -->
<body xmlns="http://www.w3.org/1999/xhtml">
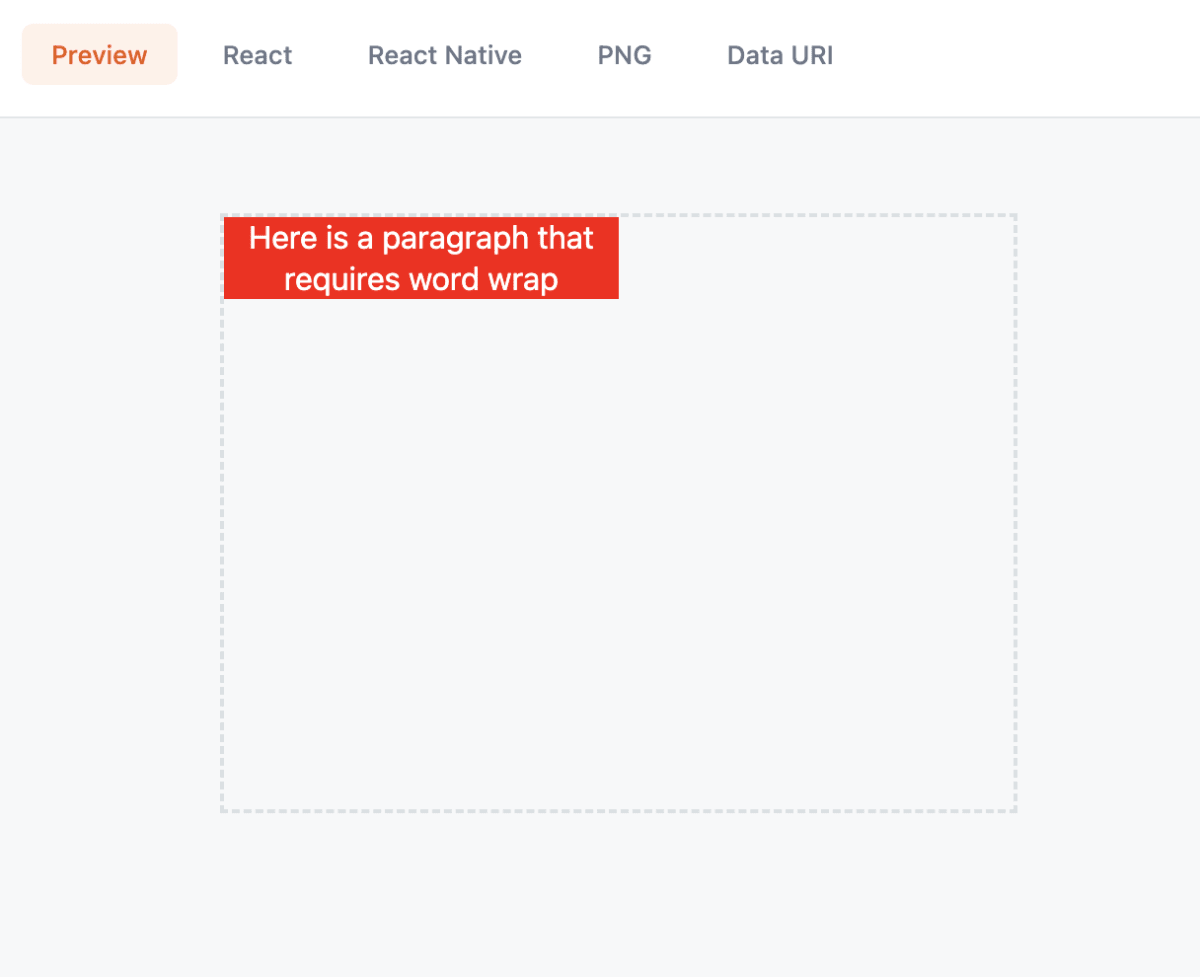
<div style="background-color: red; color: white">
<p>Here is a paragraph that requires word wrap</p>
</div>
</body>
</foreignObject>
<!-- Else, process the following alternate SVG.
Note that there are no testing attributes on the 'text' element.
If no testing attributes are provided, it is as if there
were testing attributes and they evaluated to true.-->
<text font-size="10" font-family="Verdana">
<tspan x="10" y="10">process the following alternate SVG</tspan>
</text>
</switch>
</svg>
こちらを以下のサイトに貼り付けると挙動が確認できます。
<switch> 要素に関して
switch要素は、testing属性がtrueと評価される最初の子要素
を処理します。
foreignObject の描画に失敗したら次の要素の
    <text font-size="10" font-family="Verdana">
      <tspan x="10" y="10">process the following alternate SVG</tspan>
    </text>
が描画されるという事の様です。
requiredExtensions 属性に関して
必要な言語拡張のリストを指定する。 言語拡張は,この仕様で定められている特能の範囲外であり、 UA の機能の範疇である。 個々の言語拡張は IRI 参照 により指定される。
上記の例で言うと http://www.w3.org/1999/xhtml xhtml を指定している事になります。
確認用のサンプルプロジェクト作成
↑こちらをベースにサンプルプロジェクトを作成していきたいと思います。 git clone し一度VSCode上からdevcontainerを使用しコンテナを起動、今回は Vite で React Typescript 構成のプロジェクトを作成します。
yarn create vite . --template react-ts
# Ignore files and continueを選んで作成
Current directory is not empty. Please choose how to proceed:
    Remove existing files and continue
    Cancel operation
❯   Ignore files and continue
.devcontainer/postAttach.sh に以下を追加します。
yarn install
yarn dev
.devcontainer/docker-compose.yml に以下を追加します。
services:
  app:
    build: .
    ...
    working_dir: /usr/src
    ports: # ports 追加
      - "5173:5173"
package.json の scripts > dev を以下に変更します。
  "scripts": {
    "dev": "vite --host=0.0.0.0",
    // ...
  },
ここまでして、再度VSCodeでdevcontainerを使ってコンテナを起動し直します。
ブラウザで http://localhost:5173/ にアクセスしVite + React が表示されていればOKです。
ComponentのHTML文字列化
まずはforeignObjectに埋め込むComponentを作成したいと思います。
src/components/Item.tsx を以下内容で作成します。
export const Item = () => {
  return (
    <div
      style={{
        width: "450px",
        overflow: "hidden",
        borderRadius: "8px",
        boxShadow: "0 4px 15px rgba(0,0,0,.2)",
        padding: "16px",
      }}
    >
      <h1>Item</h1>
      <p>Item content</p>
    </div>
  );
};
このComponentを表示させると↓の様になります。

こちらをまずはforeignObject内に埋め込む用にHTML文字列化して見たいと思います。
HTML文字列化には ReactDOMServer.renderToStaticMarkup を使います。
src/App.tsx を以下に修正します。
import { useState } from "react";
import ReactDOMServer from "react-dom/server";
import { Item } from "./components/Item";

const App = () => {
  const [element, setElement] = useState("");
  return (
    <div>
      <Item />
      <hr style={{ margin: "16px" }} />
      <button
        onClick={() => {
          const result = ReactDOMServer.renderToStaticMarkup(<Item />);
          setElement(result);
        }}
      >
        Convert
      </button>
      <hr style={{ margin: "16px" }} />
      {element}
    </div>
  );
};

export default App;
実行して「Convert」ボタンを押すとHTML文字列化できているかと思います。

ComponentのSVG化
本題のComponentのSVG化をやっていきたいと思います。
まずはforeignObjectのswitch部分を作成するメソッドを作成します。
const createForeignObject = (
  width: number,
  height: number,
  content: string
) => {
  const g = document.createElementNS("http://www.w3.org/2000/svg", "g");
  const sw = document.createElementNS("http://www.w3.org/2000/svg", "switch");

  // foreignObjectを作成
  const foreignObject = document.createElementNS(
    "http://www.w3.org/2000/svg",
    "foreignObject"
  );
  foreignObject.setAttribute("width", width.toString());
  foreignObject.setAttribute("height", height.toString());
  foreignObject.setAttribute(
    "requiredExtensions",
    "http://www.w3.org/1999/xhtml"
  );

  const div = document.createElementNS("http://www.w3.org/1999/xhtml", "div");
  div.setAttribute("xmlns", "http://www.w3.org/1999/xhtml");
  div.setAttribute("style", "padding: 8px"); // contentの影を表示させる為に少しpadding設定
  div.innerHTML = content;

  // foreignObjectがサポートされてない場合に以下のtextが表示される
  const fallthrough = document.createElementNS(
    "http://www.w3.org/2000/svg",
    "text"
  );
  fallthrough.setAttribute("x", "0");
  fallthrough.setAttribute("y", "10");
  fallthrough.setAttribute("font-size", "10");
  fallthrough.setAttribute("fill", "red");
  fallthrough.textContent = "failed to generate svg";

  foreignObject.appendChild(div);
  sw.appendChild(foreignObject);
  sw.appendChild(fallthrough);
  g.appendChild(sw);
  return g;
};
↑では引数のcontentをforeignObject内のdiv配下に設定し、foreignObjectがサポートされてない場合のtextを追加したものを返しています。
src/App.tsx を以下に修正します。
const App = () => {
  const element = useRef<HTMLDivElement>(null);
  return (
    <div>
      <Item />
      <hr style={{ margin: "16px" }} />
      <button
        onClick={() => {
          const svg = document.createElementNS(
            "http://www.w3.org/2000/svg",
            "svg"
          );
          svg.setAttribute("width", "100%");
          svg.setAttribute("height", "100%");
          const content = ReactDOMServer.renderToStaticMarkup(<Item />);
          const g = createForeignObject(500, 500, content);
          svg.appendChild(g);
          element.current && element.current.appendChild(svg);
        }}
      >
        Convert
      </button>
      <hr style={{ margin: "16px" }} />
      <div style={{ width: "500px", height: "500px" }} ref={element} />
    </div>
  );
};
今回SVGを表示させる外枠の幅と高さは 500px×500px に固定してます。
ここまでで実際にSVG出力してみます。

ちゃんとSVG化できていそうです! 🎉
今回シンプルなもので試しましたが、実際のプロジェクト等でもし使う場合、CSSフレームワークだったり、State管理だったりが入ってきてより複雑になるかと思います。
そういったComponentの場合うまくSVG化できないパターンもあるかと思うので、調整が必要になりそうです。
参考URL
Discussion