【Android】KtorでHTTPクライアント実装


はじめに
今回はKtorを使ったAndroidアプリでのHTTPクライアントのセットアップ〜簡単な実装までの記事になります。
ライブラリの候補
Ktorを試す前にそもそもAndroidアプリでHTTPクライアントを扱う場合、どのようなライブラリが候補にあるのか調べてみました。
1. Retrofit
Retrofitは、Squareが提供する人気の高いHTTPクライアントライブラリです。APIエンドポイントをインターフェースとして定義し、アノテーションを使用してHTTPメソッドやURLパスを指定できます。
2. OkHttp
OkHttpは、Retrofitの基盤となっているHTTPクライアントライブラリです。低レベルのHTTP操作が必要な場合や、カスタマイズされたリクエスト/レスポンスハンドリングが必要な場合に使用されます。
3. Ktor
Ktorは、Kotlin製の非同期Webフレームワークで、クライアントとサーバーの両方で使用できます。Jetpack Composeと組み合わせて使うと、ネイティブに非同期処理が行えます。
調べてみると、RetrofitとKtorの比較や、RetrofitからKtorへ移行する場合の記事がちらほら出てきます。マルチプラットフォームであればKtor、AndroidのHTTPクライアントとしてはどちらかという選択肢になってくるのかもしれないですね。
環境構築や準備
各バージョンや環境
# Android Studio Jellyfish | 2023.3.1
$ sw_vers
ProductName: macOS
ProductVersion: 14.5
BuildVersion: 23F79
1. サンプルプロジェクトの作成
早速サンプルプロジェクトを作成しKtorを試していきたいと思います。
まずは、AndroidStudioの「New Project」で「Empty Activity」を選択します。
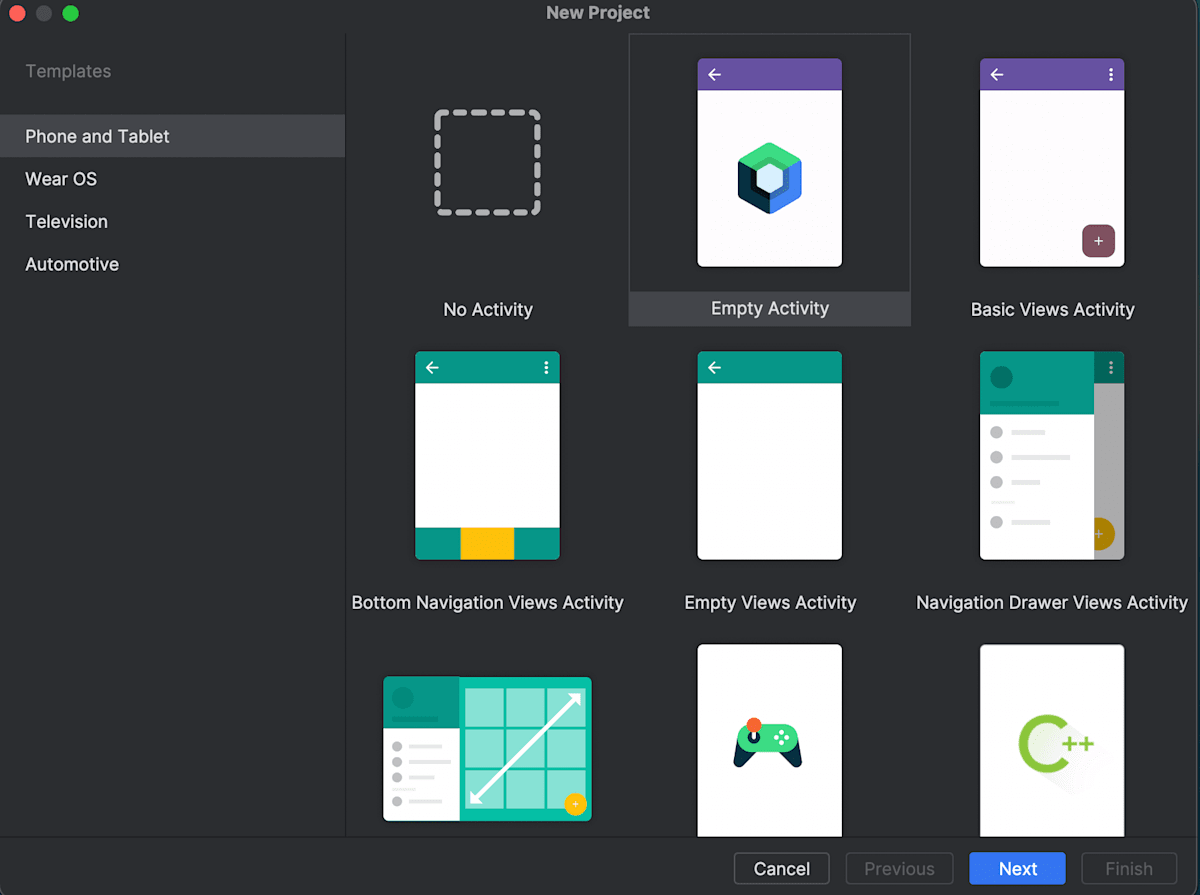
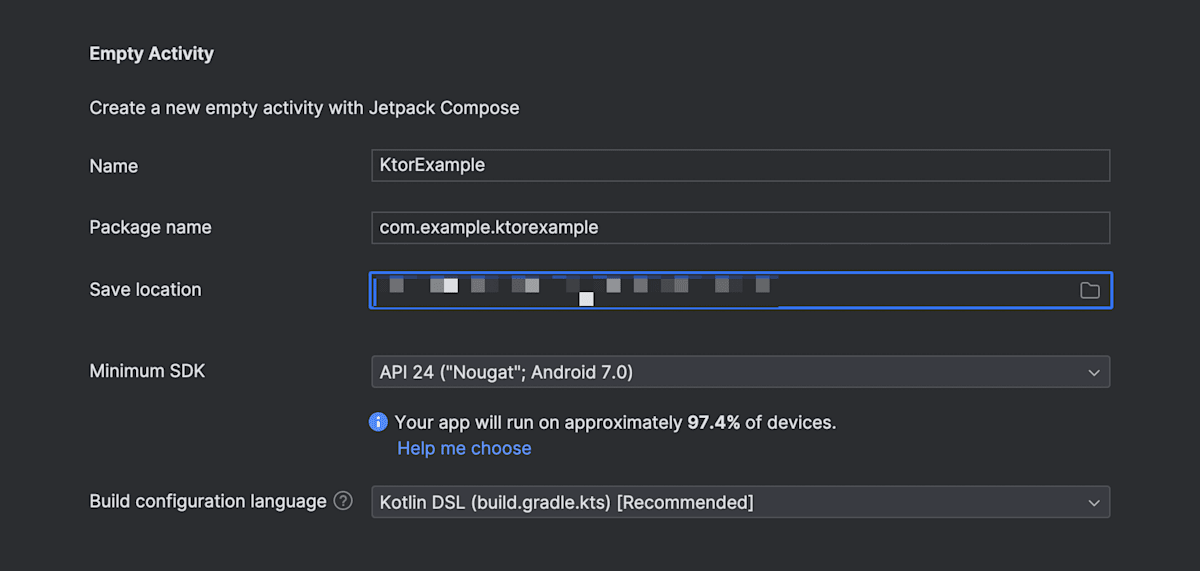
今回は名前を「KtorExample」にし Package name を「com.example.ktorexample」として進めていきます。
2. KtorとCoroutinesのインストール
2-1. gradle/libs.versions.toml に以下を追加
[versions]
ktor = "2.3.11"
coroutines = "1.8.1"

[libraries]
ktor-client-core = { module = "io.ktor:ktor-client-core", version.ref = "ktor" }
ktor-client-cio = { module = "io.ktor:ktor-client-cio", version.ref = "ktor" }

kotlinx-coroutines-core = { module = "org.jetbrains.kotlinx:kotlinx-coroutines-core", version.ref = "coroutines" }
kotlinx-coroutines-android = { module = "org.jetbrains.kotlinx:kotlinx-coroutines-android", version.ref = "coroutines" }
2-2. app/build.gradle.kts に以下を追加
dependencies {
    implementation(libs.ktor.client.core)
    implementation(libs.ktor.client.cio)

    implementation(libs.kotlinx.coroutines.core)
    implementation(libs.kotlinx.coroutines.android)
}
実装
1. 簡単な実装
こちら のドキュメントに記載されているサンプルをそのまま試してみたいと思います。
com.example.ktorexample.data に Greeting.kt を以下内容で作成します。
1-1. Greeting.kt
package com.example.ktorexample.data

import io.ktor.client.*
import io.ktor.client.request.*
import io.ktor.client.statement.*

class Greeting {
    private val client = HttpClient()

    suspend fun greeting(): String {
        val response = client.get("https://ktor.io/docs/")
        return response.bodyAsText()
    }
}
次に MainActivity.kt を以下に修正します。
1-2. MainActivity.kt
class MainActivity : ComponentActivity() {
    override fun onCreate(savedInstanceState: Bundle?) {
        super.onCreate(savedInstanceState)
        enableEdgeToEdge()
        setContent {
            KtorExampleTheme {
                Scaffold(modifier = Modifier.fillMaxSize()) { innerPadding ->
                    val scope = rememberCoroutineScope()
                    var text by remember { mutableStateOf("Loading") }
                    LaunchedEffect(true) {
                        scope.launch {
                            text = try {
                                Greeting().greeting()
                            } catch (e: Exception) {
                                e.localizedMessage ?: "error"
                            }
                        }
                    }
                    Greeting(
                        name = text,
                        modifier = Modifier.padding(innerPadding)
                    )
                }
            }
        }
    }
}
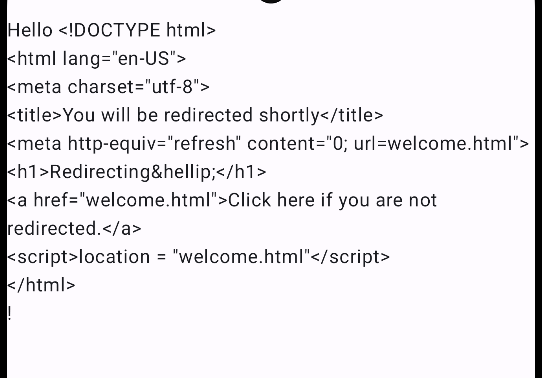
最後に AndroidManifest.xml に <uses-permission android:name="android.permission.INTERNET" /> を追加し、実行すると↓の様にHTMLが表示されていればOKです。
2. Engines
Ktor HTTPクライアントは、JVM、Android、JavaScript、Nativeなど、さまざまなプラットフォームで使用できます。特定のプラットフォームでは、ネットワークリクエストを処理する特定のエンジンが必要になる場合があります。例えば、JVMアプリケーションにはApacheやJettyを、AndroidにはOkHttpやAndroidを、Kotlin/NativeをターゲットにしたデスクトップアプリケーションにはCurlを、といった具合です。異なるエンジンには特定の機能があり、異なる設定オプションがあります。
以下のリンク先に各エンジンの比較を確認する事ができます。
先ほどの実装では特にエンジンの指定は行なっていなかったと思うのですが、その場合Ktorが環境に応じてよしなにやってくれる様です。
先ほどの実装でどのエンジンが採用されているのかログで確認した所、当たり前かもですが、dependenciesでインストールしたCIOがちゃんと使われていました。
2-1. エンジンにOkHttpを使う
ここではあえてAndroidではおなじみ?のOkHttpを明示的にエンジンとして使ってみたいと思います。
↑こちらを参考に必要なライブラリをインストールします。
-
gradle/libs.versions.tomlに以下を追加
[libraries]
ktor-client-okhttp = { module = "io.ktor:ktor-client-okhttp", version.ref = "ktor" }
-
app/build.gradle.ktsに以下を追加
dependencies {
    implementation(libs.ktor.client.okhttp)
}
これでCIOとOkHttp両方がインストールされている状態になったので HttpClient 作成時に明示的にOkHttpをエンジンとして使うように修正して確認してみたいと思います。
import android.util.Log
import io.ktor.client.*
import io.ktor.client.engine.okhttp.*
import io.ktor.client.request.*
import io.ktor.client.statement.*

class Greeting {
    private val client = HttpClient(OkHttp)

    suspend fun greeting(): String {
        Log.d("Greeting", client.engine.toString())
        val response = client.get("https://ktor.io/docs/")
        return response.bodyAsText()
    }
}
実行してみるとログにちゃんとOkHttpが表示されています。

2-2. OkHttpのLogging Interceptorを指定する
エンジン指定時に addInterceptor でInterceptorを設定できるのでこちらのLogging Interceptorを指定してみたいと思います。
早速必要なライブラリをインストールしていきます。
-
gradle/libs.versions.tomlに以下を追加- okhttpのversionはktorでインストールされたokhttpのversionに合わせてます
[versions]
okhttp = "4.12.0"

[libraries]
okhttp3-logging-interceptor = { module = "com.squareup.okhttp3:logging-interceptor", version.ref = "okhttp" }
-
app/build.gradle.ktsに以下を追加
dependencies {
    implementation(libs.okhttp3.logging.interceptor)
}
-
Greeting.ktを以下に修正
import io.ktor.client.*
import io.ktor.client.engine.okhttp.*
import io.ktor.client.request.*
import io.ktor.client.statement.*
import okhttp3.logging.HttpLoggingInterceptor

class Greeting {
    private val client = HttpClient(OkHttp) {
        engine {
            addInterceptor(HttpLoggingInterceptor().apply {
                level = HttpLoggingInterceptor.Level.BASIC
            })
        }
    }

    suspend fun greeting(): String {
        val response = client.get("https://ktor.io/docs/")
        return response.bodyAsText()
    }
}
実行してみるとちゃんとログに表示されていそうです !

この記事は以下の情報を参考にして執筆しました
Discussion