【Android】Compose で material3の Navigation Barを試す
はじめに
androidx-navigation-compose を使用してmaterial3のNavigation Barを試してみたいと思います
Compose を使用したナビゲーション | Jetpack Compose | Android Developers
環境構築や準備
各バージョンや環境
# Android Studio Giraffe | 2022.3.1 Patch 1

$ sw_vers
ProductName: macOS
ProductVersion: 13.4
BuildVersion: 22F66
1. 新規プロジェクト作成
サンプル用のプロジェクトを作成していきます。
「Empty Activity」のTemplateを選択
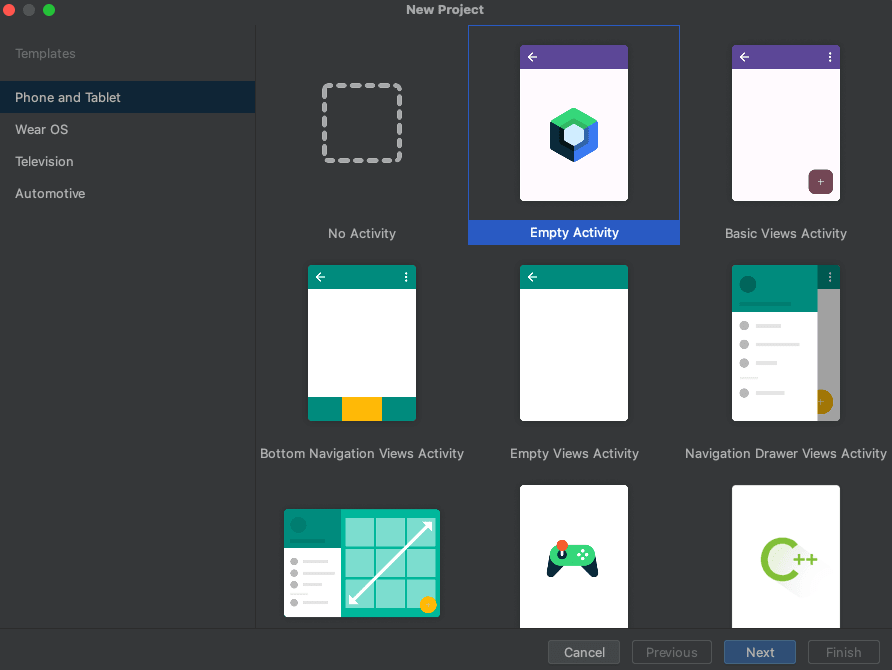
プロジェクト名は「ComposeBottomNavigationExample」としました。

※「Kotlin DSL (build.gradle.kts) + Gradle Version Catalogs (Experimental)」を選択してます
2. 必要なパッケージを追加
1-1. gradle/libs.versions.toml に以下を追加
[versions]
androidx-navigation = "2.7.2"

[libraries]
androidx-navigation-compose = { module = "androidx.navigation:navigation-compose", version.ref = "androidx-navigation" }
1-2. app/build.gradle に以下を追加
dependencies {
  ...
  implementation(libs.androidx.navigation.compose)
}
compose-navigation の 2.7.2 だと compileSdk を 34 にしておく必要があります。
3. ベースとなる MyAppNavHost 関数を追加
新規に MyAppNavHost.kt を以下内容で作成します。
@Composable
fun MyAppNavHost(
    navController: NavHostController = rememberNavController(),
    startDestination: String = "home"
) {
    NavHost(navController = navController, startDestination = startDestination) {
        composable("home") {
            Greeting("Android")
        }
    }
}
4. MainActivity で MyAppNavHost を呼ぶように修正
class MainActivity : ComponentActivity() {
    override fun onCreate(savedInstanceState: Bundle?) {
        super.onCreate(savedInstanceState)
        setContent {
            ComposeBottomNavigationExampleTheme {
                // A surface container using the 'background' color from the theme
                Surface(
                    modifier = Modifier.fillMaxSize(),
                    color = MaterialTheme.colorScheme.background
                ) {
                    MyAppNavHost() // ← ここを修正
                }
            }
        }
    }
}
ここまでで実行していつもの Greeting の内容が出とけばOKです。
実装
1. シンプルな実装
まずは一番シンプルな実装を試してみたいと思います。
新規に HomeScreen.kt を作成し、以下に修正します。
enum class MainScreenTab(
val icon: ImageVector,
val label: String
) {
Home(
icon = Icons.Outlined.Home,
label = "Home"
),
List(
icon = Icons.Outlined.List,
label = "List"
),
Settings(
icon = Icons.Outlined.Info,
label = "About"
)
}
@OptIn(ExperimentalMaterial3Api::class)
@Composable
fun MainScreen() {
var selectedItem by remember { mutableIntStateOf(0) }
Scaffold(
bottomBar = {
NavigationBar {
MainScreenTab.values().forEachIndexed { index, item ->
NavigationBarItem(
icon = { Icon(item.icon, contentDescription = item.label) },
label = { Text(item.label) },
selected = selectedItem == index,
onClick = { selectedItem = index }
)
}
}
}
) {
Box(modifier = Modifier.padding(it))
}
}
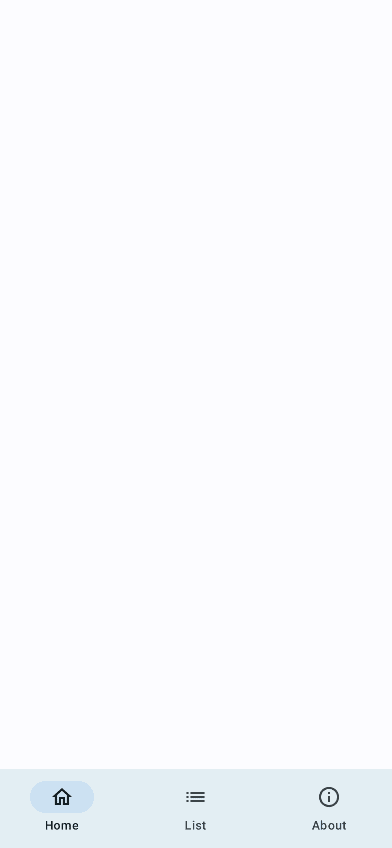
@Preview(showBackground = true)
@Composable
fun MainScreenPreview() {
ComposeBottomNavigationExampleTheme {
MainScreen()
}
}
↓Previewでの表示は以下の様になります。
2. MainScreenを呼び出すNavGraph を作成
mainScreen用にNavGraphBuilderの拡張関数として定義していきます。
composableではなく navigation を仕様するとネストした NavGraphを定義する事ができます。
private fun NavGraphBuilder.mainScreen() {
    navigation(route = "main", startDestination = "main/entry") {
        composable("main/entry") {
            MainScreen()
        }
    }
}
MyAppNavHost を以下に修正します。
@Composable
fun MyAppNavHost(
    navController: NavHostController = rememberNavController(),
    startDestination: String = "main" // mainに変更
) {
    NavHost(navController = navController, startDestination = startDestination) {
        mainScreen() // 先程の拡張関数 mainScreenを呼び出す
    }
}
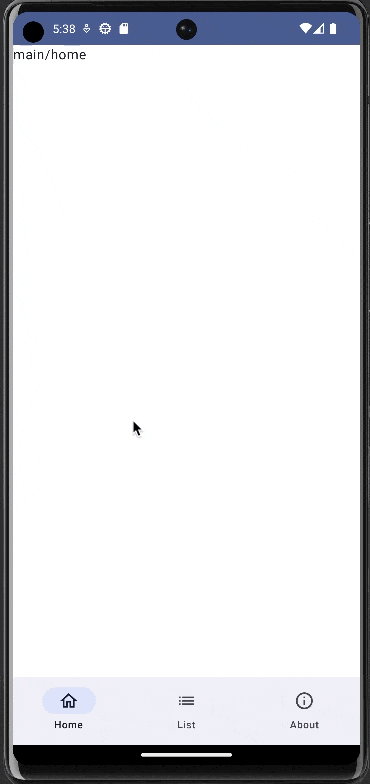
ここまでで実際に動かしてみると先程のPreview同様の画面が表示されるかと思います。
3. Navigation Bar内のNavGraphを作成
まず MainScreenTab にNavGraph用の id を追加します。
enum class MainScreenTab(
    val id: String,
    val icon: ImageVector,
    val label: String
) {
    Home(
        id = "main/home",
        icon = Icons.Outlined.Home,
        label = "Home"
    ),
    List(
        id = "main/list",
        icon = Icons.Outlined.List,
        label = "List"
    ),
    Settings(
        id = "main/about",
        icon = Icons.Outlined.Info,
        label = "About"
    )
}
次に MainScreen を以下に修正します。
rememberNavController で MainScreen のNavigation Bar用のnavControllerを作成し、 currentBackStackEntryAsState (Composable) から現在の選択しているTabを判定します。
@Composable
fun MainScreen() {
    val nestedNavController = rememberNavController()
    val navBackStackEntry by nestedNavController.currentBackStackEntryAsState()
    val currentTab = navBackStackEntry?.destination?.route
    Scaffold(
        bottomBar = {
            NavigationBar {
                MainScreenTab.values().forEachIndexed { index, item ->
                    NavigationBarItem(
                        icon = { Icon(item.icon, contentDescription = item.label) },
                        label = { Text(item.label) },
                        selected = currentTab == item.id,
                        onClick = { nestedNavController.navigate(item.id) }
                    )
                }
            }
        }
    ) {
        Box(modifier = Modifier.padding(it)) {
            NavHost(
                navController = nestedNavController,
                startDestination = "main/home",
                modifier = Modifier,
            ) {
                composable("main/home") {
                    Text("main/home")
                }
                composable("main/list") {
                    Text("main/list")
                }
                composable("main/about") {
                    Text("main/about")
                }
            }
        }
    }
}
Discussion
モケラボです
記事を参考にしていただきありがとうございます!
記事URLですが、言語suffixがついたので下記に差し替えていただけるとたすかります!
ご連絡ありがとうございます!
こちらこそ分かりやすい記事だったので参考にさせて頂きました。ありがとうございます!
また、記事URLの方も修正致しました。