TypeScript製SQLビルダー Kysely で Hono×PostgreSQL 構成の CRUD APIを構築
概要
とあるリポジトリでSQL クエリ ビルダーのKyselyを知ったので、今回は色々試してみたいと思います。
Kyselyとは?
Knexに触発されて開発されたTypeScript向けの型安全なSQLクエリビルダーです。
Knexとの違いは?
KnexはJavaScriptで書かれており、TypeScriptのサポートは限定的です。そのため、複雑なクエリでは型推論が難しく、型安全性が保証されない場合があります。一方、KyselyはTypeScriptを第一級でサポートし、データベーススキーマの型情報を活用して、コンパイル時にエラーを検出できます。これにより、開発者はオートコンプリートや型チェックの恩恵を受けながら、より安全にクエリを構築できます。
Typescriptの恩恵を受けれて実装できるんですね ✨
動作環境構築
早速 Kysely を試していく環境を構築していきたいと思います。構成としては Hono を使って PostgreSQL とやりとりするAPIサーバーを実装し、その中で Kysely を使うような形で進めていきたいと思います。
早速👇の環境をベースに構築していきます。
.devcontainer/compose.yaml を以下に修正します。
volumes:
  modules_data:
  postgres_data:

name: kysely_example
services:
  app:
    build: .
    volumes:
      - ..:/usr/src
      - modules_data:/usr/src/node_modules
    command: /bin/sh -c "while sleep 1000; do :; done"
    working_dir: /usr/src
    depends_on:
      - db
  db:
    image: postgres:17.4
    environment:
      - POSTGRES_USER=postgres
      - POSTGRES_PASSWORD=postgres
      - POSTGRES_DB=postgres
    ports:
      - "5432:5432"
    volumes:
      - postgres_data:/var/lib/postgresql/data
VSCodeで「Reopen in Container」でコンテナを起動して中に入り Hono の環境を追加していきます。
$ yarn create hono .
✔ Using target directory … .
✔ Which template do you want to use? nodejs
✔ Directory not empty. Continue? Yes
✔ Do you want to install project dependencies? Yes
✔ Which package manager do you want to use? yarn
✔ Cloning the template
✔ Installing project dependencies
🎉 Copied project files
.devcontainer/postAttach.sh に yarn install と yarn dev を追加しDevcontainerを起動したら Hono の node-server が起動するようにしておきます。
yarn install
yarn dev
最後に .devcontainer/compose.yaml に以下portを追加しときます。
    ports:
      - "3000:3000"
これで再度起動し直して http://localhost:3000/ にアクセスして Hello Hono! が表示されていればOKです。
テストテーブル作成
まずは必要なパッケージを導入します。今回は公式が出しているkyselyのcliツールである kysely-ctl を使ってテーブル作成していこうと思うので一緒にインストールします。
$ yarn add kysely pg
$ yarn add -D kysely-ctl
$ yarn kysely -h
A command-line tool for Kysely (kysely)                                                                     1:50:05 AM

USAGE kysely [OPTIONS] init|migrate:down|migrate:latest|migrate:list|migrate:make|migrate:rollback|seed:run|seed:make|migrate:up|migrate|seed

OPTIONS

                                                      --cwd    The current working directory to use for relative paths.
                                                    --debug    Show debug information.
  -e, --environment=<production | development | test | ...>    Apply environment-specific overrides to the configuration. See https://github.com/unjs/c12#environment-specific-configuration for more information.
                      --experimental-resolve-tsconfig-paths    Attempts to resolve path aliases using the tsconfig.json file.
                                    --no-filesystem-caching    Will not write cache files to disk. See https://github.com/unjs/jiti#fscache for more information.
                                        --no-outdated-check    Will not check for latest kysely/kysely-ctl versions and notice newer versions exist.
                                              -v, --version    Show version number

COMMANDS

              init    Create a sample kysely.config file
      migrate:down    Undo the last/specified migration that was run
    migrate:latest    Update the database schema to the latest version
      migrate:list    List both completed and pending migrations
      migrate:make    Create a new migration file
  migrate:rollback    Rollback all the completed migrations
          seed:run    Run seed files
         seed:make    Create a new seed file
        migrate:up    Run the next migration that has not yet been run
           migrate    Migrate the database schema
              seed    Populate your database with test or seed data independent of your migration files

Use kysely <command> --help for more information about a command.
早速作業していきたいと思います。
$ yarn kysely init
👆を実行すると .config/kysely.config.ts に以下のようなファイルが作成されます。
import {
  DummyDriver,
  PostgresAdapter,
  PostgresIntrospector,
  PostgresQueryCompiler,
} from 'kysely'
import { defineConfig } from 'kysely-ctl'

export default defineConfig({
  // replace me with a real dialect instance OR a dialect name + `dialectConfig` prop.
  dialect: {
    createAdapter() {
      return new PostgresAdapter()
    },
    createDriver() {
      return new DummyDriver()
    },
    createIntrospector(db) {
      return new PostgresIntrospector(db)
    },
    createQueryCompiler() {
      return new PostgresQueryCompiler()
    },
  },
  //   migrations: {
  //     migrationFolder: "migrations",
  //   },
  //   plugins: [],
  //   seeds: {
  //     seedFolder: "seeds",
  //   }
})
これを現在の環境に合わせて修正します。また migrationFolder も指定しています。
import { PostgresDialect } from 'kysely';
import { defineConfig } from 'kysely-ctl';
import { Pool } from 'pg';

export default defineConfig({
  dialect: new PostgresDialect({
    pool: new Pool({
      database: 'postgres',
      host: 'db',
      user: 'postgres',
      password: 'postgres',
      port: 5432,
    }),
  }),
  migrations: {
    migrationFolder: 'migrations',
  },
  //   plugins: [],
  //   seeds: {
  //     seedFolder: "seeds",
  //   }
});
早速 users テーブルを作成してみます。以下コマンドでmigrateファイルを作成します。
$ yarn kysely migrate:make add_users_table
作成されたファイルを以下の様に修正します。
import { sql, type Kysely } from 'kysely';

export async function up(db: Kysely<any>): Promise<void> {
  await db.schema
    .createTable('users')
    .addColumn('id', 'serial', (col) => col.primaryKey())
    .addColumn('first_name', 'varchar', (col) => col.notNull())
    .addColumn('last_name', 'varchar')
    .addColumn('created_at', 'timestamp', (col) =>
      col.defaultTo(sql`now()`).notNull()
    )
    .addColumn('updated_at', 'timestamp', (col) =>
      col.defaultTo(sql`now()`).notNull()
    )
    .execute();
}

export async function down(db: Kysely<any>): Promise<void> {
  await db.schema.dropTable('users').execute();
}
これで準備が整ったので、以下を実施してテーブルを作成します。
$ yarn kysely migrate latest
作成されるとテーブルが作成されているかと思います。

最後に作成したテーブルの型を定義しときたいと思います。 src/types.ts に以下を追加します。
export type User = {
  id?: number;
  first_name: string;
  last_name: string;
  created_at?: Date;
  updated_at?: Date;
};
シードデータ登録
次にシードデータを kysely-ctl を使って登録していこうと思います。 .config/kysely.config.ts にシード用のディレクトリを指定します。
export default defineConfig({
  // ...
  // 以下をコメントアウト
  seeds: {
    seedFolder: 'seeds',
  },
});
登録されるデータは先程作成した users テーブルに登録するデータを作成したいと思います。
$ yarn kysely seed:make users_seed
作成されたファイルを以下の様に修正します。
export async function seed(db: Kysely<any>): Promise<void> {
  // id は自動採番
  const users: User[] = [
    {
      first_name: 'Taro',
      last_name: 'Yamada',
    },
    {
      first_name: 'Hanako',
      last_name: 'Suzuki',
    },
  ];

  await db.insertInto('users').values(users).execute();
}
以下コマンドを実施しデータ登録していきます。
$ yarn kysely seed:run
成功するとデータ登録できているかと思います。

API実装
Query
最後にユーザー一覧や、idを指定してユーザー情報を取得するAPIを実装してみたいと思います。
まずは src/types.ts に Database を追加します。
export type Database = {
  users: User;
};
最後に src/index.ts を以下の様に修正します。
import pg from 'pg';
// ...

const dialect = new PostgresDialect({
  pool: new pg.Pool({
    database: 'postgres',
    host: 'db',
    user: 'postgres',
    password: 'postgres',
    port: 5432,
  }),
});

export const db = new Kysely<Database>({
  dialect,
});

const app = new Hono();

// ...

app.get('/users', async (c) => {
  const users = await db.selectFrom('users').selectAll().execute();
  return c.json(users);
});

app.get('/users/:id', async (c) => {
  const id = c.req.param('id');
  const user = await db
    .selectFrom('users')
    .selectAll()
    .where('id', '=', Number(id))
    .executeTakeFirst();
  if (!user) {
    return c.notFound();
  }
  return c.json(user);
});
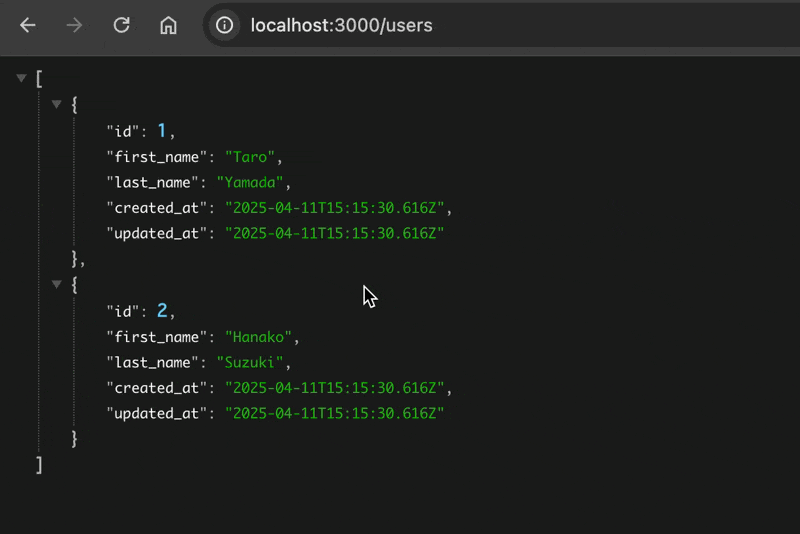
この時、Typescriptの型補完が効いているのが分かるかと思います。

最後に実際にリクエストすると👇の様に登録データが返ってきているのが分かるかと思います。
Insert
次はユーザーを登録するAPIを実装してみたいと思います。
src/index.ts に以下 post を追加します。
app.post('/users', async (c) => {
  const { first_name, last_name } = await c.req.json();
  const user = await db
    .insertInto('users')
    .values({ first_name, last_name })
    .returningAll()
    .executeTakeFirst();
  return c.json(user, 201);
});
-
returningAllに関して- returning系は以下の2種類存在します
-
returning
- 変更された行からデータを返せるようにします
-
returningAll
- PostgreSQLのようなreturningをサポートするデータベース上で、insert/update/deleteクエリにreturning *を追加します
-
returning
- returning系は以下の2種類存在します
-
executeTakeFirstに関して- execute系は以下の3種類存在します
-
execute
- クエリを実行し、行の配列を返します
-
executeTakeFirst
- クエリを実行し、最初の結果を返すか、クエリが結果を返さなかった場合は undefined を返します
-
executeTakeFirstOrThrow
- クエリを実行して最初の結果を返すか、クエリが結果を返さなかった場合にスローします (デフォルトでは NoResultError のインスタンスがスローされますが、独自のエラークラスやコールバックを用意して別のエラーをスローすることもできます)
-
execute
- execute系は以下の3種類存在します
早速適当なデータを登録してみたいと思います
$ curl -H "Content-Type: application/json" \
-X POST \
-d "{\"first_name\": \"Ichiro\", \"last_name\": \"Tanaka\"}" \
http://localhost:3000/users
うまくいくと👇の様に1件データが登録されているかと思います。

Update
次にユーザー情報を更新するAPIを実装してみたいと思います。
src/index.ts に以下 put を追加します。
app.put('/users/:id', async (c) => {
  const id = c.req.param('id');
  const { first_name, last_name } = await c.req.json();
  const user = await db
    .updateTable('users')
    .set({ first_name, last_name, updated_at: new Date() })
    .where('id', '=', Number(id))
    .returningAll()
    .executeTakeFirst();
  if (!user) {
    return c.notFound();
  }
  return c.json(user);
});
id = 2 のユーザーの名前を変更してみたいと思います。
$ curl -H "Content-Type: application/json" \
-X PUT \
-d "{\"first_name\": \"Kenta\", \"last_name\": \"Fujimoto\"}" \
http://localhost:3000/users/2
ユーザー名と updated_at が更新されているかと思います 👇

Delete
最後にユーザー削除のAPIを実装します。
src/index.ts に以下 delete を追加します。
app.delete('/users/:id', async (c) => {
  const id = c.req.param('id');
  const user = await db
    .deleteFrom('users')
    .where('id', '=', Number(id))
    .returningAll()
    .executeTakeFirst();
  if (!user) {
    return c.notFound();
  }
  return c.json(user);
});
id = 3 のユーザーを削除してみたいと思います。
$ curl -H "Content-Type: application/json" \
-X DELETE \
http://localhost:3000/users/3
ユーザーが削除されているかと思います👇

まとめ
基本的な箇所をざっと試してみましたが、すごい学習コストがかかる訳でもなく、スムーズに使えてTypescriptでの実装も公式のドキュメントにある通り、型補完の恩恵を受けながら実装が行えるので個人的には良かったです! 次は応用的な使い方を試せればと思います。
参考URL
Discussion