lexical + yjsを試す
はじめに
facebookが開発している lexical (Text Editor) と yjs を試した際の記事になります。
lexical
拡張可能なテキストエディタフレームワーク
特徴としては以下の様なものがあります。
-
Reliable
- 各編集可能な要素にアタッチされるエディタインスタンスで構成されている
- 各エディタの状態は、任意の時点で現在の状態と保留中の状態を表す
-
Accessible
- WCAG(Web Content Accessibility Guidelines)で確立されたベストプラクティスに従い、スクリーンリーダーやその他の支援技術と互換性がある
-
Fast
- UIコンポーネント、ツールバー、リッチテキスト機能やマークダウン等はプラグインとして追加できる
-
Cross Platform
- JavaScriptフレームワーク / ネイティブiOS開発用のSwiftフレームワーク として利用可能
Lexical's Design
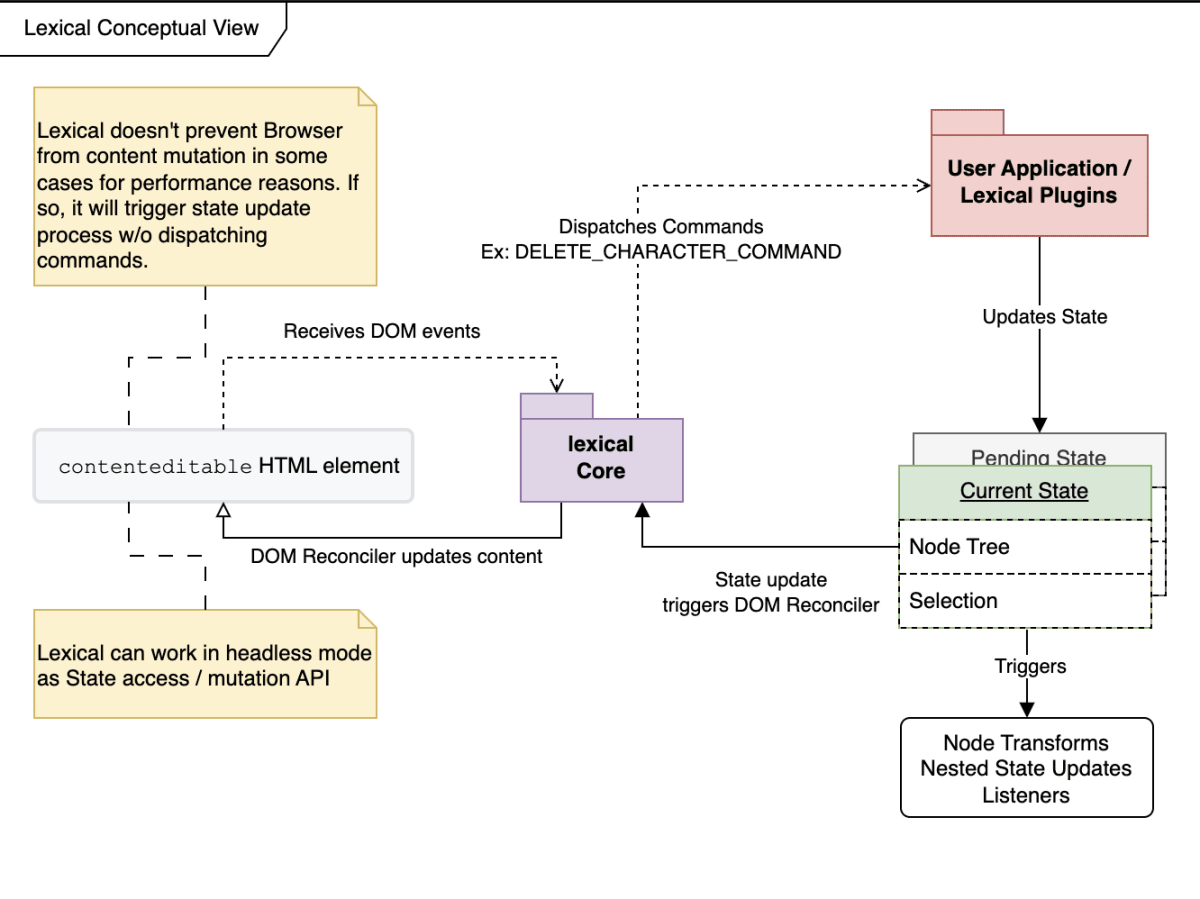
Lexicalのcore部分は↑の図の様に、contenteditable なHTML element と State と依存性がない様な設計になっている。
-
Editor instances
- coreの部分で、
contenteditableなHTML elementを結びつけたりEditorStateを更新できたりする
- coreの部分で、
-
Editor States
- DOM上に表示したいものを表す基礎となるデータ・モデル
- immutableなオブジェクト
- 主に2つのpartがある
- Lexical Node Tree
- Lexical Selection object
Collaboration
Lexicalでは LexicalCollaborationPlugin と useCollaborationContext hooks を @lexical/react で提供してます。これは @lexical/yjs で提供される yjs の binding を元に実装されています。

環境構築や準備
1. devcontainer環境構築
1-1. ベース環境
今回もこちらを使って環境構築していきたいと思います。
こちらをテンプレートとして lexical-yjs-example というプロジェクトを新規に作成し、進めて行きたいと思います。
1-2. React環境セットアップ
$ yarn create vite . --template react-swc-ts
? Current directory is not empty. Please choose how to proceed: › - Use arrow-keys. Return to submit.
> Ignore files and continue
-
package.jsonのscripts>devを以下に修正
vite --host=0.0.0.0 -
.devcontainer/docker-compose.ymlに以下portを追加ports: - "5173:5173" -
.devcontainer/postAttach.shに以下を追加yarn yarn dev
これでdevcontainerを起動し、localhost:5173 にアクセスするといつもの画面が表示されていればOKです。
2. パッケージインストール
yarn add lexical @lexical/react
実装
1. シンプルなエディタ実装
1-1. Editor.tsx の作成
以下内容で src/Editor.tsx を作成します。
import { AutoFocusPlugin } from "@lexical/react/LexicalAutoFocusPlugin";
import { LexicalComposer } from "@lexical/react/LexicalComposer";
import { ContentEditable } from "@lexical/react/LexicalContentEditable";
import LexicalErrorBoundary from "@lexical/react/LexicalErrorBoundary";
import { HistoryPlugin } from "@lexical/react/LexicalHistoryPlugin";
import { RichTextPlugin } from "@lexical/react/LexicalRichTextPlugin";

const theme = {};

const onError = (error: Error) => {
  console.error(error);
};

const Editor = () => {
  const initialConfig = {
    namespace: "MyEditor",
    theme,
    onError,
  };

  return (
    <LexicalComposer initialConfig={initialConfig}>
      <RichTextPlugin
        contentEditable={<ContentEditable />}
        placeholder={<div>Enter some text...</div>}
        ErrorBoundary={LexicalErrorBoundary}
      />
      <HistoryPlugin />
      <AutoFocusPlugin />
    </LexicalComposer>
  );
};

export default Editor;
1-2. main.tsx の修正
src/main.tsx を以下に修正します。
import React from "react";
import ReactDOM from "react-dom/client";
import Editor from "./Editor.tsx";

ReactDOM.createRoot(document.getElementById("root")!).render(
  <React.StrictMode>
    <Editor />
  </React.StrictMode>
);
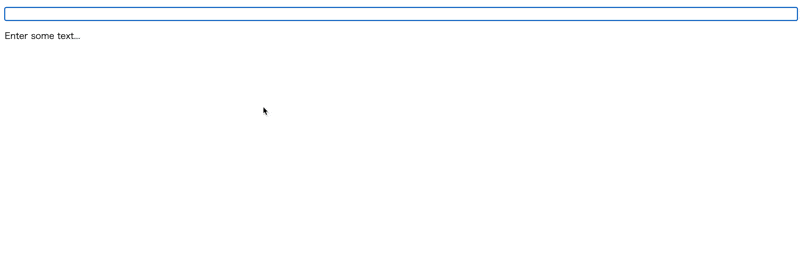
ここまでで http://localhost:5173/ にアクセスすると以下の様にシンプルなエディタが表示されているかと思います。
2. 共同編集できる様にする
2-1. yj-websocket serverを起動できる様に修正
コンテナ起動時に y-websocket が起動できるようにします。まずはnpmコマンドを同時実行できるように concurrently パッケージを追加します。
yarn add -D concurrently
次に package.json のscriptsを修正します。
  "scripts": {
    "dev": "concurrently \"vite --host=0.0.0.0\" \"npm:server:ws\"",
    "build": "tsc && vite build",
    "lint": "eslint . --ext ts,tsx --report-unused-disable-directives --max-warnings 0",
    "preview": "vite preview",
    "server:ws": "HOST=0.0.0.0 PORT=1234 YPERSISTENCE=./yjs-wss-db npx y-websocket"
  },
最後に .devcontainer/docker-compose.yml にportを追加します。
    ports:
      - "1234:1234" # 追加
      - "5173:5173"
これでコンテナ再起動するとy-websocket serverも起動しているかと思います。
2-1. LexicalにCollaboration Pluginを追加
必要なパッケージをインストールします。
yarn add @lexical/yjs y-websocket yjs
先ほど作成した src/Editor.tsx を以下の様に修正します。
import { AutoFocusPlugin } from "@lexical/react/LexicalAutoFocusPlugin";
import { CollaborationPlugin } from "@lexical/react/LexicalCollaborationPlugin";
import { LexicalComposer } from "@lexical/react/LexicalComposer";
import { ContentEditable } from "@lexical/react/LexicalContentEditable";
import LexicalErrorBoundary from "@lexical/react/LexicalErrorBoundary";
import { HistoryPlugin } from "@lexical/react/LexicalHistoryPlugin";
import { RichTextPlugin } from "@lexical/react/LexicalRichTextPlugin";
import { Provider } from "@lexical/yjs";
import { useCallback } from "react";
import { WebsocketProvider } from "y-websocket";
import * as Y from "yjs";

const theme = {};

const onError = (error: Error) => {
  console.error(error);
};

// 以下メソッド追加
const getDocFromMap = (id: string, yjsDocMap: Map<string, Y.Doc>): Y.Doc => {
  let doc = yjsDocMap.get(id);

  if (doc === undefined) {
    doc = new Y.Doc();
    yjsDocMap.set(id, doc);
  } else {
    doc.load();
  }

  return doc;
};

const Editor = () => {
  const initialConfig = {
    editorState: null, // CollaborationPluginにEditorStateを設定させる為に必要
    nodes: [],
    namespace: "MyEditor",
    theme,
    onError,
  };

  // 以下メソッド追加
  const providerFactory = useCallback(
    (id: string, yjsDocMap: Map<string, Y.Doc>): Provider => {
      const doc = getDocFromMap(id, yjsDocMap);

      // 公式もうまくキャストできて無さそうなので強制キャスト
      return new WebsocketProvider(
        "ws://localhost:1234",
        id,
        doc
      ) as unknown as Provider;
    },
    []
  );

  // CollaborationPluginを追加
  return (
    <LexicalComposer initialConfig={initialConfig}>
      <CollaborationPlugin
        id="lexical/collab"
        providerFactory={providerFactory}
        shouldBootstrap={false}
      />
      <RichTextPlugin
        contentEditable={<ContentEditable />}
        placeholder={<div>Enter some text...</div>}
        ErrorBoundary={LexicalErrorBoundary}
      />
      <HistoryPlugin />
      <AutoFocusPlugin />
    </LexicalComposer>
  );
};

export default Editor;
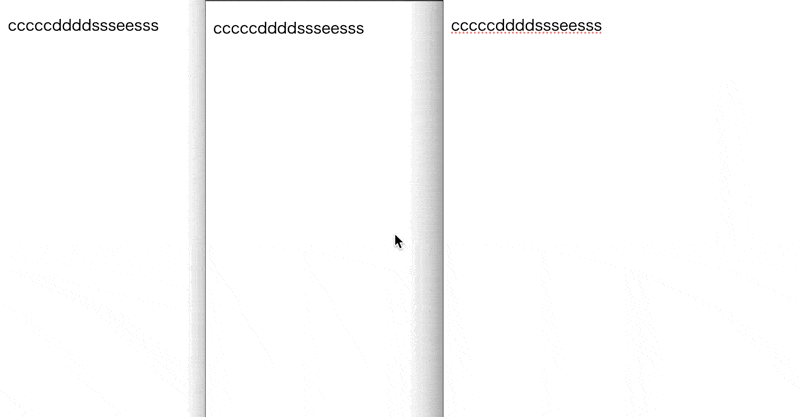
再度コンテナ起動し直して、複数タブでエディタ部分を編集して以下の様に同期されていればOKです。
Discussion