LLVM入門 - javascript使いがLLVM(Rust:inkwell)でjavascriptをJITコンパイルするまで
コンパイラ基盤であるLLVMについて、全く知識がない私が、
javascriptソースコードをパースしLLVMでコンパイルできるようになりました。
LLVMの記事は数多くありますが、初心者向けの記事が少なく感じたため、
本記事では、できる限り分かりやすくLLVMについて紹介できる記事を書こうと思います。
ソースコードは、こちらに置いています。
自己紹介
ふだん、javascriptやpythonなどインタプリタ言語を使うエンジニアです。
LLVMについて、全く知識がなかった人間です。
背景
過去に、おもちゃのブラウザ自作をやってみました。
HTMLとCSSを解析し、レンダリングするところを書き、基本的な動作を知ることができました。
HTMLとCSSとくれば、次はJSだと思い、JSを実行するエンジンを書いてみたくなりました。
ただし、WebブラウザのAPIとJS実行エンジンをバインディングする箇所(EX.DOM操作)は難しいので、
まずは、単純な処理、四則演算やfizzbuzzが処理できるものを作ろうと思いました。
コンパイラとは
コンパイラとは、
compiler is a computer program that translates computer code written in one programming language (the source language) into another language (the target language). The name "compiler" is primarily used for programs that translate source code from a high-level programming language to a lower level language (e.g. assembly language, object code, or machine code) to create an executable program.
※ https://en.wikipedia.org/wiki/Compiler
に書かれている通り、あるコードを別のコードに変換するプログラムのことをコンパイラと指します。
主に、高級言語(ex. javascript)から低級言語(ex. アセンブリ言語)への変換という意味でコンパイラが使われます。
プログラムをコンパイルするというのは、主に次の順番で処理されます。

字句解析 ~ 構文木は、lexやyaccというソフトウェアが有名だと思います。
今回は、swc_ecma_parserというものを使います。swc_ecma_parserは、swcで使われるパーサです。
EcmaScript/TypeScript parser for the rust programming language.
Passes almost all tests from tc39/test262.
tc39/test262のテストケースをほとんどパスしているようです。
tc39/test262は、次の仕様動作を保証するテストスイートです。
ECMA-262, ECMAScript Language Specification
ECMA-402, ECMAScript Internationalization API Specification
ECMA-404, The JSON Data Interchange Format (pdf)
実際のテストコードは、tc39/test262/testにあります。
パーサ部分を自作しようか悩みました。
自作するには、次の手順を踏むことになります。
- 言語文法の理解
- パース処理の実装
- BNFやPEGからパース自動生成も可
①番の言語文法について知るために、ecmascriptのBNFってどれだろうなと調べていました。
そうすると、私の調べた範囲では、次のページにたどり着きました。
これは、先程のswc_ecma_parserのテストスイート対象tc39/test262/testであったので、あえて再構築する気になれず、自作は諦めました。
中間言語 ~ コード生成については、LLVMというコンパイル基盤を使おうと思います。
LLVMとは
LLVMとは、公式ページより、
The LLVM Project is a collection of modular and reusable compiler and toolchain technologies.
LLVMプロジェクトとは、再利用性が高いコンパイラとツールチェイン技術の総称です。
LLVMは、次の特徴があります。
LLVM is a set of compiler and toolchain technologies, which can be used to develop a front end for any programming language and a back end for any instruction set architecture. LLVM is designed around a language-independent intermediate representation (IR) that serves as a portable, high-level assembly language that can be optimized with a variety of transformations over multiple passes.
※ https://en.wikipedia.org/wiki/LLVM
LLVMは、任意のフロントエンド言語(コンパイラという文脈でいう変換前の言語)から任意の命令セットアーキテクチャ(以下、ISA)バックエンドへ変換できます。
ISAは、次の意味になります。
命令セットとは、あるマイクロプロセッサ(CPU/MPU)を動作させるための命令語の体系。プロセッサが直に解釈して実行できる機械語(マシン語)の仕様を定めたもの。
※ https://e-words.jp/w/命令セット.html
プロセッサを動作させるための命令は、例えばLoad(LDR)とStore(STR)です。Loadは、メモリからレジスタへセットし、Storeは、その逆です。
(Rust:inkwellのリファレンスですが)こちら(Instruction)に一覧があります。
また、非言語依存な中間言語(以下、IR)を中心として設計されています。

今回、LLVMのフロントエンド言語は、タイトルにある通り、Rustで書こうと思います。
単にRustでやってみたかっただけです。
LLVMライブラリとして、inkwellを使用します。
これは、LLVMのC APIを安全に使えるようにする薄いラッパーライブラリです。
LLVMのバックエンドは、ローカルマシンで動かすこととします。
具体的には、x86_64-apple-darwin20.6.0 になります。
試していないですが、WASMもバックエンドとして選択できるようです。
というのも、過去の記事(WebAssemblyに正式対応した「LLVM 8.0」がリリース - Publickey)ですが、LLVMがバックエンドとしてWebAssembly(以下,WASM)をサポートしました。
ちなみに、WASMは、仮想的なISAとして設計されています。
WebAssembly, or "wasm", is a general-purpose virtual ISA designed to be a compilation target for a wide variety of programming languages.
LLVM開発で、知っておくべきこと
LLVMでは、IRを生成します。
そのIRでは、Module ⊇ Function ⊇ Block ⊇ Instruction(Builder) という構成になっています。
これを知っていないと、LLVMのコードを見ても、理解しにくいと思います。(自身が持つ言葉で解釈して誤った理解になりかねません)
小さなC言語コードとIRで例を示します。
Rustじゃなく、Cを選んだのは、clangから手軽にIRを出力できるからです。
// if.c
#include <stdio.h>
#include <stdlib.h>

int main(void)
{
    int i = rand();
    if (i == 1)
    {
        printf("i is one.");
    }
    return 0;
}
これをIRに変換
$ clang -S -emit-llvm -O3 if.c
出力されたファイルは、if.llというIRファイルです。
そこから、@mainコードを見ます。
@.str = private unnamed_addr constant [10 x i8] c"i is one.\00", align 1

define i32 @main() local_unnamed_addr #0 {
  %1 = tail call i32 @rand() #3
  %2 = icmp eq i32 %1, 1
  br i1 %2, label %3, label %5

3:                                                ; preds = %0
  %4 = tail call i32 (i8*, ...) @printf(i8* nonnull dereferenceable(1) getelementptr inbounds ([10 x i8], [10 x i8]* @.str, i64 0, i64 0))
  br label %5

5:                                                ; preds = %3, %0
  ret i32 0
}

declare i32 @rand() local_unnamed_addr #1

declare noundef i32 @printf(i8* nocapture noundef readonly, ...) local_unnamed_addr #2
IRをModule,Function,Block,Instructionで区切って見ると、次の画像のとおりです。
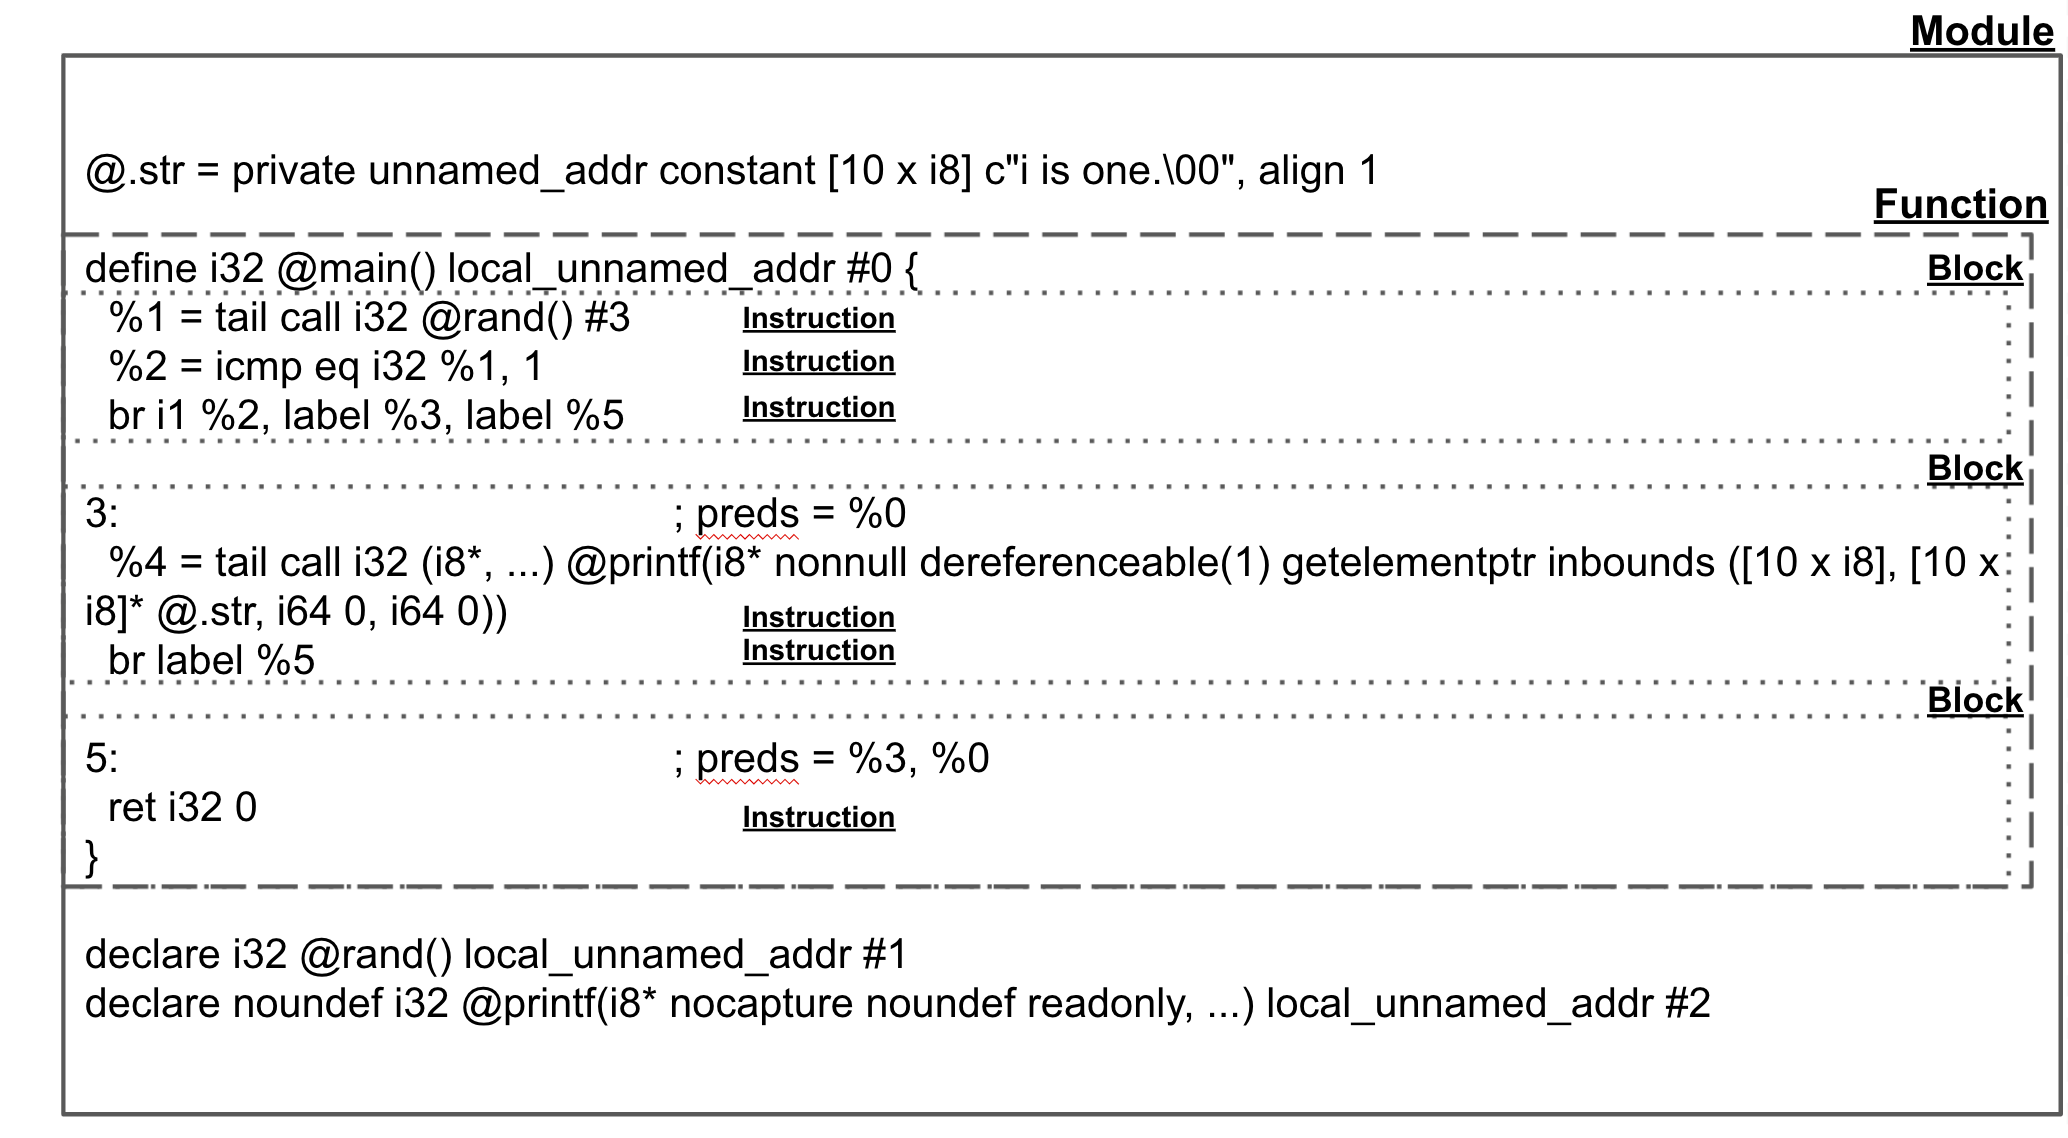
それぞれ、どういうものか簡単に説明します。
Module
LLVM programs are composed of Module’s, each of which is a translation unit of the input programs.
※ https://llvm.org/docs/LangRef.html#module-structure
モジュールは、入力プログラムの変換単位になります。
モジュールには、関数、グローバル変数、シンボルテーブルエントリを持ちます。
Function
LLVM function definitions consist of the “define” keyword.
A function definition contains a list of basic blocks.
※ https://llvm.org/docs/LangRef.html#functions
関数は、複数のブロック(Block)を持ちます。
Block
Each basic block may optionally start with a label (giving the basic block a symbol table entry), contains a list of instructions, and ends with a terminator instruction (such as a branch or function return).
※ https://llvm.org/docs/LangRef.html#functions
ブロックは、ラベルから始まり、複数の命令(Instruction)を持ちます。
Instruction
The LLVM instruction set consists of several different classifications of instructions: terminator instructions, binary instructions, bitwise binary instructions, memory instructions, and other instructions.
※ https://llvm.org/docs/LangRef.html#instruction-reference
命令は、バイナリ命令やメモリ命令など、様々な命令があります。
参考資料
参考になる資料たちは、次のとおりです。
- チュートリアル
- C++ Kaleidoscope
- Rust Kaleidoscope
- codegenが動かないため、途中までしか使えません
- Rust + inkwell Kaleidoscope
- LLVMリファレンス
LLVMをやってみよう
前置きが長くなりましたが、実際にLLVMをやっていきたいと思います。
開発環境
私の環境(Mac)はこちらです。
$ sw_vers
ProductName:    macOS
ProductVersion: 11.6
BuildVersion:   20G165
$ cargo --version && rustc --version
cargo 1.56.0-nightly (18751dd3f 2021-09-01)
rustc 1.56.0-nightly (50171c310 2021-09-01)
llvmのインストールは、Macユーザなので、brewからllvmをインストールします。
公式ページからダウンロードもできるようです。
インストールが完了すると、clangやllcといったツールが使えます。
$ clang --version
Homebrew clang version 13.0.0
Target: x86_64-apple-darwin20.6.0
Thread model: posix
InstalledDir: /usr/local/opt/llvm/bin
$ llc -version
Homebrew LLVM version 12.0.1
MacにはXcodeにclangが含まれているようです。こちらを使っても問題ありません。
(ただ、xcodeのclangには、wasmには対応していないです)
# xcode付属のclangの場合
$ clang --version
Apple clang version 12.0.5 (clang-1205.0.22.9)
Target: x86_64-apple-darwin20.6.0
Thread model: posix
InstalledDir: /Applications/Xcode.app/Contents/Developer/Toolchains/XcodeDefault.xctoolchain/usr/bin
Cargo.tomlのdependenciesは、次のとおりです。
[dependencies]
inkwell = { git = "https://github.com/TheDan64/inkwell", branch = "master", features = ["llvm12-0"] }
swc_ecma_parser = "0.73.0"
swc_common = { version = "0.13.0", features=["tty-emitter"] }
swc_ecma_ast = "0.54.0"
"Hello World" を出力
まずは、Hello World を出力します。
Rustのコードは、次のものになります。
extern crate inkwell;

use inkwell::context::Context;
use inkwell::OptimizationLevel;

fn main() {
    let context = Context::create();
    let i32_type = context.i32_type();
    let i8_type = context.i8_type();
    let i8_ptr_type = i8_type.ptr_type(inkwell::AddressSpace::Generic);

    // Module
    let module = context.create_module("main");

    // Function
    let printf_fn_type = i32_type.fn_type(&[i8_ptr_type.into()], true);
    let printf_function = module.add_function("printf", printf_fn_type, None);
    let main_fn_type = i32_type.fn_type(&[], false);
    let main_function = module.add_function("main", main_fn_type, None);

    // Block
    let entry_basic_block = context.append_basic_block(main_function, "entry");

    // Instruction(Builder)
    let builder = context.create_builder();
    builder.position_at_end(entry_basic_block);
    let hw_string_ptr = builder.build_global_string_ptr("Hello, world!\n", "hw");
    builder.build_call(printf_function, &[hw_string_ptr.as_pointer_value().into()], "call");
    builder.build_return(Some(&i32_type.const_int(0, false)));

    let execution_engine = module.create_jit_execution_engine(OptimizationLevel::Aggressive).unwrap();
    unsafe {
        execution_engine.get_function::<unsafe extern "C" fn()>("main").unwrap().call();
    }
}
実行してみます。
$ cargo run
Hello, world!
LLVMのJITコンパイラで実行できました。
ちなみに、IRがどんなものか確認したい場合は、module.print_to_file を使いましょう。
実際に出力してみると、次の結果になります。
; ModuleID = 'main'
source_filename = "main"

@hw = private unnamed_addr constant [15 x i8] c"Hello, world!\0A\00", align 1

declare i32 @printf(i8*, ...)

define i32 @main() {
entry:
  %call = call i32 (i8*, ...) @printf(i8* getelementptr inbounds ([15 x i8], [15 x i8]* @hw, i32 0, i32 0))
  ret i32 0
}
Rustのexecution_engine.get_function::<unsafe extern "C" fn()>("main").unwrap().call();は、IRの@main関数を実行しています。
@main関数では、@printf関数を実行していますが、それは、C言語のprintfになります。
IRのコードに関する調査は、LLVM Language Reference Manual が重宝します。
getelementptrを調査してみると面白いです。
SUM
次は、3つの数値を引数とし、足し算した結果を返す関数SUMを作成してみます。
Rustのコードは、次のものになります。
extern crate inkwell;

use inkwell::OptimizationLevel;
use inkwell::context::Context;
use std::error::Error;

fn main() -> Result<(), Box<dyn Error>> {
    let context = Context::create();
    let i64_type = context.i64_type();
    let fn_type = i64_type.fn_type(&[i64_type.into(), i64_type.into(), i64_type.into()], false);

    // Module
    let module = context.create_module("main");
    let builder = context.create_builder();

    // Function
    let function = module.add_function("sum", fn_type, None);

    // Block
    let basic_block = context.append_basic_block(function, "entry");

    // Instruction(Builder)
    builder.position_at_end(basic_block);
    let x = function.get_nth_param(0).unwrap().into_int_value();
    let y = function.get_nth_param(1).unwrap().into_int_value();
    let z = function.get_nth_param(2).unwrap().into_int_value();
    let sum = builder.build_int_add(x, y, "sum");
    let sum = builder.build_int_add(z, sum, "sum");
    builder.build_return(Some(&sum));

    let execution_engine = module.create_jit_execution_engine(OptimizationLevel::None)?;

    unsafe {
        let x = 1u64;
        let y = 2u64;
        let z = 3u64;
        let r = execution_engine.get_function::<unsafe extern "C" fn(u64, u64, u64)-> u64>("sum")?.call(x, y , z);
        println!("{:?}", r);
    };
    Ok(())
}
実行してみます。
$ cargo run
6
見事、1 + 2 + 3の足し算ができました。
ちなみに、IRも出力しておきます。
; ModuleID = 'main'
source_filename = "main"
target datalayout = "e-m:o-p270:32:32-p271:32:32-p272:64:64-i64:64-f80:128-n8:16:32:64-S128"

define i64 @sum(i64 %0, i64 %1, i64 %2) {
entry:
  %sum = add i64 %0, %1
  %sum1 = add i64 %2, %sum
  ret i64 %sum1
}
前回同様、Rustのexecution_engine.get_function::<unsafe extern "C" fn(u64, u64, u64)-> u64>("sum")?.call(x, y , z);は、IRの@sum関数に該当します。
足し算のInstructionが使えました。
FizzBuzz
では、次はFizzBuzzをしてみます。割り算やifの命令が新しく使います。
Rustのコードは、次のものになります。
extern crate inkwell;

use inkwell::context::Context;
use inkwell::IntPredicate::EQ;
use inkwell::OptimizationLevel;
use std::error::Error;

fn main() -> Result<(), Box<dyn Error>> {
    let context = Context::create();
    let i64_type = context.i64_type();
    let void_type = context.void_type();
    let i8_type = context.i8_type();

    let i8_ptr_type = i8_type.ptr_type(inkwell::AddressSpace::Generic);
    let fn_type = i64_type.fn_type(&[i64_type.into()], false);
    let null = i8_ptr_type.const_null();

    // Module
    let module = context.create_module("fizz_buzz");

    // Function
    let printf_fn_type = void_type.fn_type(&[i8_ptr_type.into()], true);
    let printf_function = module.add_function("printf", printf_fn_type, None);
    let fizz_buzz_function = module.add_function("fizz_buzz", fn_type, None);

    // Block
    let block = context.append_basic_block(fizz_buzz_function, "entry");

    // Instruction
    let builder = context.create_builder();
    builder.position_at_end(block);

    let fizz_buzz_string_ptr = builder.build_global_string_ptr("FizzBuzz\n", "fizz_buzz");
    let fizz_string_ptr = builder.build_global_string_ptr("Fizz\n", "fizz");
    let buzz_string_ptr = builder.build_global_string_ptr("Buzz\n", "buzz");

    let param_0 = fizz_buzz_function
        .get_nth_param(0)
        .unwrap()
        .into_int_value();

    let rem_divied_by_3 =
        builder.build_int_signed_rem(param_0, i64_type.const_int(3, false), "rem_3");
    let rem_divied_by5 =
        builder.build_int_signed_rem(param_0, i64_type.const_int(5, false), "rem_5");
    let rem_divied_by15 =
        builder.build_int_signed_rem(param_0, i64_type.const_int(15, false), "rem_15");

    let comp_that_is_divisible_by_3 = builder.build_int_compare(
        EQ,
        rem_divied_by_3,
        i64_type.const_int(0, false),
        "if_can_divide_by_3",
    );
    let comp_that_is_divisible_by_5 = builder.build_int_compare(
        EQ,
        rem_divied_by5,
        i64_type.const_int(0, false),
        "if_can_divide_by_5",
    );
    let comp_that_is_divisible_by_15 = builder.build_int_compare(
        EQ,
        rem_divied_by15,
        i64_type.const_int(0, false),
        "if_can_divide_by_15",
    );

    // Block
    let fizz_buzz_block = context.append_basic_block(fizz_buzz_function, "fizz_buzz");
    let fizz_block = context.append_basic_block(fizz_buzz_function, "fizz");
    let buzz_block = context.append_basic_block(fizz_buzz_function, "buzz");
    let num_block = context.append_basic_block(fizz_buzz_function, "num");
    let else_1_block = context.append_basic_block(fizz_buzz_function, "else_1");
    let else_2_block = context.append_basic_block(fizz_buzz_function, "else_2");
    let end_block = context.append_basic_block(fizz_buzz_function, "end_block");

    // Instruction
    builder.build_conditional_branch(comp_that_is_divisible_by_15, fizz_buzz_block, else_1_block);
    builder.position_at_end(fizz_buzz_block);
    builder.build_call(
        printf_function,
        &[fizz_buzz_string_ptr.as_pointer_value().into()],
        "print_fizz_buzz",
    );
    builder.build_unconditional_branch(end_block);

    // Instruction
    builder.position_at_end(else_1_block);
    builder.build_conditional_branch(comp_that_is_divisible_by_3, fizz_block, else_2_block);
    builder.position_at_end(fizz_block);
    builder.build_call(
        printf_function,
        &[fizz_string_ptr.as_pointer_value().into()],
        "print_fizz",
    );
    builder.build_unconditional_branch(end_block);

    // Instruction
    builder.position_at_end(else_2_block);
    builder.build_conditional_branch(comp_that_is_divisible_by_5, buzz_block, num_block);
    builder.position_at_end(buzz_block);
    builder.build_call(
        printf_function,
        &[buzz_string_ptr.as_pointer_value().into()],
        "print_buzz",
    );
    builder.build_unconditional_branch(end_block);

    // Instruction
    builder.position_at_end(num_block);
    builder.build_call(
        printf_function,
        &[buzz_string_ptr.as_pointer_value().into()], // TODO: Print input num.
        "print_num",
    );
    builder.build_unconditional_branch(end_block);

    // Instruction
    builder.position_at_end(end_block);
    builder.build_return(Some(&null));

    let e = module.create_jit_execution_engine(OptimizationLevel::None)?;
    unsafe {
        let x = 15u64;
        e.get_function::<unsafe extern "C" fn(u64) -> ()>("fizz_buzz")?
            .call(x);
    }
    Ok(())
}
if文では、build_conditional_branchとbuild_unconditional_branchがどうやら使うそうです。
inkwell/examples/kaleidoscope/main.rsで書いてありましたので、使ってみました。
実行してみます。15を引数として呼んでいます。
$ cargo run
FizzBuzz
成功です!
ちなみに、IRも出力しておきます。
; ModuleID = 'fizz_buzz'
source_filename = "fizz_buzz"

@fizz_buzz.1 = private unnamed_addr constant [10 x i8] c"FizzBuzz\0A\00", align 1
@fizz = private unnamed_addr constant [6 x i8] c"Fizz\0A\00", align 1
@buzz = private unnamed_addr constant [6 x i8] c"Buzz\0A\00", align 1

declare void @printf(i8*, ...)

define i64 @fizz_buzz(i64 %0) {
entry:
  %rem_3 = srem i64 %0, 3
  %rem_5 = srem i64 %0, 5
  %rem_15 = srem i64 %0, 15
  %if_can_divide_by_3 = icmp eq i64 %rem_3, 0
  %if_can_divide_by_5 = icmp eq i64 %rem_5, 0
  %if_can_divide_by_15 = icmp eq i64 %rem_15, 0
  br i1 %if_can_divide_by_15, label %fizz_buzz, label %else_1

fizz_buzz:                                        ; preds = %entry
  call void (i8*, ...) @printf(i8* getelementptr inbounds ([10 x i8], [10 x i8]* @fizz_buzz.1, i32 0, i32 0))
  br label %end_block

fizz:                                             ; preds = %else_1
  call void (i8*, ...) @printf(i8* getelementptr inbounds ([6 x i8], [6 x i8]* @fizz, i32 0, i32 0))
  br label %end_block

buzz:                                             ; preds = %else_2
  call void (i8*, ...) @printf(i8* getelementptr inbounds ([6 x i8], [6 x i8]* @buzz, i32 0, i32 0))
  br label %end_block

num:                                              ; preds = %else_2
  call void (i8*, ...) @printf(i8* getelementptr inbounds ([6 x i8], [6 x i8]* @buzz, i32 0, i32 0))
  br label %end_block

else_1:                                           ; preds = %entry
  br i1 %if_can_divide_by_3, label %fizz, label %else_2

else_2:                                           ; preds = %else_1
  br i1 %if_can_divide_by_5, label %buzz, label %num

end_block:                                        ; preds = %num, %buzz, %fizz, %fizz_buzz
  ret i8* null
}
Blockがめちゃくちゃ増えました。それはFizzBuzzのif,elseが多いからですね。
LLVMについて、少し自信がついてきました。
これまで中間言語 ~ コード生成をLLVMでやってみました。
少し戻って、字句解析 ~ 構文木の部分、つまりパース処理をやってみます。
四則演算するJavascriptをパース
javascriptをパースしてみます。swc_ecma_parserを使います。
パースするjavascriptは、次のものになります。
// ./src/test.js
20 / 10
Rustのコードは、次のものになります。
#[macro_use]
extern crate swc_common;
extern crate swc_ecma_ast;
extern crate swc_ecma_parser;

use std::path::Path;

use swc_common::sync::Lrc;
use swc_common::{
    errors::{ColorConfig, Handler},
    SourceMap,
};
use swc_ecma_parser::{lexer::Lexer, Parser, StringInput, Syntax};

fn main() {
    let cm: Lrc<SourceMap> = Default::default();
    let handler = Handler::with_tty_emitter(ColorConfig::Auto, true, false, Some(cm.clone()));

    let fm = cm
        .load_file(Path::new("./src/test.js"))
        .expect("failed to load test.js");
    let lexer = Lexer::new(
        Syntax::Es(Default::default()),
        // JscTarget defaults to es5
        Default::default(),
        StringInput::from(&*fm),
        None,
    );

    let mut parser = Parser::new_from(lexer);

    for e in parser.take_errors() {
        e.into_diagnostic(&handler).emit();
    }

    let _module = parser
        .parse_module()
        .map_err(|mut e| e.into_diagnostic(&handler).emit())
        .expect("failed to parser module");

    println!("{:?}", _module);
}
実行してみます。
$ cargo run
Module { span: Span { lo: BytePos(0), hi: BytePos(8), ctxt: #0 }, body: [Stmt(Expr(ExprStmt { span: Span { lo: BytePos(0), hi: BytePos(8), ctxt: #0 }, expr: Bin(BinExpr { span: Span { lo: BytePos(0), hi: BytePos(7), ctxt: #0 }, op: "/", left: Lit(Num(Number { span: Span { lo: BytePos(0), hi: BytePos(2), ctxt: #0 }, value: 20.0 })), right: Lit(Num(Number { span: Span { lo: BytePos(5), hi: BytePos(7), ctxt: #0 }, value: 10.0 })) }) }))], shebang: None }
それっぽい結果(20.0や10.0、op: "/")が出力されましたね!
四則演算するJavascriptをLLVMで実行
最後に、swc_ecma_parserとLLVMを組み合わせて、字句解析 ~ 構文木と中間言語 ~ コード生成を繋げ、四則演算するJSをパースし、LLVMで実行してみます。
パースするjavascriptは、次のものになります。
// ./src/test.js
20 / 10;
Rustのコードは、次のものになります。
extern crate inkwell;
extern crate swc_common;
extern crate swc_ecma_ast;
extern crate swc_ecma_parser;

use inkwell::context::Context;
use inkwell::OptimizationLevel;
use std::error::Error;
use std::path::Path;
use swc_common::sync::Lrc;
use swc_common::{
    errors::{ColorConfig, Handler},
    SourceMap,
};
use swc_ecma_ast::Lit::Num;
use swc_ecma_parser::{lexer::Lexer, Parser, StringInput, Syntax};

fn main() -> Result<(), Box<dyn Error>> {
    let cm: Lrc<SourceMap> = Default::default();
    let handler = Handler::with_tty_emitter(ColorConfig::Auto, true, false, Some(cm.clone()));

    let fm = cm
        .load_file(Path::new("./src/test.js"))
        .expect("failed to load test.js");
    let lexer = Lexer::new(
        Syntax::Es(Default::default()),
        Default::default(),
        StringInput::from(&*fm),
        None,
    );
    let mut parser = Parser::new_from(lexer);
    for e in parser.take_errors() {
        e.into_diagnostic(&handler).emit();
    }
    let _module = parser
        .parse_module()
        .map_err(|e| e.into_diagnostic(&handler).emit())
        .expect("failed to parser module");

    let context = Context::create();
    let module = context.create_module("main");
    let builder = context.create_builder();
    for b in _module.body {
        if b.is_stmt() {
            let stmt = b.stmt().unwrap();
            if stmt.is_expr() {
                let expr_stmt = stmt.expr().unwrap();
                let expr = expr_stmt.expr;
                if expr.is_bin() {
                    let bin_expr = expr.bin().unwrap();
                    let left_expr = bin_expr.left;
                    let right_expr = bin_expr.right;
                    let binary_op = bin_expr.op;
                    if left_expr.is_lit() && right_expr.is_lit() {
                        let left_lit = left_expr.lit().unwrap();
                        let right_lit = right_expr.lit().unwrap();
                        let left_value = match left_lit {
                            Num(n) => n.value,
                            _ => 0f64,
                        };
                        let right_value = match right_lit {
                            Num(n) => n.value,
                            _ => 0f64,
                        };
                        let i64_type = context.i64_type();
                        let void_type = context.void_type();
                        let fn_type = void_type.fn_type(&[], false);
                        let function = module.add_function("main", fn_type, None);
                        let basic_block = context.append_basic_block(function, "entry");
                        builder.position_at_end(basic_block);
                        let x = i64_type.const_int(left_value as u64, true);
                        let y = i64_type.const_int(right_value as u64, true);
                        let result = match binary_op {
                            swc_ecma_ast::BinaryOp::Add => builder.build_int_add(x, y, "main"),
                            swc_ecma_ast::BinaryOp::Sub => builder.build_int_sub(x, y, "main"),
                            swc_ecma_ast::BinaryOp::Div => {
                                builder.build_int_signed_div(x, y, "main")
                            }
                            swc_ecma_ast::BinaryOp::Mul => builder.build_int_mul(x, y, "main"),
                            _ => i64_type.const_int(0u64, true),
                        };
                        builder.build_return(Some(&result));
                        let e = module.create_jit_execution_engine(OptimizationLevel::None)?;
                        unsafe {
                            let r = e
                                .get_function::<unsafe extern "C" fn() -> u64>("main")?
                                .call();
                            println!("{:?}", r);
                        }
                    }
                }
            }
        }
    }
    Ok(())
}
実行してみます。
$ cargo run
2
20 / 10つまり、2が出力されました!やった!
終わりに
これにて、簡単なjavascriptコードをパースし、LLVMで実行できるところまでたどり着きました。
当初、LLVMの使い方って全然わからなかったのですが、段階的にできる部分が増えると、分かる領域が増えて、モチベーションが高まります。
LLVMの勉強をされている方、参考にしてみてください。
Discussion