ReactとLambda上のPythonを組み合わせてサーバーレスなStripe決済を実現する
(2022年11月25日追記)
私の本が株式会社インプレス R&Dさんより出版されました。この記事の内容も含まれています。イラストは鍋料理さんの作品です。猫のモデルはなんとうちのコです!
感想を書いていただけるととても嬉しいです!
(2022年8月3日追記)この記事の内容はこちらの本でも読めます。
開発中のAPI販売システムにサブスクリプション機能を導入したい
前回の記事では無料版のAPIキー発行ができるようになったので、今度は有料版のAPIキーを発行します。決済サービスはAPIドキュメントが充実しているStripeを利用します。サブスクリプションを導入するためのドキュメントもサンプルコード付きで用意されています。これなら比較的簡単に実装できそうです。[1]

サンプルコードはフロントエンドとバックエンドにわかれています。環境を選べるので、フロントエンドはReact、バックエンドはPythonにしました。
テスト用の商品を作成し、サンプルコードを動かす
まず販売する商品を登録します。月額980円にしてみました。

サンプルコードをダウンロードして動かしましたが、2022年5月時点では正常に動作しませんでした。[2]仕方ないのでドキュメントの説明とソースコードを読んで、サンプルコードの意図を読み解いてどうにか実装できました。
実装した機能
今回実装した機能は次の通りです。
(1)アップグレード用のボタンをクリックするとStripeの決済画面に遷移します。

アップグレード画面(アップグレード前)

Stripe決済画面
(2)クレジットカード決済に成功するとサンクスページに遷移します。

サンクスページ
(3)クレジットカード決済に失敗したり、ユーザーがキャンセルした場合はキャンセルページに遷移します。

キャンセルページ
(4)アップグレードに成功するとPRO版のAPIキーが発行されます。
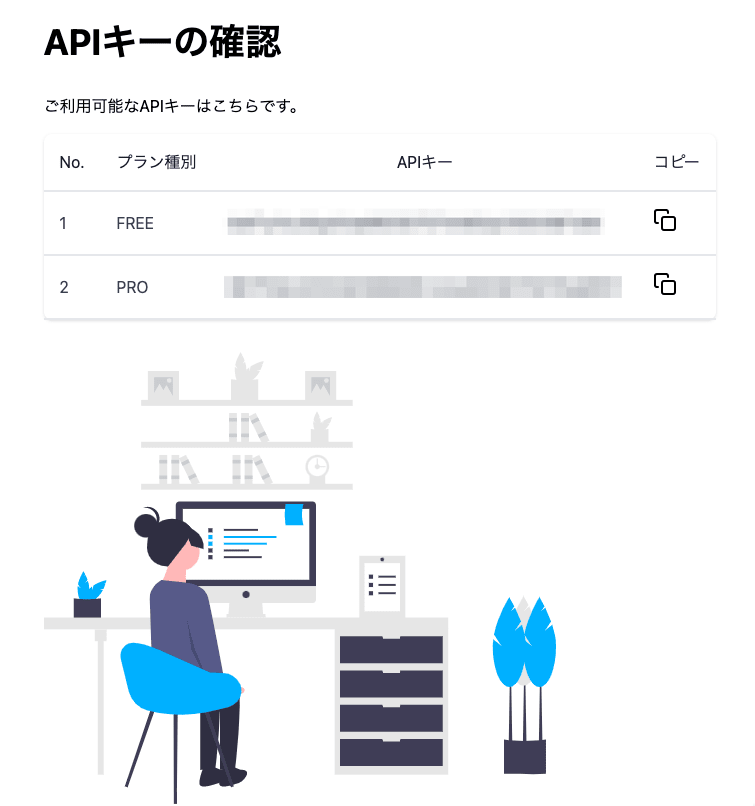
APIキー確認ページ
(5)アップグレード後はアップグレード画面の内容が変わり、請求ポータルを表示するボタンが現れます。

アップグレード画面(アップグレード後)
(6)ボタンをクリックするとStripeの請求ポータルが表示されます。

請求ポータル
今回はここまでです。解約機能は現在実装中です。
バックエンドの実装
今回の機能では3つのAPIが登場します。ひとつのファイルですが、長いのでメソッドごとに区切って説明します。APIはChaliceで実装しています。
決済前の処理とStripe決済画面への遷移
「PROプランに切り替え」ボタンがクリックされたときに呼ばれるAPIがこちらです。
import boto3
import datetime
import json
import os
import stripe
import uuid
from chalice import Chalice, CognitoUserPoolAuthorizer, Response

app = Chalice(app_name="fm_mail_create_api_key_pro")

# 環境変数
USER_POOL_ARN = os.environ.get("USER_POOL_ARN")
USER_POOL_NAME = os.environ.get("USER_POOL_NAME")
USER_POOL_ID = os.environ.get("USER_POOL_ID")
DYNAMODB_API_KEY_TABLE = os.environ.get("DYNAMODB_API_KEY_TABLE")
DYNAMODB_STRIPE_TABLE = os.environ.get("DYNAMODB_STRIPE_TABLE")
REGION_NAME = os.environ.get("REGION_NAME")
STRIPE_API_KEY = os.environ.get("STRIPE_API_KEY")
CHALICE_DOMAIN = os.environ.get("CHALICE_DOMAIN")
MY_DOMAIN = os.environ.get("MY_DOMAIN")
REST_API_ID = os.environ["REST_API_ID"]
USAGE_PLAN_ID = os.environ["USAGE_PLAN_ID"]

# Stripe初期設定
stripe.api_key = STRIPE_API_KEY

# Cognitoで認証する
authorizer = CognitoUserPoolAuthorizer(USER_POOL_NAME, provider_arns=[USER_POOL_ARN])

# DynamoDBに接続
dynamodb = boto3.resource("dynamodb", region_name=REGION_NAME)
api_key_table = dynamodb.Table(DYNAMODB_API_KEY_TABLE)
stripe_table = dynamodb.Table(DYNAMODB_STRIPE_TABLE)

# API Gatewayの設定用クライアント
apigateway_cli = boto3.client("apigateway")

# Cognitoの設定用クライアント
cognito_cli = boto3.client("cognito-idp")


@app.route("/create-checkout-session/{lookup_key}/{user_name}", cors=True)
def create_checkout_session(lookup_key, user_name):
    # 検索キーから価格を取得する
    prices = stripe.Price.list(lookup_keys=[lookup_key], expand=["data.product"])

    # ワンタイムキーを生成する
    one_time_key = str(uuid.uuid4())

    # Stripeのセッションを作成する(success_urlにワンタイムキーが含まれているのがポイント)
    checkout_session = stripe.checkout.Session.create(
        line_items=[
            {
                "price": prices.data[0].id,
                "quantity": 1,
            },
        ],
        mode="subscription",
        success_url=CHALICE_DOMAIN
        + "/create-api-key/{CHECKOUT_SESSION_ID}/"
        + one_time_key,
        cancel_url=MY_DOMAIN + "/canceled_upgrade",
    )

    # セッションIDとUserNameをDynamoDBに登録する
    dt_now_jst = datetime.datetime.now(datetime.timezone(datetime.timedelta(hours=9)))
    with stripe_table.batch_writer() as batch:
        batch.put_item(
            Item={
                "SessionID": checkout_session.id,
                "UserName": user_name,
                "PaidFlag": False,
                "OneTimeKey": one_time_key,
                "CreatedAt": dt_now_jst.strftime("%Y-%m-%d %H:%M:%S"),
                "UpdatedAt": dt_now_jst.strftime("%Y-%m-%d %H:%M:%S"),
            }
        )

    # Stripeに遷移する
    return Response(
        status_code=302, body="", headers={"Location": checkout_session.url}
    )
最初は検索キーから価格を取得します。検索キーは先ほど登録した商品に対応しています。
    # 検索キーから価格を取得する
    prices = stripe.Price.list(lookup_keys=[lookup_key], expand=["data.product"])
次にワンタイムキーを生成します。これは不正防止用に使います。
    # ワンタイムキーを生成する
    one_time_key = str(uuid.uuid4())
Stripeのセッションを作成します。success_urlに先ほど作ったワンタイムキーが含まれているのがポイントです。
    # Stripeのセッションを作成する(success_urlにワンタイムキーが含まれているのがポイント)
    checkout_session = stripe.checkout.Session.create(
        line_items=[
            {
                "price": prices.data[0].id,
                "quantity": 1,
            },
        ],
        mode="subscription",
        success_url=CHALICE_DOMAIN
        + "/create-api-key/{CHECKOUT_SESSION_ID}/"
        + one_time_key,
        cancel_url=MY_DOMAIN + "/canceled_upgrade",
セッションIDやユーザーID、ワンタイムキーをDynamoDBに保存します。これらの値は決済後の確認に用います。
    # セッションIDとUserNameをDynamoDBに登録する
    dt_now_jst = datetime.datetime.now(datetime.timezone(datetime.timedelta(hours=9)))
    with stripe_table.batch_writer() as batch:
        batch.put_item(
            Item={
                "SessionID": checkout_session.id,
                "UserName": user_name,
                "PaidFlag": False,
                "OneTimeKey": one_time_key,
                "CreatedAt": dt_now_jst.strftime("%Y-%m-%d %H:%M:%S"),
                "UpdatedAt": dt_now_jst.strftime("%Y-%m-%d %H:%M:%S"),
            }
        )
最後はStripeに遷移します。
    # Stripeに遷移する
    return Response(
        status_code=302, body="", headers={"Location": checkout_session.url}
    )
決済後の処理
Stripeで決済が正常に行われたあとの遷移先です。今回一番複雑な処理です。
@app.route("/create-api-key/{session_id}/{one_time_key}", cors=True)
def create_api_key(session_id, one_time_key):
    # チェックアウトセッションの状態を確認
    checkout_session = stripe.checkout.Session.retrieve(session_id)
    payment_status = checkout_session.payment_status

    # 支払い済みでなければキャンセルページに遷移
    cancel_url = MY_DOMAIN + "/canceled_upgrade"
    if payment_status != "paid":
        return Response(status_code=302, body="", headers={"Location": cancel_url})

    # カスタマーIDを取得
    customer_id = checkout_session.customer

    # DynamoDBからセッションIDに紐づく情報を取り出す
    result = stripe_table.get_item(Key={"SessionID": session_id})
    user_name = result["Item"]["UserName"]
    paid_flag = result["Item"]["PaidFlag"]
    one_time_key_dynamo_db = result["Item"]["OneTimeKey"]

    # ワンタイムキーが一致しない場合、もしくはAPIキー発行済みの場合はキャンセルページに遷移
    if one_time_key != one_time_key_dynamo_db or paid_flag:
        return Response(status_code=302, body="", headers={"Location": cancel_url})

    # APIキーを発行
    result = apigateway_cli.create_api_key(
        name="fm_mail_pro_" + user_name,
        enabled=True,
        stageKeys=[{"restApiId": REST_API_ID, "stageName": "api"}],
    )

    # 発行したAPIキーの値とIDを取得
    api_key = result["value"]
    api_key_id = result["id"]

    # APIキーに使用量プランを適用
    apigateway_cli.create_usage_plan_key(
        usagePlanId=USAGE_PLAN_ID, keyId=api_key_id, keyType="API_KEY"
    )

    # DynamoDBにAPIキーを登録
    with api_key_table.batch_writer() as batch:
        batch.put_item(Item={"UserID": user_name, "Type": "PRO", "ApiKey": api_key})

    # DynamoDBの支払い済みフラグを更新
    dt_now_jst = datetime.datetime.now(datetime.timezone(datetime.timedelta(hours=9)))
    stripe_table.update_item(
        Key={"SessionID": session_id},
        ExpressionAttributeNames={"#PaidFlag": "PaidFlag", "#UpdatedAt": "UpdatedAt"},
        ExpressionAttributeValues={
            ":PaidFlag": True,
            ":UpdatedAt": dt_now_jst.strftime("%Y-%m-%d %H:%M:%S"),
        },
        UpdateExpression="SET #PaidFlag = :PaidFlag, #UpdatedAt = :UpdatedAt",
    )

    # ユーザープールのカスタム属性を更新
    cognito_cli.admin_update_user_attributes(
        UserPoolId=USER_POOL_ID,
        Username=user_name,
        UserAttributes=[
            {"Name": "custom:plan_type", "Value": "PRO"},
            {"Name": "custom:stripe_customer_id", "Value": customer_id},
        ],
    )

    # サンクスページに遷移する
    success_url = MY_DOMAIN + "/thanks_upgrade"

    return Response(status_code=302, body="", headers={"Location": success_url})
上から順に説明します。まずセッションIDを用いてチェックアウトセッションを取得し、セッションの状態を確認します。支払い済みの場合はpaidというステータスになります。支払い済みでなければキャンセルページに遷移します。
    # チェックアウトセッションの状態を確認
    checkout_session = stripe.checkout.Session.retrieve(session_id)
    payment_status = checkout_session.payment_status

    # 支払い済みでなければキャンセルページに遷移
    cancel_url = MY_DOMAIN + "/canceled_upgrade"
    if payment_status != "paid":
        return Response(status_code=302, body="", headers={"Location": cancel_url})
次にチェックアウトセッションやDynamoDBから各種情報を取得し、整合性が合わない場合はキャンセルページに遷移します。ワンタイムキーはここで使います。セッションIDはユーザーも見ることができますが、ワンタイムキーはユーザーからは見えないので、ここで安全を担保しているわけです。
    # カスタマーIDを取得
    customer_id = checkout_session.customer

    # DynamoDBからセッションIDに紐づく情報を取り出す
    result = stripe_table.get_item(Key={"SessionID": session_id})
    user_name = result["Item"]["UserName"]
    paid_flag = result["Item"]["PaidFlag"]
    one_time_key_dynamo_db = result["Item"]["OneTimeKey"]

    # ワンタイムキーが一致しない場合、もしくはAPIキー発行済みの場合はキャンセルページに遷移
    if one_time_key != one_time_key_dynamo_db or paid_flag:
        return Response(status_code=302, body="", headers={"Location": cancel_url})
次はAPIキーの発行ですが前回の記事で説明したので省略します。APIを発行したらDynamoDBの支払い済みフラグを更新します。[3]
    # DynamoDBの支払い済みフラグを更新
    dt_now_jst = datetime.datetime.now(datetime.timezone(datetime.timedelta(hours=9)))
    stripe_table.update_item(
        Key={"SessionID": session_id},
        ExpressionAttributeNames={"#PaidFlag": "PaidFlag", "#UpdatedAt": "UpdatedAt"},
        ExpressionAttributeValues={
            ":PaidFlag": True,
            ":UpdatedAt": dt_now_jst.strftime("%Y-%m-%d %H:%M:%S"),
        },
        UpdateExpression="SET #PaidFlag = :PaidFlag, #UpdatedAt = :UpdatedAt",
    )
最後にCognitoユーザープールのカスタム属性を更新してサンクスページに遷移します。
    # ユーザープールのカスタム属性を更新
    cognito_cli.admin_update_user_attributes(
        UserPoolId=USER_POOL_ID,
        Username=user_name,
        UserAttributes=[
            {"Name": "custom:plan_type", "Value": "PRO"},
            {"Name": "custom:stripe_customer_id", "Value": customer_id},
        ],
    )

    # サンクスページに遷移する
    success_url = MY_DOMAIN + "/thanks_upgrade"

    return Response(status_code=302, body="", headers={"Location": success_url})
Cognitoユーザープールのカスタム属性は、この連載記事の中でははじめて登場しました。別にDynamoDBに格納してもよかったのですが、Cognitoのカスタム属性ならサインインと同時に取得できます。ユーザーに紐づく値はサインインした時点で状態管理すると便利そうだったので試してみました。
Cognitoユーザープールのカスタム属性はサインアップエクスペリエンスから追加できます。

カスタム属性は最大50個まで追加できます。一度追加したら削除や名称変更はできないので注意しましょう。[4]カスタム属性を追加すると自動的にcustom:という接頭語が付きます。ここでは利用中のプラン種別を格納するplan_typeとStripeのカスタマーIDを格納するstripe_customer_idを追加しました。
請求ポータルの表示
バックエンドの最後は請求ポータルの表示です。StripeのカスタマーIDがあれば取得できるので比較的シンプルです。ただし、他人になりすまして請求情報を表示できると大問題になるので、Cognito認証が必要な上に任意のカスタマーIDをリクエストできないようにしています。
@app.route("/create-billing-portal-by-user", authorizer=authorizer, cors=True)
def create_billing_portal_by_user():
    # 認証情報からUserNameを取り出す
    context = app.current_request.context
    user_name = context["authorizer"]["claims"]["cognito:username"]

    # ユーザープールのカスタム属性からStripeのカスタマーIDを取得
    user_info = cognito_cli.admin_get_user(UserPoolId=USER_POOL_ID, Username=user_name)
    user_attributes = user_info["UserAttributes"]
    customer_id = [
        x["Value"] for x in user_attributes if x["Name"] == "custom:stripe_customer_id"
    ][0]

    # 請求ポータルのURLを生成する
    return_url = MY_DOMAIN + "/upgrade"
    portal_session = stripe.billing_portal.Session.create(
        customer=customer_id,
        return_url=return_url,
    )
    billing_portal_url = portal_session.url
    resp = {
        "status": "OK",
        "billing_portal_url": billing_portal_url,
    }

    # 結果を返す
    return json.dumps(resp, ensure_ascii=False)
まずCognitoの認証情報からユーザー名を取得し、次にそのユーザーに紐づくカスタム属性の中からStripeのカスタマーIDを取り出します。こうすることで他人になりすます余地がなくなります。
    # 認証情報からUserNameを取り出す
    context = app.current_request.context
    user_name = context["authorizer"]["claims"]["cognito:username"]

    # ユーザープールのカスタム属性からStripeのカスタマーIDを取得
    user_info = cognito_cli.admin_get_user(UserPoolId=USER_POOL_ID, Username=user_name)
    user_attributes = user_info["UserAttributes"]
    customer_id = [
        x["Value"] for x in user_attributes if x["Name"] == "custom:stripe_customer_id"
    ][0]
後半は請求ポータルのURLを生成して返しています。
    # 請求ポータルのURLを生成する
    return_url = MY_DOMAIN + "/upgrade"
    portal_session = stripe.billing_portal.Session.create(
        customer=customer_id,
        return_url=return_url,
    )
    billing_portal_url = portal_session.url
    resp = {
        "status": "OK",
        "billing_portal_url": billing_portal_url,
    }

    # 結果を返す
    return json.dumps(resp, ensure_ascii=False)
実はまだ安全ではありません。もしユーザーが自分自身のカスタム属性を変更できたら、他人のカスタマーIDを設定することでなりすましが可能です。Cognitoユーザープールのアプリケーションの統合からアプリケーションの設定を開き、「属性の読み取りおよび書き込み許可」を編集しましょう。
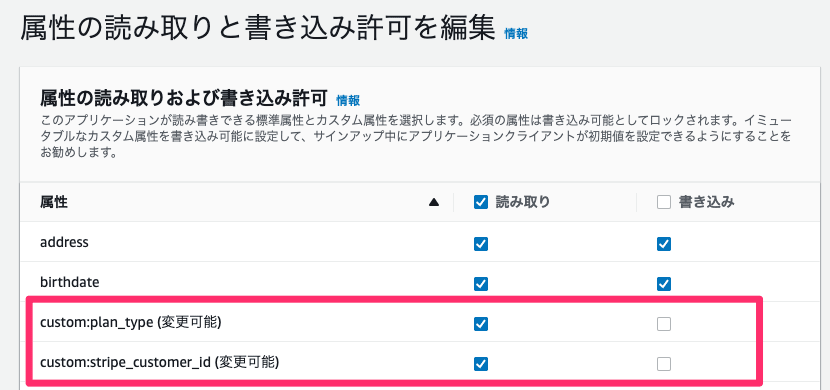
カスタム属性は「読み取り」のみにチェックを入れてください。デフォルトでは読み書きともに不可ですが、読み取り権限を付与する際に、うっかり書き込み権限まで付与しないように気をつけましょう。
フロントエンドの実装
はじめに全体を載せます。アップグレード画面の実装は次のとおりです。
import { FC } from 'react';
import { useAtom } from 'jotai';
import ky from 'ky';
import stateCurrentUser from '../atom/User';
import stateUserAttribute from '../atom/UserAttribute';
import upgradeImage from '../svg/undraw_upgrade_-06-a0.svg';
import Spacer from './Spacer';

type BillingPortalResponse = {
  billing_portal_url: string;
};

const UpgradeContent: FC = () => {
  // サインイン中のユーザー情報とユーザー属性
  const [user] = useAtom(stateCurrentUser);
  const [userAttribute] = useAtom(stateUserAttribute);
  const username = user?.username;
  const planType = userAttribute?.planType;

  // Stripe決済用URL
  const stripeUrl = `${
    import.meta.env.VITE_STRIPE_BASE_URL
    // eslint-disable-next-line @typescript-eslint/restrict-template-expressions
  }/create-checkout-session/FMMailPro/${username}`;

  // Stripeの請求ポータル呼び出し用URL
  const stripeMyPortalUrl = `${
    import.meta.env.VITE_STRIPE_BASE_URL
  }/create-billing-portal-by-user`;

  // Stripe請求ポータルを呼び出す
  const openBillingPortal = async () => {
    if (!user) return;
    const resp: BillingPortalResponse = await ky
      .get(stripeMyPortalUrl, {
        headers: {
          Authorization: `Bearer ${user.signInUserSession.idToken.jwtToken}`,
        },
      })
      .json();
    // Stripe請求ポータルに移動
    window.location.href = resp.billing_portal_url;
  };

  if (planType === 'PRO') {
    return (
      <section className="bg-white py-6 sm:py-8 lg:py-12">
        <div className="mx-auto max-w-screen-md px-4 md:px-8">
          <h1 className="mb-8 text-4xl font-bold">アップグレード</h1>
          <p className="mb-4">アップグレード済みです。</p>
          <img src={upgradeImage} alt="アップグレード済み" />
          <Spacer size={30} />
          <button
            // eslint-disable-next-line @typescript-eslint/no-misused-promises
            onClick={() => openBillingPortal()}
            type="button"
            className="inline-flex rounded border-0 bg-blue-500 py-3 px-6 text-lg text-white hover:bg-blue-600 focus:outline-none active:bg-blue-700"
          >
            請求ポータルを表示
          </button>
          <p className="text-sm text-gray-500">
            ※Stripe(決済サイト)の請求ポータルに移動します。
          </p>
        </div>
      </section>
    );
  }

  return (
    <section className="bg-white py-6 sm:py-8 lg:py-12">
      <div className="mx-auto max-w-screen-md px-4 md:px-8">
        <h1 className="mb-8 text-4xl font-bold">アップグレード</h1>
        <p className="mb-4">
          アップグレードすると月間APIアクセス数が100,000回に拡大されます。
        </p>
        <p>PROプランに切り替えますか?</p>
        <div className="xl:w-1/1 w-full p-4 md:w-1/2">
          <div className="relative flex h-full flex-col overflow-hidden rounded-lg border-2 border-yellow-500 p-6">
            <h1 className="title-font mb-1 text-sm font-medium tracking-widest">
              PRO
            </h1>
            <h2 className="mb-4 border-b border-gray-200 pb-4 text-5xl leading-none text-gray-900">
              <span>980</span>
              <span className="ml-1 text-lg font-normal text-gray-500">
                円(月額)
              </span>
            </h2>
            <p className="mb-2 flex items-center text-gray-600">
              <span className="mr-2 inline-flex h-4 w-4 flex-shrink-0 items-center justify-center rounded-full bg-green-500 text-white">
                <svg
                  fill="none"
                  stroke="currentColor"
                  strokeLinecap="round"
                  strokeLinejoin="round"
                  strokeWidth="2.5"
                  className="h-3 w-3"
                  viewBox="0 0 24 24"
                >
                  <path d="M20 6L9 17l-5-5" />
                </svg>
              </span>
              IMAP4メール受信
            </p>
            <p className="mb-2 flex items-center text-gray-600">
              <span className="mr-2 inline-flex h-4 w-4 flex-shrink-0 items-center justify-center rounded-full bg-green-500 text-white">
                <svg
                  fill="none"
                  stroke="currentColor"
                  strokeLinecap="round"
                  strokeLinejoin="round"
                  strokeWidth="2.5"
                  className="h-3 w-3"
                  viewBox="0 0 24 24"
                >
                  <path d="M20 6L9 17l-5-5" />
                </svg>
              </span>
              添付ファイル取得
            </p>
            <p className="mb-2 flex items-center text-gray-600">
              <span className="mr-2 inline-flex h-4 w-4 flex-shrink-0 items-center justify-center rounded-full bg-green-500 text-white">
                <svg
                  fill="none"
                  stroke="currentColor"
                  strokeLinecap="round"
                  strokeLinejoin="round"
                  strokeWidth="2.5"
                  className="h-3 w-3"
                  viewBox="0 0 24 24"
                >
                  <path d="M20 6L9 17l-5-5" />
                </svg>
              </span>
              月100,000回までのAPIアクセス
            </p>
            <div className="mt-2 w-5/6 md:w-1/2 lg:w-full lg:max-w-lg">
              <a href={stripeUrl}>
                <button
                  type="button"
                  className="inline-flex rounded border-0 bg-blue-500 py-3 px-6 text-lg text-white hover:bg-blue-600 focus:outline-none active:bg-blue-700"
                >
                  PROプランに切り替え
                </button>
                <p className="text-sm text-gray-500">
                  ※Stripe(決済サイト)に移動します。
                </p>
              </a>
            </div>
          </div>
        </div>
      </div>
    </section>
  );
};
export default UpgradeContent;
認証後の共通レイアウトの実装は次のとおりです。
import React, { FC, useEffect, useState } from 'react';
import { Auth } from 'aws-amplify';
import { useAtom } from 'jotai';
import { Navigate } from 'react-router-dom';
import Header2 from '../Header2';
import Footer from '../Footer';
import Spinner from '../Spinner';
import stateCurrentUser from '../../atom/User';
import stateUserAttribute from '../../atom/UserAttribute';
import type { CognitoUser } from '../../atom/User';
import type { CognitoUserAttribute } from '../../atom/UserAttribute';

type Props = { children: React.ReactNode };

const AuthenticatedLayout: FC<Props> = ({ children }) => {
  // サインイン中のユーザー情報
  const [user, setUser] = useAtom(stateCurrentUser);

  // ユーザー属性
  const [userAttribute, setUserAttribute] = useAtom(stateUserAttribute);

  // 読込中フラグ
  const [isLoading, setIsLoading] = useState<boolean>(true);

  // 要ログインフラグ
  const [loginRequired, setLoginRequired] = useState<boolean>(false);

  // サインイン済みかどうかチェックする
  useEffect(() => {
    // awaitを扱うため、いったん非同期関数を作ってから呼び出している
    const checkSignIn = async () => {
      try {
        // サインイン済みのユーザー情報を取得する
        // eslint-disable-next-line @typescript-eslint/no-unsafe-assignment
        const currentUser: CognitoUser = await Auth.currentAuthenticatedUser();
        // Cognitoのユーザー属性を取得する
        const userAttributes = await Auth.userAttributes(currentUser);
        // カスタム属性を取り出す
        const planType = userAttributes.find(
          (obj) => obj.Name === 'custom:plan_type',
        )?.Value;
        const stripeCustomerId = userAttributes.find(
          (obj) => obj.Name === 'custom:stripe_customer_id',
        )?.Value;
        const myAttribute: CognitoUserAttribute = {
          planType,
          stripeCustomerId,
        };
        // ユーザー情報をJotaiで管理(これをトリガーにもう一つのEffect Hookが動く)
        setUser(currentUser);
        // ユーザー属性をJotaiで管理
        setUserAttribute(myAttribute);
      } catch (e) {
        // サインインしていない場合はログイン画面に遷移させる
        setLoginRequired(true);
      }
    };

    // Promiseを無視して呼び出すことを明示するためvoidを付けている
    void checkSignIn();
  }, [setUser, setUserAttribute]);

  // サインイン済みチェックが終わったらローディング表示をやめる
  useEffect(() => {
    if (user || userAttribute || loginRequired) setIsLoading(false);
  }, [user, loginRequired, userAttribute]);

  // ローディング表示
  if (isLoading) {
    return (
      <main>
        <Spinner />
      </main>
    );
  }

  // 要ログインの場合はログイン画面に遷移
  if (loginRequired) {
    return <Navigate to="/login" replace />;
  }

  return (
    <>
      <header>
        <Header2 />
      </header>
      <main>
        <div className="flex justify-center text-center">
          <div
            className="relative rounded border border-red-400 bg-red-100 px-4 py-3 text-red-700"
            role="alert"
          >
            本システムは開発中です。ご利用いただけません。
          </div>
        </div>
        {children}
      </main>
      <footer>
        <Footer />
      </footer>
    </>
  );
};

export default AuthenticatedLayout;
機能ごとに分けて説明します。
Stripe決済画面の呼び出し
これは簡単で、URLを作ってaタグでリンクにしているだけです。URL中のFMMailProはStripe上で作った商品の検索キーにあたります。
  // Stripe決済用URL
  const stripeUrl = `${
    import.meta.env.VITE_STRIPE_BASE_URL
    // eslint-disable-next-line @typescript-eslint/restrict-template-expressions
  }/create-checkout-session/FMMailPro/${username}`;
<a href={stripeUrl}>
  <button
    type="button"
    className="inline-flex rounded border-0 bg-blue-500 py-3 px-6 text-lg text-white hover:bg-blue-600 focus:outline-none active:bg-blue-700"
  >
    PROプランに切り替え
  </button>
  <p className="text-sm text-gray-500">
    ※Stripe(決済サイト)に移動します。
  </p>
</a>
カスタム属性の取得
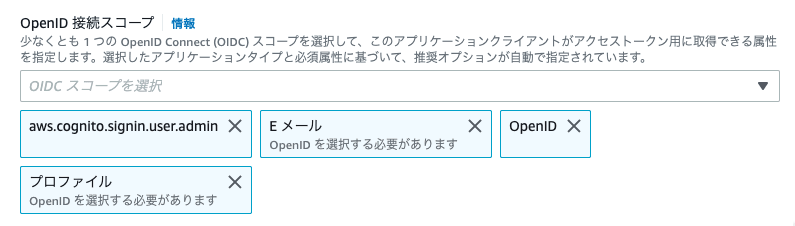
Cognitoのカスタム属性はAmplifyで取得できます。ただしscopeにaws.cognito.signin.user.adminという値を追加する必要があります。設定ファイルを次のように変更しました。
// Amplifyの設定
const awsExports = {
  Auth: {
    region: import.meta.env.VITE_REGION,
    userPoolId: import.meta.env.VITE_USER_POOL_ID,
    userPoolWebClientId: import.meta.env.VITE_USER_POOL_WEB_CLIENT_ID,
    oauth: {
      domain: import.meta.env.VITE_OAUTH_DOMAIN,
-     scope: ['openid'],
+     scope: ['openid', 'aws.cognito.signin.user.admin'],
      redirectSignIn: import.meta.env.VITE_OAUTH_REDIRECT_SIGN_IN,
      redirectSignOut: import.meta.env.VITE_OAUTH_REDIRECT_SIGN_OUT,
      responseType: 'code',
    },
  },
};

export default awsExports;
AWS側でもユーザープールのアプリケーションの設定を開き、ホストされたUIを編集でOpenID接続スコープにaws.cognito.sinin.user.adminを追加する必要があります。
クライアントでカスタム属性を取得しているのは次の箇所です。
// Cognitoのユーザー属性を取得する
const userAttributes = await Auth.userAttributes(currentUser);
// カスタム属性を取り出す
const planType = userAttributes.find(
  (obj) => obj.Name === 'custom:plan_type',
)?.Value;
const stripeCustomerId = userAttributes.find(
  (obj) => obj.Name === 'custom:stripe_customer_id',
)?.Value;
Stripe請求ポータルの呼び出し
Stripe請求ポータルの呼び出しAPIはCognito認証が必要なので少し複雑です。まずky[5]を用いてHTTPヘッダーに認証用のトークンを設定し、GETでAPIを呼び出します。戻り値からStripe請求ポータルのURLを取り出し、クライアント側で遷移します。
// Stripeの請求ポータル呼び出し用URL
const stripeMyPortalUrl = `${
  import.meta.env.VITE_STRIPE_BASE_URL
}/create-billing-portal-by-user`;

// Stripe請求ポータルを呼び出す
const openBillingPortal = async () => {
  if (!user) return;
  const resp: BillingPortalResponse = await ky
    .get(stripeMyPortalUrl, {
      headers: {
        Authorization: `Bearer ${user.signInUserSession.idToken.jwtToken}`,
      },
    })
    .json();
  // Stripe請求ポータルに移動
  window.location.href = resp.billing_portal_url;
};
呼び出し元です。
<button
  // eslint-disable-next-line @typescript-eslint/no-misused-promises
  onClick={() => openBillingPortal()}
  type="button"
  className="inline-flex rounded border-0 bg-blue-500 py-3 px-6 text-lg text-white hover:bg-blue-600 focus:outline-none active:bg-blue-700"
>
  請求ポータルを表示
</button>
まとめ
ReactとLambdaの組み合わせでStripe決済を実装する方法を説明しました。StripeのセッションIDはDynamoDBに格納し、カスタマーIDの方はCognitoユーザープールのカスタム属性に格納したのが今回のポイントです。
次はStripe用のWebhookを実装して、サブスクリプションの解約に対応する予定です。
Discussion