🤖
[Unity][コスプレZ]デバッグ画面の話
はじめに
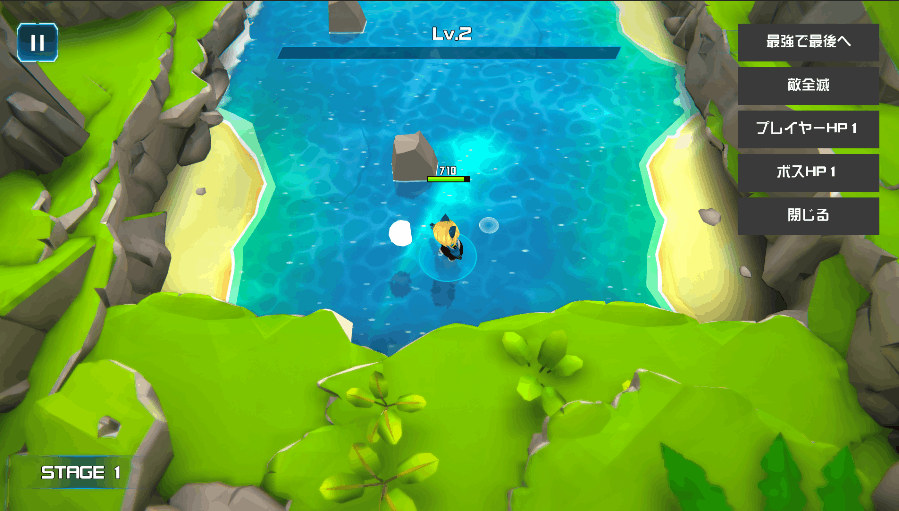
どのゲームでもデバッグする上でデバッグ機能は欠かせないものかと思いますが、コスプレZも例にもれず諸々の実装を行いました。今回はステージ画面のデバッグ機能についてのお話をします。↓の右上みたいなやつ。

持ち帰れるもの
- モバイル向けの汎用的なデバッグ画面の作り方
コスプレZについて
steamで好評配信中!無料のモバイル版もあるぞ!
仕組み
- UGUIのプレハブを作成
- モバイル版だと画面上の透明ボタン、PC版だとXボタンとか適当なボタンで1のプレハブをInstantiate
- デバッグ用スクリプトをInstantiateしたプレハブに貼り付け
- メニュー用のボタンをデバッグ用スクリプト内部で生成する
1のプレハブはだいたいこんな感じ
画面全体ストレッチで右上開始のVerticalLayoutを貼り付け

3はまずこんなベースクラスがあって(掲載用に諸々省いたりしてます)
using System.Collections;
using System.Collections.Generic;
using UnityEngine;
using UnityEngine.UI;

/// <summary>
/// デバッグメニュー
/// </summary>
public class DebugPageBase : MonoBehaviour
{
    //ザルにシングルトン
    private static DebugPageBase _instance;

    protected Transform Root => transform.Find("Root");
    private Button MenuButtonBase => transform.Find("Root/ButtonBase").GetComponent<Button>();

    //この関数を各継承先で実装する
    protected virtual Dictionary<string,System.Action> GetMenu()
    {
        return new Dictionary<string, System.Action>();
    }

    private void CreateMenu()
    {
	//継承先で実装されたメニューの辞書からボタンリストを作成する
        var menuDic = GetMenu();
        var root = Root;
        var baseButton = MenuButtonBase;
        foreach(var m in menuDic)
        {
            var button = Instantiate(baseButton, root);
            button.GetComponentInChildren<Text>().text = m.Key;
            button.onClick.AddListener(() => m.Value());
        }

	//最後に閉じるを作成
	var close = Instantiate(baseButton, root);
	button.GetComponentInChildren<Text>().text = "閉じる";
	close.onClick.AddListener(() => {
	    //テキトーに閉じる処理
	    _instance = null;
	    Destroy(gameobject);
	});

	//ボタンの素を非表示
	baseButton.gameObject.SetActive(false);
    }


    /// <summary>
    /// ページの作成
    /// </summary>
    /// <typeparam name="T"></typeparam>
    /// <param name="root"></param>
    /// <returns></returns>
    public static T Create<T>(Transform root) where T : DebugPageBase
    {
	if(_instance != null)
	    return null;

        var resource = Resources.Load<GameObject>("DebugPage");
        var obj = Instantiate(resource, root);
        var component = obj.AddComponent<T>();
        component.CreateMenu();
	_instance = component;
        return component;
    }
}
DebugPageBaseを継承した各画面ごとのデバッグ画面クラスを作成
DebugPageBase.Create<DebugPageStage>(canvas.transform)みたいな感じで呼び出して使用する感じです
ステージ画面の実装例を抜粋して以下に記載
using System;
using System.Collections;
using System.Collections.Generic;
using UnityEngine;

/// <summary>
/// ステージ画面デバッグ
/// </summary>
public class DebugPageStage : DebugPageBase
{
    protected override Dictionary<string, Action> GetMenu()
    {
        var menu = new Dictionary<string, Action>() {
            { "最強で最後へ", ToLastStageEx },
            { "敵全滅", AllEnemyDestroy },
            { "プレイヤーHP1", () => SetPlayerHp(1)},
            { "ボスHP1", () => SetBossHp(1)},
        };
        return menu;
    }

    //この辺でmenuのAction関数を諸々書いてます
}
ポイント
実装で意識した点としては以下な点ですかね。
- DebugPageプレハブはスクリプトを貼らないで使いまわせるようにし、実行時に内部でAddComponent
- プレハブ使いまわすためにRootやMenuButtonBaseはScerializeField等で参照を持たせておくのではなく都度Find(デバッグやしええやろ)
- staticで任意のデバッグクラスを呼び出せるように
PC版のデバッグ画面はダイアログ版を作成(詳細はまた今度)
PC版だとべたで画面に貼るとキーナビゲーションの問題が出たので、ダイアログ形式で出せるように実装しました。モバイルから移植した際のキーナビゲーション問題に触れだすとまた長くなるのでこれはまた後日に・・・

Discussion