Cloudflare Pages(Functions,KV)を使ったサイトをホスティングする際に行ったこと


はじめに
本記事ではCloudflare Pagesを起点に、Cloudflareのエコシステムを色々試すプロジェクトを作っていきます。具体的には以下の通りです。
-
Cloudflare Pagesで独自ドメインを利用したい -
Cloudflare Functions(beta)を使ってみたい -
Cloudflare Worker KVを使ってみたい -
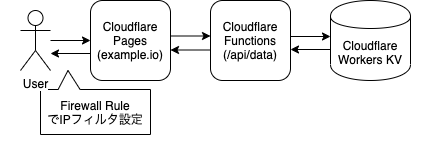
Cloudflare PagesにホスティングしたサイトにIPフィルタ設定を入れたい
構成
以下の図のように、独自ドメインを適用したCloudflare上にホスティングされたサイトからCloudflare Functionsを経由してCloudflare KVを読み書きする構成となります。(以降Cloudflare FunctionsをFunctions, Cloudflare KVをKVと省略する場合があります。)
環境情報
- Google Domainでドメイン取得済(適宜読み替えていただければ、どのレジストラを使っても問題ないです)
- Cloudflare Pagesには、Zone Apexドメインを設定
| ツール | バージョン |
|---|---|
| node | v16.10.0 |
Cloudflare WebSitesの設定
Cloudflare WebSitesの設定をします。本設定は独自ドメインを適用する前準備となります。

取得しているドメイン名を入力します

プランはfreeを選択します


Cloudflare側でドメインをチェックし、追加の設定方法が表示されます。今回はGoogle Domain側でName Serverを変更する旨の説明が表示されます。Name Serverを控えておきます。
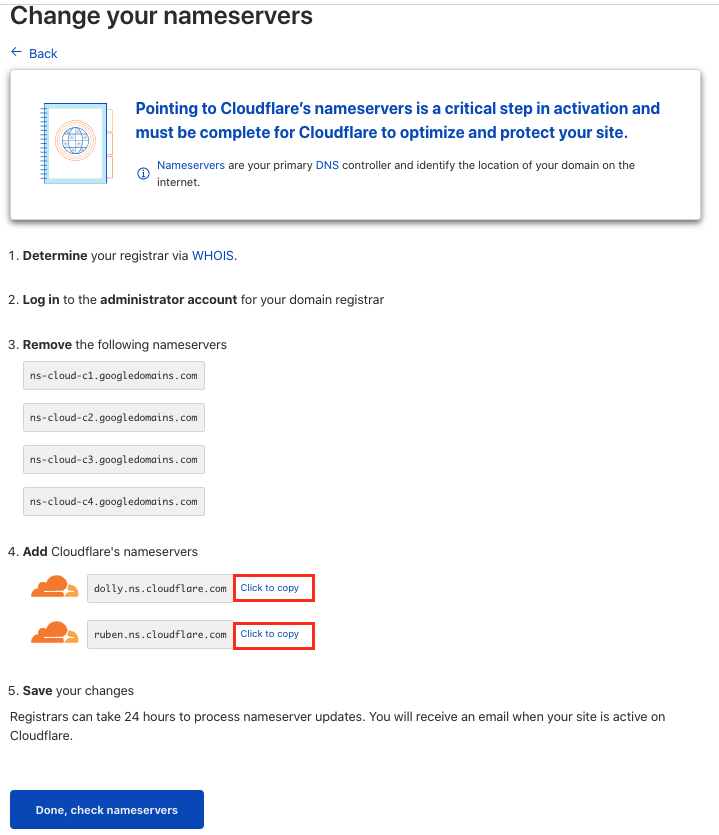
Google Domainsの設定に行きます。先ほどCloudflareのコンソールでコピペしたName Serverを設定します

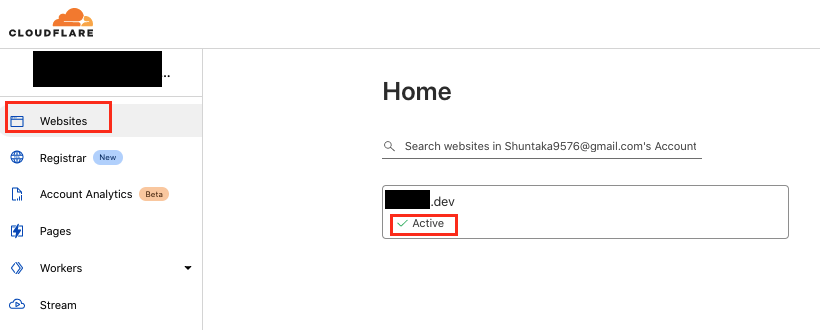
再びCloudflareのコンソールに戻り、WebSitesを開くと状態がActiveになっていることを確認します。
Cloudflare Pagesプロジェクト作成
プロジェクトテンプレート初期化
vite を利用して、プロジェクトを初期化します
$ npm init vite@latest
✔ Project name: … cf-sample-site
✔ Select a framework: › react
✔ Select a variant: › react-ts

Scaffolding project in /Users/hoge/repos/github.com/shuntaka9576/cf-sample-site...

Done. Now run:

  cd cf-sample-site
  npm install
  npm run dev
$ cd cf-sample-site
$ yarn install
$ yarn dev
必要なライブラリの導入
Cloudflare公式CLIであるcloudflare/wrangler2を導入します。本記事では利用しませんが、型定義ファイルもセットで入れておくのが良いと思います。(wrangler initで導入することも可能です)
$ yarn add -O wrangler@beta
$ yarn add -D @cloudflare/workers-types
$ yarn wrangler --version
(中略)
0.0.16
Cloudflare KVの作成と設定
wranglerの設定ファイルを初期化します
$ yarn wrangler init
(中略)
Would you like to install wrangler into your package.json? (y/n)
# => 既にインストール済のためnを入力
Would you like to create a Worker at src/index.ts? (y/n)
# => 利用しないためnを入力
出力された設定ファイルは以下のようになっています
compatibility_date = "2022-02-07"
Cloudflare KVをCLI経由で作成します
$ yarn wrangler kv:namespace create "MY_KV_DEV"
実行するとブラウザが起動し、ログイン後以下のような認可画面に遷移します。

設定完了すると、以下のような画面が表示されます。

コンソールに戻り、KV作成処理が完了していることを確認します。
$ yarn wrangler kv:namespace create "MY_KV_DEV"
yarn run v1.22.17
warning package.json: No license field
(中略)
Successfully configured. You can find your configuration file at: /Users/hoge/.wrangler/config/default.toml
🌀 Creating namespace with title "worker-MY_KV_DEV"
✨ Success!
Add the following to your configuration file in your kv_namespaces array:
{ binding = "MY_KV_DEV", id = "xxxxx" }
✨  Done in 12.52s.
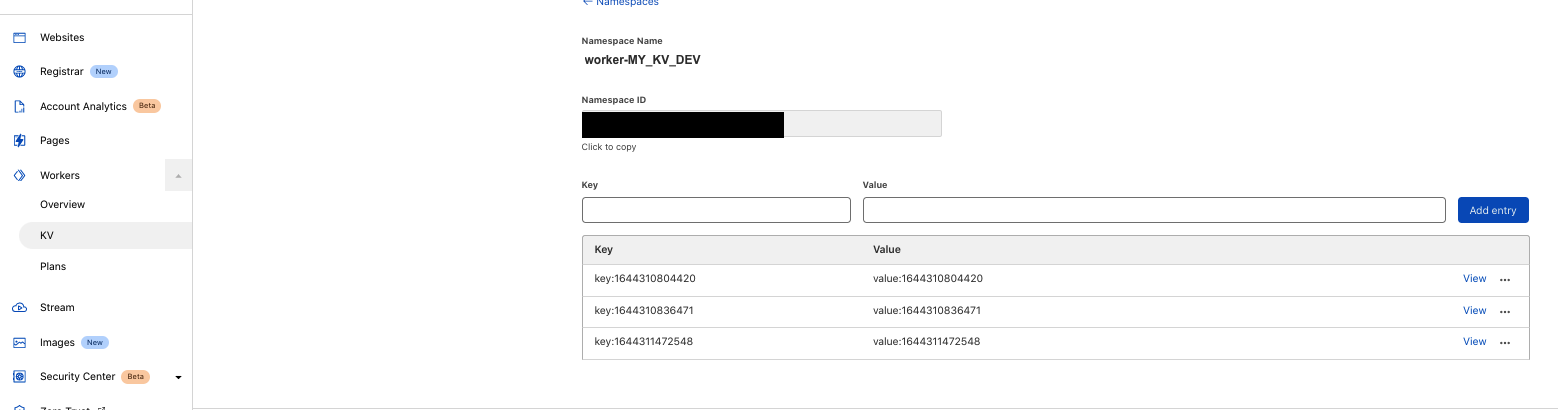
作成後コンソール上に作成したKVが存在するか確認します。

CLIでも確認可能です
$ yarn wrangler kv:namespace list
[
  {
    "id": "xxxxx",
    "title": "worker-MY_KV_DEV",
    "supports_url_encoding": true
  }
]
CLIの出力通りwrangler.tomlに作成したCloudflare KVの設定を追記します
[ts gutter="false" title="wrangler.toml"]
compatibility_date = "2022-02-07"

kv_namespaces = [
  { binding = "MY_KV_DEV", id = "xxxxx" }
]
Cloudflare Functionsと動作確認用UIの実装
確認用のUIとCloudflare Functionsを実装していきます。
確認用UIを実装します。(すいません。フロントエンドに弱く、コードの不備がありましたらissueお願いします。。)
import { useEffect, useState } from "react";

type WriteItem = {
  key: string;
  value: string;
};

const App = () => {
  const [schedulePostData, setSchedulePostData] = useState<WriteItem>();
  const [data, setGetData] = useState('');

  useEffect(() => {
    const timestamp = Date.now();
    const key = `key:${timestamp}`;
    const value = `value:${timestamp}`;

    setSchedulePostData({ key: key, value: value });
  }, [])

  const updateTime = () => {
    const timestamp = Date.now();
    const key = `key:${timestamp}`;
    const value = `value:${timestamp}`;

    setSchedulePostData({ key: key, value: value });

  }

  const post = async () => {
    await fetch("/api/data", {
      method: "POST",
      headers: {
        "Content-Type": "application/json"
      },
      body: JSON.stringify({ key: schedulePostData?.key, value: schedulePostData?.value })
    });
  };

  const get = async () => {
    const data = await fetch(`/api/data/${schedulePostData?.key}`, {
      method: "GET",
      headers: {
        "Content-Type": "application/json"
      },
    });

    const parsedJson = await data.json();
    setGetData(parsedJson.value)
  };


  return (
    <div className="App">
      <p>書き込む予定のデータ<button onClick={() => updateTime()}>更新</button></p>
      <ul>
      <li>キー: {schedulePostData?.key}</li>
      <li>バリュー: {schedulePostData?.value}</li>
      </ul>
      <button onClick={() => post()}>Cloudflare KVに書き込む</button>
      <hr/>

      <p>キー{schedulePostData?.key}の値を取得する</p>
      <button onClick={() => get()}>取得</button>
      <p>取得結果:{data}</p>
    </div>
  );
};

export default App;
Functionsの実装は、公式ドキュメントが参考になります。
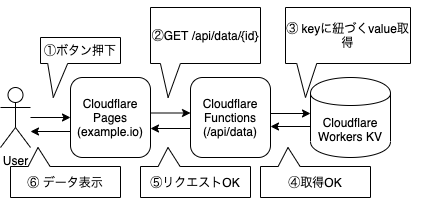
POSTリクエスト用のFunctionsを実装します。以下に挙動の略図を示します。

export const onRequestPost = async ({ request, env }) => {
  const body = await request.clone().text();
  const parsedBody = JSON.parse(body);
  const { key, value } = parsedBody;

  await env.MY_KV_DEV.put(key, value); // Cloudflare KVへ書き込み

  return new Response();
};
前述のFunctionsで書き込んだデータを取得するGET用のFunctionsを実装します。idには、前述POST時に入れたkeyが入ります。以下に挙動の略図を示します。
export const onRequestGet = async ({ params, env }) => {
  const res = await env.MY_KV_DEV.get(params.id); // Cloudflare KVへ読み込み

  return new Response(JSON.stringify({ value: res }));
};
ローカルプレビュー
プレビューには、viteではなくwranglerを利用します。Cloudflare KVとCloudflare Functionsを実際にローカルで実行して動作確認が可能なためです。ビルドは必要なので、以下のコマンドで変更を検知したらビルドが走るようにします。
$ yarn build --watch
wranglerを実行します。デフォルトでhttp://localhost:8788/で自動的にタブが開きます。
| オプション | 説明 |
|---|---|
| pages dev | Cloudflare Pagesのプレビュー |
| -k | Cloudflare KVの指定(前項で作成したKVではなく、ローカルで擬似KVが実行されます) |
| --live-reload | ビルド資材の変更を検知したらリロードする |
| ./dist | ビルド資材の指定 |
$ yarn wrangler pages dev -k MY_KV_DEV --live-reload ./dist

# 環境変数を設定したい場合
$ yarn wrangler pages dev -k MY_KV_DEV --binding ENV_VALUE="3" --live-reload ./dist
実行すると、以下のような画面になります。Cloudflare KVへkey,valueを書き込み、書き込んだ値を取得しています。

Cloudflare Pagesへデプロイ
初めてプロジェクトを作成する場合、GitHub Appsの認可が必要です。
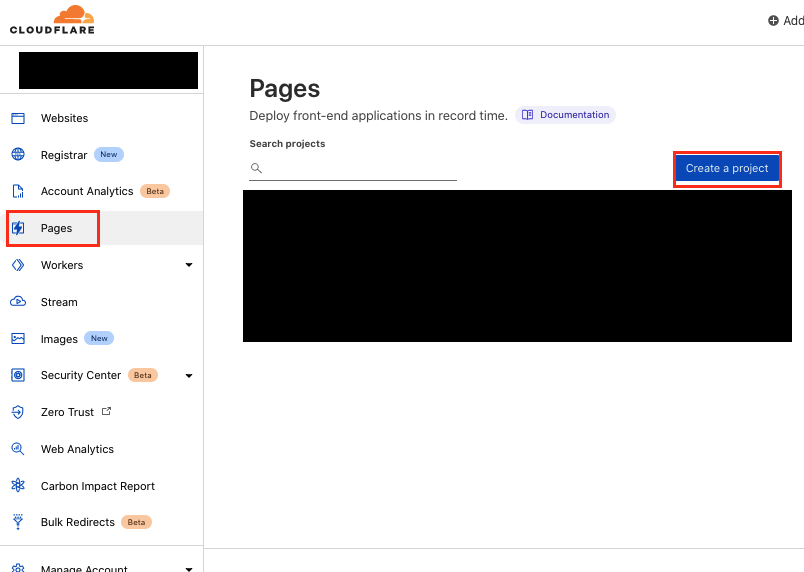
ホスティングするリポジトリを選択します

今回はシンプルにビルドコマンド、資材のディレクトリ指定を行います
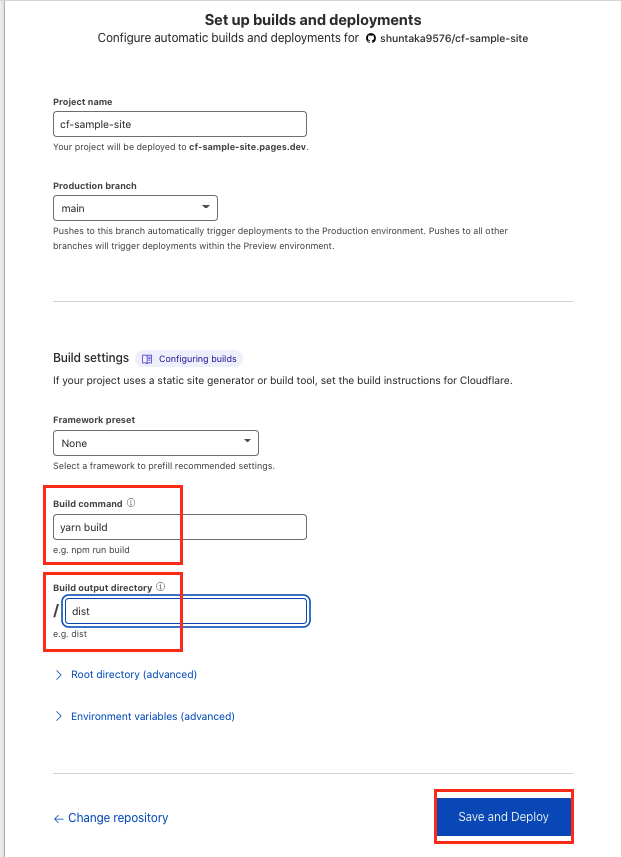
サイトのデプロイが完了しました(これではまだ動きません)

FunctionsとKVの連携設定を行います。

上記を実施後、再度Cloudflare Pagesの画面で、View Build-> Manage deployment -> Retry developmentで再デプロイしてください (※ もしかしたら必要ないかもしれません)

本設定より、前項で作成した実際のCloudflare KVに対してRead/Writeします。書き込んだデータは、コンソール上からも確認できます。
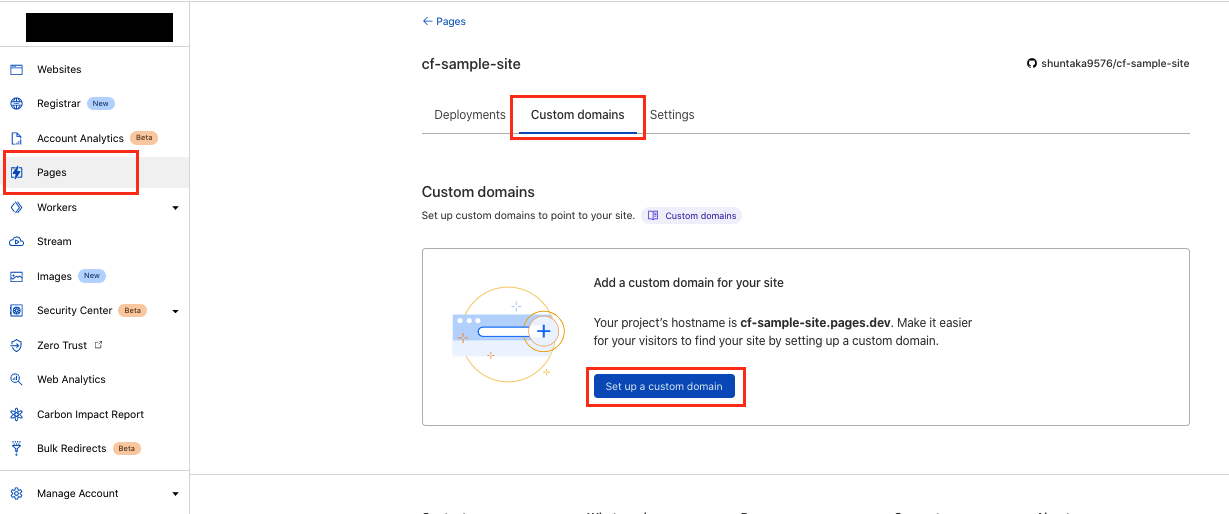
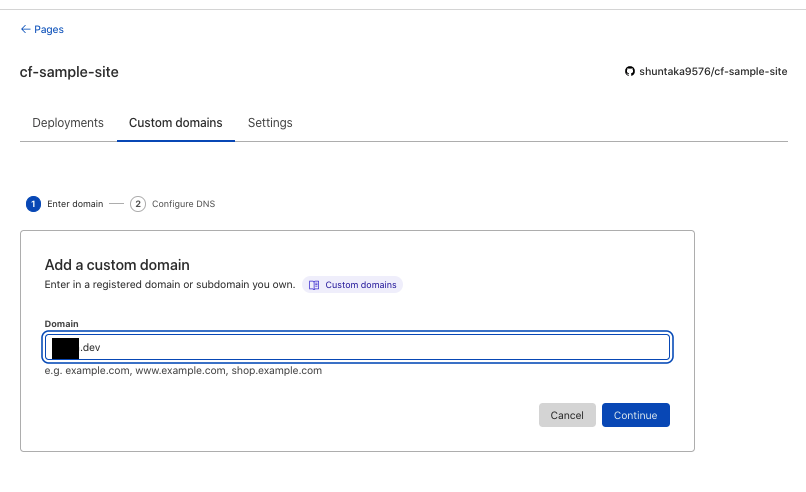
独自ドメインの適用
今回はxxx.devのようなApexドメインを割り当てます
Pagesの設定画面を開きます。
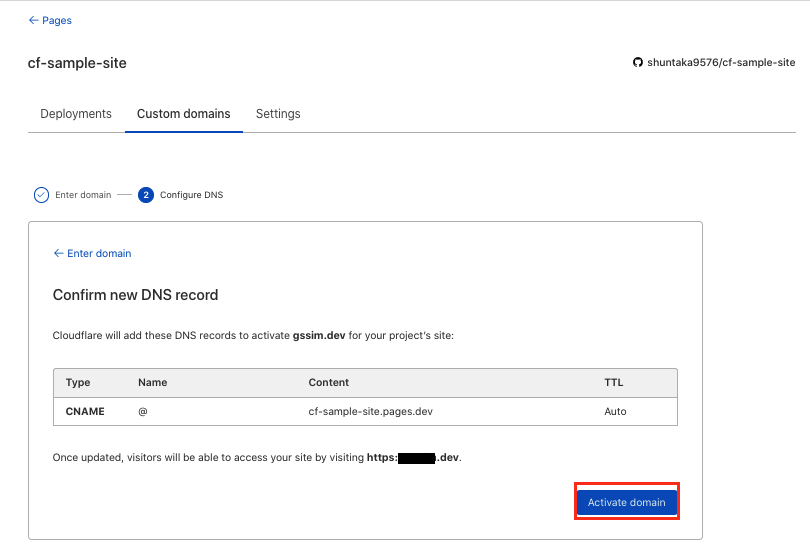

しばらく待つと、Activeになります。
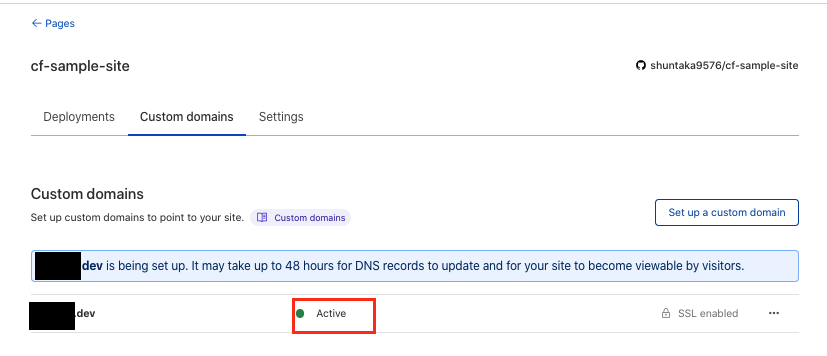
無事独自ドメインが適用されました。

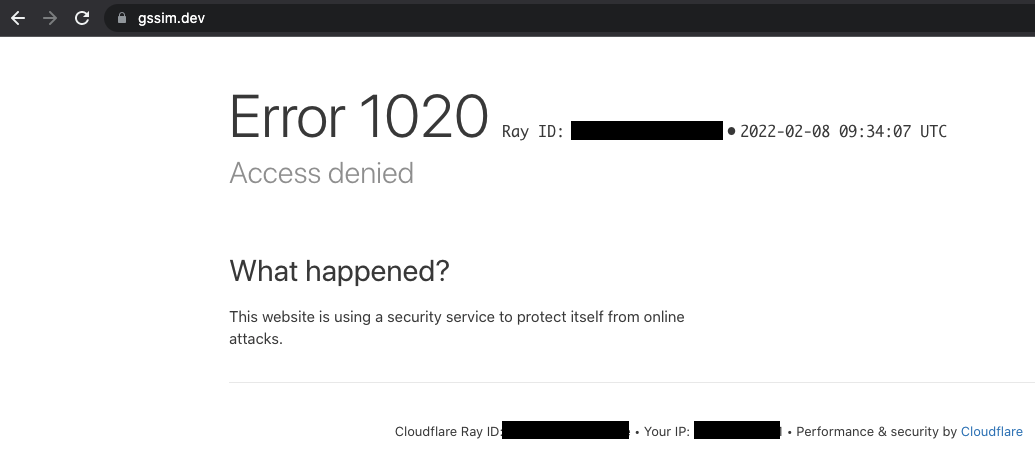
Firewall Ruleの適用
開発環境だと、IPフィルタをしたい場合があるので設定します。


以下の画像では指定したIPv4, IPv6(範囲)アドレス以外をブロックする設定を入れています。(Rule Nameがipv4になっていますが、入力ミスです)。複数IP以外はブロックのような条件は、is not in句を利用し、1つ入力ボックスに複数のIPを入れることで実現可能です。

ブロックした場合、以下のような表示になります。
さいごに
本稿では、Cloudflare Pagesを起点にし、KVやFunctionsを試しました。CDN Edgeの技術が年々進化していることから、今までサーバーサイドでやっていたことをCDN Edge上でやった方が効率が良いケースというのが増えていくと思っています。今後の技術選定の一つの選択肢として参考になればと思います。
Discussion