Vite + Vue 3.2 + TypeScript + Tailwind CSS によるタイマーアプリ
タイトルのフロントエンドのみの技術を用いて簡易的なアプリを作成することを目的として、今回、簡易的なタイマーアプリを作成しました。
本記事では、そのアプリを作成する手順をご説明します。
また、本文中で登場する Vue 3.2, TypeScript, Tailwind CSS の記法について簡易的に説明したり、参考記事を掲載したりしているので、適宜参照いただけると幸いです。
その他お気づきの点などありましたら、お気軽にコメントなどください!
対象読者
- Vite + Vue 3.2 + TypeScript + Tailwind CSS を用いた簡易的なアプリの例を見てみたい方々
- Vite + Vue 3.2 + TypeScript + Tailwind CSS のチュートリアルに取り組みたい方々
- 簡易的なタイマーアプリを作成したい方々
- 何となく読んでみたいと思った方々
など
本記事で扱う内容
- Vite + Vue 3.2 + TypeScript + Tailwind CSS を用いるプロジェクトの簡易的な環境構築
- Vue の Composition API における
ref, watch, computed, defineProps - Vue 3.2 の
<script setup>記法 - Tailwind CSS の
@apply - 簡易的なタイマーアプリの作成
など
本記事で扱わない内容
- ルーティング
- ライフサイクル
- Linter やテストツールの導入
- 厳密なタイマーアプリの作成
など
アプリ完成時のディレクトリ構成
timer
├── node_modules
│   └── ...
├── README.md
├── index.html
├── package.json
├── postcss.config.js
├── public
│   └── favicon.ico
├── src
│   ├── App.vue
│   ├── assets
│   │   ├── alarm.mp3
│   │   └── logo.png
│   ├── components
│   │   └── Timer.vue
│   ├── env.d.ts
│   ├── index.css
│   └── main.ts
├── tailwind.config.js
├── tsconfig.json
├── vite.config.ts
└── yarn.lock
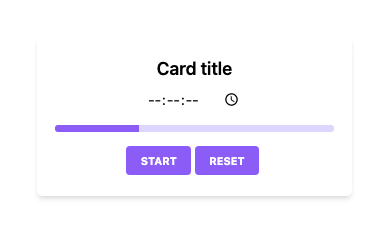
アプリ完成時の UI

時間の入力フォーム・残時間を示すプログレスバー・クリックで切り替わるStart/Stop ボタン・Reset ボタン を備えています。
バージョン
筆者による動作確認時の各ツール・パッケージのバージョンを記載します。
| name | version |
|---|---|
| yarn | 1.22.10 |
| npx | 6.14.8 |
| vue | 3.2.20 |
| @vitejs/plugin-vue | 1.9.3 |
| autoprefixer | 10.3.7 |
| postcss | 8.3.11 |
| tailwindcss | 2.2.17 |
| typescript | 4.4.4 |
| vite | 2.6.10 |
| vue-tsc | 0.3.0 |
環境構築
環境構築については、本記事中には手順のみ記載します。詳しくは こちらの記事 をご確認ください。
まず、下記コマンドを実行します。
$ yarn create vite timer --template vue-ts
$ cd timer
timer/$ yarn add --dev tailwindcss@latest postcss@latest autoprefixer@latest
timer/$ npx tailwindcss init -p
各ファイルを下記のように作成・編集します。
  module.exports = {
-   purge: [],
+   purge: ['./index.html', './src/**/*.{vue,js,ts,jsx,tsx}'],
    darkMode: false, // or 'media' or 'class'
    theme: {
      extend: {},
    },
    variants: {
      extend: {},
    },
    plugins: [],
  }
@tailwind base;
@tailwind components;
@tailwind utilities;
  import { createApp } from 'vue'
  import App from './App.vue'
+ import './index.css'

  createApp(App).mount('#app')
以上で、Vue 3.2 + TypeScript + Tailwind CSS によるプロジェクト開発の土台が完成しました。
アプリの実装
以下は、 timer ディレクトリを作業用のルートディレクトリと考えて作業していきます。
スタイルの作成
まず、 Tailwind Elements の cards や progress bars を参考にして、Timer コンポーネントのスタイルから作成していきます。
下記のように Timer.vue を作成して、 App.vue に適用します。また、 yarn create vite 時に生成された HelloWorld.vue は不要ですので、適宜削除してください。
<script setup lang="ts">
</script>

<template>
  <div class="flex items-center h-screen">
    <div class="shadow-md rounded-md mx-auto" style="width: 350px;">
      <div class="p-5 text-center">
        <h5 class="text-xl font-semibold mb-2">Card title</h5>
        <div class="mb-4">
          <input type="time" step="1" class="outline-none">
        </div>
        <div class="relative mb-4">
          <div class="overflow-hidden h-2 text-xs flex rounded bg-purple-200">
            <div style="width:30%"
              class="shadow-none flex flex-col text-center whitespace-nowrap text-white justify-center bg-purple-500">
            </div>
          </div>
        </div>
        <button
            class="bg-purple-500 text-white active:bg-purple-600 font-bold uppercase text-xs px-4 py-2 rounded shadow hover:shadow-md outline-none focus:outline-none mr-1 mb-1 ease-linear transition-all duration-150"
            type="button">
            Button
        </button>
      </div>
    </div>
  </div>
</template>
<script setup lang="ts">
import Timer from './components/Timer.vue'
</script>

<template>
  <Timer />
</template>
h5 タグ内の Card title という文字列は最後に変更します。また、タイマーの時間設定フォームとして、 type="time" の input タグを用いることにします。なお、タイマーの残時間はプログレスバーを用いて可視化する想定です。
ここまでを反映した際の UI は下記のようになります。

Vue 3.2 から、 <script setup> といった記法が可能になりました。これは Vue の単一コンポーネントファイルで用いる Composition API の setup 関数のシンタックスシュガーで、 setup 関数内に記述していたものを script タグ内に直接記述するために用いるものです。また、 export を記述せずにコンポーネントを export できます。 Vue 3.2 リリースの公式情報は こちら です。 <script setup> の記法については、 こちらの Zenn 記事 も分かりやすいです。
次に、Timer のボタンとして、スタートボタンとリセットボタンの 2 つを実装します。
現状の button タグのクラスを確認すると、かなり多くの Tailwind CSS クラスが当てられていることが分かります。単純に button タグを 2 つ実装すると、この多くのクラスが 2 回登場することになってしまいます。それを防ぐために、以下のように @apply を使用して、ボタン用のクラスを独自に定義します。
@tailwind base;
@tailwind components;
@tailwind utilities;

.btn {
  @apply text-white font-bold uppercase text-xs px-4 py-2 rounded mr-1 mb-1 ease-linear transition-all duration-150;
}
.btn:hover {
  @apply shadow-xl;
}

.purple-btn {
  @apply btn bg-purple-500;
}
.purple-btn:active {
  @apply bg-purple-600;
}
        </div>
-       <button
-           class="bg-purple-500 text-white active:bg-purple-600 font-bold uppercase text-xs px-4 py-2 rounded shadow hover:shadow-md outline-none focus:outline-none mr-1 mb-1 ease-linear transition-all duration-150"
-           type="button">
-           Button
-       </button>
+       <button class="purple-btn" type="button">Button</button>
+       <button class="purple-btn" type="button">Reset</button>
      </div>
今回 @apply を用いて独自に定義したクラスでは、必要な Tailwind CSS のクラスのみ適用しています。 .btn はボタンのクラスとし、 .purple-btn は .btn に色の情報を加えたクラスとしました。また、 :hover などの擬似クラスを用いる場合は、基本的に .btn:hover などとして @apply する必要があります。この辺りの説明は、 Tailwind CSS 公式 に記載されています。
ここまででを反映した場合の UI は下記のようになります。
タイマー機能の実装
ここから、タイマー機能を実装していきます。
まず、タイマーの時間の初期値として '00:00:00' を与えます。
  <script setup lang="ts">
+ import { ref } from "vue"
+
+ const INITIAL_TIME = '00:00:00'
+ const time = ref(INITIAL_TIME)
  </script>

...

        <div class="mb-4">
-         <input type="time" step="1" class="outline-none">
+         <input type="time" step="1" class="outline-none" v-model="time">
        </div>
ここでは、タイマーの時間を管理するために ref 関数を用いました。これはオブジェクトを返し、引数として渡した値を .value プロパティに保持します。 ref() が返したオブジェクトが管理する値を参照するためには、 script タグ内で .value を用いて記述し(例えば time.value など)、 template タグ内では直接記述します(例えば time など)。 ref の公式ドキュメントはこちら になります。
また、ここで time の型が Ref<string> と推論されていることが確認できるはずです。下記に、筆者の VSCode の環境で time にホバーした際のスクショを掲載します。

次に、タイマーをカウントダウンする処理を実装します。
'00:00:00' といった HH:mm:ss フォーマットの値からは直接計算できないため、これを秒単位の number 型の値に変換する処理を実装します。
  const time = ref(INITIAL_TIME)
+
+ const HOUR_IN_SEC = 3600
+ const MIN_IN_SEC = 60
+ const timeToSec = (t: string): number => {
+   const [h,m,s] = t.split(':').map(e => parseInt(e))
+   if (s === undefined) return 0
+   return h * HOUR_IN_SEC + m * MIN_IN_SEC + s
+ }
  </script>
HH:mm:ss フォーマットの値を秒単位の number 型の値に変換する関数として、 timeToSec を定義しました。引数 t の型を string に、返り値の型を number と指定することにより、 TypeScript の恩恵を受けることができます。なお、この関数の引数は type="time" の input タグの入力値により与えられることを想定していますが、この input では秒などを '--' などとすることができ、この際 timeToSec 関数内の s が undefined となるため、その際 0 を返すように if (s === undefined) return 0 を記述しています。
さらに、 number 型の秒単位の値を string 型の HH:mm:ss フォーマットの値に変換する関数も実装します。
  }
+ const secToTime = (s: number): string => {
+   return new Date(s * 1000).toISOString().substr(11, 8)
+ }
  </script>
単純に timeToSec 関数と逆の処理をしても良いのですが、 こちらの Stack Overflow で回答されている方法 がワンライナーで書けて単純なため、これを採用しました。
これらの関数を用いてカウントダウンさせる処理を実装します。
+
+ const sec = ref(0)
+ const timerId = ref(0)
+
+ const countDownInner = (): void => {
+   sec.value--
+   time.value = secToTime(sec.value)
+ }
+ const countDown = (): void => {
+   timerId.value = setInterval(countDownInner, 1000)
+ }
  </script>
関数の返り値がないことを明記するためには、返り値の型を記述する箇所に void と記述すれば良いです。 sec では time の値を秒単位に変換した値が管理される想定です。また、 setInterval の id を timerId で管理します。
実際にタイマーのカウントダウンをスタートする処理を実装します。
+
+ const startTimer = (): void => {
+   sec.value = timeToSec(time.value)
+   if (sec.value <= 0) return
+   countDown()
+ }
  </script>

...

        </div>
-       <button class="purple-btn" type="button">Start</button>
+       <button class="purple-btn" type="button" @click="startTimer()">Start</button>
        <button class="purple-btn" type="button">Reset</button>
ここまでで、input フォームに時間を入力して Start ボタンクリックするとタイマーが走るようになりました。
これを動作させた際の gif を下記に掲載します。 gif でのカウントダウンが不安定に見えるのは、 gif の問題ですので、ご容赦ください。実際にブラウザなどで動作させると、毎秒カウントダウン時間が減っていることが確認できるはずです。

次に、タイマーのストップ処理を実装します。
+ const isTimerStopped = ref(true)
  const startTimer = (): void => {
    sec.value = timeToSec(time.value)
    if (sec.value <= 0) return
+   isTimerStopped.value = false
    countDown()
  }
+ const stopTimer = (): void => {
+   clearInterval(timerId.value)
+   isTimerStopped.value = true
+ }
  </script>

...

        </div>
-       <button class="purple-btn" type="button" @click="startTimer()">Start</button>
+       <button v-if="!isTimerStopped" class="purple-btn" type="button" @click="stopTimer()">Stop</button>
+       <button v-else class="purple-btn" type="button" @click="startTimer()">Start</button>
        <button class="purple-btn" type="button">Reset</button>
      </div>
ここまでで、Start ボタンでタイマーがスタートしてボタンが Stop ボタンに切り替わるようになり、 Stop ボタンでタイマーがストップするようになりました。
次に、タイマーのリセット処理を実装します。
+ const resetTimer = (): void => {
+   stopTimer()
+   time.value = INITIAL_TIME
+ }
  </script>

...

        <button v-else class="purple-btn" type="button" @click="startTimer()">Start</button>
+       <button class="purple-btn" type="button" @click="resetTimer()">Reset</button>
      </div>
ここまでで、タイマーのスタート・ストップ・リセット処理を実装してきました。現状では、タイマーの残り時間が 0 になっても、カウントダウンが継続されています。そこで、残り時間 0 になった際にカウントダウンを止める処理を実装します。
  <script setup lang="ts">
- import { ref } from "vue"
+ import { ref, watch } from "vue"

...

+
+ watch(sec, (): void => {
+   if (!isTimerStopped.value && sec.value > 0) return
+   resetTimer()
+ })
  </script>
watch 関数を用いました。ここでの watch 関数には、第一引数に監視対象、第二引数にコールバック関数を与えています。この場合、監視対象が変化した際に、コールバック関数が実行されます。つまりここでは、 sec が変化した際に、「 isTimerStopped.value が false かつ sec.value が正」であれば何もせず、そうでなければ resetTimer() を実行します。 watch の公式ドキュメントはこちら になります。
さて、残り時間が 0 になった際にカウントダウンが止まりリセットされるようになりましたが、この際に何の通知もないので、タイマーとしては使い物になりません。そこで、残り時間が 0 になった際にアラーム音を鳴らすようにします。
アラーム音の素材は mp3 形式のファイルであれば何を用いても良いかと思います。ちなみに筆者は、 こちらの OtoLogic 様のサイト から音源をお借りしました。なお、OtoLogic 様の音源を活用される際は、利用規約をご確認の上、ご使用ください。
用意した mp3 ファイルを、 src/assets/alarm.mp3 として保存します。これを再生するコードを、下記のように追加します。
+ const audio = new Audio('/src/assets/alarm.mp3')
+
  watch(sec, (): void => {
    if (!isTimerStopped.value && sec.value > 0) return
+   audio.play()
    resetTimer()
  })
Audio オブジェクトについてはここでは詳しく触れませんが、気になる方は TechAcademy 様のこちらの記事 などをご参照ください。
これで、残り時間が 0 になった際にアラーム音が鳴るようになりました。
さらに、Reset ボタンでアラーム音が止まるようにします。
- const resetTimer = (): void => {
+ const resetTimer = (pausesAudio: boolean = false): void => {
    stopTimer()
    time.value = INITIAL_TIME
+   if (!pausesAudio) return
+   audio.pause()
+   audio.currentTime = 0
  }

...

        <button v-else class="purple-btn" type="button" @click="startTimer()">Start</button>
-       <button class="purple-btn" type="button" @click="resetTimer()">Reset</button>
+       <button class="purple-btn" type="button" @click="resetTimer(true)">Reset</button>
      </div>
関数の引数に初期値を与えつつ型を明記する際には、 (arg: type = defaultValue) のように記述することができます。
ここまでで、簡易的なタイマーとしての基本機能が完成しました。
ここから、タイマーの残時間を視覚的に示すためのプログレスバーを残時間と同期させます。
まず、初めにタイマーをスタートさせる場合と一度ストップした後再開する場合を区別するため、Resume ボタンを実装します。
  const sec = ref(0)
+ const startSec = ref(0)
  const timerId = ref(0)

  const countDownInner = (): void => {
    sec.value--
    time.value = secToTime(sec.value)
  }
  const countDown = (): void => {
    timerId.value = setInterval(countDownInner, 1000)
  }

  const isTimerStopped = ref(true)
- const startTimer = (): void => {
-   sec.value = timeToSec(time.value)
+ const resumeTimer = (): void => {
    if (sec.value <= 0) return
    isTimerStopped.value = false
    countDown()
  }
+ const startTimer = (): void => {
+   sec.value = timeToSec(time.value)
+   startSec.value = sec.value
+   resumeTimer()
+ }
  const stopTimer = (): void => {
    clearInterval(timerId.value)
    isTimerStopped.value = true
  }
  const resetTimer = (pausesAudio: boolean = false): void => {
    stopTimer()
    time.value = INITIAL_TIME
+   startSec.value = 0
    if (!pausesAudio) return
    audio.pause()
    audio.currentTime = 0
  }

...

        <button v-if="!isTimerStopped" class="purple-btn" type="button" @click="stopTimer()">Stop</button>
+       <button v-else-if="startSec !== 0" @click="resumeTimer" class="purple-btn">Resume</button>
        <button v-else class="purple-btn" type="button" @click="startTimer()">Start</button>
タイマー開始時間を startTime が管理することにし、タイマー再開用の関数として resumeTimer を定義しました。
これらを用いて、プログレスバーをタイマー残時間と同期させます。
  <script setup lang="ts">
- import { ref, watch } from "vue"
+ import { ref, watch, computed } from "vue"

...
+
+ const remainingTimePercent = computed((): number => {
+   const st = startSec.value
+   if (st === 0) return 0
+   return Math.round((st - sec.value) / st * 100)
+ })

...

          <div class="overflow-hidden h-2 text-xs flex rounded bg-purple-200">
-           <div style="width:30%"
+           <div :style="'width:' + remainingTimePercent + '%'"
              class="shadow-none flex flex-col text-center whitespace-nowrap text-white justify-center bg-purple-500">
computed 関数を用いました。ここでの computed 関数は、引数に 1 つのコールバック関数を与えています。この場合、 computed 関数はコールバック関数内の返り値を管理するオブジェクトを返し、コールババック関数の返り値値が変化した際に、返り値として定義した変数の状態も変化します。つまりここでは、 startSec または sec が変化した際、 remainingTimePercent が管理する値も変化します。 computed の公式ドキュメントはこちら になります。なお、 remainingTimePercent の型は ComputedRef<number> であると推論されていることが確認できるはずです。
ここで、タイマー稼働後にフォームの値を変更される場合に対応するコードを追加します。
  const stopTimer = (): void => {
    clearInterval(timerId.value)
    isTimerStopped.value = true
  }
+ const resetTimerExceptTime = (): void => {
+   stopTimer()
+   startSec.value = 0
+ }
  const resetTimer = (pausesAudio: boolean = false): void => {
-   stopTimer()
+   resetTimerExceptTime()
    time.value = INITIAL_TIME
-   startSec.value = 0
    if (!pausesAudio) return
    audio.pause()
    audio.currentTime = 0
  }

...

        <div class="mb-4">
-         <input type="time" step="1" class="outline-none" v-model="time">
+         <input type="time" step="1" class="outline-none" v-model="time" @input="resetTimerExceptTime()">
        </div>
フォームの値を変更した際は、タイマーを止め、タイマースタート時の時間をリセットするようにしました。
最後に、 h5 タグ内の文字列を変更します。このアプリではあまり意味がないのですが、ここでのこの文字列は、親コンポーネント側で指定可能にします。
  <template>
-   <Timer />
+   <Timer title="Timer" />
  </template>
  <script setup lang="ts">
  import { ref, watch, computed } from "vue"

+ defineProps<{ title: string }>()
+
...

      <div class="p-5 text-center">
-       <h5 class="text-xl font-semibold mb-2">Card title</h5>
+       <h5 class="text-xl font-semibold mb-2">{{ title }}</h5>
        <div class="mb-4">
defineProps 関数を用いました。ここでは、親コンポーネントから値を渡すために用いています。また、この関数は <script setup> 内で import することなく使用できます。 defineProps の公式ドキュメントはこちら になります。
以上で完成です。閲覧ありがとうございました!
主な参考リンク
- Tailwind Elements
- Tailwind CSS 公式
- Vue 公式
- 【Vue.js 3.2】
<script setup>構文がすごくすごい
Discussion
おはようございます〜
具体的なアプリ(タイマーアプリ)を作りつつ、要所要所でvue, tailwind cssの活用法がまとめられていて、すらすらと読めました。🙇♂️
また
<script setup>や@applyなど、知らない機能の存在を知れて、有意義な時間となりました。ありがとうございました。🙇♂️
コメントありがとうございます。励みになります!
はじめましてこんばんは。初めてZennの記事にコメント投稿いたします。
Vue をもともと勉強中で、そろそろ TypeScript や TailwindCSS に挑戦してみたいな~と思っていたところ、こんな最高の記事に巡り合えて本当に嬉しいです!
コンテンツもコンパクトかつ分かりやすくまとまっていて勉強になりました。
あと何週か繰り返させていただきます!
素敵な記事をご公開くださり本当に有難うございました。
恐縮です。励みになります!