React Native Skiaを使って動くチェックボックス作ってみた
どうも、nano72mknです。
今回はReact Native Skiaを使って「動く!チェックボックス」を作ってみました!
とりあえず、この方法で出来たぞって感じなので間違えてるかもしれません!
Skiaってなに?
SkiaとはGoogleが開発しているオープンソースの2Dグラフィックライブラリで、
Google Chrome、ChromeOS、Android、Flutterなどで使われているっぽいですね。
ちなみに、Flutterのドキュメントを見ると今後Skiaの後継のImpellerになっていくっぽいですね
本題:チェックボックスを作っていく
完成品はこちら↓
このチェックボックスを作っていきます
四角形を作る
Rectangleを指定する
const x = 0;
const y = 0;
const width = 100;
const height = 100;

const rectangle = rect(x, y, width, height);
SkPathを生成し、rectangleを追加
Skia.Path.MakeでSkPathを生成し、SkPathの引数にRectangleを追加
const rectPath = Skia.Path.Make();
rectPath.addRect(rectangle);
SkPathを描画してみる
作ったSkPathはPathコンポーネントを使って描画します。
<Path path={rectPath} color="#ffffff" />
画面上に表示する際は、Canvasコンポーネントで囲ってあげる必要があります。
styleにはwidthとheightを指定して、描画エリアを確保する必要があります。
<Canvas style={{ width, height }}>
  <Path path={rectPath} color="#ffffff" />
</Canvas>
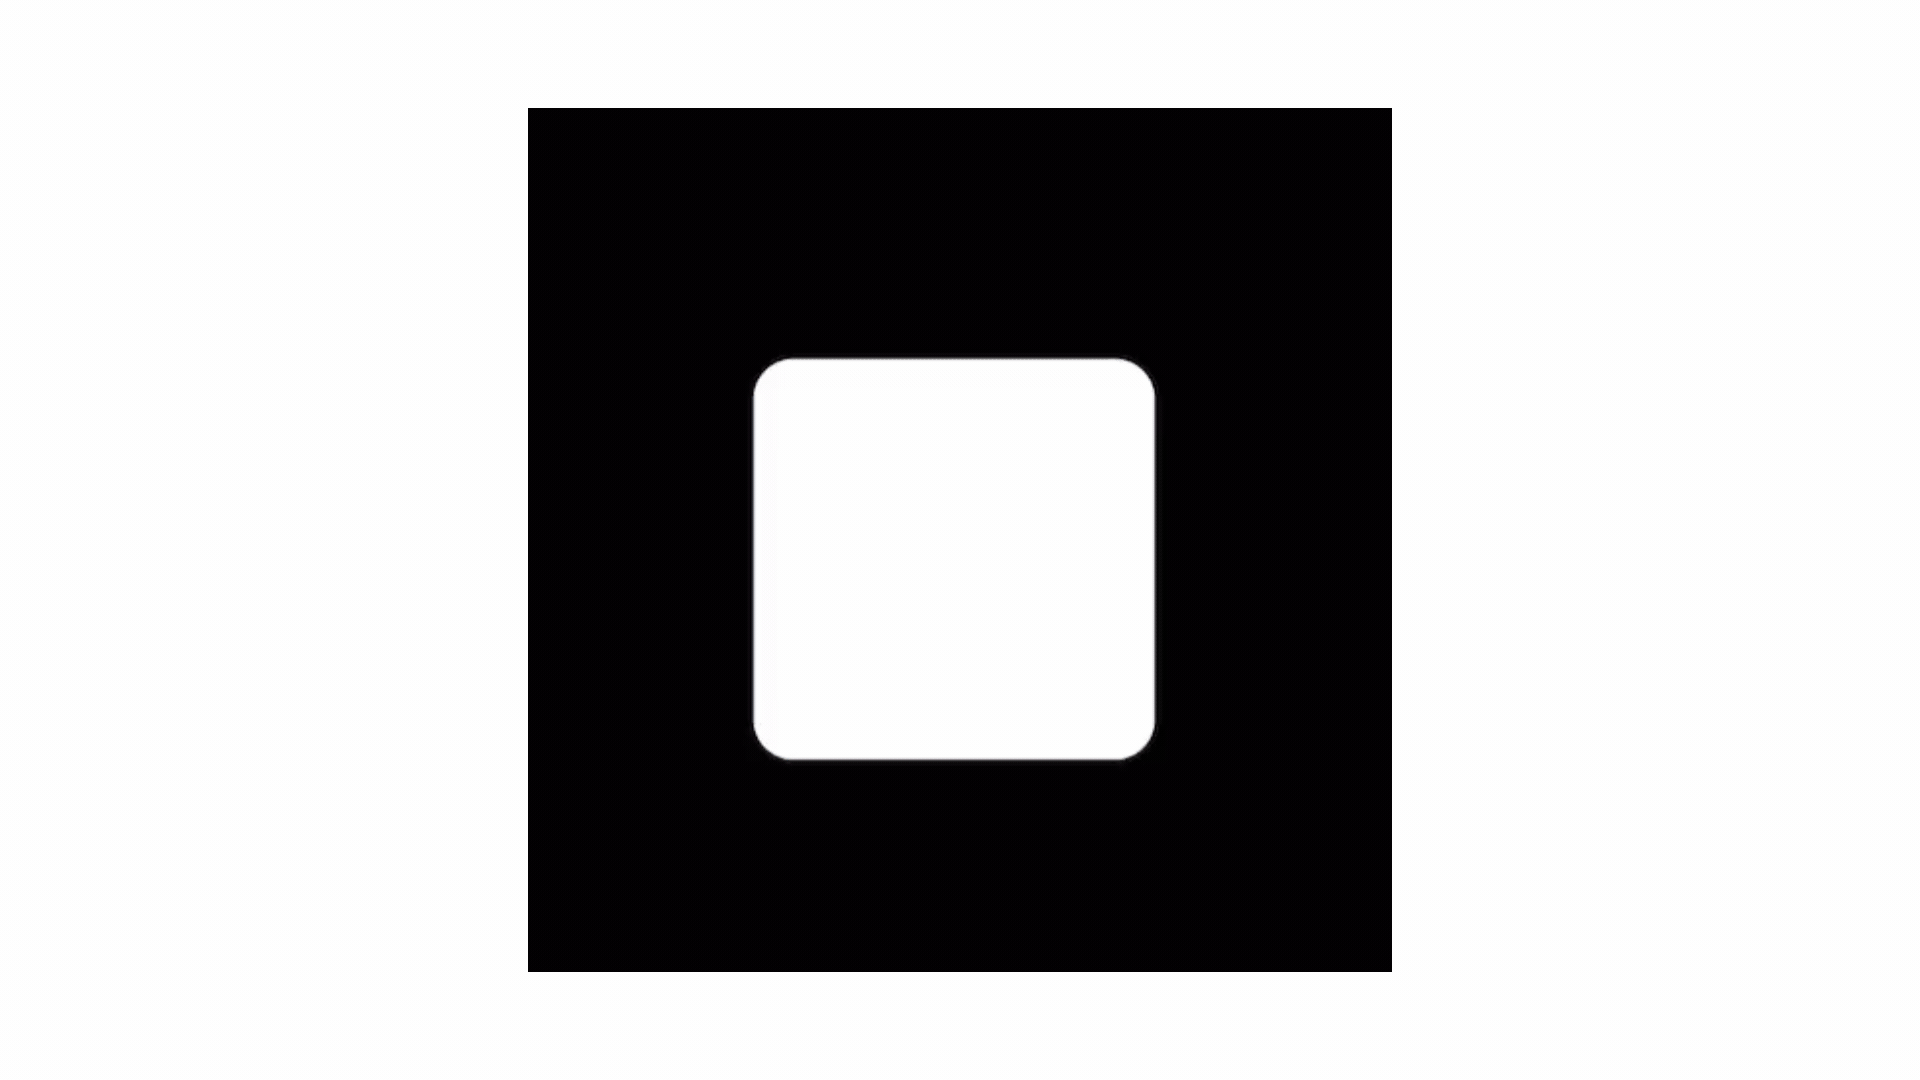
描画した四角形

コードの全体
import { Skia, rect, Path, Canvas } from '@shopify/react-native-skia';

const x = 0;
const y = 0;
const width = 100;
const height = 100;
const rectangle = rect(x, y, width, height);

const rectPath = Skia.Path.Make();
rectPath.addRect(rectangle);

export default function Index() {
  return (
    <View style={{ flex: 1, justifyContent: 'center', alignItems: 'center' }}>
      <Canvas style={{ width, height }}>
        <Path path={rectPath} color="#ffffff" />
      </Canvas>
    </View>
  );
}
作った四角を角丸にする
先ほどのスクショを見てもらったらわかる通り、めっちゃ角が尖っているので丸くしてあげます。
作ったrectangleに角丸を指定する
rrectに先ほど作ったrectangleを食わせて、角丸を指定します。
+const rx = 10;
+const ry = 10;

const rectangle = rect(x, y, width, height);
+const roundedRect = rrect(rectangle, rx, ry);
SkPathを微修正
addRectからaddRRectに変更してroundedRectを渡します
const rectPath = Skia.Path.Make();
-rectPath.addRect(rectangle);
+rectPath.addRRect(roundedRect);
描画した角丸四角形

コードの全体
import { Skia, rect, Path, Canvas, rrect } from '@shopify/react-native-skia';

const x = 0;
const y = 0;
const width = 100;
const height = 100;
const rx = 10;
const ry = 10;

const rectangle = rect(x, y, width, height);
const roundedRect = rrect(rectangle, rx, ry);

const rectPath = Skia.Path.Make();
rectPath.addRRect(roundedRect);

export default function Index() {
  return (
    <View style={{ flex: 1, justifyContent: 'center', alignItems: 'center' }}>
      <Canvas style={{ width, height }}>
        <Path path={rectPath} color="#ffffff" />
      </Canvas>
    </View>
  );
}
四角形の枠線を作る
styleをstrokeに指定
strokeWidthで枠線の太さを指定できます。
const strokeWidth = 5;

...
<Path path={rectPath} color="#3ea8ff" style="stroke" strokeWidth={strokeWidth} />
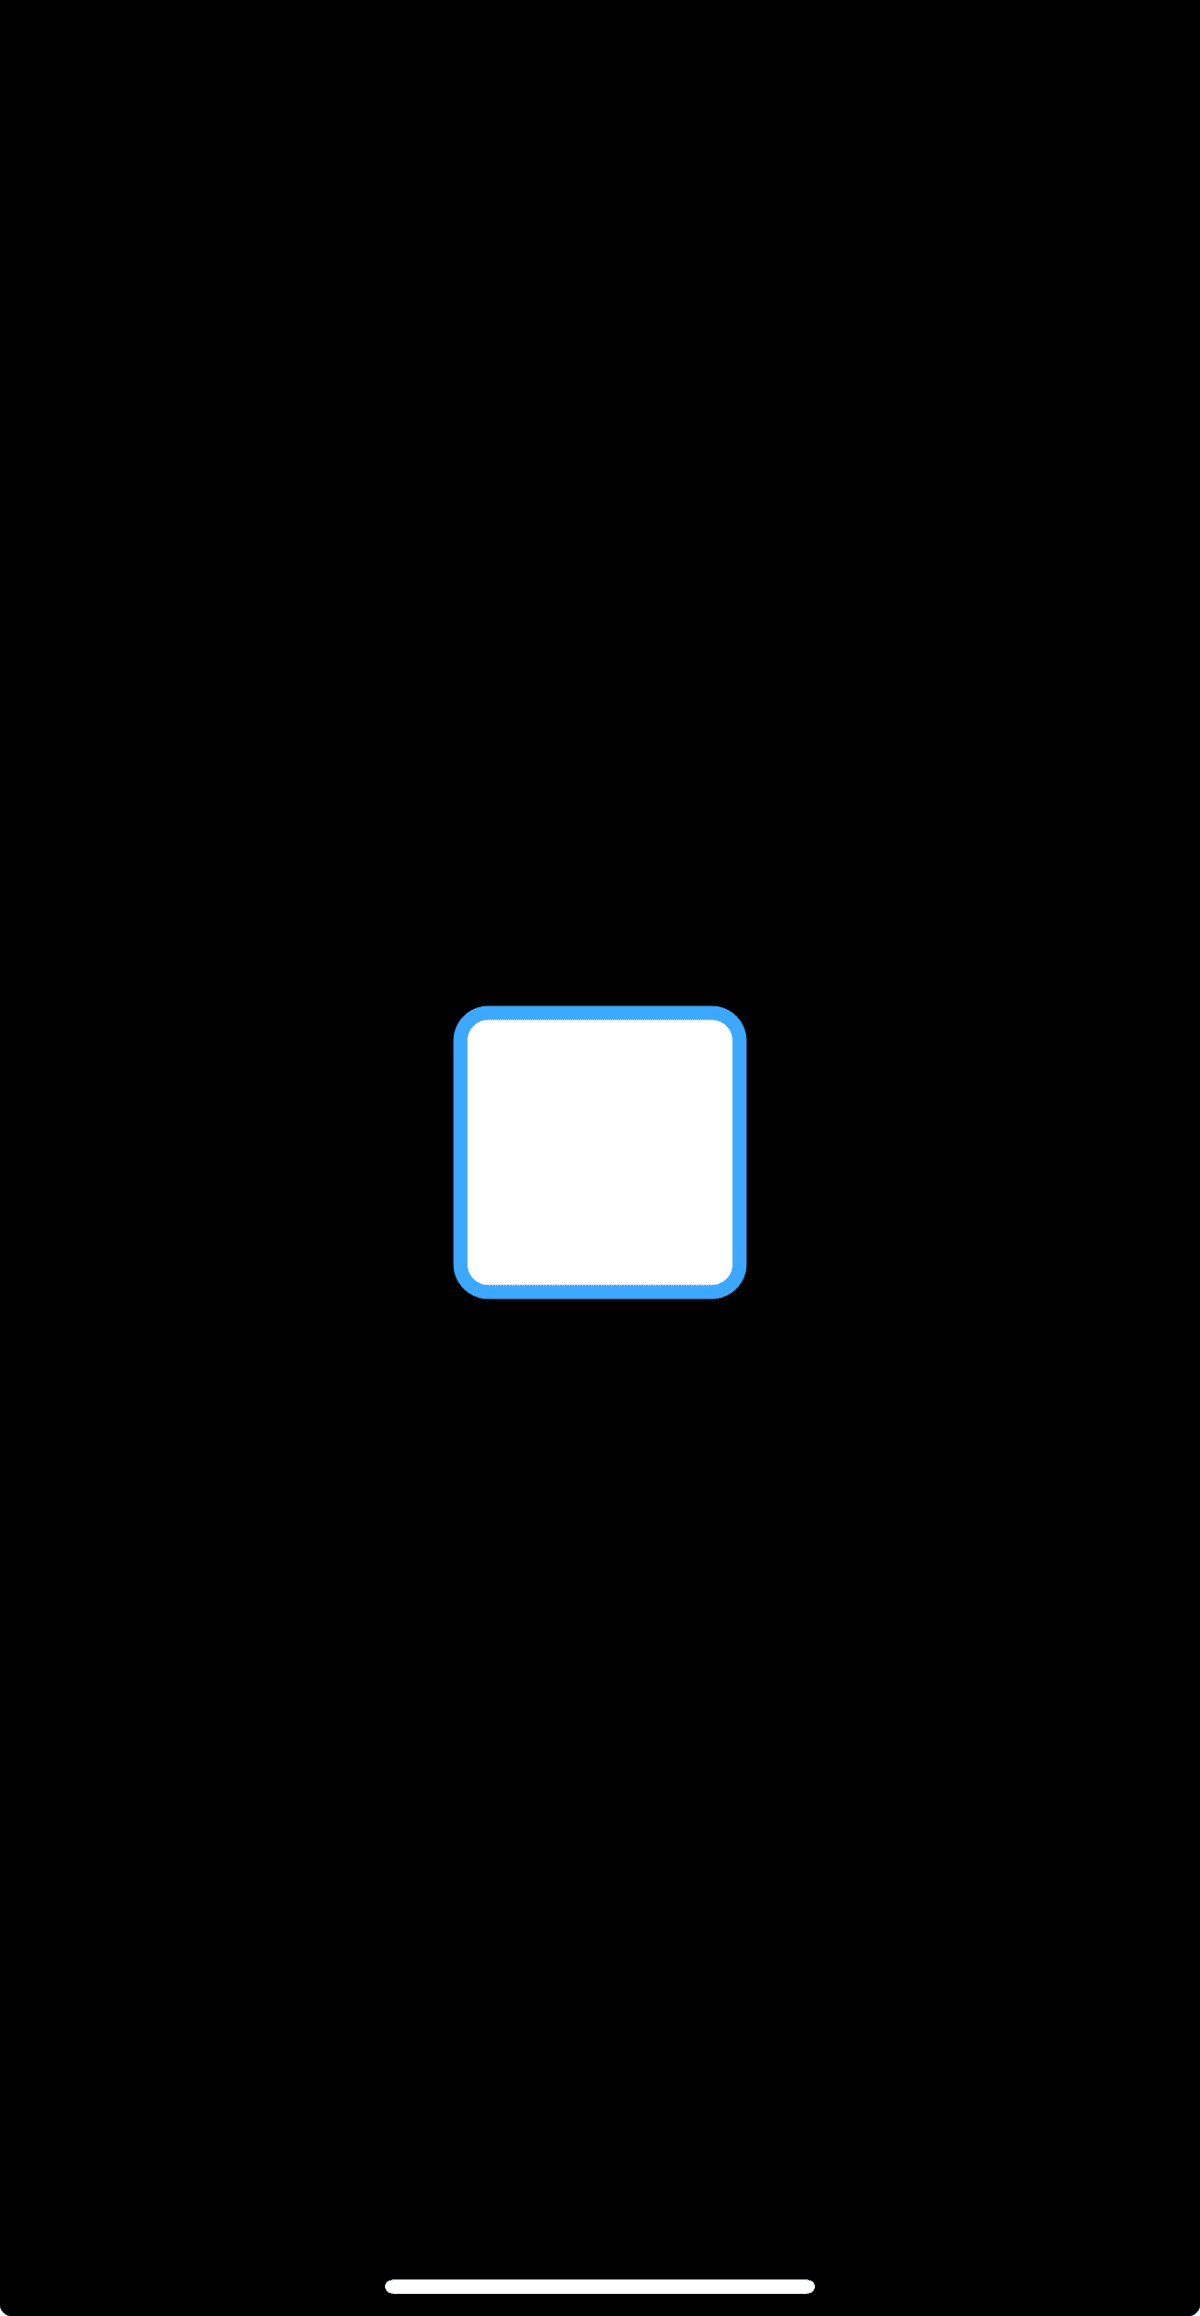
このまま描画すると、スクショのように不恰好になります

これは、CanvasのサイズとrectPathの描画位置が線の太さを考慮されていない為、線の半分がはみ出してしまい不恰好になりました。
線の太さを考慮して調整する
四角形の位置を調整する
xとyは、はみ出している線の太さの半分ずらしてあげます
+const strokeWidth = 5;
-const x = 0;
+const x = 0 + strokeWidth / 2;
-const y = 0;
+const y = 0 + strokeWidth / 2;
Canvasのサイズを調整する
上下左右に線の太さの半分がはみ出ているので、足して線の太さ分大きくしてあげます。
+const canvasWidth = width + strokeWidth * 2;
+const canvasHeight = height + strokeWidth * 2;
...
-      <Canvas style={{ width, height }}>
+      <Canvas style={{ width: canvasWidth, height: canvasHeight }}>
描画してみる
位置を調整した後は、きれいに表示されています!
コードの全体
import { Skia, rect, Path, Canvas, rrect } from '@shopify/react-native-skia';

+const strokeWidth = 5;
-const x = 0;
+const x = 0 + strokeWidth / 2;
-const y = 0;
+const y = 0 + strokeWidth / 2;
const width = 100;
const height = 100;
...
+const canvasWidth = width + strokeWidth * 2;
+const canvasHeight = height + strokeWidth * 2;

...
export default function Index() {
  return (
    <View style={{ flex: 1, justifyContent: 'center', alignItems: 'center' }}>
-      <Canvas style={{ width, height }}>
+      <Canvas style={{ width: canvasWidth, height: canvasHeight }}>
        <Path path={rectPath} color="#ffffff" />
        <Path path={rectPath} color="#3ea8ff" style="stroke" strokeWidth={strokeWidth} />
      </Canvas>
    </View>
  );
}
チェックマークを作る
一番楽しいところである、チェックマークを作っていきます。
SkPathを作る
今回は、SkPathのlineToを使って描画していきます。
前回のrectangleと同じように、Skia.Path.Makeします。
const checkPath = Skia.Path.Make();
lineを引く
まず最初に、漢字でいう「一画目」、書道でいう「起筆」「入り」の位置を決めます。
左から1/4、上から半分くらいの位置にポンと筆を立てます
checkPath.moveTo(25, 50);
あとは感性に従いながら、チェックマークの折り返し地点まで筆をすすめ
checkPath.lineTo(40, 70);
勢いよく「終筆」を決める。
checkPath.lineTo(85, 35);
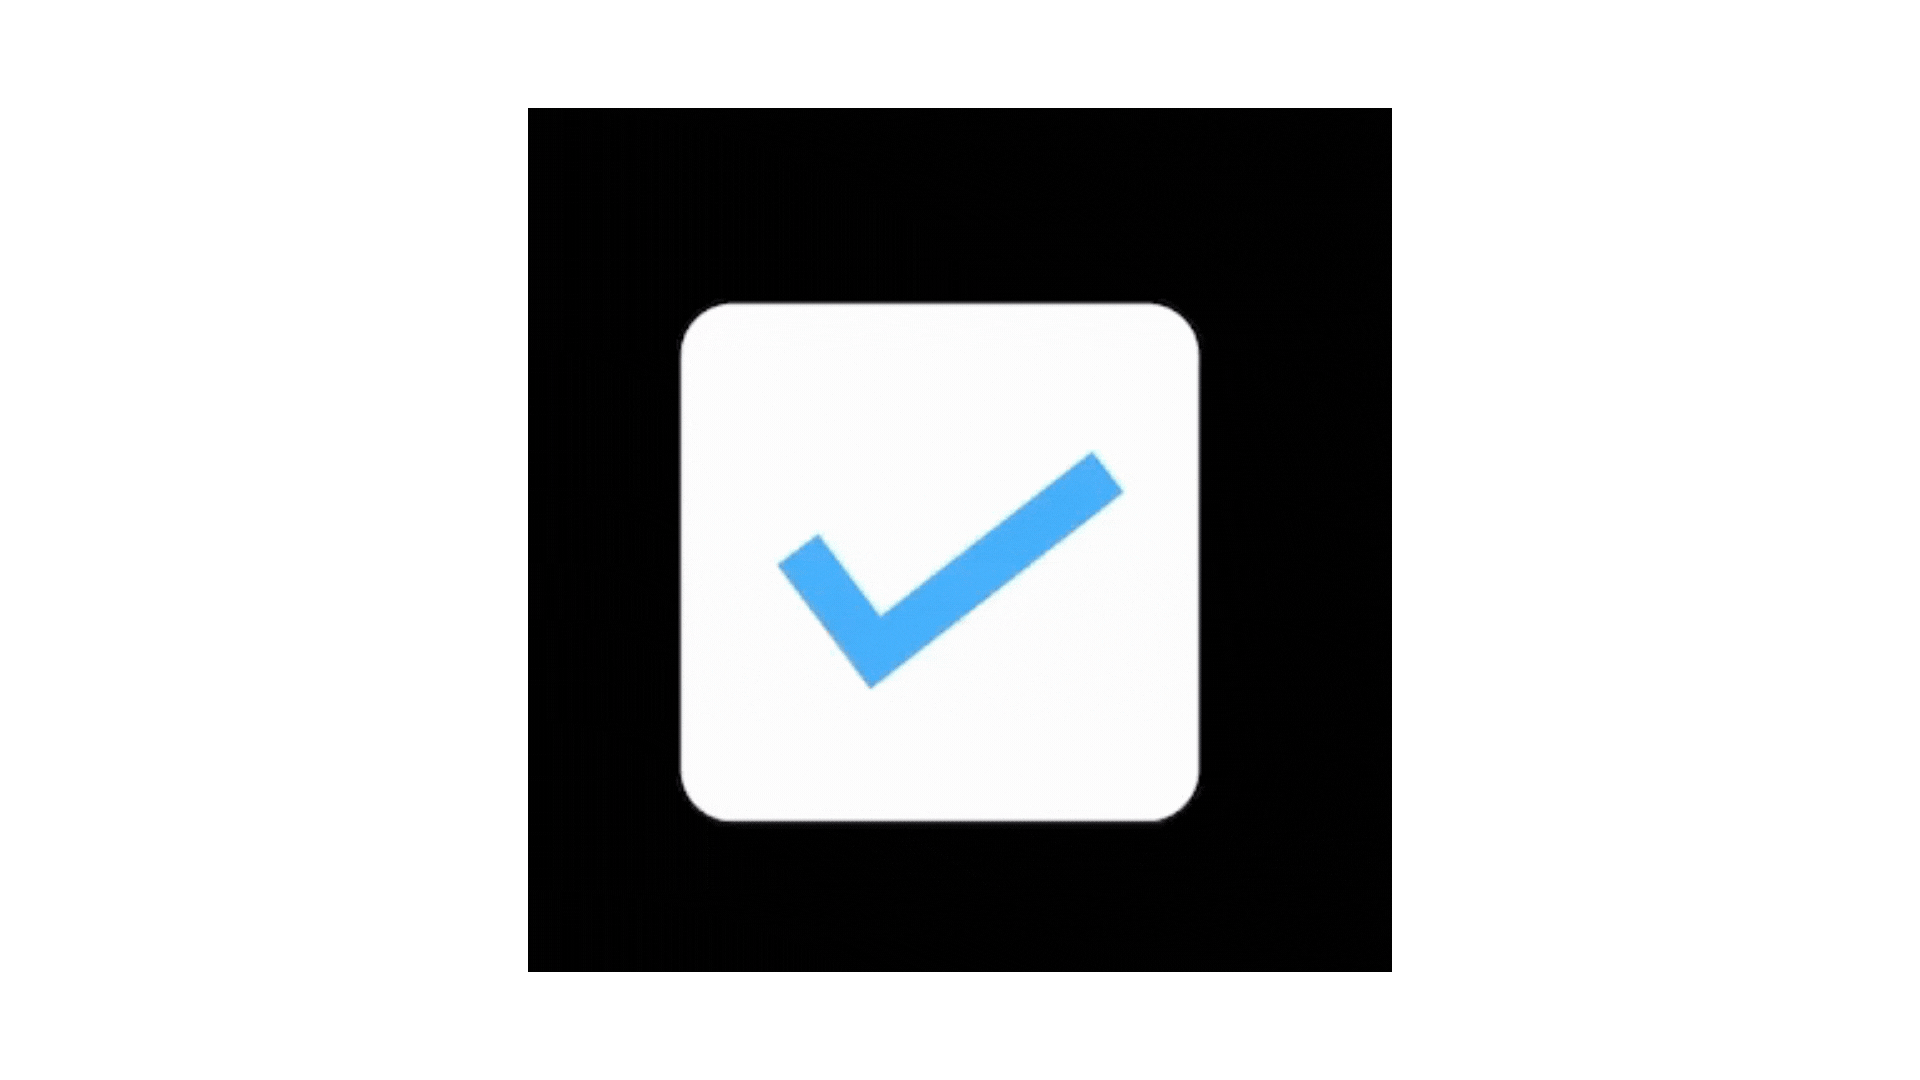
完成したものをCanvasで描画すると
<Path path={checkPath} color="#3ea8ff" style="stroke" strokeWidth={10} />
こうなります。

うまく説明できなくてすみません...w
moveTo、lineToはもしかしたら計算式とかなんかゴニョごにょするものがあるかもしれないです。
が、感性に従って書くのも楽しいですよ
動かす
アニメーションをつけるときは、react-native-reanimatedを使います
タップできるようにする
ViewからPressableに変更し、onPressでisCheckedの状態を切り替えられるようにしました
export default function Index() {
  const [isChecked, setIsChecked] = useState(false);
  return (
-    <View style={{ flex: 1, justifyContent: 'center', alignItems: 'center' }}>
+    <Pressable style={{ flex: 1, justifyContent: 'center', alignItems: 'center' }} onPress={() => setIsChecked(v => !v)}>
     ...
-    </View>
+    </Pressable>
  );
}
チェックが入ったときに、枠線が出てくるようにする
useSharedValueをreanimatedからimportしてきます。
const progress = useSharedValue(0);
isCheckedがtrueの場合に、progressが1になるようにします。
  useEffect(() => {
    if (!isChecked) {
      progress.value = withTiming(0);
      return;
    }
    progress.value = withTiming(1);
  }, [isChecked]);
Pathのendにprogressを指定します。
<Path path={rectPath} color="#3ea8ff" style="stroke" strokeWidth={strokeWidth} end={progress} strokeCap="round" />
strokeCapにroundを指定するとこで、Pathの切り口が丸くなります
枠線のアニメーションプレビュー
全体のコード
export default function Index() {
  const [isChecked, setIsChecked] = useState(false);
+  const progress = useSharedValue(0);

+  useEffect(() => {
+    if (!isChecked) {
+      progress.value = withTiming(0);
+      return;
+    }
+    progress.value = withTiming(1);
+  }, [isChecked]);

  return (
    <Pressable style={{ flex: 1, justifyContent: 'center', alignItems: 'center' }} onPress={() => setIsChecked(v => !v)}>
      <Canvas style={{ width: canvasWidth, height: canvasHeight }}>
        <Path path={rectPath} color="#ffffff" />
-        <Path path={rectPath} color="#3ea8ff" style="stroke" strokeWidth={strokeWidth} />
+        <Path path={rectPath} color="#3ea8ff" style="stroke" strokeWidth={strokeWidth} end={progress} strokeCap="round" />
        <Path path={checkPath} color="#3ea8ff" style="stroke" strokeWidth={10} />
      </Canvas>
    </Pressable>
  );
}
チェックマークにもアニメーションをつける
枠線と同様、endとstrokeCapをつけます。
strokeJoinは折り返しの時に尖ってほしくないので、strokeCapと同様にroundを指定します。
<Path path={checkPath} color="#3ea8ff" style="stroke" strokeWidth={10} end={progress} strokeCap="round" strokeJoin="round" />
完成
チェックマークにもアニメーションを設定したら完成です!
自分の場合は、背景もチェックと同じタイミングで背景色も変わるようにしてみました!
まとめ
React Native Skiaでチェックボックスを作ろう!って動き始めてから、このチェックボックスを完成させるまでに2時間もかかってしまいました...w
youtubeにReact Native Skiaの動画がたくさん上がってますが、結構クオリティが高いものばかりで、線の引き方や角丸の作り方などちょっとづつ参考になりそうなものを集めて...とやっていたら時間が経っていました。
僕みたいなちょっと触ってみたい!という方に届いたら嬉しいです!
Discussion