【React Native】FCM で Push通知に 画像 を表示する方法


iOS、Androidともに、Push通知には画像や動画などのメディアを添付することができます。
ここでは React Native と FCM(Firebase Cloud Messaging) でそれをどのように実装するか手順を解説します。
Push通知の実装
まずはFCMからPush通知を受け取る必要がありますので、実装します。
ライブラリのインストール
React Native で Push通知を実装する場合、以下のライブラリが最も人気です。
公式の手順に従って、インストールします。
Firebase SDKのインストール
次に、Firebase の設定を行います。
こちらも公式のドキュメントに従って、SDKのインストールを行います。
iOS
# Add the Firebase pod for Google Analytics
pod 'Firebase/Analytics'

# For Analytics without IDFA collection capability, use this pod instead
# pod ‘Firebase/AnalyticsWithoutAdIdSupport’

# Add the pod for Firebase Cloud Messaging
pod 'Firebase/Messaging'
Android
buildscript {

  repositories {
    // Check that you have the following line (if not, add it):
    google()  // Google's Maven repository
  }

  dependencies {
    // ...

    // Add the following line:
    classpath 'com.google.gms:google-services:4.3.10'  // Google Services plugin
  }
}

allprojects {
  // ...

  repositories {
    // Check that you have the following line (if not, add it):
    google()  // Google's Maven repository
    // ...
  }
}
通知ペイロードで画像を送信する
Androidは、FCMを使用して画像を設定することで、特に何もしなくても画像を表示することができます。
iOSは、特別な設定が必要になります。具体的には、
- 一時的に画像を保存して、
- それをPush通知に保存する
ということを行う必要があります。
基本的には以下の公式ドキュメントの手順通り行います。
Notification Service Extension ファイルを作成する
XCodeから、Notification Service extension というExtensionをアプリに追加します。
-
File / New / TargetからNotification Service extensionを選択します。 - 公式ドキュメントの通り、言語は
Objective-Cを選択します。 - ファイル名は何でも構いません。今回は
ImageNotificationとします。 - 有効化しますか?というダイアログが出るので、有効化します。(Activate)
以上の手順を行うことで、今後受信するPush通知は全てこの Extention を経由します。
このExtentionでは 通知ペーロードを参照したり加工することができます。
ペイロードに設定されている画像URLから画像をダウンロードし、実際の通知モーダルに表示する実装をこれから行います。
Notification Service Extensionの実装
FCMを使用する場合は、FirebaseのSDKに画像のダウンロードや設定をお任せすることができます。
こちらもドキュメントに書いてあるコードを設定するだけで使用することができます。
@interface NotificationService () <NSURLSessionDelegate>
@property(nonatomic) void (^contentHandler)(UNNotificationContent *contentToDeliver);
@property(nonatomic) UNMutableNotificationContent *bestAttemptContent;
@end

@implementation NotificationService

- (void)didReceiveNotificationRequest:(UNNotificationRequest *)request withContentHandler:(void (^)(UNNotificationContent * _Nonnull))contentHandler {
    self.contentHandler = contentHandler;
    self.bestAttemptContent = [request.content mutableCopy];

    // Modify the notification content here as you wish
    self.bestAttemptContent.title = [NSString stringWithFormat:@"%@ [modified]",
    self.bestAttemptContent.title];

  // Call FIRMessaging extension helper API.
  [[FIRMessaging extensionHelper] populateNotificationContent:self.bestAttemptContent
                                            withContentHandler:contentHandler];

}
FIRMessaging extension helper を有効化する
ただし、上記のままでは FIRMessaging extension helper が見つからないとエラーになってしまうので、この Extention に Podをインストールします。
Podfileを編集する
以下のように追加、変更します。
  target 'ImageNotification' do
    pod 'Firebase/Analytics', '~> 8.3.0'
    pod 'Firebase/Messaging', '~> 8.3.0'
  end

  # Enables Flipper.
  #
  # Note that if you have use_frameworks! enabled, Flipper will not work and
  # you should disable the next line.
  use_flipper!()

  post_install do |installer|
    react_native_post_install(installer)
    installer.pods_project.targets.each do |target|
      target.build_configurations.each do |config|
        config.build_settings['APPLICATION_EXTENSION_API_ONLY'] = 'NO'
      end
    end
  end
作成した Extention に Podを追加します。
ここでは アプリ本体とバージョンを合わせておく必要があるので、バージョンを指定して設定します。
APPLICATION_EXTENSION_API_ONLY を No に
アプリ本体との共有設定を No にします。
Pod のインストール
改めてPodをインストールします。
npx pod install
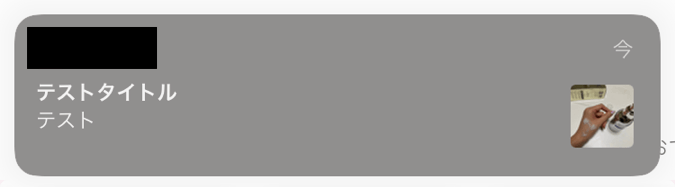
完成
これで、通知に画像が表示されるようになりました!
Discussion