Microsoft Intune 用に Web から MSI ファイルを取得&展開できるスクリプトを作った
これは何?
Intune ではアプリケーションの展開において、MSI インストーラ形式で配布されているアプリケーションを管理デバイスに展開できます。
今回、運用のやりやすさを上げるために実施した取り組みをここにまとめます。
想定する読者
以下を満たす人を対象としています。
- Intune で「Windows アプリ(Win32)」のアプリケーション登録ができる人
- Intune のアプリケーション配布の手間を減らしたい人
課題1:アプリケーションのバージョンが上がるたびに配布パッケージを Intune に登録する必要がある
これは Intune に限らず MDM 関連ではあるあるな話ですが、アプリケーションの配布において MDM にインストーラを直接アップロードするとデバイスに配布されるアプリケーションのバージョンが固定化されてしまう課題があります。
アプリケーションによっては自動でアップデートされるにしても、バージョンが古くなったものを配布することはわずかながらもセキュリティのリスクを伴います。
これを解決するにはアプリケーションのバージョンが上がった際には都度 MDM にアップロードする必要があります。が、Intune においてはアップロードファイル(.intunewinファイルとか)を用意するのは手間ですよね……。
課題2:「Windows アプリ(Win32)」と「基幹業務アプリ」が同時利用できない
Intune では「Windows アプリ(Win32)」形式でアプリケーションを配布する場合、同じタイミングに別形式(基幹業務アプリなど)を使ったアプリケーションを配布することは非推奨とされています。これ個人的には Intune の罠ポイントと思ってます。
Win32 アプリを展開する場合、特に複数ファイルの Win32 アプリ インストーラーがある場合は、Intune 管理拡張機能の方法を排他的に使用することを検討してください。 Autopilot 登録中に Win32 アプリと基幹業務 (LOB) アプリのインストールを混在させる場合、アプリのインストールが失敗する可能性があります。
おそらくインストールの排他処理が正しく処理されていないのではと思っているのですが、AutoPilot などデバイスのセットアップにて多量のインストール処理をさせたいケースで排他処理が期待通りに動かないのはちょっと苦しいですね。
つまるところ、本問題を回避するには MSI 形式のインストーラでも「Windows アプリ(Win32)」で作成する必要があるわけです。
結局、「基幹業務アプリ」だったら MSI をサクッと差し替えができるところですが、課題 1 で挙げたように運用が重たい「Windows アプリ(Win32)」になってしまうわけです…。
本スクリプトでできること
この記事で紹介するスクリプトは以下の機能を有します。
- 指定した URL から MSI インストーラを自動取得&インストール
- アンインストール
事前準備で必要な情報
本スクリプトを使う場合は以下の情報が予め必要です。
MSI インストーラーの公開 URL
導入したいアプリケーションの MSI インストーラーの配布先です。
本スクリプトはこの URL からダウンロード、インストールを実行します。
この URL は気合いで探す必要がありますが、私が調査したものをいくつか紹介します。
| アプリケーション | 配布 URL |
|---|---|
| Google Chrome (64bit) | https://dl.google.com/tag/s/appguid%3D%7B8A69D345-D564-463C-AFF1-A69D9E530F96%7D%26iid%3D%7B68387BA0-557D-F80F-58A1-9E5EDDE82361%7D%26browser%3D5%26usagestats%3D0%26appname%3DGoogle%2520Chrome%26needsadmin%3Dtrue%26ap%3Dx64-stable-statsdef_0%26brand%3DGCPK/dl/chrome/install/googlechromestandaloneenterprise64.msi |
| Zoom (64bit) | https://zoom.us/client/latest/ZoomInstallerFull.msi?archType=x64 |
| 1Password | https://downloads.1password.com/win/1PasswordSetup-latest.msi |
アプリケーションの名称
本スクリプトを使用してアプリケーションをアンインストールするとき、アプリケーションの特定のために使用します。
MSI 形式でインストールした場合 Product ID と呼ばれる識別子が Windows に登録され、その識別子を用いてアンインストールをできます。しかし、アプリケーションがバージョンアップするごとに Product ID が変化するらしい(情報求む)ので、アプリケーション名を用いて Product ID を特定します。
Windows にインストールされたアプリケーション名をそのまま使います。厳密に名称を調べたいときは以下のレジストリキーを開いて DisplayName プロパティの値を調べます。
HKEY_LOCAL_MACHINE\SOFTWARE\Microsoft\Windows\CurrentVersion\Uninstall\{XXXXXXXX-XXXX-XXXX-XXXX-XXXXXXXXXXXX}
ここでも私が調査したものをいくつか紹介します。
| アプリケーション | アプリケーションの名称 |
|---|---|
| Google Chrome (64bit) | Google Chrome |
| Zoom (64bit) | Zoom Workplace (64-bit) |
| 1Password | 1Password |
アプリケーション本体のファイルパス
後述の「検出ルール」などで使うためにアプリケーション本体が保存されるパスを調べておきます。
スクリプトの作成
下記のスクリプトを作成して .intunewin 形式にパッケージングしてください。ファイル名、ファイル形式は以下で作成してください。
- ファイル名:
msiInstaller.ps1 - 文字コード:スクリプトに日本語が含まれているため
UTF-8 with BOM - 改行コード:
CRLF
param(
    [string]$label = "",
    [string]$installerUrl = "",
    [string]$appendArguments = "",
    [switch]$uninstall = $false,
    [switch]$isDebug = $false
)

# パラメータ検証を関数内で実行
function Validate-Parameters {
    if ([string]::IsNullOrWhiteSpace($label)) {
        Write-Error "アプリケーション名(-label)を指定してください。"
        exit 1
    }

    if (-not $uninstall -and [string]::IsNullOrWhiteSpace($installerUrl)) {
        Write-Error "インストールモードではダウンロードURL(-installerUrl)を指定してください。"
        exit 1
    }
}

# メイン処理の開始時に検証
Validate-Parameters

$ProgressPreference = "SilentlyContinue"

# ログ出力関数
function Write-Log {
    param([string]$Message)

    if ($isDebug) {
        # デバッグモードの場合のみファイル出力
        if (-not $script:logInitialized) {
            $script:logPath = "C:\IntuneLog"
            if (!(Test-Path $script:logPath)) {
                New-Item -ItemType Directory -Path $script:logPath -Force | Out-Null
            }
            $script:logFile = Join-Path $script:logPath "msiInstaller_$(Get-Date -Format 'yyyyMMdd_HHmmss').log"
            $script:logInitialized = $true
        }
        $timestamp = Get-Date -Format "yyyy-MM-dd HH:mm:ss"
        "$timestamp - $Message" | Out-File -FilePath $script:logFile -Append
    }

    # コンソール出力は常に行う
    Write-Host $Message
}

# 処理情報を出力
Write-Log "====== INFO ======"
Write-Log "PowerShell Version: $($PSVersionTable.PSVersion)"
Write-Log "Execution Policy: $(Get-ExecutionPolicy)"
Write-Log "Script Path: $($MyInvocation.MyCommand.Path)"
Write-Log "Current User: $env:USERNAME"
Write-Log "Current Directory: $(Get-Location)"
Write-Log "Process Architecture: $([Environment]::Is64BitProcess)"
Write-Log "OS Architecture: $([Environment]::Is64BitOperatingSystem)"
Write-Log "Parameters received:"
Write-Log "  label: '$label'"
Write-Log "  installerUrl: '$installerUrl'"
Write-Log "  appendArguments: '$appendArguments'"
Write-Log "  uninstall: $uninstall"
Write-Log "  isDebug: $isDebug"
Write-Log "=================="

# レジストリ検索関数(reg.exe + .NETメソッド使用)
function Search-RegistryForProduct {
    param([string]$ProductName)

    $productIds = @()

    Write-Log "レジストリを検索中..."

    # 64bitシステムかチェック
    if ([Environment]::Is64BitOperatingSystem) {
        # 32bitプロセスから実行されている場合の処理
        if (-not [Environment]::Is64BitProcess) {
            Write-Log "32bitプロセスから実行されています。WOW64リダイレクトを回避します。"

            # 方法1: reg.exeを使用(64bit版が自動的に使われる)
            Write-Log "reg.exeを使用して64bitレジストリを検索中..."
            $regOutput = & reg query "HKLM\SOFTWARE\Microsoft\Windows\CurrentVersion\Uninstall" /s 2>&1
            $currentKey = ""
            foreach ($line in $regOutput) {
                if ($line -match "^HKEY_LOCAL_MACHINE\\SOFTWARE\\Microsoft\\Windows\\CurrentVersion\\Uninstall\\(.+)$") {
                    $currentKey = $matches[1]
                } elseif ($line -match "^\s+DisplayName\s+REG_SZ\s+(.+)$") {
                    $displayName = $matches[1].Trim()
                    if ($displayName -eq $ProductName) {
                        Write-Log "  64bit: 見つかりました - $displayName (ID: $currentKey)"
                        $productIds += [PSCustomObject]@{
                            ProductId = $currentKey
                            DisplayName = $displayName
                            Architecture = "64bit"
                        }
                    }
                }
            }

            # 方法2: PowerShellの.NETメソッドを使用
            Write-Log ".NETメソッドを使用して64bitレジストリを検索中..."
            try {
                $key64 = [Microsoft.Win32.RegistryKey]::OpenBaseKey([Microsoft.Win32.RegistryHive]::LocalMachine, [Microsoft.Win32.RegistryView]::Registry64)
                $uninstallKey64 = $key64.OpenSubKey("SOFTWARE\Microsoft\Windows\CurrentVersion\Uninstall")

                foreach ($subKeyName in $uninstallKey64.GetSubKeyNames()) {
                    $subKey = $uninstallKey64.OpenSubKey($subKeyName)
                    $displayName = $subKey.GetValue("DisplayName")
                    if ($displayName -and $displayName -eq $ProductName) {
                        Write-Log "  64bit (.NET): 見つかりました - $displayName (ID: $subKeyName)"
                        if (-not ($productIds | Where-Object { $_.ProductId -eq $subKeyName })) {
                            $productIds += [PSCustomObject]@{
                                ProductId = $subKeyName
                                DisplayName = $displayName
                                Architecture = "64bit"
                            }
                        }
                    }
                    $subKey.Close()
                }
                $uninstallKey64.Close()
                $key64.Close()
            } catch {
                Write-Log "ERROR: .NETメソッドでの64bitレジストリアクセスに失敗: $_"
            }
        } else {
            # 64bitプロセスから実行されている場合
            Write-Log "64bitプロセスから実行されています。通常のPowerShellレジストリアクセスを使用します。"
            $reg64Items = Get-ChildItem -Path "Registry::HKLM\SOFTWARE\Microsoft\Windows\CurrentVersion\Uninstall" -ErrorAction SilentlyContinue
            foreach ($item in $reg64Items) {
                $prop = Get-ItemProperty -Path $item.PSPath -ErrorAction SilentlyContinue
                if ($prop.DisplayName -and $prop.DisplayName -eq $ProductName) {
                    Write-Log "  64bit: 見つかりました - $($prop.DisplayName) (ID: $($item.PSChildName))"
                    $productIds += [PSCustomObject]@{
                        ProductId = $item.PSChildName
                        DisplayName = $prop.DisplayName
                        Architecture = "64bit"
                    }
                }
            }
        }

        # 32bitレジストリも検索(WOW6432Node)
        Write-Log "32bitレジストリを検索中..."
        $reg32Items = Get-ChildItem -Path "Registry::HKLM\SOFTWARE\WOW6432Node\Microsoft\Windows\CurrentVersion\Uninstall" -ErrorAction SilentlyContinue
        foreach ($item in $reg32Items) {
            $prop = Get-ItemProperty -Path $item.PSPath -ErrorAction SilentlyContinue
            if ($prop.DisplayName -and $prop.DisplayName -eq $ProductName) {
                Write-Log "  32bit: 見つかりました - $($prop.DisplayName) (ID: $($item.PSChildName))"
                $productIds += [PSCustomObject]@{
                    ProductId = $item.PSChildName
                    DisplayName = $prop.DisplayName
                    Architecture = "32bit"
                }
            }
        }
    } else {
        # 32bitシステムの場合
        Write-Log "32bitシステムで実行されています"
        $regItems = Get-ChildItem -Path "Registry::HKLM\SOFTWARE\Microsoft\Windows\CurrentVersion\Uninstall" -ErrorAction SilentlyContinue
        foreach ($item in $regItems) {
            $prop = Get-ItemProperty -Path $item.PSPath -ErrorAction SilentlyContinue
            if ($prop.DisplayName -and $prop.DisplayName -eq $ProductName) {
                Write-Log "  見つかりました - $($prop.DisplayName) (ID: $($item.PSChildName))"
                $productIds += [PSCustomObject]@{
                    ProductId = $item.PSChildName
                    DisplayName = $prop.DisplayName
                    Architecture = "32bit"
                }
            }
        }
    }

    return $productIds
}

try {
    #
    # アンインストール処理ここから
    #
    if ($uninstall)
    {
        Write-Log "アンインストール処理を開始します"
        Write-Log "検索対象のDisplayName: '$label'"

        # レジストリ検索
        $productIds = @(Search-RegistryForProduct -ProductName $label)

        Write-Log "検索結果: $($productIds.Count)個の製品が見つかりました"

        if ($productIds.Count -eq 0) {
            Write-Error "レジストリにアプリケーションが登録されていません。"
            exit 1
        }

        # 複数見つかった場合の処理
        if ($productIds.Count -gt 1) {
            Write-Log "複数の製品が見つかりました:"
            $productIds | ForEach-Object {
                Write-Log "  - $($_.DisplayName) [ID: $($_.ProductId), Arch: $($_.Architecture)]"
            }
            # 64bit版を優先
            $selected = $productIds | Where-Object { $_.Architecture -eq "64bit" } | Select-Object -First 1
            if (-not $selected) {
                $selected = $productIds[0]
            }
            Write-Log "選択: $($selected.Architecture)版を使用します"
        } else {
            $selected = $productIds[0]
        }

        Write-Log "アンインストール対象: $($selected.DisplayName) [ID: $($selected.ProductId)]"

        # 取得した製品ID(Product ID)を使ってアンインストール実行
        $process = Start-Process -NoNewWindow -PassThru -Wait -FilePath "msiexec" -ArgumentList "/x", $selected.ProductId, "/qn"

        Write-Log "アンインストール終了コード: $($process.ExitCode)"

        # 正常終了または既にアンインストール済みの場合は成功とする
        if ($process.ExitCode -eq 0 -or $process.ExitCode -eq 1605) {
            Write-Log "アンインストールが正常に完了しました"
            exit 0
        } else {
            Write-Error "アンインストールに失敗しました。終了コード: $($process.ExitCode)"
            exit $process.ExitCode
        }
    }
    #
    # アンインストール処理ここまで
    #

    #
    # 以下インストール処理
    #
    Write-Log "インストール処理を開始します"

    $installerLabel = $label.replace(" ","")
    $installerName = "$installerLabel.msi"

    Write-Log "ダウンロード先: $installerName"
    Write-Log "ダウンロード元: $installerUrl"

    # プロキシ設定を取得(システムプロキシを使用)
    $proxy = [System.Net.WebRequest]::GetSystemWebProxy()
    $proxyUri = $proxy.GetProxy($installerUrl)

    if ($proxyUri -ne $installerUrl) {
        Write-Log "プロキシを使用します: $proxyUri"
        Invoke-WebRequest -UseBasicParsing -Uri $installerUrl -OutFile $installerName -Proxy $proxyUri -ProxyUseDefaultCredentials
    } else {
        Write-Log "直接接続でダウンロードします"
        Invoke-WebRequest -UseBasicParsing -Uri $installerUrl -OutFile $installerName
    }

    if (!(Test-Path $installerName)) {
        Write-Error "MSIファイルのダウンロードに失敗しました"
        exit 1
    }

    Write-Log "MSIファイルのダウンロードが完了しました"

    # MSI ファイルのインストールをサイレントモードで実行
    $arguments = @("/i", $installerName)

    # 追加引数が指定されている場合は追加
    if ($appendArguments -and $appendArguments.Trim() -ne "") {
        $additionalArgs = $appendArguments -split '\s+' | Where-Object { $_ }
        if ($additionalArgs -and $additionalArgs.Count -gt 0) {
            $arguments += $additionalArgs
            Write-Log "追加引数: $($additionalArgs -join ' ')"
        }
    }
    # 最後に /qn を追加
    $arguments += "/qn"

    Write-Log "インストールを実行します: msiexec $($arguments -join ' ')"
    $process = Start-Process -NoNewWindow -PassThru -Wait -FilePath "msiexec" -ArgumentList $arguments

    Write-Log "インストール終了コード: $($process.ExitCode)"

    # 一時ファイルを削除
    if (Test-Path $installerName) {
        Remove-Item $installerName -Force
        Write-Log "一時ファイルを削除しました"
    }

    # 終了コードをチェック
    if ($process.ExitCode -eq 0) {
        Write-Log "インストールが正常に完了しました"
        exit 0
    } elseif ($process.ExitCode -eq 3010) {
        Write-Log "インストールが完了しました(再起動が必要)"
        exit 3010
    } else {
        Write-Error "インストールに失敗しました。終了コード: $($process.ExitCode)"
        exit $process.ExitCode
    }

} catch {
    Write-Log "ERROR: 予期しないエラーが発生しました: $_"
    Write-Log "スタックトレース: $($_.ScriptStackTrace)"
    Write-Error "予期しないエラーが発生しました: $_"
    exit 1
} finally {
    Write-Log "=== SCRIPT END ==="
}
Intune の配布設定
上記スクリプトを格納した .intunewin ファイルを Intune にアップロードします。
配布設定は以下のように設定します。
プログラム
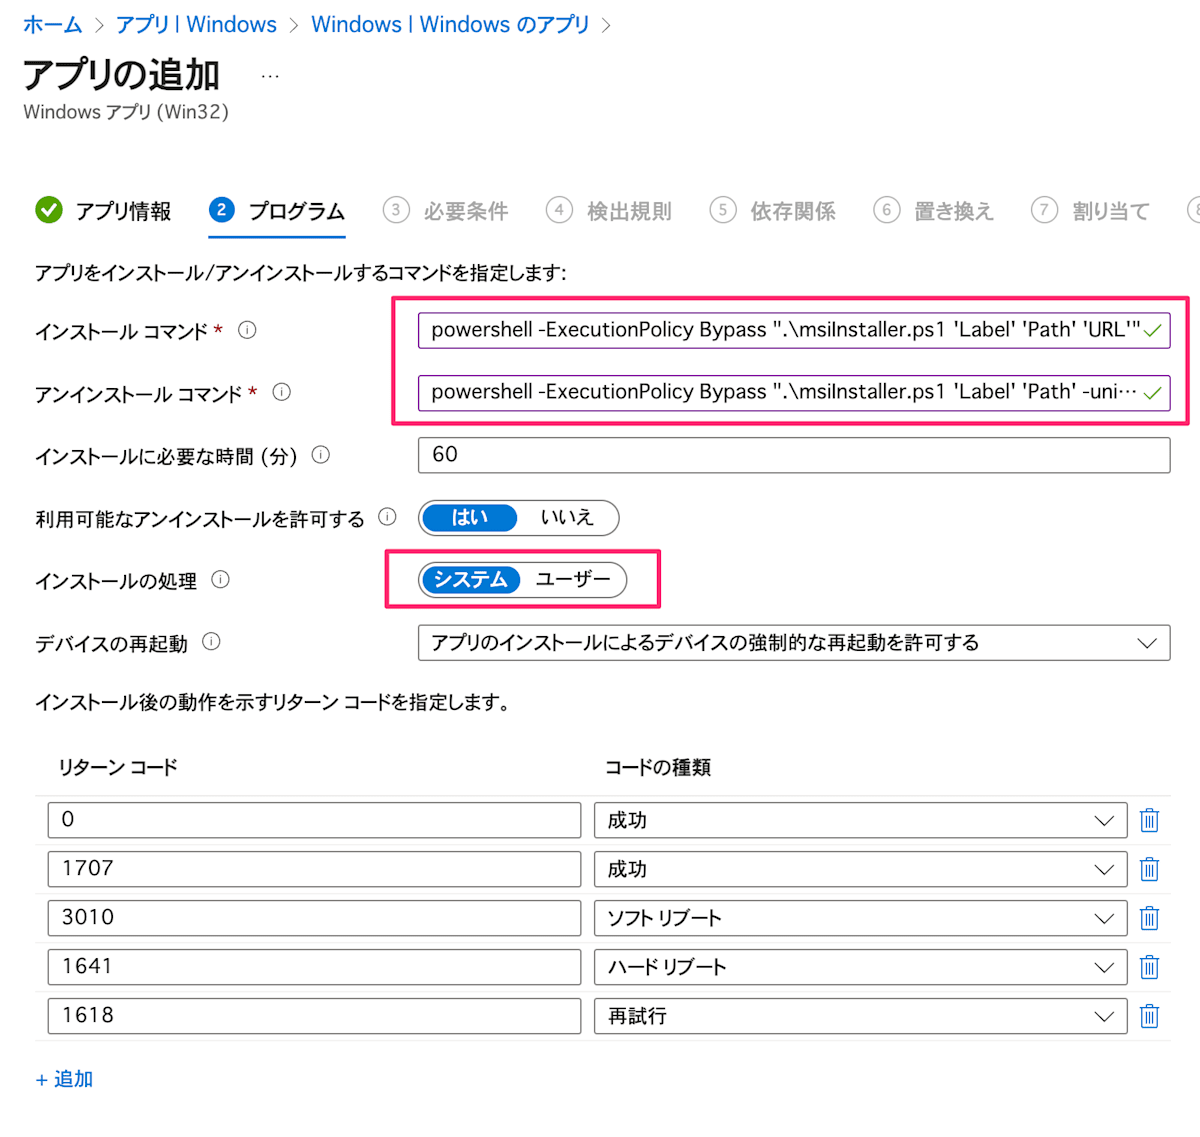
インストールコマンド
下記文字列を入力します。一部書き換えないといけない箇所があるので下表から置き換えてください。
powershell -ExecutionPolicy Bypass -File ".\msiInstaller.ps1" -label "$LABEL" -installerUrl "$URL" -appendArguments "$APPEND_ARGUMENTS"
| コマンド内の文字列 | 置き換える値 |
|---|---|
$LABEL |
事前準備で確認した「アプリケーションのタイトル」 |
$URL |
事前準備で確認した「MSI インストーラーの公開 URL」 |
$APPEND_ARGUMENTS |
MSI に追加で引数を渡したい場合はスペース区切りで入力。必要ない場合は -appendArguments ごと削除でOK |
例えば、例に挙げた Google Chrome や Zoom ではこんな感じです。
| アプリケーション | コマンド例 |
|---|---|
| Google Chrome (64bit) | powershell -ExecutionPolicy Bypass -File ".\msiInstaller.ps1" -label "Google Chrome" -installerUrl "https://dl.google.com/tag/s/appguid%3D%7B8A69D345-D564-463C-AFF1-A69D9E530F96%7D%26iid%3D%7B68387BA0-557D-F80F-58A1-9E5EDDE82361%7D%26browser%3D5%26usagestats%3D0%26appname%3DGoogle%2520Chrome%26needsadmin%3Dtrue%26ap%3Dx64-stable-statsdef_0%26brand%3DGCPK/dl/chrome/install/googlechromestandaloneenterprise64.msi" |
| Zoom (64bit) | powershell -ExecutionPolicy Bypass -File ".\msiInstaller.ps1" -label "Zoom Workplace (64-bit)" -installerUrl "https://zoom.us/client/latest/ZoomInstallerFull.msi?archType=x64" |
| 1Password | powershell -ExecutionPolicy Bypass -File ".\msiInstaller.ps1" -label "1Password" -installerUrl "https://downloads.1password.com/win/1PasswordSetup-latest.msi" -appendArguments "MANAGED_INSTALL=1 /norestart" |
アンインストールコマンド
下記文字列を入力します。一部書き換えないといけない箇所があるので、「インストールコマンド」項で挙げた対応表と同じものを入れてください。
powershell -ExecutionPolicy Bypass -File ".\msiInstaller.ps1" -label "$LABEL" -uninstall
例えば、例に挙げた Google Chrome や Zoom ではこんな感じです。
| アプリケーション | コマンド例 |
|---|---|
| Google Chrome (64bit) | powershell -ExecutionPolicy Bypass -File ".\msiInstaller.ps1" -label "Google Chrome" -uninstall |
| Zoom (64bit) | powershell -ExecutionPolicy Bypass -File ".\msiInstaller.ps1" -label "Zoom Workplace (64-bit)" -uninstall |
| 1Password | powershell -ExecutionPolicy Bypass -File ".\msiInstaller.ps1" -label "1Password" -uninstall |
インストールの処理
事前準備で確認した「アプリケーション本体のファイルパス」によって値を変えます。
- パスが
C:¥Users¥配下である場合:ユーザー - パスが上記以外の場合:
システム
検出ルール
前述の通り、アプリケーションのバージョンアップで Product ID が変わるので MSI ではなくファイルの有無で検出するように設定します。
その他の設定
特に特筆することがないので割愛します。
トラブルシューティング
スクリプトの実行に失敗し-isDebug オプションをつけてもログファイルが生成されないときは、文字コードを正しく指定てきていないことが多いです。
最後に
というわけで、MSI ファイルを Intune にアップロードすることなく自動で配布先から取得できるようにする方法を紹介しました。
ここまで書いて気づいたのですが、PowerShell を実行できる環境なら Intune じゃなくても動きますね…w。
記載した内容について何かありましたら、記事コメントか X/Twitter までご連絡ください。
Discussion