ShopifyのAPI機能や情報まとめ
ShopifyにはモックのストアのAPIがある
shopifyのAPIを叩くには、ヘッダーにX-Shopify-Access-Tokenにアクセストークンを付与する必要がある
shopify_python_apiは内部でpyactiveresourceを読んでいたり、更新頻度も少し遅い。また、APIクライアントとしてもそこそこまで速くない。
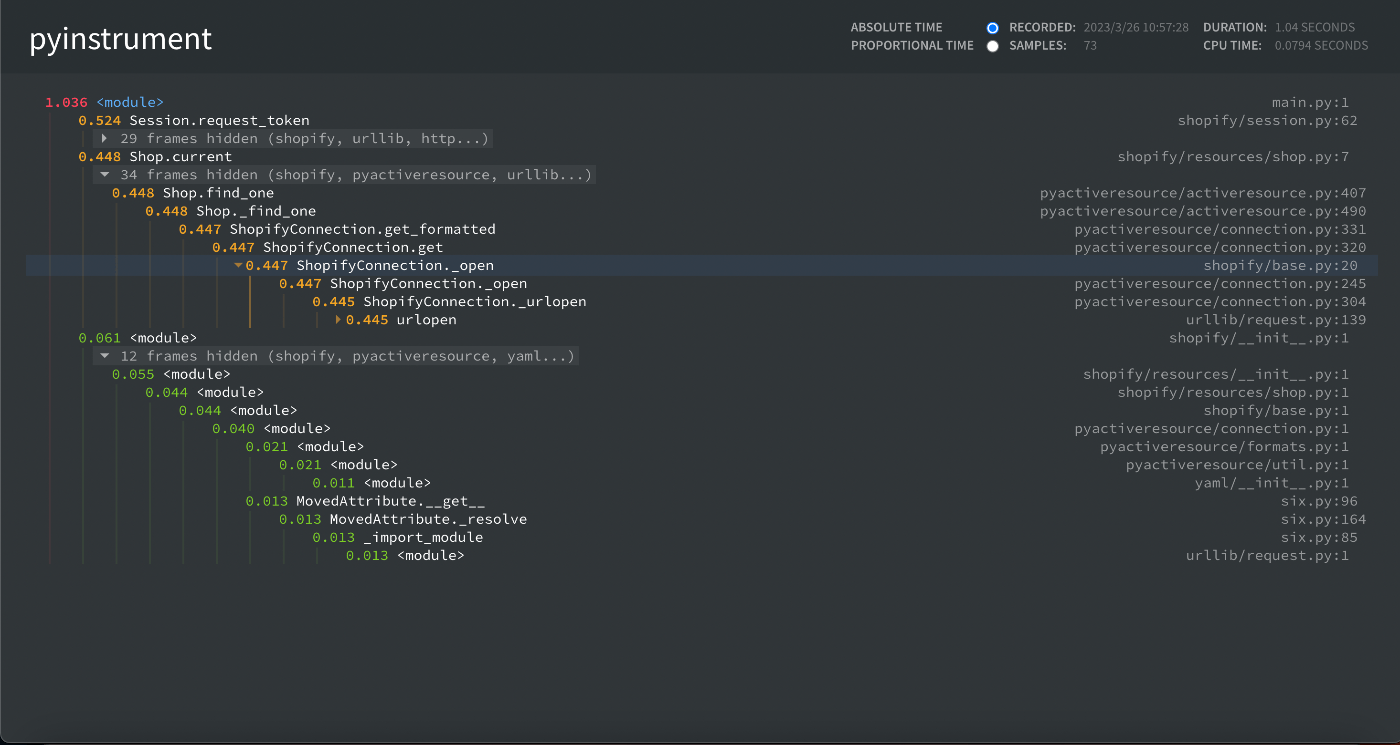
Pyinstrumentを駆使して、shopify_python_apiを使用した以下のコードをプロファイリングしてみた。
API_KEYとAPI_SECRETは環境ごとに違うので、それぞれで指定が必要。
import os
import shopify
import binascii

API_KEY: str = ""
API_SECRET: str = ""
shopify.Session.setup(api_key=API_KEY, secret=API_SECRET)

shop_url = "recustomer-test13.myshopify.com"
api_version = '2022-10'
state = binascii.b2a_hex(os.urandom(15)).decode("utf-8")
redirect_uri = "http://127.0.0.1:80"
scopes = ['read_products', 'read_orders']

newSession = shopify.Session(shop_url, api_version)
auth_url = newSession.create_permission_url(scopes, redirect_uri, state)
print("auth_url", auth_url)

# code: str = auth_url.split("code=")[1]
# print("code", code)
$ pyinstrument -r html init.py

import shopify
import urllib.parse
API_KEY: str = ""
API_SECRET: str = ""
shopify.Session.setup(api_key=API_KEY, secret=API_SECRET)
shop_url = "hogehoge.myshopify.com"
api_version = '2022-10'
session = shopify.Session(shop_url, api_version)
url: str = "http://127.0.0.1/?code={code}&hmac={hmac}&host={host}&shop={shop}&state={state}×tamp={timestamp}"
params: str = url.split("?")[1]
request_params: dict[str, str | int] = urllib.parse.parse_qs(params)
new_request_params: dict[str, str | int] = {}
print("request_params", request_params)
for key in request_params:
value = request_params[key][0]
new_request_params[key] = value
print("new_request_params", new_request_params)
access_token: str = session.request_token(new_request_params)
print("access_token", access_token)
session = shopify.Session(shop_url, api_version, access_token)
shopify.ShopifyResource.activate_session(session)
shop = shopify.Shop.current() # Get the current shop
print("shop", shop)
print("shop.dir", dir(shop))
$ pyinstrument -r html main.py
import shopify

access_token: str = "shpca_access_token"
product_id: int = 00123456789
shop_url: str = "hogehoge.myshopify.com"
api_version: str = '2022-10'

API_KEY: str = ""
API_SECRET: str = ""
shopify.Session.setup(api_key=API_KEY, secret=API_SECRET)

session = shopify.Session(shop_url, api_version, access_token)
shopify.ShopifyResource.activate_session(session)

shop = shopify.Shop.current() # Get the current shop
print("shop", shop)
print("shop.to_json", shop.to_json())
# to_dict

# product = shopify.Product.find(product_id) # Get a specific product
# print("product", product)

# execute a graphQL call
result = shopify.GraphQL().execute("{ shop { name id } }")
print("result", result)
$ pyinstrument -r html find.py

まとめ
shopify_python_apiはAPIを叩くのに、1秒ぐらいかかっている。基本的にPythonが動くサーバーサイドからAPIを叩くので、フロントエンドに結果を返すのも含めると、1秒もかかるのは流石に遅いと感じる。
PyCurlを使用した方が良い?
パフォーマンスを高める方法の一つの解決策として、PyCurlを使用する方法がある。PyCurl自体はlibcurlを使うためのPythonインタフェースであることから、C言語で作られていることもあり、かなり速い。
requestsとpycurlでshipifyAPIを叩いて比較してみる
Shopify Billing API
サブスクリプションなどの定期購読、従量課金などに便利なShopify Billing APIを提供している。
やりたいこと
アプリに使用量に応じた課金モデルを追加したい。
利用料金を定期購読プランと組み合わせたいと考えている。
アプリのサブスクリプションを作成する
appSubscriptionCreateミューテーションを使用する場合、cappedAmount フィールドを含める必要があります。
これは、Shopify の 30 日の課金サイクル内で、マーチャントに請求される使用量の上限を示すもの。
また、termsフィールドも含める必要があります。これは、マーチャントが料金プランを受け入れる際に確認されるものです。
ペイロードに含まれる AppSubscription.id と AppSubscriptionLineItem.id は、アプリの使用記録を作成するために使用されます。
使用状況に基づいてアプリのサブスクリプションを作成するには、appSubscriptionCreateミューテーションを使用します:
mutation {
  appSubscriptionCreate(
    name: "Super Duper Capped Pricing Plan"
    returnUrl: "http://super-duper.shopifyapps.com"
    lineItems: [{
      plan: {
        appUsagePricingDetails: {
          terms: "$1 for 100 emails"
          cappedAmount: { amount: 20.00, currencyCode: USD }
        }
      }
    }]
  ){
    userErrors {
      field
      message
    }
    confirmationUrl
    appSubscription {
      id
      lineItems {
        id
        plan {
          pricingDetails {
            __typename
          }
        }
      }
    }
  }
}
料金プランに課金モデルを組み合わせる
また、1回のミューテーションで、定期的な料金プランと利用料金プランを作成することができる。
mutation {
  appSubscriptionCreate(
    name: "Super Duper Capped Pricing Plan",
    returnUrl: "http://super-duper.shopifyapps.com",
    lineItems: [{
      plan: {
        appUsagePricingDetails: {
          terms: "$1 for 100 emails"
          cappedAmount: { amount: 20.00, currencyCode: USD }
        }
      }
    },
    {
      plan: {
        appRecurringPricingDetails: {
          price: { amount: 10.00, currencyCode: USD }
        }
      }
    }]
  ){
    userErrors {
      field
      message
    }
    confirmationUrl
    appSubscription {
      id
      lineItems {
        id
        plan {
          pricingDetails {
            __typename
          }
        }
      }
    }
  }
}
appRecurringPricingDetails
継続課金の価格詳細
appRecurringPricingDetails
利用課金の価格詳細
アプリの利用記録を作成する
利用料金プランを作成し、マーチャントがそのプランを受け入れたら、利用レコードを作成することができます。
使用記録には、appSubscriptionCreateミューテーションによって返されたAppSubscriptionオブジェクトのAppSubscriptionLineItem.idを含める必要があります。
アプリの使用記録を作成するには、appUsageRecordCreate ミューテーションを使用します。
mutation {
  appUsageRecordCreate(
    subscriptionLineItemId: "gid://shopify/AppSubscriptionLineItem/4019585080?v=1&index=0"
    description: "Super Mega Plan 1000 emails",
    price: { amount: 1.00, currencyCode: USD }
  ) {
    userErrors {
      field
      message
    }
    appUsageRecord {
      id
    }
  }
}