UnityにSQLCipherを導入して暗号化DBを使う
はじめに
UnityにSQLite-netを導入するの記事でSQLite-netとSQLiteの公式ライブラリを導入するとUnityからSQLiteを使えました。
ここから更にSQLiteをDBを暗号化できるSQLCipherを導入してみます。
SQLCipher自体は有償ですがCommunity EditionはOSSなので各プラットフォーム毎にビルドすると利用できます。
動作環境
以下の環境で動作確認しました。
- Unity: 2020.3.5f1をIL2CPPビルド
- OS
- Windows10
- Android
- Intel Mac
- iOS
SQLCipherを追加
Windows
sqlcipherをビルドする方法を調べるといくつか見付かりますが今はvcpkgやconanに登録されているので環境さえ整備すれば簡単にdllをビルドできます。
conan v2
お手軽版
-
conanをインストールします。
-
以下の内容で
conanfile.pyを用意します。conanfile.pyfrom conan import ConanFile from conan.tools.files import copy from conan.tools.layout import basic_layout class SQLCipherRecipe(ConanFile): settings = "os", "compiler", "build_type", "arch" def requirements(self): self.requires("sqlcipher/4.6.1", options={"shared": True}) def layout(self): basic_layout(self) def generate(self): for dep in self.dependencies.values(): dst_dir = self.build_folder copy(self, "*.dll", dep.cpp_info.bindirs[0], dst_dir) copy(self, "*.dylib", dep.cpp_info.libdirs[0], dst_dir) -
Developer Command Prompt for VS 2019を開き、conanfile.pyを置いたフォルダで以下のコマンドを実行します。conan install . --build=missing -
完了すると
build-releaseフォルダにライブラリがコピーされます。
サイズ削減版
-
conanとVisual Studioをインストールします。
-
以下の内容で
conanfile.pyを用意します。conanfile.pyfrom conan import ConanFile from conan.tools.files import copy from conan.tools.layout import basic_layout class SQLCipherRecipe(ConanFile): settings = "os", "compiler", "build_type", "arch" def requirements(self): openssl_options = { "no_bf": True, "no_camellia": True, "no_cast": True, "no_dh": True, "no_dsa": True, "no_ec": True, "no_ecdh": True, "no_ecdsa": True, "no_engine": True, "no_idea": True, "no_md4": True, "no_mdc2": True, "no_rc2": True, "no_rfc3779": True, "no_seed": True, "no_sock": True, "no_srp": True, "no_srtp": True, "no_ssl3": True, "no_tls1": True, "no_whirlpool": True } self.requires("openssl/3.3.1", options=openssl_options) self.requires("sqlcipher/4.6.1", options={"shared": True}) def layout(self): basic_layout(self) def generate(self): for dep in self.dependencies.values(): dst_dir = self.build_folder copy(self, "*.dll", dep.cpp_info.bindirs[0], dst_dir) copy(self, "*.dylib", dep.cpp_info.libdirs[0], dst_dir) -
Developer Command Prompt for VS 2019を開き、conanfile.pyを置いたフォルダで以下のコマンドを実行します。conan install . --build=missing -
完了すると
build-releaseフォルダにライブラリがコピーされます。
conan v1
お手軽版
-
conanをインストールします。
-
以下の内容で
conanfile.txtを用意します。[requires] sqlcipher/4.5.1 [options] sqlcipher:shared=True [imports] bin, *.dll -> ./bin lib, *.dylib* -> ./bin -
conanfile.txtを置いたフォルダで以下のコマンドを実行します。conan install . -
完了すると
binフォルダにライブラリがコピーされます。
サイズ削減版
-
conanとVisual Studioをインストールします。
-
以下の内容で
conanfile.txtを用意します。[requires] sqlcipher/4.5.1 [options] sqlcipher:shared=True # disable unused feature openssl:no_bf=True openssl:no_camellia=True openssl:no_cast=True openssl:no_dh=True openssl:no_dsa=True openssl:no_ec=True openssl:no_ecdh=True openssl:no_ecdsa=True openssl:no_engine=True openssl:no_idea=True openssl:no_md4=True openssl:no_mdc2=True openssl:no_rc2=True openssl:no_rfc3779=True openssl:no_seed=True openssl:no_sock=True openssl:no_srp=True openssl:no_srtp=True openssl:no_ssl3=True openssl:no_tls1=True openssl:no_whirlpool=True [imports] bin, *.dll -> ./bin lib, *.dylib* -> ./bin -
Developer Command Prompt for VS 2019を開き、conanfile.txtを置いたフォルダで以下のコマンドを実行します。conan install . --build=sqlcipher --build=openssl -
完了すると
binフォルダにライブラリがコピーされます。
vcpkg
-
Developer Command Prompt for VS 2019を開き、以下のコマンドを実行します。# 64bit版の場合 vcpkg install sqlcipher:x64-windows # 32bit版の場合 vcpkg install sqlcipher:x86-windows -
完了すると以下のフォルダにdllがコピーされます。
# 64bit版の場合
installed\x64-windows\bin\libcrypto-1_1-x64.dll
installed\x64-windows\bin\sqlcipher.dll

# 32bit版の場合
installed\x86-windows\bin\libcrypto-1_1.dll
installed\x86-windows\bin\sqlcipher.dll
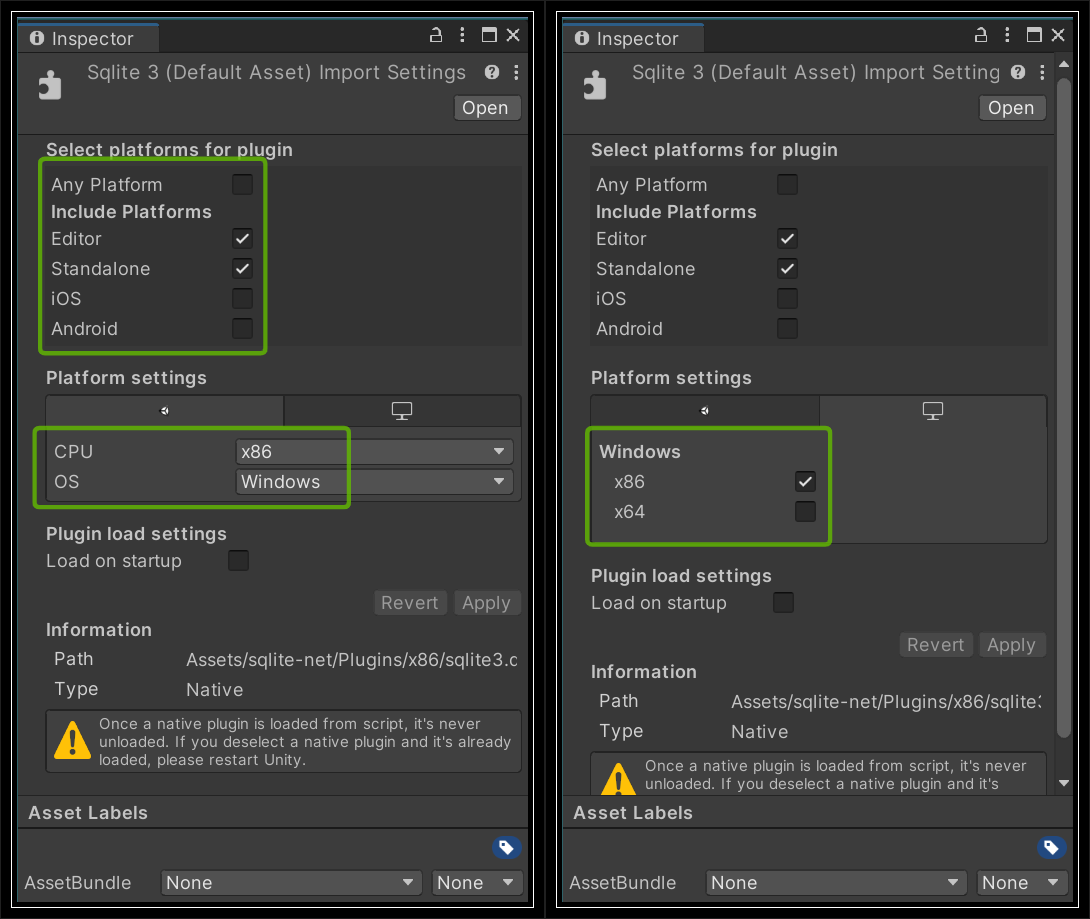
dllをインポート
ビルドが終わったらそれぞれ以下の2つのdllをUnityプロジェクトにコピーしてImport Settingsを設定します。
-
64bit版の場合
コピー先:
Plugins/x86_64/
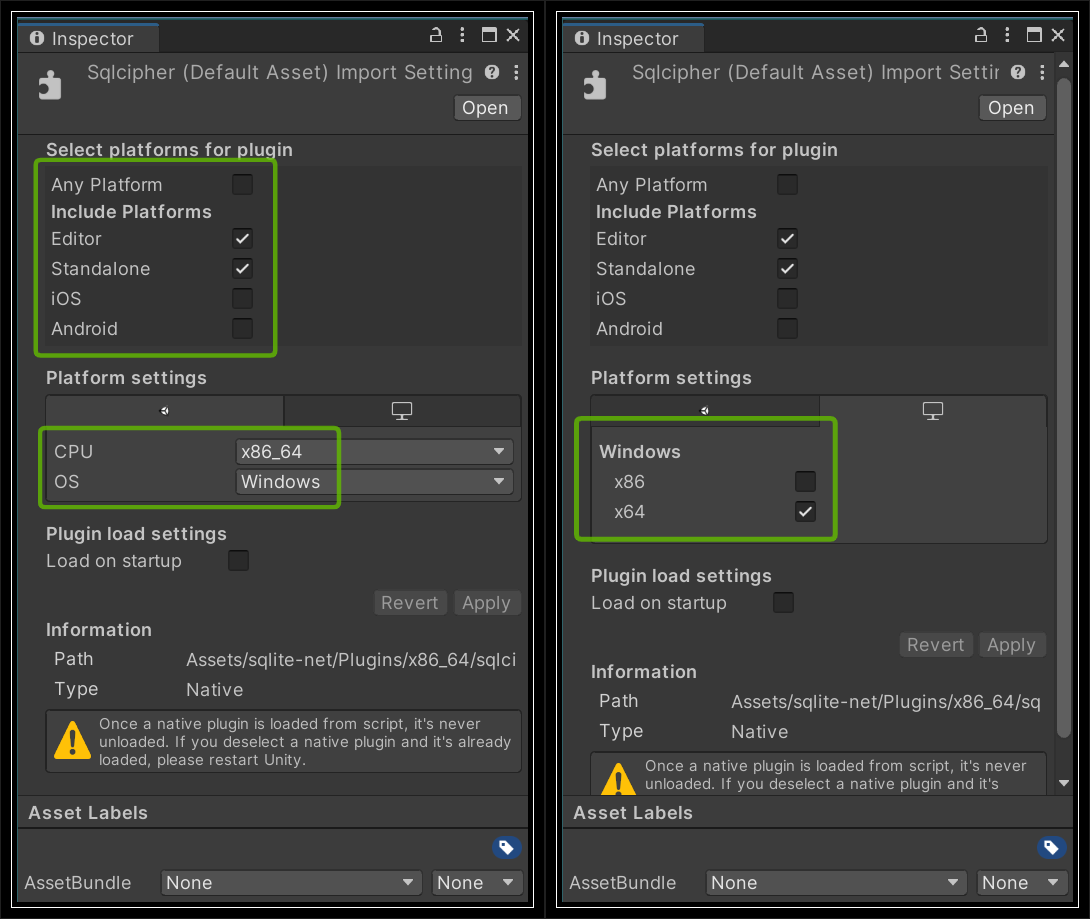
-
32bit版の場合
コピー先:
Plugins/x86/
Android
Androidはいくつかの導入方法があり、Gradleを利用、直接追加、自前ビルドの3つを紹介します。
Gradleを利用
公式ライブラリがmaven repositoryに登録されているのでドキュメント[1]と同じようにgradleを利用します。
この方法はビルド時にダウンロードするのでプロジェクトに追加しなくてもよいのが利点です。
-
Project Settings > Publishing Settingsの
Custom Main Gradle TemplateとCustom Gradle Properties Templateをチェックします。
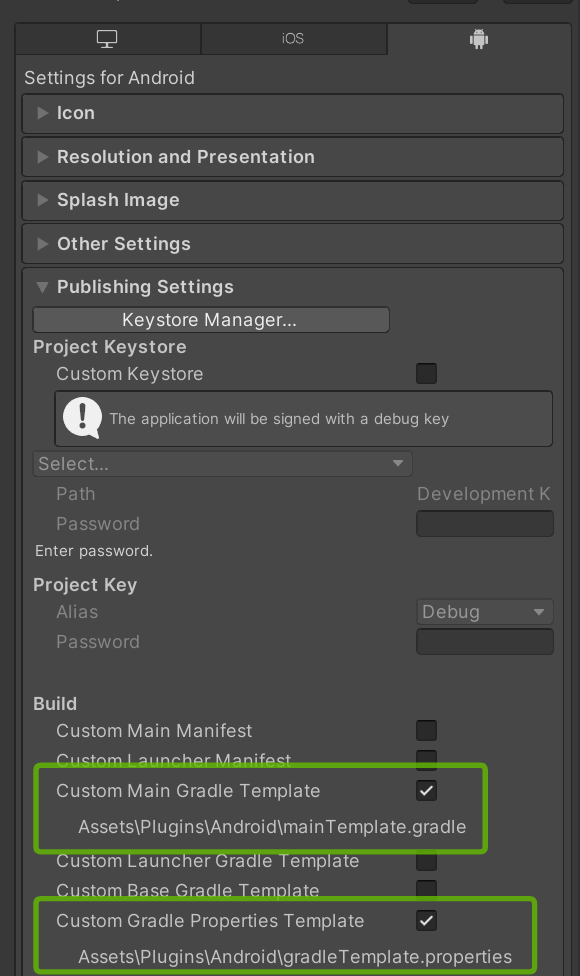
-
Plugins/Android/mainTemplate.gradleのdependenciesにライブラリを追加します。
--- a/Assets/Plugins/Android/mainTemplate.gradle 2021-04-25 15:08:06.515926300 +0900 +++ b/Assets/Plugins/Android/mainTemplate.gradle 2021-04-19 20:38:55.095754500 +0900 @@ -5,6 +5,8 @@ dependencies { implementation fileTree(dir: 'libs', include: ['*.jar']) + implementation 'net.zetetic:android-database-sqlcipher:4.5.1@aar' + implementation "androidx.sqlite:sqlite:2.0.1" **DEPS**} android { -
AndroidX[2]を使っているのでPlugins/Android/gradleTemplate.propertiesに
android.useAndroidX=trueを追加します。--- a/Assets/Plugins/Android/gradleTemplate.properties 2021-04-25 15:17:57.327076200 +0900 +++ b/Assets/Plugins/Android/gradleTemplate.properties 2021-04-25 15:17:35.993821900 +0900 @@ -1,5 +1,6 @@ org.gradle.jvmargs=-Xmx**JVM_HEAP_SIZE**M org.gradle.parallel=true android.enableR8=**MINIFY_WITH_R_EIGHT** +android.useAndroidX=true unityStreamingAssets=.unity3d**STREAMING_ASSETS** **ADDITIONAL_PROPERTIES**
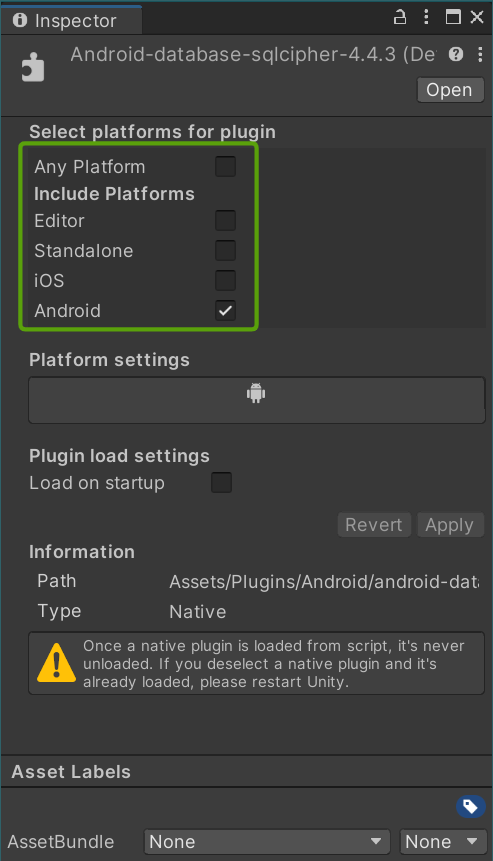
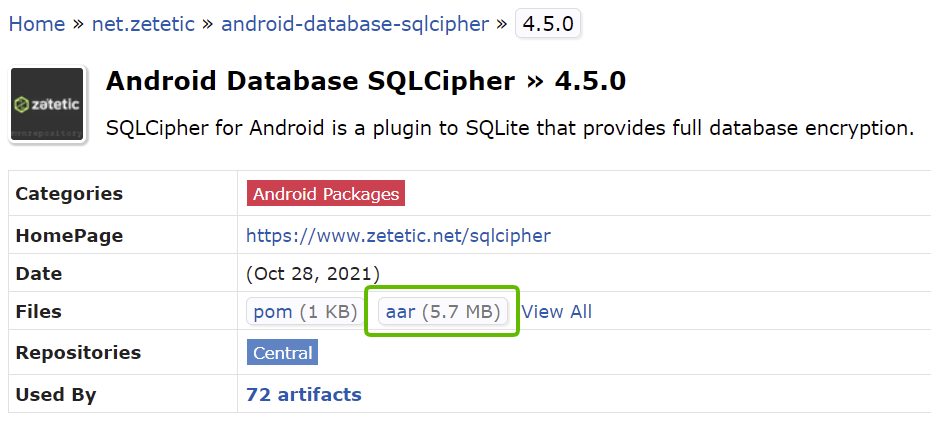
ライブラリを直接追加
この方法はGradleが分からなくてもとりあえず追加すればよいのが利点です。
- 以下のページからそれぞれライブラリをダウンロードします。
- Plugins/Android/にコピーしてImport Settingsを設定します。
自前ビルド
https://github.com/sjemens/sqlcipher のandroidブランチにビルドスクリプトがあるのでこれを利用するとJNIなしのlibsqlcipher.soを簡単にビルドできます。ですが公式ライブラリと比べてapkが100kb程度しか小さくならないのであまり利点がありません。
macOS/iOS
macOS/iOSはいくつかの導入方法があり、conan、自前ビルド、CocoaPodsの3つを紹介します。
conan v2 (macOSのみ)
お手軽版
Windowsと同じ手順でライブラリを取得できます。
サイズ削減版
-
conanをインストールします。
-
以下の内容で
conanfile.pyを用意します。conanfile.pyfrom conan import ConanFile from conan.tools.files import copy from conan.tools.layout import basic_layout class SQLCipherRecipe(ConanFile): settings = "os", "compiler", "build_type", "arch" def requirements(self): options = { "shared": True, "crypto_library": "commoncrypto" } self.requires("sqlcipher/4.6.1", options=options) def layout(self): basic_layout(self) def generate(self): for dep in self.dependencies.values(): dst_dir = self.build_folder copy(self, "*.dll", dep.cpp_info.bindirs[0], dst_dir) copy(self, "*.dylib", dep.cpp_info.libdirs[0], dst_dir) -
conanfile.pyを置いたフォルダで以下のコマンドを実行します。conan install . --build=sqlcipher -
完了すると
binフォルダにライブラリがコピーされます。
conan v1 (macOSのみ)
お手軽版
Windowsと同じ手順でライブラリを取得できます。
サイズ削減版
-
conanをインストールします。
-
以下の内容で
conanfile.txtを用意します。[requires] sqlcipher/4.5.1 [options] sqlcipher:shared=True sqlcipher:crypto_library=commoncrypto [imports] bin, *.dll -> ./bin lib, *.dylib* -> ./bin -
conanfile.txtを置いたフォルダで以下のコマンドを実行します。conan install . --build=sqlcipher -
完了すると
binフォルダにライブラリがコピーされます。
自前ビルド
https://github.com/jfcontart/SqlCipher4Unity3D_Apple にビルドスクリプトと野良バイナリがあるのでこれを利用できます。ですが非公式の配布ライブラリなので安全を取るなら自前ビルドをおすすめします。
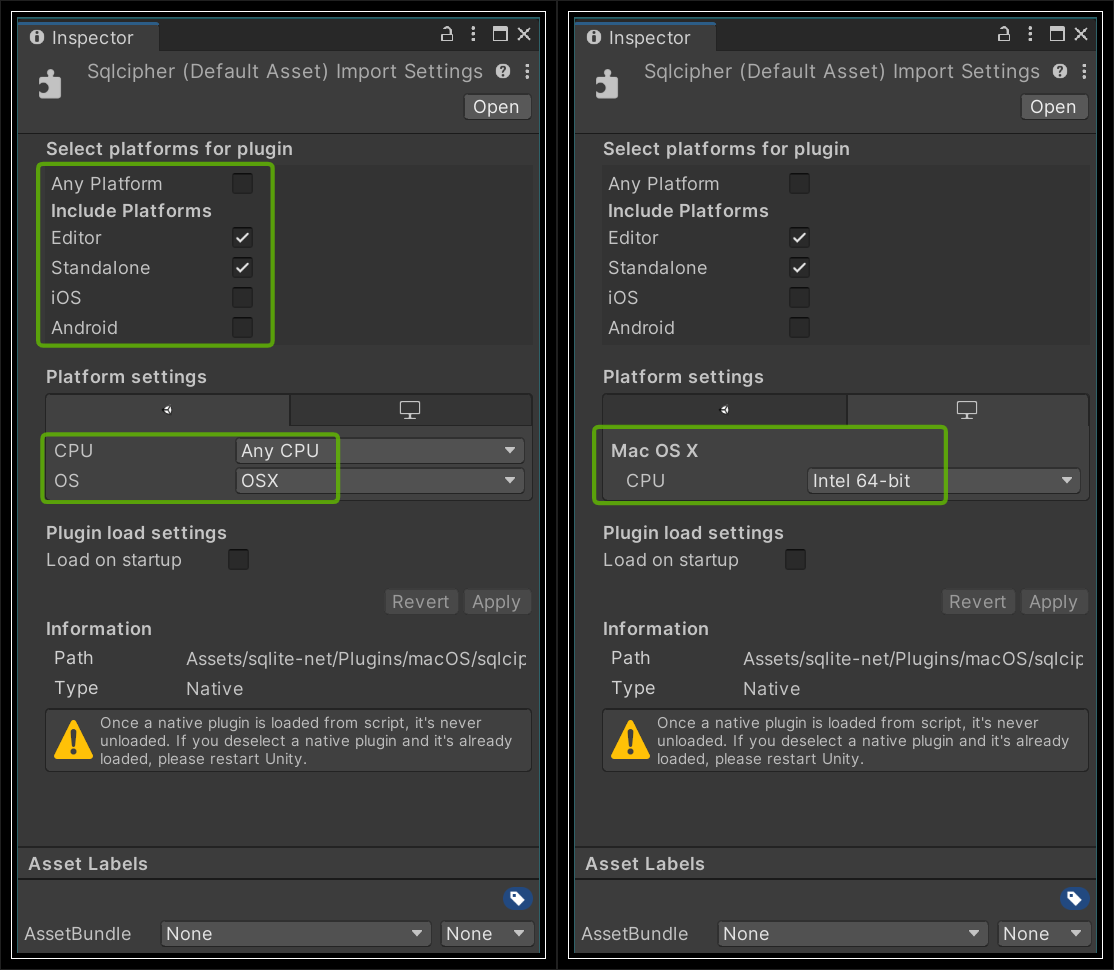
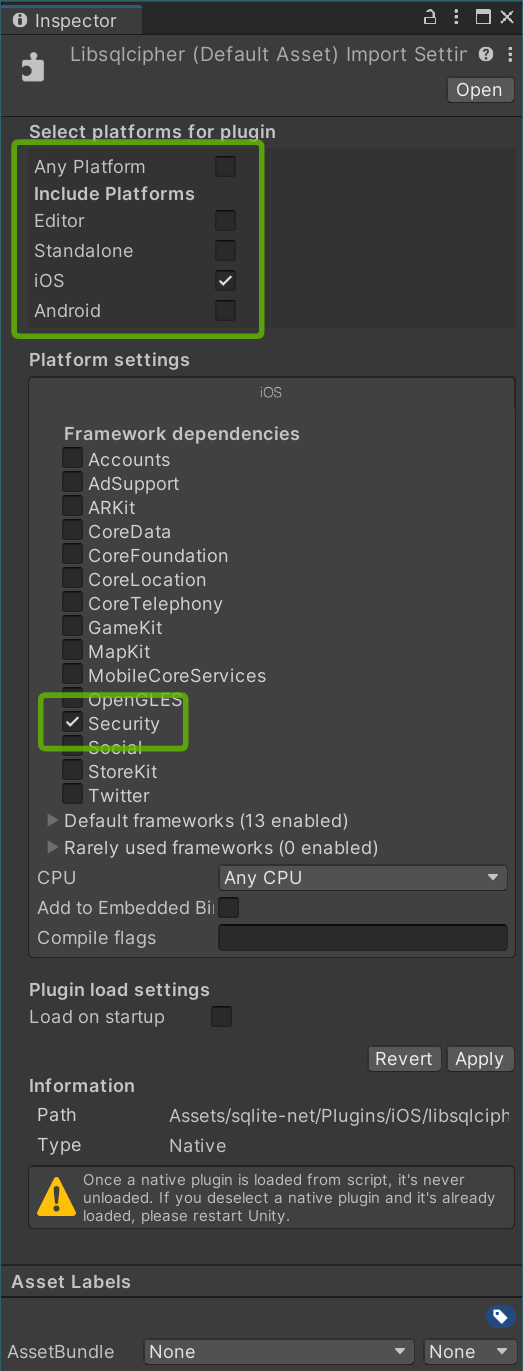
ライブラリをUnityプロジェクトにコピーしたらImport Settingsを設定します。
- Plugins/macOS/sqlcipher.bundleの場合
- Plugins/iOS/libsqlcipher.aの場合
CocoaPodsを利用
公式ライブラリがCocoaPodsに登録されているのでドキュメント[3]と同じようにiOSの場合はXCodeプロジェクトを出力した後にCocoaPodsを利用できます。
-
XCodeプロジェクトにPodfileを追加する
Podfiletarget 'UnityFramework' do pod 'SQLCipher', '~>4.5' end -
podをインストールする
pod install -
<ProductName>.xcworkspaceからXCodeを開いてビルドする
SQLite-netをSQLCipherに対応する
SQLite-netからsrc/SQLite.csとsrc/SQLiteAsync.csをコピーして以下の3つを修正します。
- パスワード変更メソッド追加
- iOS向けライブラリ名対応
- Windows専用関数対応
diff --git a/SQLite.cs b/SQLite.cs
index ee172b3..aa16a2d 100644
--- a/src/SQLite.cs
+++ b/src/SQLite.cs
@@ -390,6 +390,24 @@ namespace SQLite
 			ExecuteScalar<string> ("pragma key = \"x'" + s + "'\"");
 		}

+		public void SetReKey(string key)
+		{
+			if (key == null)
+				throw new ArgumentNullException(nameof(key));
+			var q = Quote(key);
+			ExecuteScalar<string>("pragma rekey = " + q);
+		}
+
+		public void SetReKey(byte[] key)
+		{
+			if (key == null)
+				throw new ArgumentNullException(nameof(key));
+			if (key.Length != 32 && key.Length != 48)
+				throw new ArgumentException("Key must be 32 bytes (256-bit) or 48 bytes (384-bit)", nameof(key));
+			var s = String.Join("", key.Select(x => x.ToString("X2")));
+			ExecuteScalar<string>("pragma rekey = \"x'" + s + "'\"");
+		}
+
 		/// <summary>
 		/// Enable or disable extension loading.
 		/// </summary>
@@ -4442,7 +4460,11 @@ namespace SQLite
 			Serialized = 3
 		}

-		const string LibraryPath = "sqlite3";
+#if ENABLE_IL2CPP && !UNITY_EDITOR
+		const string LibraryPath = "__Internal";
+#else
+		const string LibraryPath = "sqlcipher";
+#endif

 #if !USE_CSHARP_SQLITE && !USE_WP8_NATIVE_SQLITE && !USE_SQLITEPCL_RAW
 		[DllImport(LibraryPath, EntryPoint = "sqlite3_threadsafe", CallingConvention=CallingConvention.Cdecl)]
@@ -4478,8 +4500,10 @@ namespace SQLite
 		[DllImport(LibraryPath, EntryPoint = "sqlite3_config", CallingConvention=CallingConvention.Cdecl)]
 		public static extern Result Config (ConfigOption option);

+#if NETFX_CORE
 		[DllImport(LibraryPath, EntryPoint = "sqlite3_win32_set_directory", CallingConvention=CallingConvention.Cdecl, CharSet=CharSet.Unicode)]
 		public static extern int SetDirectory (uint directoryType, string directoryPath);
+#endif

 		[DllImport(LibraryPath, EntryPoint = "sqlite3_busy_timeout", CallingConvention=CallingConvention.Cdecl)]
 		public static extern Result BusyTimeout (IntPtr db, int milliseconds);
SQLite-netでパスワードを設定する
SQLCipherで暗号化DBを作る方法と従来のSQLiteでDBを作る方法の比較です。
SQLCipherではoptionでDBのパスとパスワードを設定しています。
パスワードはnullと32バイトのbyte[]とstringを指定可能で、nullはパスワードなしと同じ、32バイトのbyte[]はstringより速くなります。[4][5]
// SQLCipherでパスワードを設定する場合
var path = Path.Combine(Application.persistentDataPath, "database");
var password = "your-secret-password";
var option = new SQLiteConnectionString(database, true, password);
var db = new SQLiteConnection(option);
// 従来のSQLiteと同じパスワードなしの場合
var path = Path.Combine(Application.persistentDataPath, "database");
var db = new SQLiteAsyncConnection(path,
    SQLiteOpenFlags.Create | SQLiteOpenFlags.FullMutex | SQLiteOpenFlags.ReadWrite);
パスワードを変更する場合は追加したSetReKeyメソッドを使います。
// DBオープンと同時にパスワードを変更する場合
var path = Path.Combine(Application.persistentDataPath, "database");
var password = "old-secret-password";
void ReKey(SQLiteConnection conn)
{
    conn.SetReKey("new-secret-password");
}
var option = new SQLiteConnectionString(database, true, password, postKeyAction: ReKey);
var db = new SQLiteConnection(option);
// DBオープン後にパスワードを変更する場合
var path = Path.Combine(Application.persistentDataPath, "database");
var password = "old-secret-password";
var option = new SQLiteConnectionString(database, true, password);
var db = new SQLiteConnection(option);

// dbを開いている間ならいつでも可能
db.SetReKey("new-secret-password");
余談
本記事で導入したライブラリと同様のアセットにSQLCipher4Unity3Dがあります。違いは以下の3点です。
- sqlite-netのSQLite.csをclassやenum毎にファイル分割
- 各プラットフォームのネイティブラリブラリ同梱(バージョンは若干古い4.4.0)
- サンプルシーンとスクリプト同梱
sqlcipher4系は4.4.1以前と4.4.2以前に脆弱性[6][7]があるのでそのままの利用はおすすめできません。ですがサンプルシーンとスクリプトは実装の参考になると思います。
Discussion