【Processing】なんちゃって3Dで遊ぼう ~行列による座標変換~
はじめに
2Dの画面に3Dを描画することにロマンを感じませんか.私は感じます.描きましょう.

なお,「なんちゃって3D」とタイトルにあるのは,遠くのものが小さく見えるような処理がないからです.ガチガチの3Dモデルを描きたい!という方が求めるようなものはない可能性が高いですし,厳密性には欠けるかもしれません.
また,この記事は長野高専アドベントカレンダー2022の8日目の記事です.
環境
ジェネラティブアートの作品にしばしば使われるProcessingを使います.ProcessingはJavaベースの記法で簡単に図形を描画することができます.ダウンロードしてついてくるexeファイルを実行すればIDEが立ち上がり,すぐにコードを実行できます.
余談ですが,長野高専の情報技術研究部ではProcessingを用いてプログラミング入門しています.
原理
座標系
今回は,processingの
-
x -
y -
z
の座標系の世界で考えます.
正面から見る
画面上で,手前から奥が
今回の手法は点
もちろん,この方法で描画すると現実ではあり得ないような立体の見え方になってしまいます.
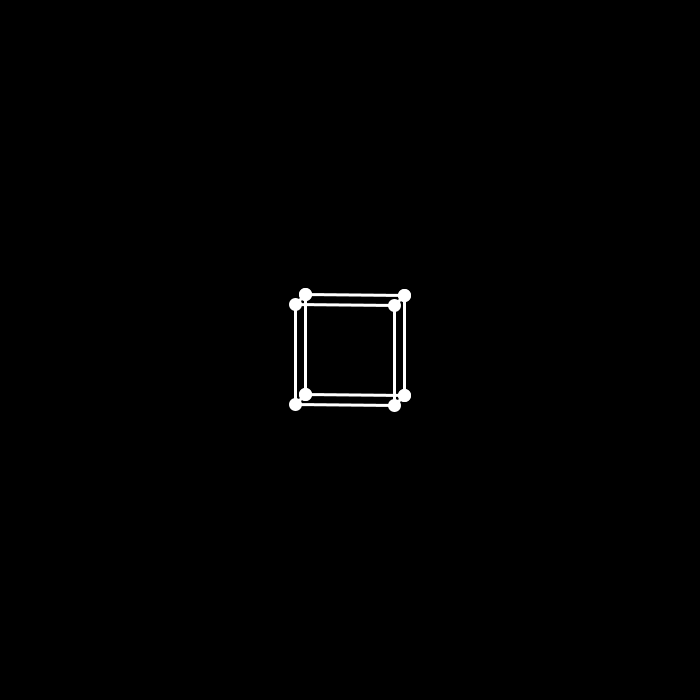
別の角度から見る
各辺が各座標軸と平行な立方体を先程の手法で描画すると,ただの正方形が描かれます.「これは真正面から見た立方体です!3Dです!」と主張するのは無理がありますね.しかし,斜めから見た場合を描画するのは簡単ではないです.そこで,別の角度から見た場合の処理は諦めます.代わりに,立体自身が回転してもらいます.視点が動くのではなく,見えてる物体が動き,実質視点が動いているように見える,という状態です.自分が動いているのではない,世界が動いているんだ.
z
では,ここから回転をさせる方法を考えていきます.いきなり立方体を回転させるのは難しいので,点を回転させることを考えます.立体図形は点の集まりだと考えれば良いです.立方体であれば,
まず,
なぜこうなるかは,ベクトルの
x,y
で表されます.
行列での表現
行列で表現しておくと,行列の積によって回転の組み合わせが行えるため,便利です.このような行列を回転行列と呼びます.
座標
平行移動
原点から離れた場所に立体を置いてから回転させると,回転の軸が原点を通っているため立体の場所が移動します.これは,その場で回転させたい場合に不便です.その場合は,
- 原点中心に立体を配置
- 欲しい角度に回転させる
- 平行移動させる
のステップが必要です.面倒ですね.スッキリさせたいです.
行列の次元数を
左の
このように行列の積を扱うことで,平行移動させて回転させて平行移動させて回転させて...みたいな複雑な座標変換も可能です.複数のオブジェクトを配置したあとに,視点を移動させるためにさらに平行移動と回転を加える,といったことができます.
このように座標を表すベクトルに行列を掛け算させるて座標を移動させることを座標変換といい,その行列のことを変換行列と呼びます.また,この掛け算をベクトルに変換行列を作用させる,といいます.
実装
- 行列の積
- 単位行列の生成
- 各軸周りの回転行列の生成
- 平行移動するための変換行列の生成
行列に関するプログラム
float[][] MatrixMul(float A[][], float B[][]) {
  float [][] Mat = new float [4][4];
  for (int i=0; i<4; i++) {
    for (int j=0; j<4; j++) {
      for (int k=0; k<4; k++) {
        Mat[i][j] += A[i][k]*B[k][j];
      }
    }
  }
  return Mat;
}

float[][] MatrixI() {
  float [][] Mat = new float [4][4];
  Mat[0][0] = 1;
  Mat[1][1] = 1;
  Mat[2][2] = 1;
  Mat[3][3] = 1;
  return Mat;
}


float[][] MatrixRotateX(float a) {
  float [][] Mat = new float [4][4];
  Mat[0][0] = 1;
  Mat[1][1] = cos(a);
  Mat[1][2] = -sin(a);
  Mat[2][1] = sin(a);
  Mat[2][2] = cos(a);
  Mat[3][3] = 1;
  return Mat;
}

float[][] MatrixRotateY(float a) {
  float [][] Mat = new float [4][4];
  Mat[0][0] = cos(a);
  Mat[0][2] = sin(a);
  Mat[1][1] = 1;
  Mat[2][0] = -sin(a);
  Mat[2][2] = cos(a);
  Mat[3][3] = 1;
  return Mat;
}

float[][] MatrixRotateZ(float a) {
  float [][] Mat = new float [4][4];
  Mat[0][0] = cos(a);
  Mat[0][1] = -sin(a);
  Mat[1][0] = sin(a);
  Mat[1][1] = cos(a);
  Mat[2][2] = 1;
  Mat[3][3] = 1;
  return Mat;
}

float[][] MatrixMove(Vector3D v) {
  float [][] Mat = new float [4][4];
  Mat[0][0] = 1;
  Mat[1][1] = 1;
  Mat[2][2] = 1;
  Mat[3][3] = 1;
  Mat[0][3] = v.x;
  Mat[1][3] = v.y;
  Mat[2][3] = v.z;
  return Mat;
}


void printMatrix(float[][] mat) {
  for (int i=0; i<4; i++) {
    for (int j=0; j<4; j++) {
      print(mat[i][j]);
      print(", ");
    }
    print("\n");
  }
}
また,Vector3Dクラスを作ります.行列を作用させた点を返すactMatrixメソッドも作っておきます.
Vector3Dクラス
class Vector3D {
  float x, y, z;
  Vector3D(float _x, float _y, float _z) {
    this.x = _x;
    this.y = _y;
    this.z = _z;
  }
  Vector3D actMatrix(float Mat[][]) {
    Vector3D p = new Vector3D(0, 0, 0);
    p.x = this.x * Mat[0][0] + this.y * Mat[0][1] + this.z * Mat[0][2] + Mat[0][3];
    p.y = this.x * Mat[1][0] + this.y * Mat[1][1] + this.z * Mat[1][2] + Mat[1][3];
    p.z = this.x * Mat[2][0] + this.y * Mat[2][1] + this.z * Mat[2][2] + Mat[2][3];
    return p;
  }
}
グローバル変数として,transformMatrixを用意してます.各描画関数ではtransformMatrixを作用させて得られる点を使って描画するようにします.次の例ではline3D関数を実装しています.また,時間tもグローバル変数として用意しておきます.
グローバル変数とline3D関数
float transformMatrix[][] = new float [4][4];
float t = 0;

void line3D(Vector3D p1, Vector3D p2) {
  Vector3D a1 = p1.actMatrix(transformMatrix);
  Vector3D a2 = p2.actMatrix(transformMatrix);
  //ellipse(a1.x, a1.y, 10, 10); 頂点
  //ellipse(a2.x, a2.y, 10, 10);
  line(a1.x, a1.y, a2.x, a2.y);
}
あとはdraw関数に適当な内容を書いて完成です.
適当な内容
void draw(){;
  t += 1;
  background(0);
  translate(width/2, height/2);

  int s = 50;
  transformMatrix = MatrixI();
  float mat1[][] = MatrixRotateX(t*0.1);
  float mat2[][] = MatrixRotateY(t*0.1);
  transformMatrix = MatrixMul(mat2, transformMatrix);
  transformMatrix = MatrixMul(mat1, transformMatrix);

  Vector3D p1 = new Vector3D(-s, -s, s);
  Vector3D p2 = new Vector3D(-s, s, s);
  Vector3D p3 = new Vector3D(s, s, s);
  Vector3D p4 = new Vector3D(s, -s, s);
  Vector3D p5 = new Vector3D(-s, -s, -s);
  Vector3D p6 = new Vector3D(-s, s, -s);
  Vector3D p7 = new Vector3D(s, s, -s);
  Vector3D p8 = new Vector3D(s, -s, -s);
  stroke(255);
  strokeWeight(3);
  line3D(p1, p2);
  line3D(p2, p3);
  line3D(p3, p4);
  line3D(p4, p1);
  line3D(p5, p6);
  line3D(p6, p7);
  line3D(p7, p8);
  line3D(p8, p5);
  line3D(p1, p5);
  line3D(p2, p6);
  line3D(p3, p7);
  line3D(p4, p8);
}
遊ぶ
キーボード(WASD)を押すと正八面体を回転させることができるサンプルです.
コピペで動きます.
コード全体
float t = 0;
float transformMatrix[][] = new float [4][4];
float alpha=0, beta=0, gamma=0;


float[][] MatrixMul(float A[][], float B[][]) {
  float [][] Mat = new float [4][4];
  for (int i=0; i<4; i++) {
    for (int j=0; j<4; j++) {
      for (int k=0; k<4; k++) {
        Mat[i][j] += A[i][k]*B[k][j];
      }
    }
  }
  return Mat;
}

float[][] MatrixI() {
  float [][] Mat = new float [4][4];
  Mat[0][0] = 1;
  Mat[1][1] = 1;
  Mat[2][2] = 1;
  Mat[3][3] = 1;
  return Mat;
}


float[][] MatrixRotateX(float a) {
  float [][] Mat = new float [4][4];
  Mat[0][0] = 1;
  Mat[1][1] = cos(a);
  Mat[1][2] = -sin(a);
  Mat[2][1] = sin(a);
  Mat[2][2] = cos(a);
  Mat[3][3] = 1;
  return Mat;
}

float[][] MatrixRotateY(float a) {
  float [][] Mat = new float [4][4];
  Mat[0][0] = cos(a);
  Mat[0][2] = sin(a);
  Mat[1][1] = 1;
  Mat[2][0] = -sin(a);
  Mat[2][2] = cos(a);
  Mat[3][3] = 1;
  return Mat;
}

float[][] MatrixRotateZ(float a) {
  float [][] Mat = new float [4][4];
  Mat[0][0] = cos(a);
  Mat[0][1] = -sin(a);
  Mat[1][0] = sin(a);
  Mat[1][1] = cos(a);
  Mat[2][2] = 1;
  Mat[3][3] = 1;
  return Mat;
}

float[][] MatrixMove(Vector3D v) {
  float [][] Mat = new float [4][4];
  Mat[0][0] = 1;
  Mat[1][1] = 1;
  Mat[2][2] = 1;
  Mat[3][3] = 1;
  Mat[0][3] = v.x;
  Mat[1][3] = v.y;
  Mat[2][3] = v.z;
  return Mat;
}


void printMatrix(float[][] mat) {
  for (int i=0; i<4; i++) {
    for (int j=0; j<4; j++) {
      print(mat[i][j]);
      print(", ");
    }
    print("\n");
  }
}


class Vector3D {
  float x, y, z;
  Vector3D(float _x, float _y, float _z) {
    this.x = _x;
    this.y = _y;
    this.z = _z;
  }
  Vector3D actMatrix(float Mat[][]) {
    Vector3D p = new Vector3D(0, 0, 0);
    p.x = this.x * Mat[0][0] + this.y * Mat[0][1] + this.z * Mat[0][2] + Mat[0][3];
    p.y = this.x * Mat[1][0] + this.y * Mat[1][1] + this.z * Mat[1][2] + Mat[1][3];
    p.z = this.x * Mat[2][0] + this.y * Mat[2][1] + this.z * Mat[2][2] + Mat[2][3];
    return p;
  }
}

void line3D(Vector3D p1, Vector3D p2) {
  Vector3D a1 = p1.actMatrix(transformMatrix);
  Vector3D a2 = p2.actMatrix(transformMatrix);
  ellipse(a1.x, a1.y, 10, 10);
  ellipse(a2.x, a2.y, 10, 10);
  line(a1.x, a1.y, a2.x, a2.y);
}

void ellipse3D(Vector3D p,float r){
  Vector3D a = p.actMatrix(transformMatrix);
  ellipse(a.x, a.y, r , r);
}


void setup() {
  size(500, 500);
  frameRate(50); // 50fpsでアニメーションする
}


void draw() {
  t += 0.1;
  background(0);
  translate(width/2, height/2);
  for(int i=1;i<=1;i++){
    int s = 70 + i*50;
    transformMatrix = MatrixI();
    float mat1[][] = MatrixRotateY(i*PI/2+alpha);
    float mat2[][] = MatrixRotateX(beta);
    float mat3[][] = MatrixRotateZ(gamma);
    transformMatrix = MatrixMul(mat1, transformMatrix);
    transformMatrix = MatrixMul(mat2, transformMatrix);
    transformMatrix = MatrixMul(mat3, transformMatrix);
    stroke(255);
    Vector3D p1 = new Vector3D (s,s,0);
    Vector3D p2 = new Vector3D (s,-s,0);
    Vector3D p3 = new Vector3D (-s,-s,0);
    Vector3D p4 = new Vector3D (-s,s,0);
    Vector3D p5 = new Vector3D (0,0,sqrt(2)*s);
    Vector3D p6 = new Vector3D (0,0,-sqrt(2)*s);
    line3D(p1,p2);
    line3D(p2,p3);
    line3D(p3,p4);
    line3D(p4,p1);
    line3D(p1,p5);
    line3D(p2,p5);
    line3D(p3,p5);
    line3D(p4,p5);
    line3D(p1,p6);
    line3D(p2,p6);
    line3D(p3,p6);
    line3D(p4,p6);
  }

}

void keyPressed(){
  if(key == 'd'){
    alpha += 0.1;
  }
  if(key == 'a'){
    alpha -= 0.1;
  }
  if(key == 'w'){
    beta += 0.1;
  }
  if(key == 's'){
    beta -= 0.1;
  }
}
余談
こちらのつぶやきProcessingは回転行列を作用させるような計算をして作りました.
あとがき
3Dで描画できる環境を使えばいい話なのですが,ロマンがありますね.
Discussion