latexindentの実践的な使い方&設定例
忙しい人向けのまとめ
- latexindent で真っ先にいじった方がよい箇所は
lookForAlignDelims,oneSentencePerLine,Poly-switches,Replacementsの4つ - その4つをいじるだけでデモでやっているような数式環境に対する実用的な format ができるようになる
- 手っ取り早く設定を丸パクリしたいなら私のGitHubにおいてある
.latexindent.yamlをコピると近いものが手に入る
前置き
latexindent はデフォルト設定ではほとんど仕事をしない. python でいう black のような, インストールして IDE と紐づければ後は勝手に仕事をしてくれるタイプの formatter ではない. 実際, 多くの機能はデフォルトではオフになっている. latexindent 導入の山場は, 必要な Perl モジュールのインストールではなく(あれも面倒なことは認める), 自分用の設定を書くパートにある. 有り難いことに(?), latexindent の設定項目は膨大であり, となるとやはり公式ドキュメントもそれなりのボリュームがある. それにも関わらず, 日本語の解説が非常に少ないため, ライトユーザーには厳しい状況のように思える(2023年執筆時点).
この記事は, その latexindent の使い方・設定に関する日本語の解説記事を意図して書いた. ただし, 入門的というよりはかなり実践的な内容になっている. latexindent の使い方 とかで入門的な知識を仕入れた人が次に読むとだいたい分かる, くらいのレベルのはず. (なお, これを書いている人間のバックグラウンドは数学なので, 紹介する内容もその方面に偏っている.)
"実践的"の意味するところは, ツールを現実に使う際の応用重視, というニュアンスだと思ってもらえば大体合っている. 教科書的な説明は良くも悪くも少ない. また, 取り上げる話題は, 相対的に少ない労力で多くのリターンが期待できるものに限定しているから包括的でもない.
デモ
この記事で紹介する適当な設定を行ったときに, latexindent がどの程度仕事をしてくれるのかを以下のデモで示す. それを見て興味が湧かなければ, その時点でブラウザバック&サヨナラで構わない. 実際, デモに出てくる以上のことはこの記事では解説されないので.
デモの実行環境は, 私のGitHub にあるVSCode用のTeXLive-Dockerイメージを使っている. latexindent の設定ファイル .latexindent.yaml もそこにある.
デモ1
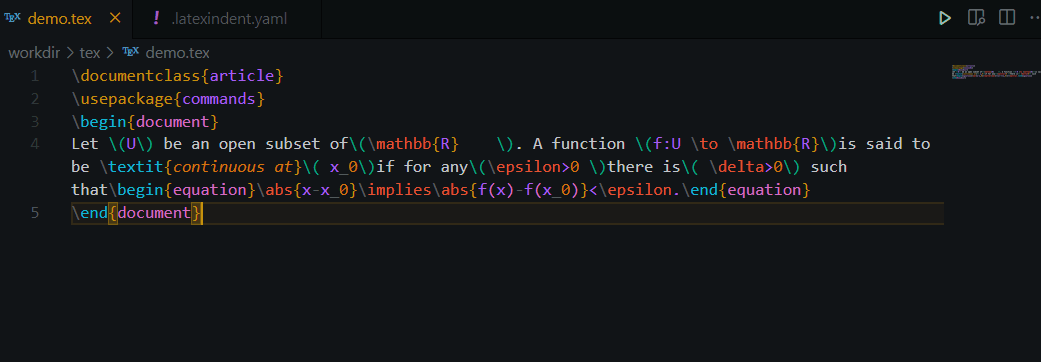
見やすさのために所々に改行を入れた. その箇所は \linebreak で明記してある.
Let \(U\) be an open subset of\(\mathbb{R}    \).\linebreak
A function \(f:U \to \mathbb{R}\)is said to be \textit{continuous at}\( x_0\)\linebreak
if for any\(\epsilon>0 \)there is\( \delta>0\)\linebreak
such that\begin{equation}\abs{x-x_0}\implies\abs{f(x)-f(x_0)}<\epsilon.\end{equation}
Let \( U \) be an open subset of \( \mathbb{R} \).
A function \( f:U \to \mathbb{R} \) is said to be \textit{continuous at} \( x_{0} \)\linebreak
if for any \( \epsilon > 0 \) there is \( \delta > 0 \) such that

\begin{equation}
    \abs{x - x_{0}} \implies \abs{f(x) - f(x_{0})} < \epsilon.
\end{equation}
- latexindent のデモ1でのお仕事 (対応する設定項目)
- ピリオド
.の後に改行を置く (oneSentencePerLine) - 数式環境
\begin \end {equation}を独立行に移し, 中身にインデントを与える (Poly-switches) - インライン数式環境
\( \)の開始直後と終了直前に space を1つだけ置く (Replacements) - インライン数式環境
\( \)とその前後の文章の間に space を1つだけ置く (Replacements) - 数式環境内の(不)等号・二項演算子の周りに space を1つだけ置く (
Replacements) - 隣接する
\commandの間に space を1つだけ置く (Replacements) - 数式環境内の subscript に braces
{}を補完する:x_0→x_{0}(Replacements)
- ピリオド
デモ2
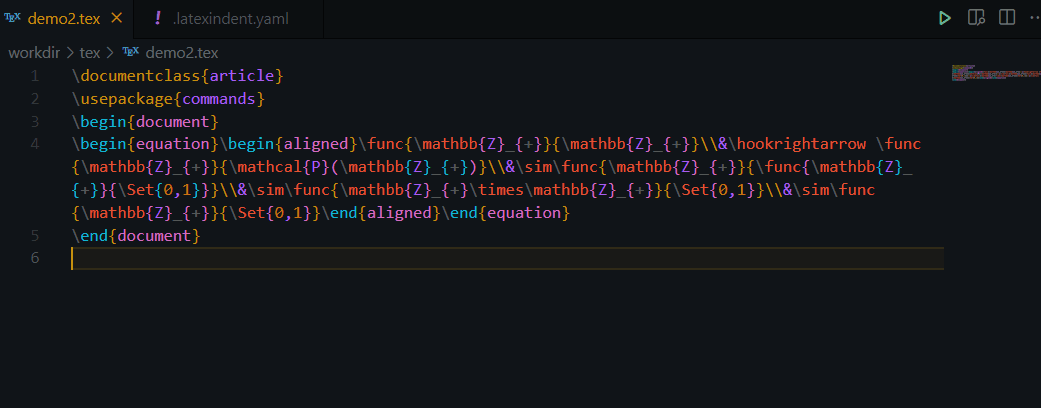
\begin{equation}\begin{aligned}\func{\mathbb{Z}_{+}}{\mathbb{Z}_{+}}\\ \linebreak
&\hookrightarrow \func{\mathbb{Z}_{+}}{\mathcal{P}(\mathbb{Z}_{+})}\\ \linebreak
&\sim\func{\mathbb{Z}_{+}}{\func{\mathbb{Z}_{+}}{\Set{0,1}}}\\ \linebreak
&\sim\func{\mathbb{Z}_{+}\times\mathbb{Z}_{+}}{\Set{0,1}}\\ \linebreak
&\sim\func{\mathbb{Z}_{+}}{\Set{0,1}}\end{aligned}\end{equation}
\begin{equation}
    \begin{aligned}
        \func{\mathbb{Z}_{+}}{\mathbb{Z}_{+}} \\
         &\hookrightarrow   \func{\mathbb{Z}_{+}}{\mathcal{P}(\mathbb{Z}_{+})} \\
         &\sim              \func{\mathbb{Z}_{+}}{\func{\mathbb{Z}_{+}}{\Set{0,1}}} \\
         &\sim              \func{\mathbb{Z}_{+} \times \mathbb{Z}_{+}}{\Set{0,1}} \\
         &\sim              \func{\mathbb{Z}_{+}}{\Set{0,1}}
    \end{aligned}
\end{equation}
- latexindent のデモ2でのお仕事 (既出内容は省略)
- 数式環境
\begin \end {equation}と\begin \end {aligned}を独立行に移し, ネストしたインデントを与える (Poly-switches) - aligned 環境において,
\\の位置でソースコードを改行する (lookForAlignDelims,Poly-switches) - aligned 環境において,
&\commandを一纏まりの区切り文字と認識して, それらを左揃えにする (lookForAlignDelims) - 区切り文字の後に続く文字列の開始地点を左揃えにする (
lookForAlignDelims) -
\\の位置は揃えない (lookForAlignDelims)
- 数式環境
デモ3
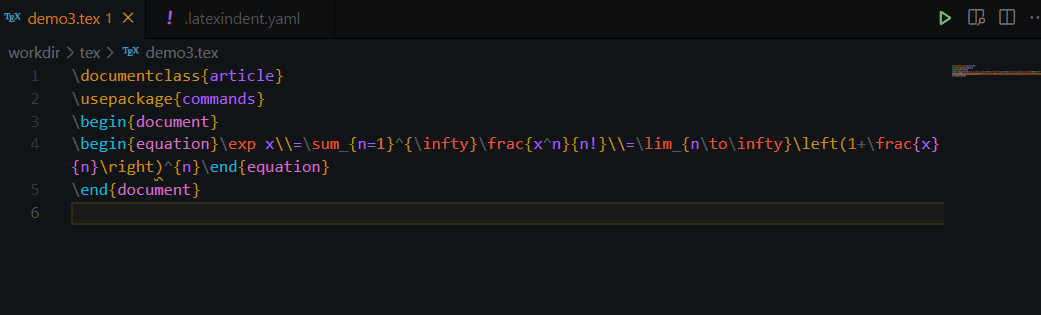
\begin{equation}\exp x\\ \linebreak
=\sum_{n=1}^{\infty}\frac{x^n}{n!}\\=\lim_{n\to\infty}\left(1+\frac{x}{n}\right)^{n}\end{equation}
\begin{equation}
    \exp x \\
    = \sum_{n = 1}^{\infty} \frac{x^{n}}{n!} \\
    = \lim_{n \to \infty} \left( 1 + \frac{x}{n} \right)^{n}
\end{equation}
- latexindent のデモ3でのお仕事 (既出内容は省略)
- aligned 環境でやった
\\による改行を equation 環境でもやる (lookForAlignDelims,Poly-switches) -
\left( \right)の開始直後と終了直前に space を1つだけ置く (Replacements)
- aligned 環境でやった
前提・予備知識
環境構築についてはほとんど書かない. latexindent の導入自体は済んでいると想定する.
latexindent 自体の予備知識としては, latexindent の使い方 の "Example of settings for latexindent" の手前までを読んで理解しているものとする. 自信のない人は上の記事は全て読むことを勧める. 本記事とは見解の異なる部分もあるが, その違いも含めて有益だと思う.
また, Replacements について深く理解したいなら正規表現と入門レベルの Perl の知識があるとよい.
上の記事と重複する部分もあるが, 設定ファイルの扱い方についてだけは重要項目を例示列挙しておく.
-
latexindent -vvで, デフォルト設定が書かれたdefaultSettings.yamlのパスが分かる -
defaultSettings.yamlはユーザー設定を書く際の元ネタであって, 直接編集するものではない. ユーザー設定ファイル(e.g.,.latexindent.yaml)にデフォルト設定を選択的に引用→上書きする. ユーザー設定ファイルに書かなかった項目は勝手にデフォルトが適用されるので, 変更項目だけをユーザー設定に書けばよい. - ユーザー設定ファイルは, ホームディレクトリに置く
.indentconfig.yamlを経由して指定するか(Docker環境ならこれが便利),-lスイッチで指定する - (Advanced) デフォルトでは, latexindent は tex ファイルだけでなく sty ファイル等にも働くことになっている. しかし, これらのファイルは互いに異なる syntax が用いられるのが通常なので, それぞれの拡張子に対して別々のユーザー設定ファイルを割り当てる方が自然. 特に, tex ファイルに対する設定と sty に対する設定は衝突しやすい.
latexindent の最優先設定項目
独断と偏見に基づき, 以下4つを挙げる.
lookForAlignDelims-
oneSentencePerLine(ModifyLineBreak) -
Poly-switches(ModifyLineBreak) Replacements
これは重要度順ではなく, 公式ドキュメントにおける出現位置順. 重要度は, 用途と latexindent 以外のツールの整備状況に依存するので一般に答えることは難しい(この中だと oneSentencePerLine を下に置く人が多いとは思う. 他は分からない).
これらを押さえるだけで, 他設定はデフォルトのままでも, 執筆環境の快適度の桁が上がるはず. それぞれがどのような役割を担うのか, ラフに述べておこう.
lookForAlignDelims
lookForAlignDelims は, 環境内の delimiter (たとえば, aligned 環境における &) と DBS(double back slash) \\ の位置関係を中心に, 環境内の他要素の format ルールを制御する. 自作環境も含め好きな環境を登録でき, 各環境ごとに delimiter の定義をユーザーが自由に正規表現で指定できる. つまり, 色々な環境内における format ルールを柔軟に設定できる.
たとえば,
\begin{aligned}
    x &< y \\
    &< \loooooooooooooongTerm \\
    &< w
\end{aligned}
というコードがあって, & や \\ の位置を揃えたいとしよう. 仕上がりの姿は書き手の好みに応じていくつかパターンが有り得る. いくつか例を挙げる. lookForAlignDelims はこのようなパターンのうちのどれを採用するかを, 各環境ごとに定めるものだ.
\begin{aligned}
    x &< y \\
      &< \loooooooooooooongTerm \\
      &< w
\end{aligned}
\begin{aligned}
    x &< y                      \\
      &< \loooooooooooooongTerm \\
      &< w
\end{aligned}
\begin{aligned}
    x &< y
   \\ &< \loooooooooooooongTerm
   \\ &< w
\end{aligned}
デモでは, delimiter=&\command として aligned 環境の要素を左揃えにしていた. ひとまず, lookForAlignDelims は, tabular や align 系のように & と \\ を典型的に持つ環境に対する format ルールだと思っておけばよい.
oneSentencePerL ine
oneSentencePerLine は, ModifyLineBreak というジャンルの中の1つ. 名前の通り, 自動で文章の終わりに改行を打ってくれる.
一文の開始パターンの定義と, 終了パターンの定義を, 必要なら正規表現で指定することができる. 非インライン数式環境外のソースコードの可読性に資する.
Poly-switches
厳密には, Poly-switches という名の設定項目は存在せず, ModifyLineBreak の中に poly-switches を持つ設定項目があるだけである. しかし, 便利なので, そのような設定項目のことを総称して Poly-switches と呼んでしまうことにする(というか既にそうしていた).
この項目内に登録した任意の環境の, 開始直前・開始直後・終了直前・終了直後のそれぞれに改行または空行を入れるかどうかを制御する. lookForAlignDelims が環境"内部"のレイアウトに関する format ルールであるのに対して, Poly-switches は環境の"境界部"の format ルールを定める.
たとえば,
before env
\begin{equation} 1+1=2. \end{equation}
after env
というコードがあって, これに適当に改行・空行を差し込んで整形したいとしよう. 仕上がりの姿は書き手の好みに応じていくつかパターンが有り得る. いくつか例を挙げる. Poly-switches はこのようなパターンのうちのどれを採用するかを, 各環境ごとに定める.
before env
\begin{equation}
    1+1=2.
\end{equation}
after env
before env
\begin{equation}
    1+1=2. \end{equation}
after env
before env

\begin{equation}
    1+1=2.
\end{equation}
after env
before env
\begin{equation}
1+1=2.
\end{equation}
after env
また, Poly-switches は lookForAlignDelims と連携して, DBS \\ の位置指定(行頭 or 行末), その前後における改行有無なども指定できる. この連携により, 環境の format ルールをよりきめ細やかに制御できる. デモにおいて, \\ の後に改行を入れていたのはこの機能を使った.
Replacements
Replacements は, latexindent の最も aggressive な機能. ユーザーの書いた正規表現による置換を実行する. 特定の数式環境のレイアウトは lookForAlignDelims や Poly-switches で調整できるが, 数式それ自体に対する format や特定の環境外にある文字列に対する format は Replacements に頼ることになる. 公式ドキュメントには書いてないが, 正規表現だけでなく Perl コードを書くこともできる.
デモの中の space を1つだけ挿入する系の操作は, ほとんど全てが Replacements によって実行されている.
各論と設定例
上で挙げた4つの項目の設定についての大雑把な説明と実践的な設定例を挙げていく.
詳細な説明は公式ドキュメントを参照のこと.
lookForAlignDelims
公式ドキュメントの該当箇所: 5.5. Aligning at delimiters.
概要は上で述べたばかりなので, そちらを参照.
設定概要
defaultSettings.yaml の該当部分を引用すると次のようになっている.
# default
lookForAlignDelims:
    tabular:
        delims: 1
        alignDoubleBackSlash: 1
        spacesBeforeDoubleBackSlash: 1
        multiColumnGrouping: 0
        alignRowsWithoutMaxDelims: 1
        spacesBeforeAmpersand: 1
        spacesAfterAmpersand: 1
        justification: left
        alignFinalDoubleBackSlash: 0
        dontMeasure: 0
        delimiterRegEx: (?<!\\)(&)
        delimiterJustification: left
        lookForChildCodeBlocks: 1
        alignContentAfterDoubleBackSlash: 0
        spacesAfterDoubleBackSlash: 1
    tabularx:
        delims: 1
    longtable: 1
    tabu: 1
        .
        .
        .
longtable: 1 などは簡易設定であって, これがオンオフのみを指定している. オンのときはデフォルトに従う.
tabular についてだけ詳細設定が例示されている. ちなみにこれがデフォルトの内容. このデフォルトを上書きしたいときだけ詳細設定を書けばよい.
詳細設定の全てを理解する必要はなく, 一旦以下を押さえればよい.
| Setting | Value | Description |
|---|---|---|
delims |
0/1 |
& を揃えるかどうか |
alignDoubleBackSlash |
0/1 |
\\ を揃えるかどうか |
spacesBeforeDoubleBackSlash |
n |
\\ 前の space の数 |
spacesBeforeAmpersand |
n |
& 前の space の数 |
justification |
left/right | delimiter で隔てた各セルを 左/右揃えのどちらにするか |
delimiterRegEx |
RegExp | delimiter の定義 |
delimiterJustification |
left/right | 長さの異なる delimiter 達は 左/右揃えのどちらにするか |
イメージしやすいように delimiter のことを & と書いたが, 実際の delimiter は delimiterRegEx においてユーザーが正規表現で指定する文字列のパターンであって, 必ずしも & とは限らない. たとえば, aligned 環境であれば & 単体よりも, &= や &\simeq などの, "&+二項関係記号"を delimiter として指定するのが自然だろう.
なお, delimiterRegEx: (?<!\\)(&) と例示されているように, delimiter をキャプチャするための () は必須である. これを忘れるとエラーは起こさないが意味不明な挙動をするのでかなり厄介.
設定例
デモで使った aligned 環境と equation 環境の設定例を以下で紹介する.
lookForAlignDelims:
    aligned:
      delims: 1
+     alignDoubleBackSlash: 0
-     alignDoubleBackSlash: 1
      spacesBeforeDoubleBackSlash: 1
      multiColumnGrouping: 0
      alignRowsWithoutMaxDelims: 1
      spacesBeforeAmpersand: 1
      spacesAfterAmpersand: 1
      justification: left
      alignFinalDoubleBackSlash: 0
      dontMeasure: 0
+     delimiterRegEx: (?<!\\)((?:&\\[a-zA-Z]+)|(?:&[\+\-\*=<>]?))   # e.g., &\command, &=
-     delimiterRegEx: (?<!\\)(&)
      delimiterJustification: left
      lookForChildCodeBlocks: 1
      alignContentAfterDoubleBackSlash: 0
      spacesAfterDoubleBackSlash: 0
    equation: # the same setting for equation*, gather and gather*
      delims: 1
+     alignDoubleBackSlash: 0
-     alignDoubleBackSlash: 1
      spacesBeforeDoubleBackSlash: 1
+     delimiterRegEx: 0^ # no delimiters
-     delimiterRegEx: 0
aligned 環境について. 二箇所変えた.
まず delimiterRegEx の定義を, コメントに書いてある通り, 先述した"&+二項関係記号"のパターンを含むように delimiter として指定している. & と次のコマンドの間の spacing 次第では false-positive を生む点だけ注意.
&\alpha + ...   # false-positive
& \alpha + ...  # true-negative
alignDoubleBackSlash を 0 にしているのは, 以下の例のように, ソースコード上の表記で長い式が来たときに, その式の末尾の位置に \\ が固定されるのを嫌ったためだ. 長い式の表示がエディタによって折り返されると短い式の末尾に大量の不要なスペースが生まれることになる.
\begin{equation}
    \begin{aligned}
        f(x) &= \loooooooooooooooooooooooongTerm \\
             &= \shorTerm                        \\
             &= 0
    \end{aligned}
\end{equation}
上に挙げた設定例の中で
equation:
    delims: 1
    alignDoubleBackSlash: 0
    spacesBeforeDoubleBackSlash: 1
    delimiterRegEx: 0^ # no delimiters
として, delimiter のない環境をあえて書いているのは, Poly-switches の DBSFinishesWithLineBreak が, lookForAlignDelims に挙げられている項目しか参照しない仕様になっているためだ. それに見つけてもらうために, equation などを delimiter は持たないが \\ は持ち得る環境として lookForAlignDelims の中に挙げている. つまり, ここに equation を書いた主たる目的は, この field に名前が挙がっているという事実が欲しかったから.
modifyLineBreaks
公式ドキュメントの該当箇所: 6. The -m (modifylinebreaks) switch.
その名の通り, 改行の操作を行う項目. latexindent に -m オプションを与えることで実行される.
ただし, 例のごとく, デフォルトでは以下のように既存の改行は消さない設定になっているので, あまり仕事はしない.
modifyLineBreaks:
    preserveBlankLines: 1
    condenseMultipleBlankLinesInto: 1
次以降の節で見る oneSentencePerLine と Poly-switches では, preserveBlankLines: 0 を前提として書く.
oneSentencePerLine
公式ドキュメントの該当箇所: 6.2. oneSentencePerLine: modifying line breaks for sentences.
設定概要
defaultSettings.yaml の該当部分を引用すると次のようになっている.
modifyLineBreaks:
    oneSentencePerLine:
        manipulateSentences: 0              # 0/1
        removeSentenceLineBreaks: 1         # 0/1
        multipleSpacesToSingle: 1           # 0/1
        textWrapSentences: 0                # 1 disables main textWrap
        sentenceIndent: ""
        sentencesFollow:
            par: 1                          # 0/1
            blankLine: 1                    # 0/1
            fullStop: 1                     # 0/1
            exclamationMark: 1              # 0/1
            questionMark: 1                 # 0/1
            rightBrace: 1                   # 0/1
            commentOnPreviousLine: 1        # 0/1
            other: 0                        # regex
        sentencesBeginWith:
            A-Z: 1                          # 0/1
            a-z: 0                          # 0/1
            other: 0                        # regex
        sentencesEndWith:
            basicFullStop: 0                # 0/1
            betterFullStop: 1               # 0/1
            exclamationMark: 1              # 0/1
            questionMark: 1                 # 0/1
            other: 0                        # regex
主要項目だけ触れておく.
-
manipulateSentences: 0→oneSentencePerLineのオン/オフ設定. デフォルトではオフ -
removeSentenceLineBreaks: 1→oneSentencePerLineが既存の改行を消去することを許可するかどうか. デフォルトはYES -
multipleSpacesToSingle: 1→ 連続した space を1つまとめるか. デフォルトはオン. -
sentencesFollow:→ 文と評価し得る文字列の前に出現するべき記号.exclamationMark: 1なら,!の後に続く文章は文として評価対象になる. -
sentencesBeginWith:→ 文の開始パターン.otherfiled に正規表現を書くことでルールを追加可能. -
sentencesEndWith:→ 文の終了パターン.-
betterFullStop: 1とすると,e.g.,などの略語中のピリオド.や特定パターンを後続に持つピリオドを一文の終了箇所とは評価しない.
-
設定例
コード以外の文章に強く依存する項目なので, 人のものを真似るというより, 用途に合わせて育てていくべき項目だと思う.
以下は, 数学等で ! を階乗の意味で使うことを念頭に置いたもの.
modifyLineBreaks:
    oneSentencePerLine:
        manipulateSentences: 1              # 0/1
        removeSentenceLineBreaks: 1         # 0/1
        multipleSpacesToSingle: 1           # 0/1
        sentencesBeginWith:
            A-Z: 1                          # 0/1
            a-z: 0                          # 0/1
+           other: 0                        # regex
-           other: ^\\\(                    # regex
        sentencesEndWith:
            basicFullStop: 0                # 0/1
            betterFullStop: 1               # 0/1
+           exclamationMark: 0              # 0/1
-           exclamationMark: 1              # 0/1
            questionMark: 1                 # 0/1
+           other: \\linebreak              # regex
-           other: 0                        # regex
この設定下では, 強調等の意味で ! を文末に使いたいときは, !\\linebreak と書くことになる.
文頭のインライン数式も一文の開始位置ということに設定した.
Poly-switches
公式ドキュメントの該当箇所: 6.3. Poly-switches.
設定概要
例のごとく, defaultSettings.yaml では, 何もしない設定になっている.
modifyLineBreaks:
        .
        .
        .
    environments:
        BeginStartsOnOwnLine: 0             # -1,0,1,2,3,4
        BodyStartsOnOwnLine: 0              # -1,0,1,2,3,4
        EndStartsOnOwnLine: 0               # -1,0,1,2,3,4
        EndFinishesWithLineBreak: 0         # -1,0,1,2,3,4
        equation*:
            BeginStartsOnOwnLine: 0         # -1,0,1,2,3,4
            BodyStartsOnOwnLine: 0          # -1,0,1,2,3,4
            EndStartsOnOwnLine: 0           # -1,0,1,2,3,4
            EndFinishesWithLineBreak: 0     # -1,0,1,2,3,4
Poly-switches for Environments
environments とは, \begin{env} \end{env} のような形式で書かれる env 全てを指す.
ここでの equation* は単なる例示で, environments で定めた一般則を, このような形で個別に上書きできることを示唆する.
以下, いくつかの点について大雑把な説明を行うが, 具体的な挙動例は公式ドキュメントに豊富にあるので, 必要に応じてそちらを参照されたい.
まず, 数字の意味について大雑把な解説をしておく. BeginStartsOnOwnLine を例に挙げる. 他3項目についても同様なので, 1項目について理解すれば十分. 以下のような状況を考える.
before env \begin{env} body \end{env} after env
このとき,
-
BeginStartsOnOwnLine:-
0= off → 何もしない. -
1= add →\begin{env}の手前に改行を入れる(既にあるなら何もしない). -
2= comment then add → 改行を行う際にbefore envの末尾に%を打つという仕様を足した1. -
3= add then blank line →\begin{env}の手前に空行を入れる(既に改行があるなら何もしない). -
4= add blank line →\begin{env}の手前に空行を入れる(既に空行があるなら何もしない). -
-1= remove →\begin{env}の前にある改行・空行を削除する.
-
2, 3 は before env の末尾に改行があるか否かで挙動が変わるという意味で, 繊細な所がある. より強制力の強い他の番号の使用を勧めたい.
一般則を定める environments においては, これら4項目は, 0 or 1 が安全だろう. 特に BodyStartsOnOwnLine: 3 or 4 はコンパイルエラーとなる環境があることは指摘しておくべきだろう(代表例はequation). その上で個別環境については, その環境の用途に応じて, 一般則を上書きすることも有り得る.
Poly-switches for double back slash (DBS)
実は, environments に対しては, 上の4項目に加えて DBSStartsOnOwnLine と DBSFinishesWithLineBreak という項目もある. これはなぜか defaultSettings.yaml には書かれていないようだが, 公式ドキュメントには記載がある. これらは 0 or 1 or 2 の値を取り, 意味は上述のものと同じ.
これらの DBS 系の項目を特定の環境 env に効かせるためには, lookForAlignDelims に env が登録されていなければならない.
たとえば, equation 環境に対して DBSFinishesWithLineBreak を設定したいなら, lookForAlignDelims に equation 環境を明記する必要がある.
なぜなら, equation 環境は元々 lookForAlignDelims の中にはいないからだ.
2つの DBS... のどちらかだけを 1 にするのが基本で, どちらを選ぶかは趣味の問題.
DBSStartsOnOwnLine: 1 とした場合は, lookForAlignDelims の中の alignContentAfterDoubleBackSlash なども追加の調整項目として挙がるだろう.
設定例
引き続き,
before env \begin{env} body \end{env} after env
を例として用いる.
これに
equation:
    BeginStartsOnOwnLine: 1
    BodyStartsOnOwnLine: 1
    EndStartsOnOwnLine: 1
    EndFinishesWithLineBreak: 1
を当てると
before env
\begin{env}
    body
\end{env}
after env
のような形になる. body がどれくらいインデントされるかは, defaultIndent: の値などに依存する(これはまた別の場所で定義されている).
以下, settingN.yaml, outputN.tex などが対応する設定と結果の組であるとして, いくつか例を挙げていく.
equation:
    BeginStartsOnOwnLine: 4
    BodyStartsOnOwnLine: 1
    EndStartsOnOwnLine: 1
    EndFinishesWithLineBreak: 4
before env

\begin{env}
    body
\end{env}

after env
このとき, after env は新しいパラグラフになることに注意. before env の後の空行はこのような副作用を持たない.
equation:
    BeginStartsOnOwnLine: 1
    BodyStartsOnOwnLine: 4
    EndStartsOnOwnLine: 4
    EndFinishesWithLineBreak: 1
before env
\begin{env}

    body

\end{env}
after env
equation 環境などでは, この空行はコンパイラに怒られるはず.
equation:
    BeginStartsOnOwnLine: 1
    BodyStartsOnOwnLine: 1
    EndStartsOnOwnLine: -1
    EndFinishesWithLineBreak: 1
before env
\begin{env}
    body \end{env}
after env
DBS の例も挙げておく.
before env \begin{env} x\\=y\\=z \end{env} after env
equation:
    BeginStartsOnOwnLine: 1
    BodyStartsOnOwnLine: 1
    EndStartsOnOwnLine: 1
    EndFinishesWithLineBreak: 1
    DBSStartsOnOwnLine: 0
    DBSFinishesWithLineBreak: 1
before env
\begin{env}
    x \\
    = y \\
    = z
\end{env}
after env
equation:
    BeginStartsOnOwnLine: 1
    BodyStartsOnOwnLine: 1
    EndStartsOnOwnLine: 1
    EndFinishesWithLineBreak: 0
    DBSStartsOnOwnLine: 1
    DBSFinishesWithLineBreak: 1
before env
\begin{env}
    x
    \\ = y
    \\ = z
\end{env}
after env
最後に, デモで使った環境の設定例を書く. 全項目がデフォルトから変更されている.
environments:
        BeginStartsOnOwnLine: 1             # -1,0,1,2,3,4
        BodyStartsOnOwnLine: 1              # -1,0,1,2,3,4
        EndStartsOnOwnLine: 1               # -1,0,1,2,3,4
        EndFinishesWithLineBreak: 1         # -1,0,1,2,3,4
        DBSStartsOnOwnLine: 0               # 0,1,2
        DBSFinishesWithLineBreak: 1         # 0,1,2
        document:
            BodyStartsOnOwnLine: 4          # -1,0,1,2,3,4
            EndStartsOnOwnLine: 4           # -1,0,1,2,3,4
        equation:
            BeginStartsOnOwnLine: 4         # -1,0,1,2,3,4
            BodyStartsOnOwnLine: 1          # -1,0,1,2,3,4
            EndStartsOnOwnLine: 1           # -1,0,1,2,3,4
            EndFinishesWithLineBreak: 1     # -1,0,1,2,3,4
私は, equation と gather 環境についてだけは, BeginStartsOnOwnLine: 4 として, 同環境とその前の文章を視覚的に見分けやすいようにしている. 同じ理由で EndFinishesWithLineBreak: 4 としたいが, 上述の副作用を嫌って不採用としている.
Replacements
その名の通り, 置換を行う項目. latexindent に -r オプションを与えることで実行される.
公式ドキュメントの該当箇所: 7. The -r, -rv and -rr switches.
設定概要
defaultSettings.yaml には次のような非常に単純な文字列置換が例示されているが, あまり使い所がないので, この単純版についてはスルーする.
replacements:
  -
    this: latexindent.pl
    that: pl.latexindent
    lookForThis: 0
    when: before
ここで取り上げるのは, 正規表現を用いた文字列置換. 以下の形式で書く.
正規表現のワンライナーでもよし, 正規表現で文字列を受けた後に Perl コードを書いてもよし.
replacements:
  -
    substitution: s/\h+/ /sg    # Regular Expression with replacement
    lookForThis: 1              # whether to run this
    when: after                 # run before/after indentation
  -
    substitution: |-                     # with Perl code
      s/(?<=\\\()\h*(.*?)\h*(?=\\\))/    # Regular Expression must be here
        my $body = $1;
        process $body as you like...
        $body/sxge;
    lookForThis: 1
    when: after
ちなみに, Perl コードを書けることは公式ドキュメント等では書かれていない. latexindent 開発者が Stack Exchange で Perl コードを含めた例を回答していたのを見て, 取り入れた.
注意事項・限界
注意事項
Replacements はプリアンブルと \begin{document} 以降の区別なく, ファイル内の全テキストに対して効く. コメントに対しても効く. したがって, 適用範囲を意識的に絞らないと, 意図しない置換やコンフリクトが起こりやすい. というか必ず起こると思った方がよい. 私の勧める対処法としては, tex ファイルを,
- プリアンブル
-
document環境- 別行数式環境(
equation等) - インライン数式環境
- (Optional)
%含むコメント環境 - その他のテキスト
- 別行数式環境(
と区分けして, それぞれの範囲にだけ効く置換ルールを定義すること. 冒頭で例に挙げた s/\h+/ /sg のようなファイル全体に渡って効く置換ルールはアンチパターンとすべきだと思う.
たとえば, 数式環境に限定せずにマイナス記号 - の周囲に space を差し込むような置換ルールは \usepackage{tikz-cd} や, "Hahn-Banach"等にも効いてしまう.
数式以外を対象とした置換ルールであったとしても, その適用範囲は広くても document 環境かプリアンブルのどちらかに限定した方がよい. 欲を言えば, プリアンブルを対象とする置換ルールは sty ファイルに対するルールとして, tex ファイルに対する置換ルールとは隔離した方がよい. つまり, 対象ファイルの拡張子ごとに異なる設定ファイルで管理した方がよい.
限界
Perl の文法全てがサポートされているわけではないらしい. 私が知る例としては, if($body =~ regexp) が動かなかった. また, モジュールを呼び出したり, 同じファイルの他所で定義した関数を呼び出すこともできない.
これらの事実と前述の注意事項の内容を踏まえると, latexindent の Replacements の枠組み内で頑張ってコードを書くメリットはお世辞にも多くはない. 簡易な正規表現以上のものが欲しくなったら, 他言語で専用のものを書く(あるいは有り物を探す)方に舵を切った方が良いだろう.
以下では, それなりに実用性のある簡易なもの紹介する.
設定例
document 環境内に作用するもの
substitution: |-
s/(?<=\\begin\{document\})(.*?)(?=\\end\{document\})/
my $body = $1;
# Condense consecutive white spaces into one
$body =~ s@\h{2,}@ @g;
# Remove leading and trailing white spaces in braces "{}"
$body =~ s@\{\h*(.*?)\h*\}@\{$1\}@g;
# Insert half-width space at every end of brace if it is followed by a command or a character
$body =~ s@(?<=\)|\}|])(\\?[0-9a-zA-Z])@ $1@g;
# Remove space before comma and punctuation
$body =~ s@\h*([,\.])@$1@g;
# Add space before "\" (excluding \left\rvert)
$body =~ s@(?<=\w|\})\\(?)@ \\@g;
$body;/sxge;
lookForThis: 1
when: before
一度 \begin{document} と \end{document} の間も文字列を抽出してから, 改めて目的の置換(たとえば, brace{} 内の始まりと終わりの space を削除する)を順に適用している. (1, 2行目を変更しないなら)置換ルールの変更や追加は $body =~ を変更したり新たに書き足したりすればよい. これは以下の例でも同様.
数式環境外の文字列に作用するもの
substitution: |- # text env is intended to be document env minus math env
    s/(?<=\\begin\{document\}|\\\)|\\end\{equation\}|\\end\{equation\*\}|\\end\{gather\}|\\end\{gather\*\})(.*?)(?=\\end\{document\}|\\\(|\\begin\{equation\}|\\begin\{equation\*\}|\\begin\{gather\}|\\begin\{gather\*\})/
    my $body = $1;
# Condense consecutive blank lines into one
    $body =~ s@(?:\h*\n\h*){2,}\n@\n\n@g;
    $body;/sxge;
lookForThis: 1
when: before
数式環境達の間にある文字列を抜き出しているだけなので, プリアンブルに数式環境を複数書くと意図しない動作をする場合がある.
また, インライン数式環境は \( \) だけしか定義に入れていないし, \[ \]も含まれていない.
インライン数式環境に作用するもの
substitution: |-
    s/(?<=\\\()\h*(.*?)\h*(?=\\\))/
    my $body = $1;
# Insert space at the beginning&end of inline math env
# \(x\) -> \( x \)
    $body = " ". $body . " ";
# Add braces to superscripts and subscripts
    $body =~ s@(\^|\_)([a-zA-Z0-9]+)@$1\{$2\}@g;
# Add a single space around + - = * /
    $body =~ s@\h*(?<![\{:])([\+\-=\/\*])(?![\}:])\h*@ $1 @g;
# Add space around <>
    $body =~ s@(?<!\\left|\\right)\h*(<|>)\h*(?!\\left|\\right)@ $1 @g;
    $body;/sxge
lookForThis: 1
when: after
例のごとく, インライン数式環境は \( \) だけしか定義に入れていない点に注意.
Replacements がプリアンブルやコメント等にも走ってしまうことを考慮すると $ インライン数式環境を適切にカバーするのは面倒.
行別数式環境に作用するもの
substitution: |-
    s/(\\begin\{(?:equation|gather)\*?\}[\h\n]*)(?<!\n)(.*?)(?!\h)([\h\n]*\\end\{(?:equation|gather)\*?\}[\h\n]*)/
    my ($begin, $body, $end) = ($1, $2, $3);
# name of environment that can come into equation or gather.
    my @envs = ("aligned","cases");
# choose only envs that are present in the body
        @envs = grep { contain_env($_, $body) } @envs;
# function to cut \begin\end in body and paste in $be and $en
    sub process_gather {
        my ($b, $c, $e, $be, $en) = @_;
        $$be .= $b;
        $$en = $e.$$en;
        return $c;
    }
# function to test if body contains \begin{env*?} statement
    sub contain_env {
        my ($env, $body) = @_;
        return index($body, "\\begin\{".$env) != -1;
    }
# recursively cut out \begin and \end from body and add them to $begin and $end
    while (1){
        foreach my $env (@envs){
            if (contain_env($env, $body)){
                $body =~ s@([\h\n]*?\\begin\{$env\*?\}[\h\n]*)(?<!\n)(.*?)(?!\h)([\h\n]*\\end\{$env\*?\}[\h\n]*)@process_gather($1, $2, $3, \$begin, \$end)@egxs;
                next;
            }
        }
        last;
    }
# add space around operators +-=/* if they are not paired with &
    $body =~ s@\h*(?<![&\{:])([\+\-=\/\*])(?![\:}&])\h*@ $1 @g;
# Add braces to superscripts and subscripts
    $body =~ s@(\^|\_)([a-zA-Z0-9]+)@$1\{$2\}@g;
# add space around <>
    $body =~ s@(?<!\\left|\\right)\h*(<|>)\h*(?!\\left|\\right)@ $1 @g;
# add space after \leftxxx
    $body =~ s@(\\left(?:\(|\[|\\\{|\.|\\l))\h*@$1 @g;
# remove blank line (this is mostly done by modifyLineBreaks)
    $body =~ s@(?:\h*\n\h*){2,}@\n@g;
    $begin . $body . $end /sxge;
lookForThis: 1
when: before
以下のように複数環境がネストされている場合が有り得るので, コアにある 1+1=2 を抜き出す前処理(~while文まで)がある.
\begin{equation}
    \begin{aligned}
        1+1=2
    \end{aligned}
\end{equation}
プリアンブルだろうが, コメントアウトされていようが, 全ての equation 環境が影響を受ける点に注意.
Discussion