NextjsのSSGを使ってGithub Pagesサイトを作成する
はじめに
この記事を読むと、以下の技術を使って静的サイトをデプロイする事ができます。
- Nextjs
- Github Pages
- Custom GitHub Actions Workflows
レポジトリを作る
Github Docsを参考に、レポジトリを作成します。
ここで注意するのは、レポジトリ名を必ず[user].github.ioまたは[organization].github.ioにしなくてはいけないということです。
リポジトリの名前と、任意で説明を入力してください。 ユーザーまたは Organization サイトを作成する場合は、リポジトリに [user].github.io または [organization].github.io という名前を付ける必要があります。 ユーザーまたは Organization の名前に大文字が含まれている場合は、小文字にする必要があります。 詳細については、「GitHub Pages について」を参照してください。
ローカルにcloneする
リポジトリを作成できたらcloneしましょう。URLはご自身のものに書き換えてくださいね。
git clone https://github.com/sev3e3e/sev3e3e.github.io.git
Nextjsを導入する
Create Next Appを使ってNextjsを導入します。
先程cloneしたレポジトリのフォルダへ移動します。その後Create Next Appを実行します。
cd sev3e3e.github.io
npx create-next-app@latest .
# or
yarn create next-app .
# or
pnpm create next-app .
皆さんのお好きなパッケージマネージャーを使用してください。私はyarnが好きなのでyarnを使いました。
コマンドを実行すると、TypeScript/ESLintをインストールするか聞かれます。
√ Would you like to use TypeScript with this project? ... No / Yes
√ Would you like to use ESLint with this project? ... No / Yes
今回はどちらもYesにします。TypeScriptやESLintの詳しい説明は省きますが、ざっと以下のような認識で大丈夫です。
TypeScript: 型有りJavaScript
ESLint: 変なコード書いたらエラーを出すツール
これも、お好みによって選択してください。
The directory [REPOSITORY NAME] contains files that could conflictエラーが発生
レポジトリを作った段階でREADME.mdを生成していると、以下のようなエラーが出ると思います。
yarn create next-app .
yarn create v1.22.17
[1/4] Resolving packages...
[2/4] Fetching packages...
[3/4] Linking dependencies...
[4/4] Building fresh packages...

success Installed "create-next-app@13.1.1" with binaries:
      - create-next-app
√ Would you like to use TypeScript with this project? ... No / Yes
√ Would you like to use ESLint with this project? ... No / Yes
The directory test contains files that could conflict:

  README.md

Either try using a new directory name, or remove the files listed above.
この場合はREADME.mdを一旦削除してから再度Create Next Appコマンドを実行してください。
成功すれば以下の画像のようなファイルが生成されます。
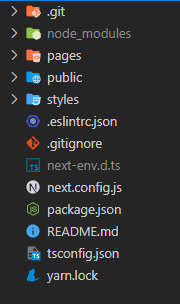
ここで一旦commitしておきましょう。
git add --all
commit -m "initial commit"
NextjsをSSG用に変更する
Nextjsも導入したし早速deployと行きたいところですが、SSGを使用する場合は追加の作業が必要です。
Nextjsのドキュメントに記載の通り、以下の機能はSSGでは使用できません。
- Image Optimization (default loader)
- Internationalized Routing
- API Routes
- Rewrites
- Redirects
- Headers
- Middleware
- Incremental Static Regeneration
- fallback: true
- getServerSideProps
一方Create Next Appコマンドで生成されるNextjsは、以下の機能が含まれています
- Image Optimization (default loader)
- API Routes
そのため、以下の手順を実行します。
-
pages\apiディレクトリの削除 -
next/imageをimgタグへ書き換え
それではやっていきましょう。
pages\apiディレクトリの削除
rm -r -fo pages\api
エクスプローラーやVSCodeから削除しても大丈夫です。
next/imageをimgタグへ書き換え
@@ -1,72 +1,68 @@
import Head from 'next/head'
-import Image from 'next/image'
import { Inter } from '@next/font/google'
import styles from '../styles/Home.module.css'
const inter = Inter({ subsets: ['latin'] })
export default function Home() {
return (
<>
<Head>
<title>Create Next App</title>
<meta name="description" content="Generated by create next app" />
<meta name="viewport" content="width=device-width, initial-scale=1" />
<link rel="icon" href="/favicon.ico" />
</Head>
<main className={styles.main}>
<div className={styles.description}>
<p>
Get started by editing
<code className={styles.code}>pages/index.tsx</code>
</p>
<div>
<a
href="https://vercel.com?utm_source=create-next-app&utm_medium=default-template&utm_campaign=create-next-app"
target="_blank"
rel="noopener noreferrer"
>
By{' '}
- <Image
+ <img
src="/vercel.svg"
alt="Vercel Logo"
className={styles.vercelLogo}
width={100}
height={24}
- priority
/>
</a>
</div>
</div>
<div className={styles.center}>
- <Image
+ <img
className={styles.logo}
src="/next.svg"
alt="Next.js Logo"
width={180}
height={37}
- priority
/>
<div className={styles.thirteen}>
- <Image
+ <img
src="/thirteen.svg"
alt="13"
width={40}
height={31}
- priority
/>
</div>
</div>
<div className={styles.grid}>
<a
href="https://nextjs.org/docs?utm_source=create-next-app&utm_medium=default-template&utm_campaign=create-next-app"
className={styles.card}
target="_blank"
rel="noopener noreferrer"
>
<h2 className={inter.className}>
Docs <span>-></span>
</h2>
<p className={inter.className}>
No img element警告を非表示にする
next/imageをimgタグに書き換えると、No img element警告が出ます。これは、next/imageを使っていないと出る警告です。
SSGではそもそもnext/imageが使えないので、この警告を表示させないようにしましょう。
eslintの設定ファイルを以下のように書き換えます。
@@ -1,3 +1,6 @@
 {
-  "extends": "next/core-web-vitals"
-}
+  "extends": "next/core-web-vitals",
+  "rules": {
+      "@next/next/no-img-element": "off"
+  }
+}
buildコマンドを変更
さて、ようやく準備が整いました。
SSG用に静的ファイルを生成するには、next exportコマンドを使用します。
@@ -4,7 +4,7 @@
   "private": true,
   "scripts": {
     "dev": "next dev",
-    "build": "next build",
+    "build": "next build && next export",
     "start": "next start",
     "lint": "next lint"
   },
next buildのみでよいのは、Nodejsで動くことを前提としたアプリケーションです。すなわち、SSRですね。
それを静的な物に変換するのがnext exportコマンドです。このコマンドを実行すると、Nodejsを必要としない、スタンドアロンなWebサイトを生成できます。
詳しくは以下のドキュメントを御覧ください。
変更をpushする
これでNextjsをSSGにすることが出来ました。
deployを進めるために、commitとpushを行いましょう。
git add --all
git commit -m "SSG化"
git push origin
勿論、VSCode内でやっても大丈夫です。
Github Pagesにdeployする
ようやくdeployです。
以下の記事を参考に、deployの設定 ~ yamlの生成を行います。
手順がまったく同じなため、詳細は割愛します。最終的に、以下のようなyamlが生成されます。
# Sample workflow for building and deploying a Next.js site to GitHub Pages
#
# To get started with Next.js see: https://nextjs.org/docs/getting-started
#
name: Deploy Next.js site to Pages

on:
  # Runs on pushes targeting the default branch
  push:
    branches: ["main"]

  # Allows you to run this workflow manually from the Actions tab
  workflow_dispatch:

# Sets permissions of the GITHUB_TOKEN to allow deployment to GitHub Pages
permissions:
  contents: read
  pages: write
  id-token: write

# Allow one concurrent deployment
concurrency:
  group: "pages"
  cancel-in-progress: true

jobs:
  # Build job
  build:
    runs-on: ubuntu-latest
    steps:
      - name: Checkout
        uses: actions/checkout@v3
      - name: Detect package manager
        id: detect-package-manager
        run: |
          if [ -f "${{ github.workspace }}/yarn.lock" ]; then
            echo "manager=yarn" >> $GITHUB_OUTPUT
            echo "command=install" >> $GITHUB_OUTPUT
            echo "runner=yarn" >> $GITHUB_OUTPUT
            exit 0
          elif [ -f "${{ github.workspace }}/package.json" ]; then
            echo "manager=npm" >> $GITHUB_OUTPUT
            echo "command=ci" >> $GITHUB_OUTPUT
            echo "runner=npx --no-install" >> $GITHUB_OUTPUT
            exit 0
          else
            echo "Unable to determine packager manager"
            exit 1
          fi
      - name: Setup Node
        uses: actions/setup-node@v3
        with:
          node-version: "16"
          cache: ${{ steps.detect-package-manager.outputs.manager }}
      - name: Setup Pages
        uses: actions/configure-pages@v2
        with:
          # Automatically inject basePath in your Next.js configuration file and disable
          # server side image optimization (https://nextjs.org/docs/api-reference/next/image#unoptimized).
          #
          # You may remove this line if you want to manage the configuration yourself.
          static_site_generator: next
      - name: Restore cache
        uses: actions/cache@v3
        with:
          path: |
            .next/cache
          # Generate a new cache whenever packages or source files change.
          key: ${{ runner.os }}-nextjs-${{ hashFiles('**/package-lock.json', '**/yarn.lock') }}-${{ hashFiles('**.[jt]s', '**.[jt]sx') }}
          # If source files changed but packages didn't, rebuild from a prior cache.
          restore-keys: |
            ${{ runner.os }}-nextjs-${{ hashFiles('**/package-lock.json', '**/yarn.lock') }}-
      - name: Install dependencies
        run: ${{ steps.detect-package-manager.outputs.manager }} ${{ steps.detect-package-manager.outputs.command }}
      - name: Build with Next.js
        run: ${{ steps.detect-package-manager.outputs.runner }} next build
      - name: Static HTML export with Next.js
        run: ${{ steps.detect-package-manager.outputs.runner }} next export
      - name: Upload artifact
        uses: actions/upload-pages-artifact@v1
        with:
          path: ./out

  # Deployment job
  deploy:
    environment:
      name: github-pages
      url: ${{ steps.deployment.outputs.page_url }}
    runs-on: ubuntu-latest
    needs: build
    steps:
      - name: Deploy to GitHub Pages
        id: deployment
        uses: actions/deploy-pages@v1
このままpushすれば、勝手にbuildが開始されます。
githubのプロジェクトページのActionsタブで詳細が確認できます。

コミットメッセージ横のアイコンでも確認ができます。

ymlをxmlと記述していて恥ずかしいです。
画像のように、緑のチェックマークであれば正常にbuildとdeployが完了しています。
やったね!🎉
動作確認
それでは本当にdeployされているのか確認しましょう。
URLは
https://[USERNAME].github.io/
です。私の場合は
ですね。リポジトリ名と一緒です。

🎉🎉🎉🎉🎉
終わりに
Custom GitHub Actions Workflowsは2022年の7月22日から提供が開始されているようなので、触ったことがない方もいらっしゃるかもしれません。
github blogにもある通り、発行元を設定する必要が無く簡単にサイトをデプロイすることができます。実際とっても簡単でした。
ちなみに、これが私の初めての記事です。記事を書くって大変なんですね。
scrapも公開しています。メモ書きなので見る必要も無いですが。
この記事が誰かの参考になれば嬉しいです。
Discussion