はじめに
CIなどによって自動化されたテストは大量のアウトプットを出力しますが、必ずしもViewerが提供されているともかぎりません。
弊社のE2Eテストも同様で、Github Actionsで実行されたPlaywrightのArtifactsは都度ローカルマシンにダウンロードして解凍して閲覧していました。
Artifactsがそれなりに大きなサイズであることもあって、これらをプライベートかつサクっと見れるwebサイトにできませんか?というご相談があり、今回やってみました。
今回のキーワード
- S3 Static Website Hosting
- AWSマルチアカウント構成
- Cloudflare Zero Trust(WARPを使わない&cloudflaredのみ)
- Google Workspace Groupによるアクセス制御
構成
AWSにインフラ管理しているアカウント(以降A)と対象のS3バケットのある開発用アカウント(以降B)の2つがあります。
Cloudflare Zero Trustはsite.example.netにアクセスしたクライアントをGoogleとのOauthによって認証します。その後、認証されたクライアントのリクエストをAアカウントのプライベートなネットワークにルーティングし、AアカウントのVPCからS3へのプライベートなアクセスを実現します。
登場した構成要素
- Aアカウント: インフラ管理用アカウント
- Cloudflare用トンネルサーバ
- S3へのVPCエンドポイント
- Bアカウント: 開発用アカウント
- S3静的ホスティングサイト
- Cloudflare Zero Trust:
- site.example.netの認証
- Aアカウントへのトンネル
- Google Workspace: Oauth認証のためのIDP
- Github Actions: E2Eテストのワークロード

【AWS】プライベートなS3静的ホスティングサイトの設定
静的ホスティングサイトとして利用するS3バケットを作成します。
今回バケット名はsite.example.netです。
【AWS】VPCの設定
VPC Endpoint
AアカウントにBアカウントのS3リソースに対してのプライベートなVPC Endpointを作成します。
構成管理にterraformを利用しているので下記のような出力になります。(idなどはマスクしています)
# aws_vpc_endpoint.site["production"]:
resource "aws_vpc_endpoint" "site" {
    arn                   = "arn:aws:ec2:ap-northeast-1:account_A_id:vpc-endpoint/vpcendpoint_id"
    cidr_blocks           = [
        "X.X.X.X/XX",
    ]
    dns_entry             = []
    id                    = "vpcendpoint_id"
    network_interface_ids = []
    owner_id              = "account_A_id"
    policy                = jsonencode(
        {
            Statement = [
                {
                    Action    = "*"
                    Effect    = "Allow"
                    Principal = "*"
                    Resource  = "*"
                },
            ]
            Version   = "2008-10-17"
        }
    )
    private_dns_enabled   = falsed
    requester_managed     = false
    route_table_ids       = [
        "account_A_production_private_routetable_id",
    ]
    security_group_ids    = []
    service_name          = "com.amazonaws.ap-northeast-1.s3"
    state                 = "available"
    subnet_ids            = []
    tags                  = {
        "Name"    = "site-example-net-production-endpoint"
        "env"     = "production"
        "service" = "site-example-net"
    }

    vpc_endpoint_type     = "Gateway"
    vpc_id                = "accont_A_vpc_id"

    timeouts {}
}
マネジメントコンソールから作るときは、下記を押さえておきます。
- サービスカテゴリはAWSのサービス
- サービス名はcom.amazonaws.ap-northeast-1.s3
- サービスのタイプはGateway
- ルートテーブルはプライベート環境用のものを作成・選択
S3 Bucket Access Policy
アカウントBにあるS3バケットのポリシーを編集して前述のEndpointからのアクセスを許可します。
以下はポリシーのjsonです。
{
    "Version": "2012-10-17",
    "Statement": [
        {
            "Sid": "AllowVPC",
            "Effect": "Allow",
            "Principal": "*",
            "Action": "s3:*",
            "Resource": [
                "arn:aws:s3:::site.example.net",
                "arn:aws:s3:::site.example.net/*"
            ],
            "Condition": {
                "StringEquals": {
                    "aws:SourceVpce": [
                        "account_A_vpc_endpoint_id"
                    ]
                }
            }
        }
    ]
}
【Cloudflare】 Cloudflare Accessの設定
Tunnel
アカウントAにあるEC2にcloudflaredをインストールしてCloudflare->AWSのトンネルを開通させます。
CloudflareのマネジメントコンソールにログインしZero Trustを選択、遷移先のダッシュボードの左メニューからNetworks/Tunnelsを選択して、あとはトンネル作成のナビゲーションに従うのみ。
下記のようにパッケージインストールのコマンドまで用意されています。
curl -L --output cloudflared.rpm https://github.com/cloudflare/cloudflared/releases/latest/download/cloudflared-linux-aarch64.rpm &&
sudo yum localinstall -y cloudflared.rpm &&
sudo cloudflared service install xxxxxxxxxxxxxxxxxxxxxxxxxxxxxxxxxxxx
今回はEC2インスタンスにcloudfalredをインストールしました。その状態のインスタンスでイメージを作成しAutoscalingGroupのテンプレートに組みこむことで冗長化しています。
Domain
作成したトンネルの設定を編集をして、PublicHostnameにレコードを追加します。
serivceのURLはS3バケットの静的ホスティングサイト設定にあるバケットウェブサイトエンドポイントを入力します。
- public hostname
- subdomain: site
- domain: example.net
- service
- type: http
- URL: site.example.net.s3-website-ap-northeast-1.amazonaws.com
※本記事ではexample.netとしていますが、本来はCloudflareでサイトとして登録したドメインから選びます。
Authentication
Google WorkspaceをIDPとしてsite.example.netのアクセスに対してOauth認証を設定します。
Zero Trustダッシュボードの左メニューsettingsからAuthenticationに遷移しLogin methodsのAdd newを選択します。あとはナビゲーションの通りに作成して連携ができます。
名前はgoogle_workspace_auth_01にしています。
Google WorkspaceによるSSO手順の公式ドキュメント
Application
最後にLogin methodsに追加した認証方法を用いて具体的にsite.example.netを閲覧可能なポリシーを設定していきます。
Zero Trustのダッシュボードの左メニューAccessからApplicationに遷移してAdd an applicationします。基本的には今まで作成したリソースを指定して埋めていきます。
- type: self-hosted
- ApplicationConfiguration
- ApplicationName: s3-private-static-hosting-site
- ApplicationDomain: site.example.net
- Authentication
- IdentityProviders: google_workspace_auth_01
Policies
ポリシーを作成します。
ポリシーでは個別のメールアドレスなどで許可することもできますが、今回、Google Workspaceと連携したのでGoogle Group情報によるアクセス制限を適用してみます。Google Groupであれば閲覧を許可したいユーザへのアタッチが簡単ですし非開発者に運用をお任せしやすいためオススメです。
- Configure rulesのSelectorプルダウンからGoogle Groupsを選択します。
- Valueにはアクセス許可したいGroupのメールアドレスを入力します。
- Add policyして完了です。
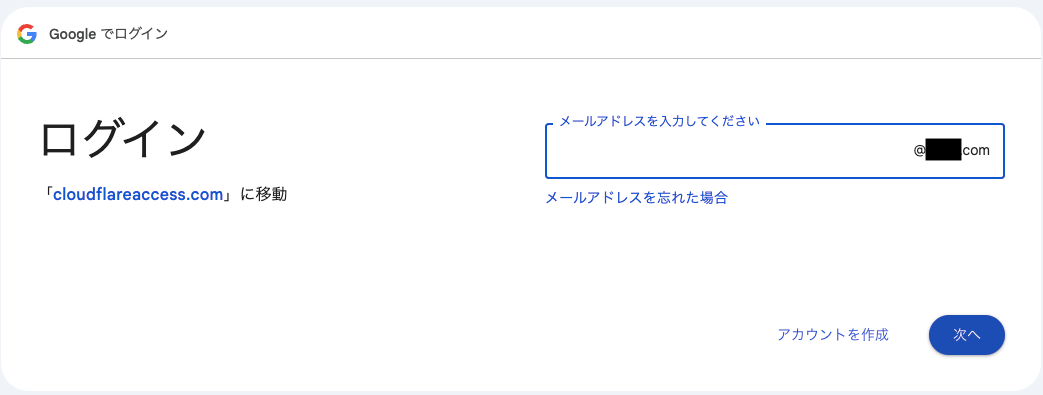
Test
Chromeのシークレットモードでsite.example.comにアクセスしてみたところ、無事Googleのログインが求められるようになりました。
【Github Actions】E2Eテストの結果をS3へアップロード
workflow.yml
最後、site.example.netのバケットへPlaywright Artifactsをアップロードするようにします。
いろいろ端折ってはいますが、.github/workflowsは下記のような感じで記述しています。STATIC_SITE_S3_BUCKET変数に入る値は、今回作成したsite.example.netのバケット名です。
jobs:
  test:
    runs-on: ubuntu-latest
    steps:
    - name: Run Playwright tests (default)
    - name: Upload Playwright report
      uses: actions/upload-artifact@v4
      if: always()
      id: upload-report
      with:
        name: playwright-report
        path: playwright-report/
        retention-days: 3
    - name: Upload Paywright report to S3
      id: s3-upload
      if: always()
      run: |
          dest=${{ vars.STATIC_SITE_S3_BUCKET }}/e2e/playwright-report_${{ github.run_number }}_$(date +%Y%m%d%H%M%S)
          aws s3 sync ./playwright-report/ s3://${dest}/
          echo "site-url=https://${dest}/index.html" >> $GITHUB_OUTPUT
    - name: Notify Slack
      if: ${{ always() && github.event_name != 'pull_request' }}
      uses: XXXXXXX/action-slack@v3
      with:
        status: custom
        custom_payload: |
          {
            "attachments": [
              {
                "color": '${{ job.status }}' === 'success' ? 'good' : 'danger',
                "title": '${{ job.status }}' === 'success' ? 'E2E Test Succeeded' : 'E2E Test Failed',
                "text": "テストの内容は以下のURLから確認できます。\n\nSiteURL: ${{ steps.s3-upload.outputs.site-url }}\n\nArtifactURL: ${{ steps.upload-report.outputs.artifact-url }}"
              }
            ]
          }
Test
slackに通知されたURLにアクセスしてみます。

ちゃんとPlaywrightの結果が表示されました!

まとめ
- AWSアカウントにS3バケットを作成し静的ホスティングサイト機能を有効にする
- S3へアクセスするVPCエンドポイントを作成し、バケットのポリシーによってVPCエンドポイントを許可する
- Cloudflare AccessのトンネルをAWSのVPC内のインスタンスにセットアップする
- CloudflareにS3静的ホスティングサイトのためのドメインとアクセスポリシーを設定する
- Github ActionsにS3アップロードとslack通知を追加する
以上でした。

Discussion