【備忘録】HonoでGitHub認証とJWT認証を試す
はじめに
本記事では、ローカル環境でHonoを利用した認証フローを実装してみた内容を備忘録としてまとめています。
具体的には、GitHubを利用したOAuth認証によるユーザー登録と、JWTを用いたトークンの検証処理について取り扱います。
Honoや認証周りの経験が浅いため突っ込みどころが多々あるかと思います。
問題箇所等ございましたらご指摘のほどよろしくお願いいたします!!
環境・使用技術等
- WSL: Ubuntu
- Docker
- PostgreSQL
- Hono
- Drizzle ORM
- Drizzle Kit
本記事ではパッケージマネージャにpnpmを使用します。
本記事の再現で他のパッケージマネージャを使用する場合は適宜読み替えてください。
Honoプロジェクト作成
公式ドキュメントに従ってHonoプロジェクトを作成します。
以下のようにセットアップを進めていきます。
> pnpm create hono@latest hono-auth-test-app
create-hono version 0.15.3
✔ Using target directory … hono-auth-test-app
? Which template do you want to use? cloudflare-workers
? Do you want to install project dependencies? yes
? Which package manager do you want to use? pnpm
✔ Cloning the template
✔ Installing project dependencies
🎉 Copied project files
Get started with: cd hono-auth-test-app
続いて依存関係のインストールとローカルサーバーの起動まで確認します。
> cd hono-auth-test-app
> pnpm i
❯ pnpm dev

> hono-auth-test-app@ dev /home/xxx/projects/hono-auth-test-app
> wrangler dev


 ⛅️ wrangler 3.111.0
--------------------

No bindings found.
⎔ Starting local server...
[wrangler:inf] Ready on http://localhost:8787
エンドポイントを叩いて以下のようなレスポンスが返ってきたら成功です。
> curl -X GET http://localhost:8787/
Hello Hono!
wrangler.jsoncの編集
本記事では、Node.jsのAPIに依存しているパッケージを入れます。
デフォルトの状態で使用すると怒られるので、nodejs_compatフラグを有効化しておきます。
{
  "$schema": "node_modules/wrangler/config-schema.json",
  "name": "hono-auth-test-app",
  "main": "src/index.ts",
  "compatibility_date": "2025-03-02",
  "compatibility_flags": [
    "nodejs_compat"
  ],
}
DB環境構築
Dockerを使用してPostgresSQLのコンテナを作成します。
DockerでPostgreSQLコンテナを作成する
プロジェクトルートにdocker-compose.ymlを作成します。
services:
  postgres:
    image: postgres:17
    container_name: db
    environment:
      POSTGRES_USER: "${POSTGRES_USER}"
      POSTGRES_PASSWORD: "${POSTGRES_PASSWORD}"
      POSTGRES_DB: "${POSTGRES_DB}"
    ports:
      - "5432:5432"
    volumes:
      - pgdata:/var/lib/postgresql/data
volumes:
  pgdata:
ユーザー名やパスワード等は環境変数に入れておきます。
POSTGRES_USER=admin
POSTGRES_PASSWORD=admin
POSTGRES_DB=test-pg
コンテナを立ち上げます。
> docker compose up -d
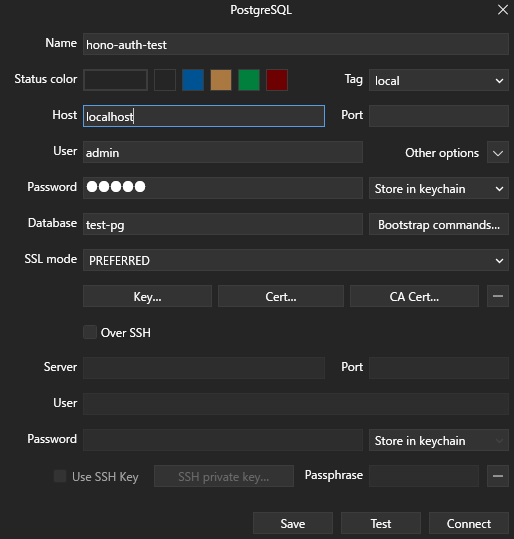
DBクライアントツールで接続を確認してみます。
以下のように接続情報を入力して繋がったら成功です。
Drizzle ORMのインストール
公式ドキュメントに従ってインストールしていきます。
> pnpm add drizzle-orm pg
> pnpm add -D drizzle-kit @types/pg
pnpm v10以降の場合は以下警告が出るので、esbuildのbuild scriptを許可しておきます。
╭ Warning ───────────────────────────────────────────────────────────────────────────────────╮
│                                                                                            │
│   Ignored build scripts: esbuild.                                                          │
│   Run "pnpm approve-builds" to pick which dependencies should be allowed to run scripts.   │
│                                                                                            │
╰────────────────────────────────────────────────────────────────────────────────────────────╯

> pnpm approve-builds
✔ Choose which packages to build (Press <space> to select, <a> to toggle all, <i> to invert selection)
 · esbuild

✔ The next packages will now be built: esbuild.
Do you approve? (y/N) · true
スキーマ定義
今回は以下2つのテーブルを作成します。
- users
- ユーザー情報を管理するテーブル
- user_auths
- ユーザーにどの認証プロバイダが紐づいているかを管理するテーブル
srcディレクトリ直下にinfrastructure/dbディレクトリを作成し、以下のように定義します。
import {
  pgTable,
  serial,
  smallint,
  text,
  timestamp,
} from "drizzle-orm/pg-core";

export const users = pgTable("users", {
  id: serial("id").primaryKey(),
  name: text("name").notNull(),
  email: text("email").notNull().unique(),
  createdAt: timestamp("created_at").notNull().defaultNow(),
  updatedAt: timestamp("updated_at")
    .notNull()
    .defaultNow()
    .$onUpdate(() => new Date()),
});

export const userAuths = pgTable("user_auths", {
  id: serial("id").primaryKey(),
  userId: serial("user_id")
    .notNull()
    .references(() => users.id),
  providerType: smallint("provider_type").notNull(),
  providerUserId: text("provider_user_id").notNull(),
  createdAt: timestamp("created_at").notNull().defaultNow(),
  updatedAt: timestamp("updated_at")
    .notNull()
    .defaultNow()
    .$onUpdate(() => new Date()),
});

export const tables = {
  users: users,
  userAuths: userAuths,
};
drizzle.config.tsの設定
Drizzle ORMの設定ファイルを定義します。
基本的には公式ドキュメントに従って設定していきますが、今回はローカル検証用ということでdrizzle-dev.config.tsという名前を付けて以下のように設定します。
import { defineConfig } from "drizzle-kit";

export default defineConfig({
	out: "./drizzle",
	schema: "./src/infrastructure/db/schema.ts",
	dialect: "postgresql",
	dbCredentials: {
		url: "postgres://admin:admin@localhost:5432/test-pg",
	},
});
マイグレーションファイルの生成
以下コマンドを使用してマイグレーションファイルを生成します
❯ pnpm drizzle-kit generate --config=drizzle-dev.config.ts
Reading config file '/home/xxx/projects/hono-auth-test-app/drizzle-dev.config.ts'
2 tables
user_auths 6 columns 0 indexes 1 fks
users 4 columns 0 indexes 0 fks

[✓] Your SQL migration file ➜ drizzle/0000_curious_professor_monster.sql 🚀
プロジェクトルートにdrizzleディレクトリが生成され、その中に先ほど生成したsqlファイルが入っていたら成功です
> tree
.
├── README.md
├── docker-compose.yml
├── drizzle
│   ├── 0000_curious_professor_monster.sql
│   └── meta
│       ├── 0000_snapshot.json
│       └── _journal.json
マイグレーションファイルを生成してみて気付いたのですが、マイグレーションのロールバックができなさそうだと思いました。
調べてみるとロールバックの機能は議論中みたいでした。
今後機能追加されたらとても助かりますね
マイグレーションを適用
以下コマンドを使用してマイグレーションをDBに適用します
> pnpm drizzle-kit migrate --config=drizzle-dev.config.ts
Reading config file '/home/xxx/projects/hono-auth-test-app/drizzle-dev.config.ts'
Using 'pg' driver for database querying
[✓] migrations applied successfully!
DBクライアントツールでテーブルが作成されているか確認します

問題なさそうでした😼
DB操作の関数を実装
後述するミドルウェア実装で使用する関数を作成しておきます
環境変数の追加
環境変数ファイルにデータベースのURL情報を追加します
DATABASE_URL=postgres://admin:admin@localhost:5432/test-pg
.dev.varsはローカル環境でシークレット情報を扱うときに使用します
実装
export const Provider = {
	GitHub: 0,
	Google: 1,
};

export type ProviderType = (typeof Provider)[keyof typeof Provider];
import { tables, userAuths, users } from "./db/schema";
import { findFirstUserAuth } from "./userAuth";
import { drizzle } from "drizzle-orm/node-postgres";

import type { Context } from "hono";
import { ProviderType } from "../types/provider";

export interface User {
	id: number;
	name: string;
	email: string;
}

export const findOrCreateUser = async (
	c: Context,
	name: string,
	email: string,
	providerType: ProviderType,
	providerUserId: string,
): Promise<User> => {
	const db = drizzle(c.env.DATABASE_URL, { schema: tables });

	let user = await db.query.users.findFirst({
		where: (users, { eq }) => eq(users.email, email),
	});

	if (user) {
		const userAuth = await findFirstUserAuth(
			c,
			user.id,
			providerType,
			providerUserId,
		);
		if (!userAuth) {
			await db.insert(userAuths).values({
				userId: user.id,
				providerType,
				providerUserId,
			});
		}
		return user;
	}

	return await db.transaction(async (tx) => {
		const newUser = await tx.insert(users).values({ name, email }).returning();
		await tx.insert(userAuths).values({
			userId: newUser[0].id,
			providerType,
			providerUserId,
		});

		return newUser[0];
	});
};

export const findManyUsers = async (c: Context): Promise<User[]> => {
	const db = drizzle(c.env.DATABASE_URL, { schema: tables });
	return await db.query.users.findMany();
};
import { and, eq } from "drizzle-orm";
import { tables, userAuths } from "./db/schema";
import { drizzle } from "drizzle-orm/node-postgres";

import type { Context } from "hono";
import { ProviderType } from "../types/provider";

export interface UserAuth {
	id: number;
	userId: number;
	providerType: ProviderType;
	providerUserId: string;
	createdAt: Date;
	updatedAt: Date;
}

export const findFirstUserAuth = async (
	c: Context,
    userId: number,
	providerType: ProviderType,
	providerUserId: string,
): Promise<UserAuth | undefined> => {
	const db = drizzle(c.env.DATABASE_URL, { schema: tables });
	const result = await db.query.userAuths.findFirst({
		where: and(
        	eq(userAuths.userId, userId),
			eq(userAuths.providerType, providerType),
			eq(userAuths.providerUserId, providerUserId),
		),
	});
	return result;
};
環境変数からDBのURLを取得するために各関数でContextを受け取るようにしています。
(他に良い方法がある気がする...)
user.tsのfindOrCreateUser()関数は、認証成功時に呼び出す想定で実装しています。
以下のような流れになります。
-
usersテーブルからメールアドレスでユーザー情報を取得 - ユーザー情報が存在しているかつ認証情報が紐づいていなければ
user_authsテーブルに認証情報を追加してユーザー情報を返す - ユーザー情報が存在しているかつ認証情報が紐づいていればユーザー情報を返す
- 上記に該当しない場合新規作成
ミドルウェア実装
ここでは、トークン検証処理とGitHub認証の実装を行います。
トークン検証処理を実装
アクセストークンとリフレッシュトークンを検証するミドルウェアを実装し、全エンドポイントをプロテクトします。
環境変数の設定
署名用の秘密鍵と有効期限を環境変数ファイルに追加します。
ACCESS_TOKEN_SECRET='access-token-secret'
REFRESH_TOKEN_SECRET='refresh-token-secret'
ACCESS_TOKEN_EXPIRY="300"
REFRESH_TOKEN_EXPIRY="604800"
実装
以下図のイメージで実装していきます
トークンの検証や署名、CookieのセットなどはHonoのヘルパーを使用してみました。
どちらもシンプルで使いやすいです。
/auth/*には各プロバイダの認証用エンドポイントを作る予定なので、パスを見て最初にスルーするようにしておきます。
import type { Hono } from "hono";
import { getCookie, setCookie } from "hono/cookie";
import { createMiddleware } from "hono/factory";
import { sign, verify } from "hono/jwt";
import type { JWTPayload } from "hono/utils/jwt/types";

export const configAuthMiddleware = (app: Hono) => {
	app.use(authMiddleware); // エンドポイント全体に適用
};

export const authMiddleware = createMiddleware(async (c, next) => {
	if (c.req.path.startsWith("/auth/")) {
		return next();
	}

	let accessToken = getCookie(c, "access_token");
	if (!accessToken) {
		return c.text("Unauthorized: no access token", 401);
	}

	let accessTokenPayload: JWTPayload;
	try {
		accessTokenPayload = await verify(accessToken, c.env.ACCESS_TOKEN_SECRET);
	} catch (err) {
		const refreshToken = getCookie(c, "refresh_token");
		if (!refreshToken) {
			return c.text("Unauthorized: no refresh token", 401);
		}
		let refreshTokenPayload: JWTPayload;
		try {
			refreshTokenPayload = await verify(refreshToken, c.env.REFRESH_TOKEN_SECRET);
		} catch (err2) {
			return c.text("Unauthorized: invalid refresh token", 401);
		}

		accessTokenPayload = {
			...refreshTokenPayload,
			exp:
				Math.floor(Date.now() / 1000) + parseInt(c.env.ACCESS_TOKEN_EXPIRY, 10),
		};
		accessToken = await sign(accessTokenPayload, c.env.ACCESS_TOKEN_SECRET);
	}

	setCookie(c, "access_token", accessToken, {
		path: "/",
		httpOnly: true,
		secure: true,
		sameSite: "Strict",
	});

	return next();
});
src直下のindex.tsで先ほど定義した関数を呼び出します。
import { Hono } from "hono";
import { configAuthMiddleware } from "./middleware/auth";

const app = new Hono();

configAuthMiddleware(app); // 追加

app.get("/", (c) => {
	return c.text("Hello Hono!");
});

export default app;
サーバーを立ち上げて確認してみます。
Hello Hono!ではなく、401エラーが返ってくるようになっていたら成功です。
> curl -X GET http://localhost:8787/
Unauthorized: no access token
GitHub認証の実装
以下の流れで実装していきます。
- GitHub認証に飛ばす
- 認証が成功したら認証情報を使用してユーザー確認または登録
- トークンを返す
OAuth Appsの登録
実装前に、OAuth Appsの登録を行います。
GitHubを開き、Settings > Developer settingsからOAuth Appsを追加します。
今回はローカル環境で検証するため、以下のように設定して追加します。

追加ができたら、Client IDと Client secretsが表示されるので環境変数に追加します。
GITHUB_ID=your-github-client-id
GITHUB_SECRET=your-github-client-secret
実装
GitHub認証の実装には、Honoのoauth-providersパッケージを使用します。
インストールしておきます
> pnpm i @hono/oauth-providers
以降GitHub認証用エンドポイントの実装になります。
/auth/githubエンドポイントにアクセスしたときに、GitHubの認証ページに飛ばすようにしています。
認証が成功したらコールバックURLにリダイレクトされるため、認証情報を使用してユーザー検索・登録・トークンの発行を行います。
import { Context, Hono } from "hono";
import { githubAuth } from "@hono/oauth-providers/github";
import { Provider } from "../../types/provider";
import { findOrCreateUser } from "../../infrastructure/user";
import { sign } from "hono/jwt";
import { setCookie } from "hono/cookie";

export const useGitHubAuth = (app: Hono) => {
	app.use("/auth/github", (c: Context, next) => {
		return githubAuth({
			client_id: c.env.GITHUB_ID,
			client_secret: c.env.GITHUB_SECRET,
			scope: ["read:user", "user", "user:email"],
			oauthApp: true,
		})(c, next);
	});

	app.get("/auth/github", async (c: Context) => {
		const userData = c.get("user-github");

		if (!userData) {
			return c.text("GitHub authentication failed", 400);
		}
		if (!userData.id || !userData.name || !userData.email) {
			return c.text("Required information could not be retrieved", 400);
		}

		const user = await findOrCreateUser(
			c,
			userData.name,
			userData.email,
			Provider.GitHub,
			userData.id.toString(),
		);

		const accessTokenPayload = {
			sub: user.id.toString(),
			name: user.name,
			exp:
				Math.floor(Date.now() / 1000) + parseInt(c.env.ACCESS_TOKEN_EXPIRY, 10),
		};
		const refreshTokenPayload = {
			sub: user.id.toString(),
			name: user.name,
			exp:
				Math.floor(Date.now() / 1000) +
				parseInt(c.env.REFRESH_TOKEN_EXPIRY, 10),
		};

		const accessToken = await sign(
			accessTokenPayload,
			c.env.ACCESS_TOKEN_SECRET,
		);
		const refreshToken = await sign(
			refreshTokenPayload,
			c.env.REFRESH_TOKEN_SECRET,
		);

		setCookie(c, "access_token", accessToken, {
			path: "/",
			httpOnly: true,
			secure: true,
			sameSite: "Strict",
		});
		setCookie(c, "refresh_token", refreshToken, {
			path: "/",
			httpOnly: true,
			secure: true,
			sameSite: "Strict",
		});

		return c.redirect("/");
	});
};
GitHub認証用のエンドポイントを使用可能にするため、auth/index.tsのconfigAuthMiddleware()関数に先ほど実装したuseGitHubAuth()関数を追加します。
import { useGitHubAuth } from "./github";

export const configAuthMiddleware = (app: Hono) => {
	useGitHubAuth(app);
	// useGoogleAuth(app);
	app.use(authMiddleware);
};
動作確認
GitHub認証用エンドポイントにアクセスするとGitHubの認証ページに遷移するので許可します。

許可するとルートにリダイレクトされます。
Cookieにトークンが設定されていることを確認します。

リダイレクト時にトークン検証が走らなかったので、エンドポイントを叩きなおします。(要調査..)

401ではなく、Hello Hono!と表示されるようになりました🥳
ユーザー情報を取得する
最後にDBに登録されているユーザー情報を取得してみます。
src/index.tsに新しいエンドポイントを追加します。
import { findManyUsers } from "./infrastructure/user";

app.get("/users", async (c) => {
	const users = await findManyUsers(c);
	return c.json({ users: users });
});
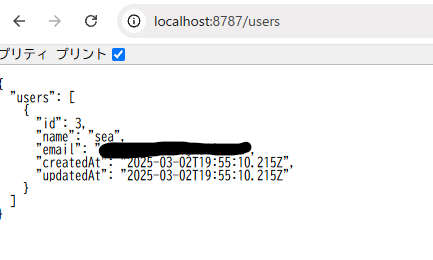
/usersを叩くとユーザー情報を取得することが出来ました🙌
おわりに
直近で触ってみたかった技術を触ることができました。大満足。
Honoはサードパーティのミドルウェアや組み込みのミドルウェアが充実していたり、シンプルで使いやすいヘルパーがあったりとても開発体験が良いなと思いました😸
以上になります。
本記事が少しでも参考になれば幸いです。
ここまで読んでいただきありがとうございました!
Discussion