xdialogでかんたんダイアログ
xdialogとは!?
xdialogを利用することで、簡単にダイアログを実装することができます。
今回はこのライブラリを使って、あっさりとダイアログを実装してみます。
(とても簡単ですよ!!)

プロジェクトを用意する
次の様にプロジェクトを作ります。
MyProject01/
├ index.html (プログラムを起動するファイルです)
├ main.js (メインのプログラムを記述するファイルです)
HTMLファイルを用意する
では、作っていきましょう。
HTMLファイルを用意して、下記コードを記述します。
<!DOCTYPE html>
<html>
<head>
	<meta charset="UTF-8"/>
	<!-- xdialog -->
	<link rel="stylesheet" href="//cdn.jsdelivr.net/gh/xxjapp/xdialog@3/xdialog.min.css">
</head>
<body>
	<p>
		<button onclick="showDialogA();">ダイアログA</button>
	</p>
	<p>
		<button onclick="showDialogB();">ダイアログB</button>
	</p>
	<p id="result"></p>
	<!-- xdialog -->
	<script src="//cdn.jsdelivr.net/gh/xxjapp/xdialog@3/xdialog.min.js"></script>
	<script src="./main.js"></script>
</body>
</html>
xdialogの利用に必要なファイルはたったの2つです。
次の部分で、CSSファイルとJavaScriptファイルをそれぞれCDNで読み込んでいます。
(インターネットから読み込む事でプロジェクトがシンプルになりますね)
CSSファイル
<!-- xdialog -->
<link rel="stylesheet" href="//cdn.jsdelivr.net/gh/xxjapp/xdialog@3/xdialog.min.css">
JavaScriptファイル
<!-- xdialog -->
<script src="//cdn.jsdelivr.net/gh/xxjapp/xdialog@3/xdialog.min.js"></script>
そして、ダイアログを表示させるボタンを2つ用意し、
ダイアログ内のボタンからの結果を表示させる場所にidを付けておきます。
(ここでは"result"としました)
<p id="result"></p>
JavaScriptファイルを用意する
次に、JavaScriptファイルにコードを記述していきます。
公式ドキュメントを参考にながら実装を進めていきますね。
ボタンが一つのダイアログ
さっそく、ボタンが一つだけ配置されたシンプルなダイアログを実装してみます。
(次のコードを見れば一目瞭然ですね)
// ダイアログA
xdialog.open({
	title: "ダイアログAです!!",
	buttons: {
		ok: {
			text: "OK",
			style: "border-radius: 8px; background: orange;"
		}
	},
	body: "<p>今日は良い天気ですね</p>",
	style: "width: 90%; height: auto;"
});
"xdialog.open()"を実行することでダイアログを表示させることができます。
引数にはオプションとして、次の様にパラメータを指定します。
(なんて簡単なんでしょう!!)
| オプション | 意味 |
|---|---|
| title | ダイアログのタイトル |
| buttons | ボタン各種の設定 |
| body | ダイアログの内容 |
| style | ダイアログのCSS |
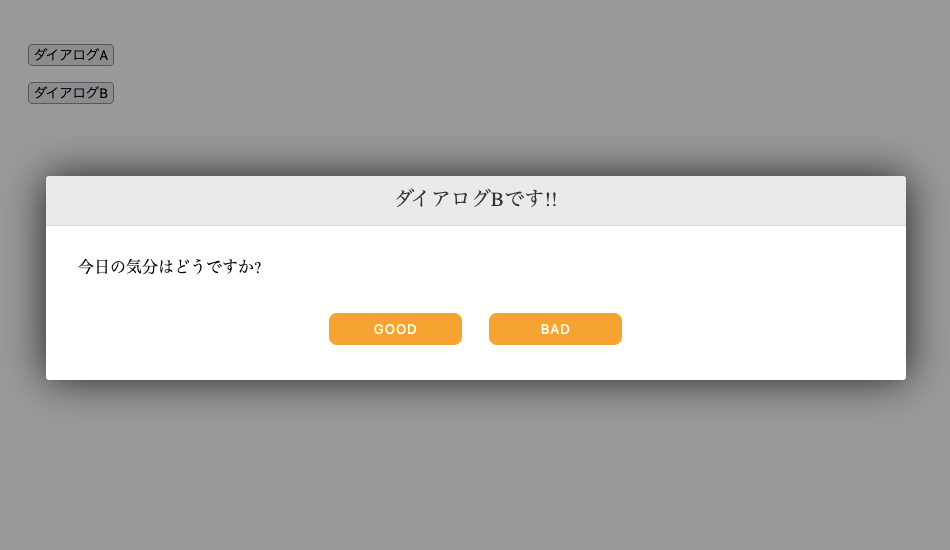
ボタンが二つのダイアログ
次はボタンが二つ配置されたダイアログを実装してみます。
(こちらの方がより実用的ですね)
// ダイアログB
xdialog.open({
	title: "ダイアログBです!!",
	buttons: {
		ok: {
			text: "GOOD",
			style: "border-radius: 8px; background: orange;"
		},
		cancel: {
			text: "BAD",
			style: "border-radius: 8px; background: orange;"
		}
	},
	body: "<p>今日の気分はどうですか?</p>",
	style: "width: 90%; height: auto;",
	onok: (param)=>{
		console.info("OK!!");
		// 結果を表示
		const elem = document.getElementById("result");
		elem.innerText = "Goodです!!";
	},
	oncancel: (param)=>{
		console.info("Cancel!!");
		// 結果を表示
		const elem = document.getElementById("result");
		elem.innerText = "Badです!!";
	}
});
オプションにある"buttons"に注目してください。
今回はボタンが二つあるので、"buttons"には"ok"と"cancel"の二つの要素が追加されています。
| オプション | 意味 |
|---|---|
| ok | OKボタンの設定 |
| cancel | Cancelボタンの設定 |
そして、上記のボタンに対してそれぞれイベントを設定します。
"onok"と、"oncancel"に注目してください。
(ここが重要です!!)
| オプション | 意味 |
|---|---|
| onok | OKボタンが押された時に実行されます |
| oncancel | Cancelボタンが押された時に実行されます |

やりました!!
全体のコード
最後に全体のコードを載せておきますね。
<!DOCTYPE html>
<html>
<head>
	<meta charset="UTF-8"/>
	<!-- xdialog -->
	<link rel="stylesheet" href="//cdn.jsdelivr.net/gh/xxjapp/xdialog@3/xdialog.min.css">
</head>
<body>
	<p>
		<button onclick="showDialogA();">ダイアログA</button>
	</p>
	<p>
		<button onclick="showDialogB();">ダイアログB</button>
	</p>
	<p id="result"></p>
	<!-- xdialog -->
	<script src="//cdn.jsdelivr.net/gh/xxjapp/xdialog@3/xdialog.min.js"></script>
	<script src="./main.js"></script>
</body>
</html>
console.log("main.js!!");

// ダイアログを表示する関数A
function showDialogA(){
	console.log("showDialogA");

	// ダイアログA
	xdialog.open({
		title: "ダイアログAです!!",
		buttons: {
			ok: {
				text: "OK",
				style: "border-radius: 8px; background: orange;"
			}
		},
		body: "<p>今日は良い天気ですね</p>",
		style: "width: 90%; height: auto;"
	});
}

// ダイアログを表示する関数B
function showDialogB(){
	console.log("showDialogB");

	// ダイアログB
	xdialog.open({
		title: "ダイアログBです!!",
		buttons: {
			ok: {
				text: "GOOD",
				style: "border-radius: 8px; background: orange;"
			},
			cancel: {
				text: "BAD",
				style: "border-radius: 8px; background: orange;"
			}
		},
		body: "<p>今日の気分はどうですか?</p>",
		style: "width: 90%; height: auto;",
		onok: (param)=>{
			console.info("OK!!");
			// 結果を表示
			const elem = document.getElementById("result");
			elem.innerText = "Goodです!!";
		},
		oncancel: (param)=>{
			console.info("Cancel!!");
			// 結果を表示
			const elem = document.getElementById("result");
			elem.innerText = "Badです!!";
		}
	});
}
いかがでしたでしょうか。
手短では御座いましたが、xdialogを簡単に解説させて頂きました。
このライブラリは実装も簡単でとても扱いやすく、初学者の方に特にお勧めです。
ここまで読んでいただき有難う御座いました。
Discussion