SpringBootログイン認証の実装


#はじめに
本記事は自分の備忘録としての記事として残します。
今回、作成したのはJava初学者の私が学習がてらSpringBootとSpringSecurityを使用しログイン機能の実装をしたものになります。
挙動としては以下のような感じです。
流れとしては
・ログイン画面でDBに登録してあるユーザーを認証
・トップ画面に遷移(/hello)
・ログアウトボタンを押下するとログアウト成功時の画面に遷移(/afterLogout)
・ログインリンクをクリックするとログイン画面に遷移(/login)
このような形で実装を行いました。
個人的にはトップページのユーザー名の表示と、ログアウト成功時の画面に遷移するという実装に手こずりました。
#開発環境
・SpringBoot
・SpringSecurity
・MySQL
・Eclipse
#ログイン認証
こちらは下記の記事を参考に実装しています。
##コンフィグファイル
「初めて見るとわけわからん...」という状態でしたが、調べてみたり、何度かいじっていると、なんとなくわかってきますし、基本は定形みたいなものなので、慣れるしかありません。
僕の場合は以下のような設定にしました。
package com.cmind.security;

import org.springframework.beans.factory.annotation.Autowired;
import org.springframework.context.annotation.Bean;
import org.springframework.context.annotation.Configuration;
import org.springframework.security.config.annotation.authentication.builders.AuthenticationManagerBuilder;
import org.springframework.security.config.annotation.web.builders.HttpSecurity;
import org.springframework.security.config.annotation.web.builders.WebSecurity;
import org.springframework.security.config.annotation.web.configuration.EnableWebSecurity;
import org.springframework.security.config.annotation.web.configuration.WebSecurityConfigurerAdapter;
import org.springframework.security.crypto.bcrypt.BCryptPasswordEncoder;
import org.springframework.security.web.util.matcher.AntPathRequestMatcher;

@Configuration
@EnableWebSecurity
public class WebSecurityConfig extends WebSecurityConfigurerAdapter {


    //フォームの値と比較するDBから取得したパスワードは暗号化されているのでフォームの値も暗号化するために利用
    @Bean
    public BCryptPasswordEncoder passwordEncoder() {
        BCryptPasswordEncoder bCryptPasswordEncoder = new BCryptPasswordEncoder();
        return bCryptPasswordEncoder;
    }

    @Override
    public void configure(WebSecurity web) throws Exception {
        web.ignoring().antMatchers(
                            "/images/**",
                            "/css/**",
                            "/javascript/**"
                            );
    }

	    @Override
	    protected void configure(HttpSecurity http) throws Exception {
	        http
	            .authorizeRequests()
	                //「login.html」はログイン不要でアクセス可能に設定
	                .antMatchers("/login").permitAll()
	                //上記以外は直リンク禁止
	                .anyRequest().authenticated()
	            .and()
	            .formLogin()
	                //ログイン処理のパス
	                .loginProcessingUrl("/login")
	                //ログインページ
	                .loginPage("/login")
	                //ログインエラー時の遷移先 ※パラメーターに「error」を付与
	                .failureUrl("/login?error")
	                //ログイン成功時の遷移先
	                .defaultSuccessUrl("/hello", true)
	                //ログイン時のキー:名前
	                .usernameParameter("username")
	                //ログイン時のパスワード
	                .passwordParameter("password")
	            .and()
	            .logout()
	            	.logoutRequestMatcher(new AntPathRequestMatcher("/logout"))
	            	.logoutUrl("/logout") //ログアウトのURL
	            	.invalidateHttpSession(true)
	                //ログアウト時の遷移先 POSTでアクセス
	                .logoutSuccessUrl("/afterLogout.html");
	    }

	    @Autowired
	    LoginUserDetailsService service;
	    @Override
	    protected void configure(AuthenticationManagerBuilder auth) throws Exception {
	      auth.userDetailsService(service);
	    }


}
基本的な部分等は公式や紹介している記事を読んでみてください。
強いて変えている部分があるとするならばログアウト時の遷移先の部分です。
##.logoutSuccessUrl()
コメントに書いてある通りログアウトボタンを押下したら、/afterLogoutに遷移するように設定しています。
##.logoutUrl()
また、SpringBootではビューファイルで
<form th:action="@{/logout}" method="post">
とすることで、自動的にログアウトして初期画面に戻るのでlogoutUrl()には/logoutを指定してあげます。
##.invalidateHttpSession
invalidateHttpSession(boolean)はログアウトごにセッションを無効にするかどうかを指定します。trueなら、セッションが削除され、falseならセッションが残るようになります。
これに合わせて、deleteCookies(cookieName...)をつけるよう設定することもできますが、僕は設定していません。
これをつけるとログアウト時に指定された名前(cookieName)を削除することができます。
要はCookieを削除することができるようです。ちなみに、cookieNameは複数指定もできます。
#MvcConfig.java
続いて、MVCの流れの設定です。
紹介記事を参考に設定しました。
package com.cmind.security;

import org.springframework.context.annotation.Configuration;
import org.springframework.web.servlet.config.annotation.ViewControllerRegistry;
import org.springframework.web.servlet.config.annotation.WebMvcConfigurer;

@Configuration
public class MvcConfig implements WebMvcConfigurer {

	@Override
	public void addViewControllers(ViewControllerRegistry registry) {
		registry.addViewController("/home").setViewName("home");
		registry.addViewController("/").setViewName("home");
		registry.addViewController("/hello").setViewName("hello");
		registry.addViewController("/login").setViewName("login");
	}

}
重要な部分は@Override部分です。
例えばログイン部分なら「/loginというURLからlogin.html」を呼び出す」という意味です。
これによって「コントローラー→ビュー」という流れを作ることができます。
#Controller
package com.cmind.controller;

import org.springframework.security.core.Authentication;
import org.springframework.security.core.context.SecurityContextHolder;
import org.springframework.stereotype.Controller;
import org.springframework.ui.Model;
import org.springframework.web.bind.annotation.GetMapping;
import org.springframework.web.bind.annotation.PostMapping;
import org.springframework.web.bind.annotation.RequestMapping;


@Controller
public class LoginController {

	//ログイン画面への遷移
    @GetMapping
    String getLogin() {
        return "login";
    }

    //ログイン成功時のメニュー画面への遷移
    @PostMapping
    String postLogin() {
        return "redirect:/hello";
    }

	/**
	 * ログイン成功時に呼び出されるメソッド
	 * SecurityContextHolderから認証済みユーザの情報を取得しモデルへ追加する
	 * @param model リクエストスコープ上にオブジェクトを載せるためのmap
	 * @return helloページのViewName
	 */
	@RequestMapping("/hello")
	private String init(Model model) {
		Authentication auth = SecurityContextHolder.getContext().getAuthentication();
		//Principalからログインユーザの情報を取得
		String userName = auth.getName();
		model.addAttribute("userName", userName);
		return "hello";

	}

	//ログアウト成功時の画面へ遷移
	@RequestMapping("/afterLogout")
    String afterLogout() {
        return "afterLogout";
    }

}
これについてはコメントを見てもらえれば理解できると思いますので、説明は割愛させていただきます。
#View
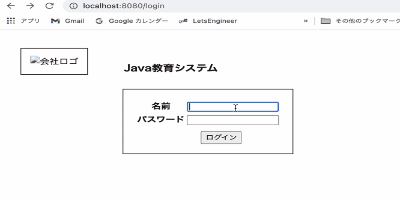
##login.html
<!DOCTYPE html>
<html xmlns:th="http://www.thymeleaf.org">
<head>
<meta charset="UTF-8">
<link rel="stylesheet" th:href="@{/webjars/bootstrap/4.3.1/css/bootstrap.min.css}">
<link rel="stylesheet" th:href="@{/css/login.css}">
<title>ログイン</title>
</head>
<body>
    <div class="container">
        <div class="logo-group">
            <div class="logo">
                <img th:src="@{/image/logo.jpg}" alt="会社ロゴ">
            </div>
            <div class="title">
            	<h3>Java教育システム</h3>
            </div>
        </div>
        <div class="login-form">
            <form th:action="@{/login}" method="post">
                <table class="table table-bordered col-md-6">
                <tr class="form-group">
                    <th class="align-middle">名前</th>
                    <td><input type="text" class="form-controll" name="username"></td>
                </tr>
                <tr class="form-group">
                    <th class="align-middle">パスワード</th>
                    <td><input type="text" class="form-controll" name="password"></td>
                </tr>
                </table>
                <!--/* ログインエラー時にメッセージを表示 */-->
                <div th:if="${param.error}" class="alert alert-danger">
                    名前またはパスワードが正しくありません
                 </div>
                <div class="submit">
                    <input type="submit" class="btn btn-primary" value="ログイン">
                </div>
            </form>
        </div>
    </div>
    <script src="@{/webjars/jquery/3.4.1/jquery.min.js}"></script>
    <script src="@{/webjars/bootstrap/4.3.1/js/bootstrap.min.js}"></script>
</body>
</html>
重要な部分はformタグとエラーメッセージ表示部です。
ちなみに基礎的な部分にはなりますが、***thymleaf***を適用している場合は"@{/〇〇}"というような記述を取ります。
<form th:action="@{/login}" method="post">
action属性でth:action="@{/login}"とすることでログインをすることができます。
また、HTTPメソッドはPOSTを指定します。
そして、ログインに成功するとコントローラーで設定したようにhello.htmlに遷移します。
失敗した倍位はエラーメッセージを表示しエラー画面を表示します。
この設定はWebSecurityConfig.javaのfailureUrl("login?error")という部分で設定しています。
そのためビューでの記述はth:if="${param.error}"となります。
##hello.html
<!DOCTYPE html>
<html xmlns="http://www.w3.org/1999/xhtml" xmlns:th="https://www.thymeleaf.org"
      xmlns:sec="https://www.thymeleaf.org/thymeleaf-extras-springsecurity3">
    <head>
        <title>Hello World!</title>
    </head>
    <body>
        <h1 th:inline="text">Hello [[${#httpServletRequest.remoteUser}]]!</h1>
        <form th:action="@{/afterLogout}" method="post">
            <input type="submit" value="Sign Out"/>
        </form>
        <p th:text="${userName}"></p>
    </body>
</html>
ここではログアウト成功時にログアウト後の画面に遷移するような仕様にしています。
コントローラーで言うと@RequestMapping("/afterLogout")の部分です。
ビューではこれをフォームの属性として使用しています。
SpringBootでは通常
<form th:action="@{/logout} method="post">とすることで自動でログアウトしログイン画面に戻るというのがベターな仕様ですが、今回の僕の仕様はログアウトが成功したあとに画面遷移して、その後、ログイン画面にリンクから戻るという点が大きな違いです。
そのため、最初で説明したようにWebSecurityConfig.javaでログアウトの設定を少し複雑にしています。
また、hello.htmlがトップページになるので、ユーザー名の表示もする必要があったため、<p th:text='${userName}">としてコントローラーで取得しているログイン中のユーザーのユーザー名を指定しています。
/**
	 * ログイン成功時に呼び出されるメソッド
	 * SecurityContextHolderから認証済みユーザの情報を取得しモデルへ追加する
	 * @param model リクエストスコープ上にオブジェクトを載せるためのmap
	 * @return helloページのViewName
	 */
	@RequestMapping("/hello")
	private String init(Model model) {
		Authentication auth = SecurityContextHolder.getContext().getAuthentication();
		//Principalからログインユーザの情報を取得
		String userName = auth.getName();
		model.addAttribute("userName", userName);
		return "hello";

	}
上記でユーザー名を取得しています。
##afterLogout.html
<!DOCTYPE html>
<html xmlns:th="http://www.thymeleaf.org">
<head>
<meta charset="UTF-8">
<link rel="stylesheet" th:href="@{/css/afterLogout.css}">
<title>ログアウト成功</title>
</head>
<body>
	<h1>Hello</h1>
	<a th:href="@{/login}">ログイン</a>画面へ
</body>
</html>
このビューファイルがログアウト時に遷移するファイル(ログアウト成功を告げるファイル)となります。
リンクでログイン画面に遷移するようにしています。
正直、ログアウト成功はalertやmessageで知らせる手段もありますが、ビューファイルを使うとこのようになるかと思います。
以上、参考になると幸いです。
#参考文献
Discussion