【Next.js13 × Prisma】App Routerによる宿泊施設予約システムの作成
はじめに
今回はNext.jsのApp RouterとPrismaによる「宿泊施設予約システム」を作成した際に、API設計の解釈が広がったので、その際に作成したAPIとUIについての解説を行います。
API設計の参考になるかと思いますので、どなたかの参考になれば幸いです。
(その他、意見・アドバイス等あれば、ぜひお願い致します!)
本記事の実装をした全コードになります。
環境
- Next.js 13.5.5
- prisma 5.5.2
- react-date-range 1.4.0
- @types/react-date-range 1.4.8
- date-fns 2.30.0
概要
概要としては、1つのAPIで、以下の3パターンのユースケースに対するレスポンスを返却するAPIを作成しました。
(Airbnbなど宿泊予約できるシステムを想像してもらうと、よりイメージが湧くと思います)
①.ユーザーが予約した宿泊施設リストの管理
②.ユーザー(ゲスト)の予約の管理
(オーナー自身が自分の宿泊施設に予約をした場合もレスポンスにその予約を含む)
③.宿泊施設詳細で予約されている日付についてカレンダーで非活性化をし、新規に予約できないよう制御する
それぞれ、ユースケースの役割としては、以下です。
①.ユーザー自身が予約した宿泊施設の一覧を取得し、それの予約確認とキャンセルができるようにする
②.ユーザー(ゲスト)の予約を一覧として確認でき、利益の確認やオーナーによるキャンセルができるようにする
③.同じ宿泊施設にてダブルブッキングが発生しないように制御する
よりイメージが湧きやすいよう、実際の画面を以下に示します。
-
ユースケース①
-
ユースケース②
-
ユースケース③
実装内容
早速、実装の解説に入っていきます。
テーブルスキーマ
まずはprismaのデータ構造ですが、これは一般的なものとなっています。
model User {
  id             String    @id @default(auto()) @map("_id") @db.ObjectId
  name           String?
  email          String?   @unique
  emailVerified  DateTime?
  image          String?
  hashedPassword String?
  createdAt      DateTime  @default(now())
  updatedAt      DateTime  @updatedAt
  favoriteIds    String[]  @db.ObjectId

  listings     Listing[]
  reservations Reservation[]
}

model Listing {
  id            String        @id @default(auto()) @map("_id") @db.ObjectId
  userId        String        @db.ObjectId
  title         String
  description   String
  imageSrc      String
  category      String
  roomCount     Int
  bathroomCount Int
  guestCount    Int
  locationValue String
  price         Int
  createdAt     DateTime      @default(now())
  updatedAt     DateTime      @updatedAt
  user          User          @relation(fields: [userId], references: [id], onDelete: Cascade)
  reservations  Reservation[]
}

model Reservation {
  id         String   @id @default(auto()) @map("_id") @db.ObjectId
  userId     String?  @db.ObjectId
  listingId  String?  @db.ObjectId
  startDate  DateTime
  endDate    DateTime
  totalPrice Int
  createdAt  DateTime @default(now())
  updatedAt  DateTime @updatedAt
  user       User?    @relation(fields: [userId], references: [id], onDelete: Cascade)
  listing    Listing? @relation(fields: [listingId], references: [id], onDelete: Cascade)
}
リレーションについては、以下のようになっています。特段変わった点はないかと思います。
- User : Listing → 1 : 多
- User : Reservation → 1 : 多
- Listing : Reservation → 1 : 多
予約管理API
このAPIが今回のメインの機能を実装しているものです。
import { type NextRequest, NextResponse } from 'next/server'

import prisma from '@/libs/prismadb'

export const GET = async (req: NextRequest) => {
  try {
    const searchParams = req.nextUrl.searchParams
    const listingId = searchParams.get('listingId')
    const userId = searchParams.get('userId')
    const authorId = searchParams.get('authorId')

    const query: {
      listingId?: string
      userId?: string
      listing?: { userId?: string }
    } = {}

    if (listingId) query.listingId = listingId

    if (userId) query.userId = userId

    if (authorId) query.listing = { userId: authorId }

    const reservations = await prisma.reservation.findMany({
      where: query,
      include: { listing: true },
      orderBy: { createdAt: 'desc' },
    })

    return NextResponse.json(reservations, { status: 200 })
  } catch (err) {
    return NextResponse.json(
      { message: 'Internal Server Error' },
      { status: 500 },
    )
  }
}
※ Next.jsのURLのパラメータの取得については、以下の記事を参照してください。
重要な部分はquery変数に関連する部分です。
具体的には、listingId・userId・authorIdの各パラメータが存在するかどうかをで、queryに格納される値が変わるという部分です(各if文の部分です)
そのqueryの値により、発行されるクエリが変わります。
要するに、どのパラメータがフロントエンドから渡ってくるかによって、取得するデータが変わるということです。
各パラメータを最初に解説したユースケースと紐付けてみると解像度がより上がると思います。
①.ユーザーが予約した宿泊施設リストの管理
②.ユーザー(ゲスト)の予約の管理
(オーナー自身が自分の宿泊施設に予約をした場合もレスポンスにその予約を含む)
③.宿泊施設詳細で予約されている日付についてカレンダーで非活性化をし、新規に予約できないよう制御する
上記がユースケースですので、これらのユースケースをクエリパラメータに紐付けると以下のようになります。
- listingId(query.listingId) : ③
- userId(query.userId) : ①
- authorId(query.listing) : ②
ちなみに、少し分かりづらいauthorIdですが、authorIdのクエリは以下のような形式となっています。
{ listing: { userId: 'hogefuga' } }
やっていることはSQLのJOINと同じで、「reservation.listing.userId = listing.userId」という検索を行っています。
また、prismaのクエリでincludeとするとリレーションを組んでいるModelをレスポンスに含めるかどうかを決めることができます。
以上がAPIの実装となります。
やっていることはシンプルなのですが、ユースケースを考えたり、パラメータとクエリの関係を考えるとAPI設計の奥深さがわかると思います。
(APIを分けるなどの方法もありますが、今回はユースケースが予約管理という1つの役割に集約できるためAPIは1つにしてクエリパラメータで取得できるレスポンスを変えるのが妥当かと思います)
フロントエンド実装
次にフロントエンドの実装です。
当然ですがユースケースごとにUIが異なるので、実装は3画面となります。
※ 各画面はいくつかのコンポーネントで構成されていたり、各コンポーネントで様々な処理を実装していますが、すべてを解説すると本筋の内容とはそれるので、APIのデータフェッチを行っている部分のUIのみに絞って解説いたします
また、前節のAPI実装ですが、私の場合は、カスタムフックにしてデータフェッチしているので、まずはカスタムフックの内容から解説します。
データフェッチ用カスタムフック
まずは、APIの型定義ですが、prismaでincludeとしてlistingもレスポンスに含まれるため、reservationとlistingを合体させた型を定義しています。
import type { Listing, Reservation } from '@prisma/client'

export type ReservationWithListing = Reservation & { listing: Listing }
続いてカスタムフックですが、以下のように、データフェッチをしています。
import type { ReservationWithListing } from '@/types/ReservationWithListing'

type TParams = {
  params: { listingId?: string; userId?: string; authorId?: string }
}

const useFetchReservations = async ({ params }: TParams) => {
  try {
    let url = `${process.env.API_BASE_URL}/api/reservations`

    const queryParams = new URLSearchParams()

    if (params.listingId) queryParams.append('listingId', params.listingId)
    if (params.userId) queryParams.append('userId', params.userId)
    if (params.authorId) queryParams.append('authorId', params.authorId)

    url += '?' + queryParams.toString()

    const response = await fetch(url, { cache: 'no-store' })
    const reservations: ReservationWithListing[] = await response.json()

    return reservations
  } catch (err) {
    throw new Error('Something Went Wrong')
  }
}

export default useFetchReservations
ここでも重要となるのが、APIにパラメータを渡す処理です。
今回は、URLSearchParamsを使用して、カスタムフック呼び出し時に引数として渡ってきたパラメータごとにクエリパラメータを追加していくようにしています。
URLSearchParamsは、URLのクエリパラメータを操作するためのWeb APIです。
このAPIのappendメソッドを使用して、クエリパラメータを作成するようにしています。
(appendメソッドは新しいパラメータを追加したり、既存のパラメータを更新したりすることができます)
最終的には、url += '?' + queryParams.toString()の部分で、作成したクエリパラメータをURLに追加するようにしています。
ただ、クエリパラメータは「?」で始まり、複数のパラメータは「&」でつながれるので、例えば、userIdとauthorIdの2つのパラメータがある場合、URLは?userId=hoge&authorId=fugaのようになります。 (今回の場合は、パラメータは1つということが前提となるので、?userId=hoge`というURLが作成されます)
このようにして、予約管理のAPIにリクエストをし、ユースケースごとのレスポンスを得ることができます。
それでは次に、ユースケースの順に解説をしていきます。
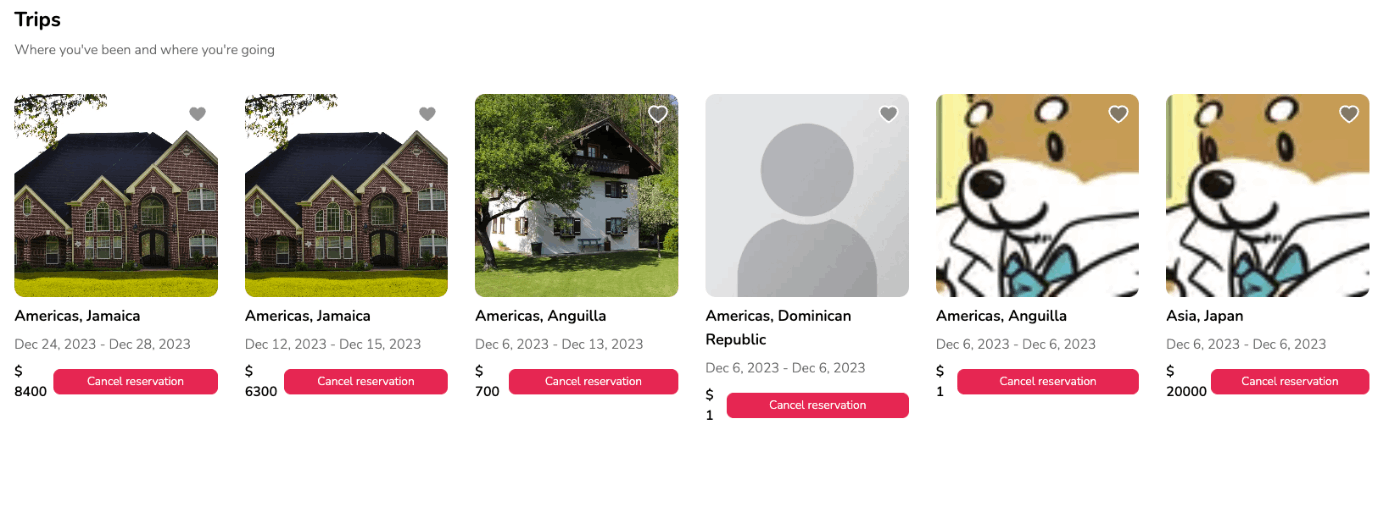
ユースケース①のUI
このUIはユーザーが予約した宿泊施設の一覧を取得しています。
カスタムフックのuseFetchReservationsにはログインユーザーのIDをパラメータとして渡しています。
これにより、自分が予約した宿泊施設の情報が見れたり、予約のキャンセルができたり、ユースケースを実現することができます。
import { getServerSession } from 'next-auth'
import React from 'react'

import EmptyState from '@/components/EmptyState'
import TripsClient from '@/components/TripsClient'
import useFetchCurrentUser from '@/hooks/useFetchCurrentUser'
import useFetchReservations from '@/hooks/useFetchReservations'
import authOptions from '@/libs/authOptions'

const TripsPage = async () => {
  const session = await getServerSession(authOptions)
  const currentUser = await useFetchCurrentUser(session?.user?.id || '')
  const reservations = await useFetchReservations({
    params: { userId: currentUser?.id },
  })

  if (!currentUser)
    return <EmptyState title="Unauthorized" subtitle="Please login" />

  if (reservations.length === 0)
    return (
      <EmptyState
        title="No trips found"
        subtitle="Looks like you haven't reserved any trips."
      />
    )

  return <TripsClient reservations={reservations} currentUser={currentUser} />
}

export default TripsPage
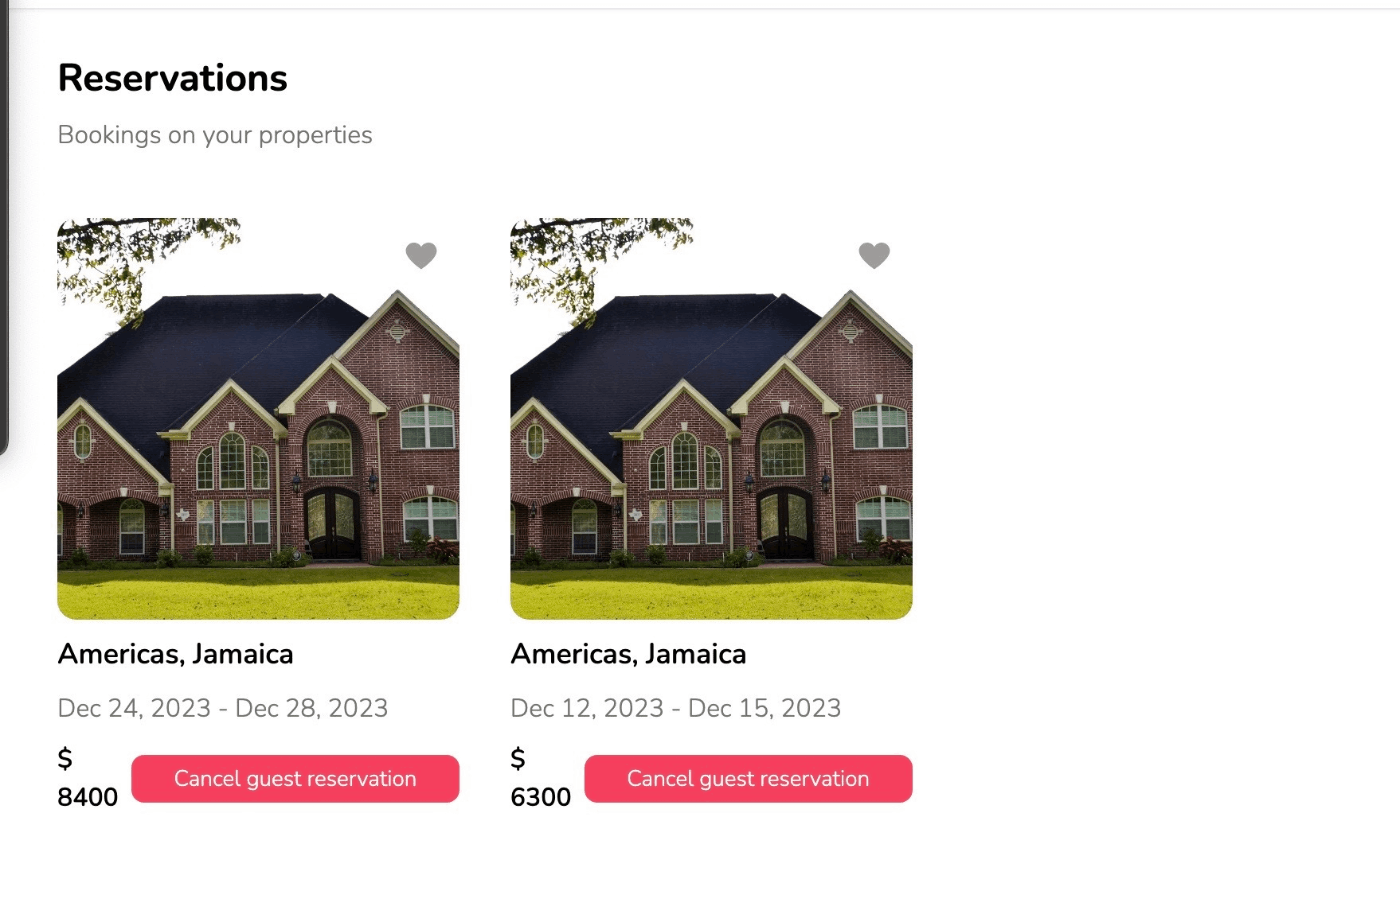
ユースケース②のUI
ここでもログインユーザーのIDをauthorIdとしてカスタムフックにパラメータとして渡すようにしています。
API側でクエリの内容を分けているので、フロントエンドではログインユーザーのIDを渡すだけでユースケースを実現できます。
(APIの処理を見てもらうとわかるのですが、authorIdがクエリパラメータにある場合、query変数にauthorIdを追加するようにしているので、フロントエンドではこれだけで期待したユースケースを実現できます)
import { getServerSession } from 'next-auth'
import React from 'react'

import EmptyState from '@/components/EmptyState'
import ReservationsClient from '@/components/ReservationsClient'
import useFetchCurrentUser from '@/hooks/useFetchCurrentUser'
import useFetchReservations from '@/hooks/useFetchReservations'
import authOptions from '@/libs/authOptions'

const ReservationsPage = async () => {
  const session = await getServerSession(authOptions)
  const currentUser = await useFetchCurrentUser(session?.user?.id || '')
  const reservations = await useFetchReservations({
    params: { authorId: currentUser?.id },
  })

  if (!currentUser)
    return <EmptyState title="Unauthorized" subtitle="Please login" />

  if (reservations.length === 0)
    return (
      <EmptyState
        title="No reservations found"
        subtitle="Looks like you have no reservations on your properties"
      />
    )

  return (
    <ReservationsClient reservations={reservations} currentUser={currentUser} />
  )
}

export default ReservationsPage
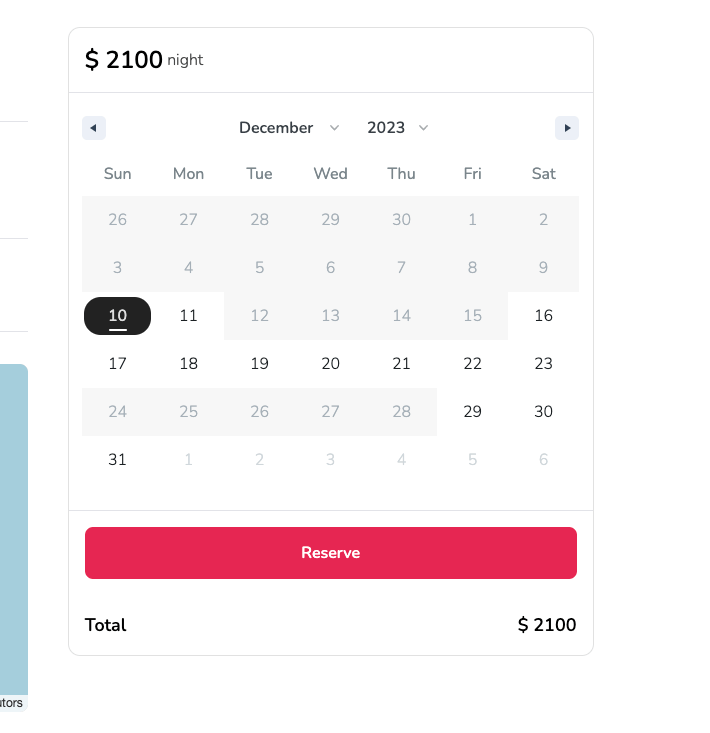
ユースケース③のUI
ここでは、宿泊施設詳細で予約されている日付を取得するので、実際に宿泊施設詳細ページのURLのパラメータをカスタムフックであるuseFetchReservationsに渡しています。
ただ、このユースケースは宿泊施設に対する予約を取得するだけでユースケースが完了するわけではないので、どのように予約されているかを判定し、ダブルブッキングを制御しているか(カレンダーを非活性としているか)を解説します。
そのため、このUIの子コンポーネントの部分にも触れていきます。
import type { Listing, Reservation } from '@prisma/client'
import { getServerSession } from 'next-auth'
import React from 'react'

import EmptyState from '@/components/EmptyState'
import ListingClient from '@/components/listings/ListingClient'
import useFetchCurrentUser from '@/hooks/useFetchCurrentUser'
import useFetchListing from '@/hooks/useFetchListing'
import useFetchReservations from '@/hooks/useFetchReservations'
import authOptions from '@/libs/authOptions'

type ListingPageParams = {
  params: { listingId: string }
}

export const generateStaticParams = async () => {
  const listings: Listing[] = await fetch(
    `${process.env.API_BASE_URL}/api/listing`,
  ).then((res) => res.json())

  return listings.map((listing) => ({
    listingId: listing.id,
  }))
}

const ListingPage: React.FC<ListingPageParams> = async ({ params }) => {
  const listing = await useFetchListing(params.listingId)
  const reservations = await useFetchReservations({ params })

  const session = await getServerSession(authOptions)
  const currentUser = await useFetchCurrentUser(session?.user?.id || '')

  if (!listing) return <EmptyState />

  return (
    <ListingClient
      listing={listing}
      reservations={reservations}
      currentUser={currentUser}
    />
  )
}

export default ListingPage
まずは、ListingClientコンポーネントです。
このクライアントコンポーネントで予約されている日付を非活性化する処理を行っています。
'use client'

import type { Listing, Reservation, User } from '@prisma/client'
import { differenceInCalendarDays, eachDayOfInterval } from 'date-fns'
import { useRouter } from 'next/navigation'
import React, { useCallback, useEffect, useMemo, useState } from 'react'
import type { Range } from 'react-date-range'
import toast from 'react-hot-toast'

import createReservation from '@/app/actions/createReservation'
import Container from '@/components/Container'
import ListingHead from '@/components/listings/ListingHead'
import ListingInfo from '@/components/listings/ListingInfo'
import ListingReservation from '@/components/listings/ListingReservation'
import { categories } from '@/components/navbar/Categories'
import useLoginModal from '@/hooks/useLoginModal'
import type { SafeUser } from '@/types/SafeUser'

const initialDateRange: Range = {
  startDate: new Date(),
  endDate: new Date(),
  key: 'selection',
}

type ListingClientProps = {
  reservations?: Reservation[]
  listing: Listing & { user: User }
  currentUser?: SafeUser | null
}

const ListingClient: React.FC<ListingClientProps> = ({
  reservations = [],
  listing,
  currentUser,
}) => {
  const loginModal = useLoginModal()
  const router = useRouter()

  const disabledDates = useMemo(() => {
    const dates = reservations.flatMap((reservation) =>
      eachDayOfInterval({
        start: new Date(reservation.startDate),
        end: new Date(reservation.endDate),
      }),
    )

    return dates
  }, [reservations])

  const [isLoading, setIsLoading] = useState(false)
  const [totalPrice, setTotalPrice] = useState(listing.price)
  const [dateRange, setDateRange] = useState(initialDateRange)

  const onCreateReservation = useCallback(async () => {
    if (!currentUser) return loginModal.onOpen()

    try {
      setIsLoading(true)

      await createReservation({
        listingId: listing.id,
        totalPrice,
        startDate: dateRange.startDate,
        endDate: dateRange.endDate,
        userId: currentUser.id,
      })

      toast.success('Listing reserved!')
      setDateRange(initialDateRange)
      router.push('/trips')
      router.refresh()
    } catch (err) {
      toast.error('Something Went Wrong')
    } finally {
      setIsLoading(false)
    }
  }, [
    currentUser,
    dateRange.endDate,
    dateRange.startDate,
    listing.id,
    loginModal,
    router,
    totalPrice,
  ])

  useEffect(() => {
    if (dateRange.startDate && dateRange.endDate) {
      const dayCount = differenceInCalendarDays(
        dateRange.endDate,
        dateRange.startDate,
      )

      if (dayCount && listing.price) {
        setTotalPrice(dayCount * listing.price)
      } else {
        setTotalPrice(listing.price)
      }
    }
  }, [dateRange.endDate, dateRange.startDate, listing.price])

  const category = useMemo(
    () => categories.find((item) => item.label === listing.category),
    [listing.category],
  )

  return (
    <Container>
      <div className="mx-auto max-w-screen-xl">
        <div className="flex flex-col gap-6">
          <ListingHead
            id={listing.id}
            title={listing.title}
            imageSrc={listing.imageSrc}
            locationValue={listing.locationValue}
            currentUser={currentUser}
          />
          <div className="mt-6 grid grid-cols-1 md:grid-cols-7 md:gap-10">
            <ListingInfo
              user={listing.user}
              category={category}
              description={listing.description}
              roomCount={listing.roomCount}
              guestCount={listing.guestCount}
              bathroomCount={listing.bathroomCount}
              locationValue={listing.locationValue}
            />
            <div className="order-first mb-10 md:order-last md:col-span-3">
              <ListingReservation
                price={listing.price}
                totalPrice={totalPrice}
                dateRange={dateRange}
                disabled={isLoading}
                disabledDates={disabledDates}
                onChangeDate={(value) => setDateRange(value)}
                onSubmit={onCreateReservation}
              />
            </div>
          </div>
        </div>
      </div>
    </Container>
  )
}

export default ListingClient
全体を説明するのは本筋とは逸れるので、興味がある人は、全体の処理を読んでみてください。
以下が、予約されている日付を非活性化する処理です。
返却値であるdatesが非活性化となる日付、つまり既に予約されている日付が格納される配列です。
処理の内容ですが、flatMapで配列を1次元としています。
flatMapがわからない方は以下の記事がおすすめです。
なぜ、そのような処理が必要なのかというと、以下の2つの理由があります。
1.宿泊施設には複数の予約が紐づいているため
2.react-date-rangeのDateRangeコンポーネントのdisabledDatesで日付の非活性を管理するため(これはDate[]を渡す必要があります)
そのため、複数の予約に対して予約している日付の範囲を1次元の配列で取得する必要があります。
(次のeachDayOfIntervalの解説で合点がいくはずです)
以下は、date-fnsでよく使う関数がまとめらている記事です。
ということで、eachDayOfIntervalですが、これは指定された期間内の各日付を生成します。
今回の場合でいうと、各予約の開始日と終了日を指定し、予約開始日から予約終了日までの各日付を要素として持つ配列を生成しています。
つまり、予約が複数ある場合は、型がDate[][]と2次元の配列となります。
具体的な値を用いて解説します。
まずは「予約が1つの場合」です
例えば、予約が開始日が2022年1月1日、終了日が2022年1月3日である場合、eachDayOfInterval関数は以下のような配列を生成します。
[2022年1月1日, 2022年1月2日, 2022年1月3日]
この場合は、1次元の配列なのでflatMapの必要性はありません。
次に「予約が2つの場合」を見てみましょう。
例えば、以下のような2つの予約があるとします。
- 予約1:開始日が2022年1月1日、終了日が2022年1月3日
- 予約2:開始日が2022年1月5日、終了日が2022年1月6日
これらの予約に対してeachDayOfInterval関数を適用すると、以下のような2つの配列が生成されます。
[ [2022年1月1日, 2022年1月2日, 2022年1月3日], [2022年1月5日, 2022年1月6日] ]
もうおわかりかと思いますが、当然ながら宿泊施設のシステムなどは1つの施設に予約が複数存在しているので、予約が1つということは非常にレアな状況でしかありません。
そのため、2次元の配列を1次元にするflatMapを使用する必要があるのです。
 const disabledDates = useMemo(() => {
   const dates: Date[] = reservations.flatMap((reservation) =>
     eachDayOfInterval({
       start: new Date(reservation.startDate),
       end: new Date(reservation.endDate),
     }),
   )

    return dates
 }, [reservations])
このdatesが以下のListingReservationにdisabledDatesというpropsとして渡ります。
'use client'

import React from 'react'
import type { Range } from 'react-date-range'

import Button from '@/components/Button'
import Calendar from '@/components/inputs/Calendar'

type ListingReservationProps = {
 price: number
 totalPrice: number
 dateRange: Range
 disabled: boolean
 disabledDates: Date[]
 onChangeDate: (value: Range) => void
 onSubmit: () => void
}

const ListingReservation: React.FC<ListingReservationProps> = ({
 price,
 totalPrice,
 dateRange,
 disabled,
 disabledDates,
 onChangeDate,
 onSubmit,
}) => {
 return (
   <div className="overflow-hidden rounded-xl border-[1px] border-neutral-200 bg-white">
     <div className="flex flex-row items-center gap-1 p-4">
       <div className="text-2xl font-semibold">$ {price}</div>
       <div className="font-light text-neutral-600">night</div>
     </div>
     <hr />
     <Calendar
       value={dateRange}
       disabledDates={disabledDates}
       onChange={(value) => onChangeDate(value.selection)}
     />
     <hr />
     <div className="p-4">
       <Button label="Reserve" disabled={disabled} onClick={onSubmit} />
     </div>
     <div className="flex flex-row items-center justify-between p-4 text-lg font-semibold">
       <div>Total</div>
       <div>$ {totalPrice}</div>
     </div>
   </div>
 )
}

export default ListingReservation
このコンポーネントでは予約を新規登録できます。
私の実装では、カレンダーで日付を指定して予約できるようになっています。
そのため、カレンダーで既に予約がある日付は非活性とする必要があります。
それを実現しているのが、Calendarコンポーネントのreact-date-rangeのDateRangeコンポーネントのdisabledDatesです。
import 'react-date-range/dist/styles.css'
import 'react-date-range/dist/theme/default.css'

import React from 'react'
import { DateRange, type Range, type RangeKeyDict } from 'react-date-range'

type CalendarProps = {
  value: Range
  disabledDates?: Date[]
  onChange: (value: RangeKeyDict) => void
}

const Calendar: React.FC<CalendarProps> = ({
  value,
  disabledDates,
  onChange,
}) => {
  return (
    <DateRange
      rangeColors={['#262626']}
      ranges={[value]}
      date={new Date()}
      direction="vertical"
      showDateDisplay={false}
      minDate={new Date()}
      disabledDates={disabledDates}
      onChange={onChange}
    />
  )
}

export default Calendar
このようにすることで、予約済みの日付は非活性となり、見た目も入力も不可となり、ダブルブッキングを避けることができます。
ちなみに、react-date-rangeは簡単にカレンダーのUIが作れるので、触ってみてください。
長くなりましたが、以上で今回の解説は終了です。
どなたかの参考になれば幸いです。
おわりに
感想ベースですが、予約管理の機能は初めて実装しました。
かなり学びが多かったり、API設計からパラメータやURLの生成などを通して、設計・実装の引き出しが増えたと思います。
引き出しを増やすにはインプットも重要ですが、それ以上にアウトプットと振り返りが重要だなとしみじみ感じました。
参考文献
Discussion
全体を通して分かりやすい解説ありがとうございます!
カレンダーまわりの機能が一番大変そうだと感じました。宿泊予約はよく利用するサービスなのでこのような技術が使われているんだなと勉強になりました!
すごく勉強になります。全ソースコードをgithub等で公開していただけますと嬉しいです
ありがとうございます!
ソースコードですが、GitHubに公開済みです。
また、本文の「はじめに」の部分にリンクを記載したので、覗いてみてください。
ありがとうございます。
参考にさせていただきます!