【Supabase × React】認証機能の実装方法
はじめに
今回は、SupabaseとReactを用いて認証機能を実装する方法についてまとめました。
ここでいう認証機能は以下です。
- サインアップ(ユーザー登録)機能
- ログイン機能
- ログアウト機能
- パスワードリセット機能
- パスワード再設定用URLメール送信機能
- パスワード再設定機能
余談ですが、他にも良質な記事はありました。しかしながら、どの記事もNext.jsでの実装が前提となっていました。
私が作成したものはVite×ReactのSPAでの実装で、Reactのみの実装の記事もあったら良いなと思い記事にさせていただきました。
環境
- typescript 5.2
- vite 4.5.1
- react 18.2.0
- @types/react 7.5.3
- react-router-dom 6.19.0
- react-hook-form 7.48.2
- @hookform/resolver 3.3.2
- zod 3.22.4
- @supabase/supabase-js 2.39.2
- @supabase/auth-ui-react 0.4.7
- @supabase/auth-ui-shared 0.1.8
- @mui/material 5.14.18
- @mui/icons-material 5.14.18
- uuid 9.0.1
実装
それでは実装の解説に入ります。
まずは、Supabaseとアプリケーションの連携をして、SupabaseのAuth APIを実行できるようにします。
※ 既存のSupabaseのProjectがない場合は、作成しておく必要があります
(本記事は、SupabaseのProjectが既存で存在している場合を前提としています)
Supabaseとアプリケーションの連携
ここでは、SupabaseのProjectのIDとProject URL・API Keyを取得します。
また、メール認証を実装するため、その設定も行います。
Project IDの取得
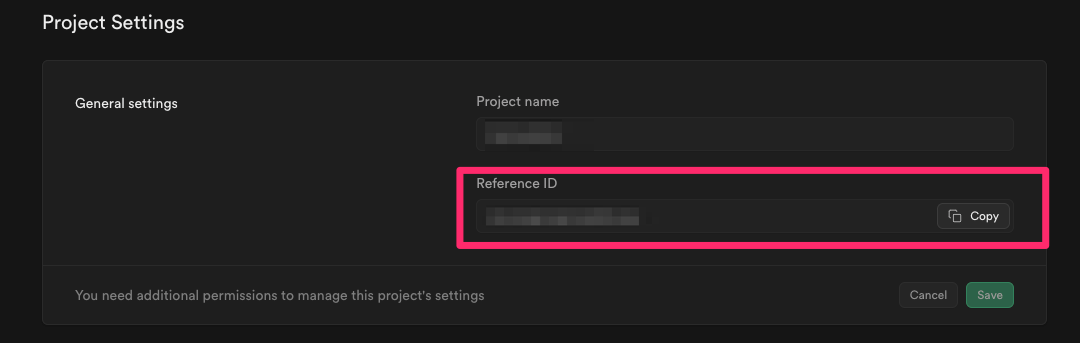
まず、SupabaseのDashboard画面から該当のProjectを選択します。
ProjectのHome画面に遷移できたら、「Project Settings」をクリックし、Projectの設定画面に遷移します。
(設定画面の初期画面であるGeneralに遷移できればOKです)
ここで、以下のReference IDをコピーします。
Supabaseの型生成
今回のアプリケーションではTypeScriptで開発をしているので、Supabaseの型を生成します。
以下の公式ドキュメントを参考に実施しまう。
まず、ターミナルで以下のコマンドを実行します。。
※ アプリケーションのディレクトリに移動しておいてください
npx supabase login
ブラウザが立ち上がり、Supabaseの画面が表示され、「アクセストークンが取得できた」旨のメッセージが表示されていればOKです。
ターミナルでは以下のようになっていればOKです。
Token cli_username@MacBook-hoge_XXXXXXXXXXXX created successfully.
次に以下のコマンドを実行します。
その際、$PROJECT_REFを、先程コピーしたReference IDに置き換える必要があります。
また、types/supabase.tsの部分ですが、typesディレクトリを事前に作成しておく必要があります。
もちろん、libなど任意のディレクトリを指定することも可能です。
npx supabase gen types typescript --project-id "$PROJECT_REF" --schema public > types/supabase.ts
Project URL・API Keyの取得
Projectの設定画面から「API」のメニューをクリックし、画面遷移します。
以下のProject URLとProject API Keyのanon publicをコピーします。
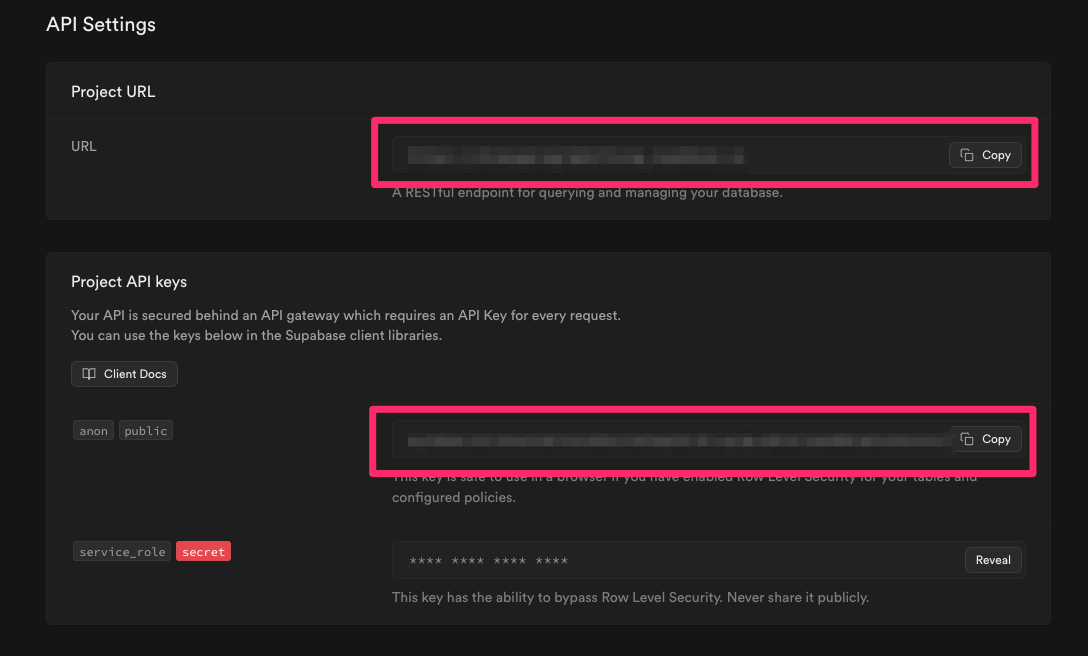
コピーしたProject URLとProject API Keyを環境変数ファイルに記述します。
VITE_SUPABASE_URL = "Project URL"
VITE_SUPABASE_API_KEY = "Project API Key"
Viteではimport.meta.env.VITE_SUPABASE_URLのように環境変数にアクセスします。
Authentication Providerの設定
Projectの設定画面のサイドメニューから「Authentication」のをクリックし、画面遷移します。
その後、「Providers」を選択し、以下のようにEmailをEnabledとし、有効化します。
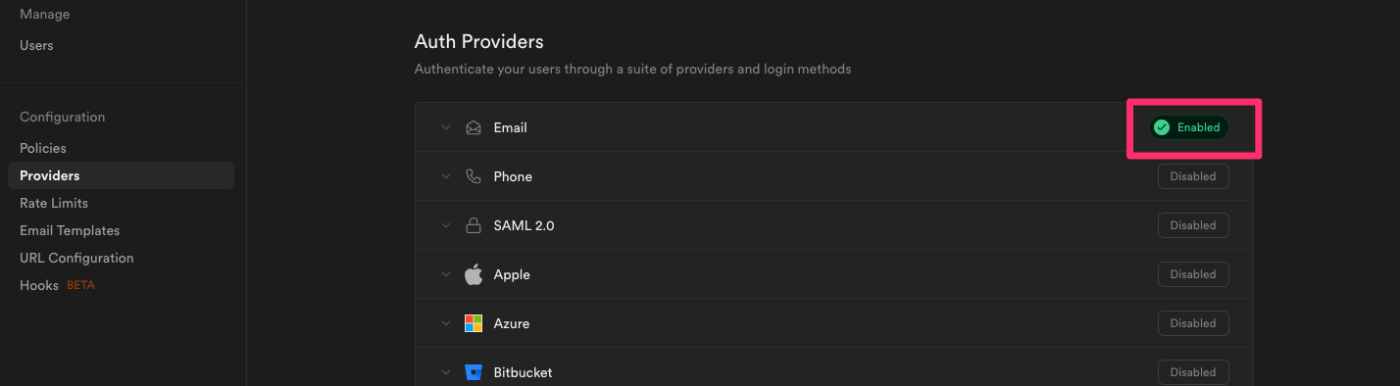
ここまでで、ReactアプリケーションとのSupabaseの連携・管理画面での設定は完了です。
認証機能
ここからが本題となる認証機能の実装です。
ですが、その前に、必要なライブラリをインストールし、SupabaseClientを作成する必要があります。
SupabaseClientにより、アプリケーション全体でSupabaseのAPIを使用できるようになります。
まずは、ライブラリの導入から行います。
以下の公式のクイックスタートを参照し、行います。
※ Reactアプリケーション×Supabaseを0から作成する場合にも以下を参照して行ってください。
yarn add @supabase/supabase-js @supabase/auth-ui-react @supabase/auth-ui-shared
次にSupabaseClientを作成します。
以下のようにutilsなどのディレクトリにファイルを作成し、記述を行います。
import { createClient } from "@supabase/supabase-js";
import type { Database } from "../types/supabase";

export const supabase = createClient<Database>(
  import.meta.env.VITE_SUPABASE_URL,
  import.meta.env.VITE_SUPABASE_API_KEY,
);
SupabaseのcreateClientに、supabaseUrlとsupabaseKeyを渡して、SupabaseClientを作成します。
DatabaseはSupabaseの型を生成した際に作成されたinterfaceです。
これで、SupabaseのAuth APIをsupabase.〇〇のような形式で使用することができます。
サインアップ機能
以下、ドキュメントを参照し、機能実装します。
実装したロジックやUIは以下となります。
import { zodResolver } from "@hookform/resolvers/zod";
import ArrowForwardIcon from "@mui/icons-material/ArrowForward";
import LockOutlinedIcon from "@mui/icons-material/LockOutlined";
import PersonOutlineOutlinedIcon from "@mui/icons-material/PersonOutlineOutlined";
import { Box } from "@mui/material";
import { useForm } from "react-hook-form";
import { useNavigate } from "react-router-dom";

import { AccountFormFooter } from "../../../../components/ui-elements/AccountFormFooter";
import AccountTextField from "../../../../components/ui-elements/AccountTextField";
import { supabase } from "../../../../utils/supabase";
import { signUpInputSchema } from "../../types/SignUpFormInput";

import type { SignUpFormInput } from "../../types/SignUpFormInput";
import type { SubmitHandler } from "react-hook-form";

export const LoginForm = () => {
  const navigate = useNavigate();

  const {
    handleSubmit,
    control,
    formState: { isSubmitting, errors },
    reset,
  } = useForm<SignUpFormInput>({
    resolver: zodResolver(signUpInputSchema),
    defaultValues: {
      email: "",
      password: "",
    },
  });

  const onSubmit: SubmitHandler<SignUpFormInput> = async (data) => {
    try {
      const { email, password } = data;
      const { error } = await supabase.auth.signUp({
        email,
        password,
	options: {
	  emailRedirectTo: `${window.location.origin}/welcome`
	}
      });

      if (error) {
        throw new Error(error.message);
      }
      navigate("/");
    } catch (err) {
      console.log(err);
    } finally {
      reset();
    }
  };

  const handleClick = () => {
    navigate("/login", { state: { referrer: "signUp" } });
  };

  return (
    <Box
      component="form"
      sx={{
        display: "flex",
        flexDirection: "column",
        gap: "32px",
        width: "100%",
      }}
      onSubmit={handleSubmit(onSubmit)}
    >
      <AccountTextField
        id="email"
        name="email"
        control={control}
        error={errors.email?.message}
        type="text"
        label="メールアドレス"
        secondaryLabel="メールアドレスを入力..."
        icon={<PersonOutlineOutlinedIcon />}
        disabled={isSubmitting}
      />
      <AccountTextField
        id="password"
        name="password"
        control={control}
        type="password"
        error={errors.password?.message}
        label="パスワード"
        secondaryLabel="パスワードを入力..."
        icon={<LockOutlinedIcon />}
        disabled={isSubmitting}
      />
      <AccountFormFooter
        disabled={isSubmitting}
        text="サインアップ"
        icon={<ArrowForwardIcon />}
        secondaryText="アカウントを持っている場合"
        onClick={handleClick}
      />
    </Box>
  );
};
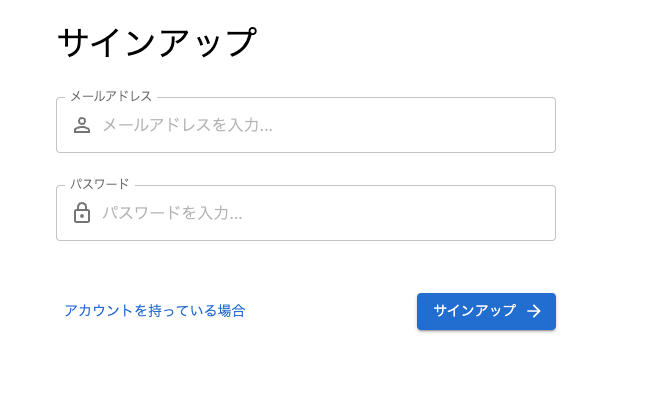
サインアップフォームのUIは以下のような簡易的なものになります。
実装部分の解説をします。
APIの部分はドキュメント通りなので実装自体は簡単です。
emailとpassword、optionsを引数に渡すことで実装ができます。
SupabaseのAuth APIの関数は基本的に返り値として、dataやerrorを返してくれるので、それを受け取り、errorがあれば例外をthrowするようにしています。
(この処理は、他の認証機能の実装でも行っています)
emailRedirectToに任意のURLを渡すことでメールで送信されるURLのリダイレクト先が指定したURLとなります。
そのため、emailRedirectToで指定したページが存在しないと当然、404ページに遷移するなどの挙動になります。
また、Supabaseを用いたメール送信機能ではSupabase側のRedirect URLsという設定も必要です。
Redirect URLsの設定
以下は、Redirect URLsのドキュメントです。
こちらを参照し、設定していきます。
まず「Supabase Project画面」のサイドメニューからAuthenticationをクリックします。
画面遷移できたら、「URL Configuration」をクリックします。
その後、Redirect URLsのAdd URLでURLを追加します。
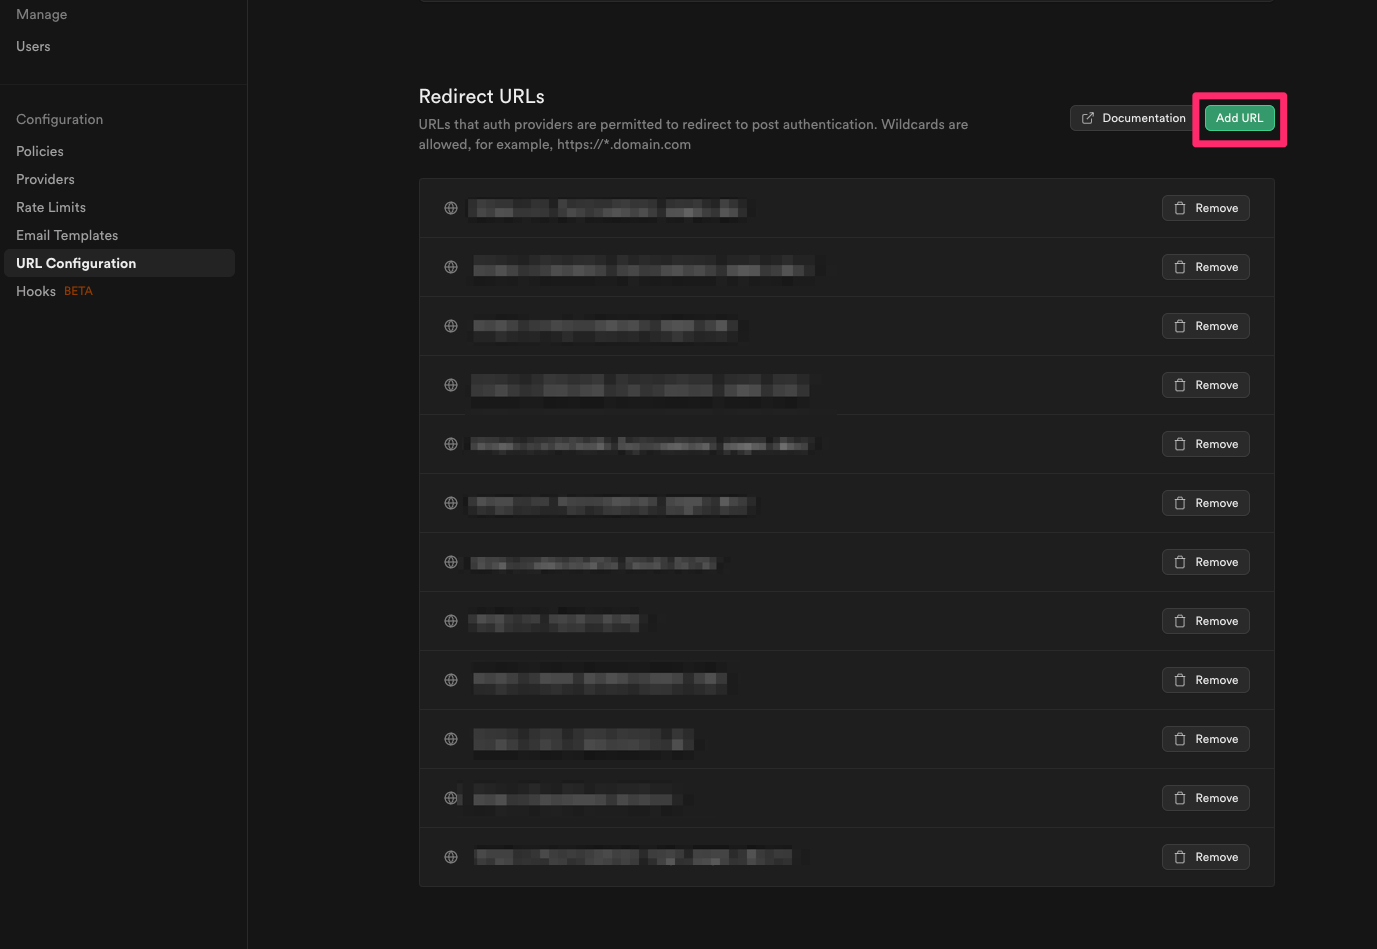
Add URLをクリックすると、モーダルが開くので入力欄にリダレクトをさせたいURLのドメインを入力します。
今回の場合は、http://localhost:3000/*を入力します。
これを入力すると、http://localhost:3000/fooやhttp://localhost:3000/barをemailRedirectToに指定すると、それらのURLがメールに記載されるURLのリダイレクト先になります。
(今回の場合はhttp://localhost:3000/welcomがメールのURLリンクとなります)
ログイン機能
続いて、ログイン機能です。
以下、ドキュメントを参照し、実装します。
実際に実装したUIやロジックは以下のとおりです。
import { zodResolver } from "@hookform/resolvers/zod";
import ArrowForwardIcon from "@mui/icons-material/ArrowForward";
import LockOutlinedIcon from "@mui/icons-material/LockOutlined";
import PersonOutlineOutlinedIcon from "@mui/icons-material/PersonOutlineOutlined";
import { Box } from "@mui/material";
import { useForm } from "react-hook-form";
import { useNavigate } from "react-router-dom";

import { AccountFormFooter } from "../../../../components/ui-elements/AccountFormFooter";
import AccountTextField from "../../../../components/ui-elements/AccountTextField";
import { supabase } from "../../../../utils/supabase";
import { loginInputSchema } from "../../types/LoginFormInput";

import type { LoginFormInput } from "../../types/LoginFormInput";
import type { SubmitHandler } from "react-hook-form";

export const LoginForm = () => {
  const navigate = useNavigate();

  const {
    handleSubmit,
    control,
    formState: { isSubmitting, errors },
    reset,
  } = useForm<LoginFormInput>({
    resolver: zodResolver(loginInputSchema),
    defaultValues: {
      email: "",
      password: "",
    },
  });

  const onSubmit: SubmitHandler<LoginFormInput> = async (data) => {
    try {
      const { email, password } = data;
      const { error } = await supabase.auth.signInWithPassword({
        email,
        password,
      });

      if (error) {
        throw new Error(error.message);
      }
      navigate("/");
    } catch (err) {
      console.log(err);
    } finally {
      reset();
    }
  };

  const handleClick = () => {
    navigate("/reset_password", { state: { referrer: "login" } });
  };

  return (
    <Box
      component="form"
      sx={{
        display: "flex",
        flexDirection: "column",
        gap: "32px",
        width: "100%",
      }}
      onSubmit={handleSubmit(onSubmit)}
    >
      <AccountTextField
        id="email"
        name="email"
        control={control}
        error={errors.email?.message}
        type="text"
        label="メールアドレス"
        secondaryLabel="メールアドレスを入力..."
        icon={<PersonOutlineOutlinedIcon />}
        disabled={isSubmitting}
      />
      <AccountTextField
        id="password"
        name="password"
        control={control}
        type="password"
        error={errors.password?.message}
        label="パスワード"
        secondaryLabel="パスワードを入力..."
        icon={<LockOutlinedIcon />}
        disabled={isSubmitting}
      />
      <AccountFormFooter
        disabled={isSubmitting}
        text="ログイン"
        icon={<ArrowForwardIcon />}
        secondaryText="パスワードを忘れた場合"
        onClick={handleClick}
      />
    </Box>
  );
};
ログインフォームのUIは以下のような簡易的なものになります。

ここもAPIの部分はドキュメント通りなので実装自体は簡単にできます。
emailとpasswordを引数に渡すことでログイン機能の実装ができます。
次はログアウトを見ていきましょう。
ログアウト機能
ログアウト機能もドキュメントどおりに実装していきます。
実際のログアウトの実装は以下のとおりです。
import { Logout } from "@mui/icons-material";
import { Button } from "@mui/material";
import { useCallback } from "react";
import { useNavigate } from "react-router-dom";

import { supabase } from "./utils/supabase";

const SideBar = () => {
  const navigate = useNavigate();

  const onLogout = useCallback(async () => {
    try {
      const { error } = await supabase.auth.signOut();
      if (error) {
        throw new Error(error.message);
      }
      navigate("/login");
    } catch (err) {
      console.log(err);
    }
  }, [navigate]);

  return (
    <Button
      color="error"
      variant="text"
      startIcon={<Logout />}
      onClick={onLogout}
    >
      ログアウト
    </Button>
  );
};

export default SideBar;
このように簡単に実装できます。
パスワードリセット機能
本機能は以下のドキュメントを参照し、実装します。
それでは、実際の実装を見ていきましょう。
前もって認識していただきたいのですが、この機能のみコンポーネントを、実装上2つに分けています。
またカスタムフックを1つ作成しています。
それぞれ解説します。
import { zodResolver } from "@hookform/resolvers/zod";
import { Box, Typography } from "@mui/material";
import { useForm } from "react-hook-form";
import { z } from "zod";

import { useIsLocationState } from "../../../hooks/useIsLocationState";
import { loginInputSchema } from "../../login/types/LoginFormInput";

import { ResetPasswordForm } from "./ResetPasswordForm";

export const ResetPasswordPage = () => {
  useIsLocationState("/login");

  const emailSchema = z.object({
    email: loginInputSchema.shape.email,
  });

  const {
    handleSubmit,
    control,
    formState: { isSubmitting, isSubmitSuccessful, errors },
    reset,
  } = useForm<{ email: string }>({
    resolver: zodResolver(emailSchema),
    defaultValues: { email: "" },
  });

  return (
    <Box
      sx={{
        display: "flex",
        flexDirection: "column",
        alignItems: "flex-start",
        gap: "32px",
        width: "100%",
      }}
    >
      <Typography variant="h4" align="left">
        パスワード再設定
      </Typography>
      {isSubmitSuccessful ? (
        <Typography variant="body1">
          パスワードの再設定URLを送信しました。メールをご確認ください。
        </Typography>
      ) : (
        <ResetPasswordForm
          handleSubmit={handleSubmit}
          control={control}
          isSubmitting={isSubmitting}
          errors={errors}
          reset={reset}
        />
      )}
    </Box>
  );
};
まず、ResetPasswordPage.tsxですが、ここはフォームの型定義と、画面の切り替えを行っています。
react-hook-formのformState: { isSubmitSuccessful } で送信が成功した場合に、メールが送信された旨のメッセージを送信するようにしています。
続いてカスタムフックのuseIsLocationStateを解説します。
import { useEffect } from "react";
import { useLocation, useNavigate } from "react-router-dom";

export const useIsLocationState = (path: string) => {
  const navigate = useNavigate();
  const location = useLocation();

  useEffect(() => {
    if (!location.state) {
      navigate(path);
    }
  }, [location.state, navigate, path]);
};
このカスタムフックは、ブラウザバックを制御しています。
useNavigateでnavigate("/reset_password", { state: { referrer: "login" } });のようにstateがない画面遷移の場合、引数に渡したpathに強制的に遷移するようにしています。
今回の場合、ログイン画面からの遷移でない場合は、ログイン画面に遷移させるようにしています。
例えば、ホーム画面から/reset_passwordとURLを直打ちした場合に、location.stateが存在しないので、強制的にログイン画面に遷移します。
そうすると/reset_passwordにはログイン画面からの遷移でしか行けないので、ブラウザバックした際には必ずログイン画面が表示されるという要件を満たすことができます。
最後に、パスワードリセットのフォームのコンポーネントです。
import ArrowBackIcon from "@mui/icons-material/ArrowBack";
import PersonOutlineOutlinedIcon from "@mui/icons-material/PersonOutlineOutlined";
import SendIcon from "@mui/icons-material/Send";
import { Box } from "@mui/material";
import { useCallback } from "react";
import { useNavigate } from "react-router-dom";
import { v4 as uuidv4 } from "uuid";

import { AccountFormFooter } from "../../../../components/ui-elements/AccountFormFooter";
import AccountTextField from "../../../../components/ui-elements/AccountTextField";
import { supabase } from "../../../../utils/supabase";

import type {
  Control,
  FieldErrors,
  SubmitHandler,
  UseFormHandleSubmit,
  UseFormReset,
} from "react-hook-form";

type Props = {
  handleSubmit: UseFormHandleSubmit<{ email: string }>;
  control: Control<{ email: string }>;
  isSubmitting: boolean;
  errors: FieldErrors<{ email: string }>;
  reset: UseFormReset<{ email: string }>;
};

export const ResetPasswordForm: React.FC<Props> = ({
  handleSubmit,
  control,
  isSubmitting,
  errors,
  reset,
}) => {
  const navigate = useNavigate();

  const goBack = useCallback(() => {
    navigate("/login");
  }, [navigate]);

  const onSubmit: SubmitHandler<{ email: string }> = async (data) => {
    const { email } = data;
    const token = uuidv4();

    try {
      const { error } = await supabase.auth.resetPasswordForEmail(email, {
        redirectTo: `${window.location.origin}/reset_password/${token}`,
      });

      if (error) {
        throw new Error(error.message);
      }
      alert("パスワード再設定メールを送信しました。メールを確認してください。");
    } catch (err) {
      console.log(err);
    } finally {
      reset();
    }
  };

  return (
    <Box
      component="form"
      sx={{
        display: "flex",
        flexDirection: "column",
        gap: "32px",
        width: "100%",
      }}
      onSubmit={handleSubmit(onSubmit)}
    >
      <AccountTextField
        id="email"
        name="email"
        control={control}
        error={errors.email?.message}
        type="text"
        label="メールアドレス"
        secondaryLabel="メールアドレスを入力..."
        icon={<PersonOutlineOutlinedIcon />}
        disabled={isSubmitting}
      />
      <AccountFormFooter
        disabled={isSubmitting}
        text="パスワードを再設定する"
        secondaryText="ログイン画面に戻る"
        icon={<SendIcon />}
        secondaryIcon={<ArrowBackIcon />}
        onClick={goBack}
      />
    </Box>
  );
};
パスワードリセットでは、パスワード再設定のメールが送信される関数を実装します。
その関数がresetPasswordForEmailです。
引数に入力したemailとサインアップ機能の実装と同様にメールに記載されるURLのリンク(リダイレクト先)となるパスを引数に渡します。
今回の場合、redirectToで指定したパスがhttp://localhost:3000/reset_password/hogefugaのようになります。
そのため、Supabase側のRedirect URLsの設定で、URLを追加する必要があります。
以下にRedirect URLsのワイルドカードの詳細な記述があります。
上記を参照すると、http://localhost:3000/*の場合は、http://localhost:3000/fooやhttp://localhost:3000/barをメールに記載されるURLのリンクとして設定できます。
しかし、http://localhost:3000/foo/bazはメールに記載されるURLのリンクとして設定できない事がわかります。
そのため新たに、http://localhost:3000/**をSupabaseのProject > Authentication > URL Configurationから追加する必要があります。
この**のURLドメインを追加することでhttp://localhost:3000/foo/bazのようなURLもメールに記載されるURLのリンクとして設定することができます。
つまり、http://localhost:3000/reset_password/:tokenのURLを設定できるということになります。
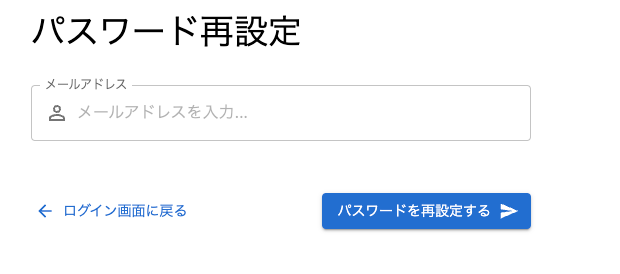
この機能のUIは、以下のようになります。
続いて、メールの件名は本文の設定をしていきます。
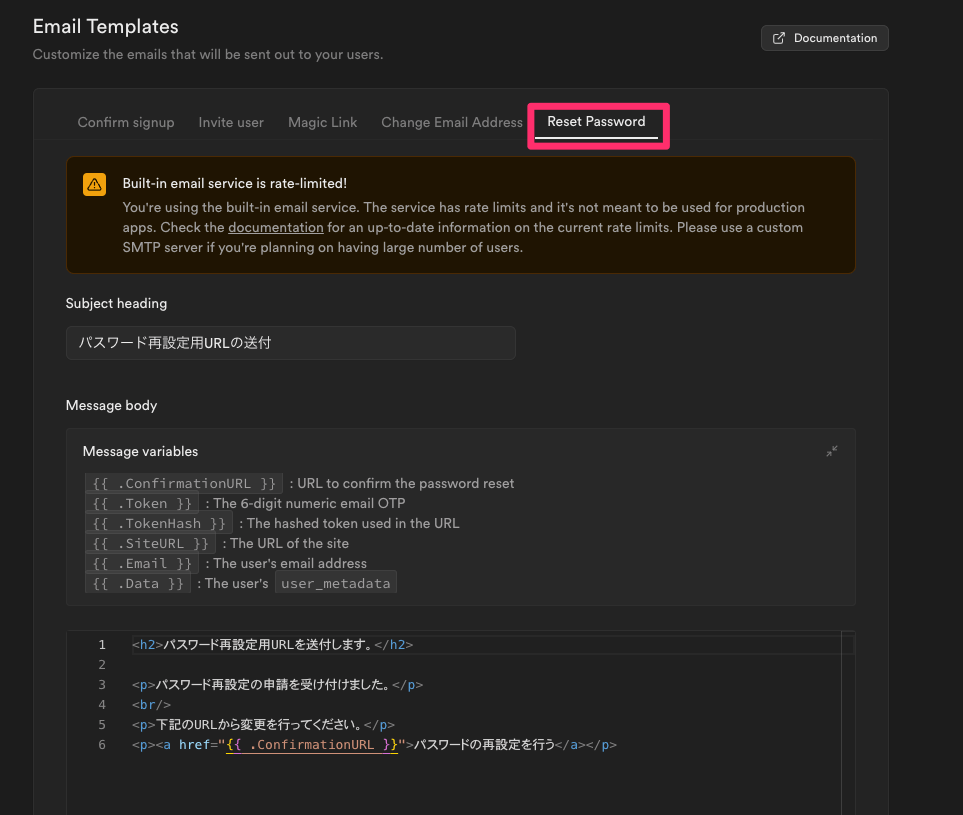
パスワード再設定用URLメール送信機能
まずSupabaseのProject > Authentication > Email Templatesで画面遷移します。
以下のReset Passwordタブからパスワード再設定用のメールの設定が行なえます。
その他にも、サインアップ時のメールの設定なども行えます。
 `
`
.ConfirmationURLにresetPasswordForEmailのredirectToで指定したURLがリダイレクトリンクとして渡されます。
最後にパスワード再設定機能の実装を見ていきましょう。
パスワード再設定機能
以下のドキュメントを参照し、パスワードの再設定機能を実装します。
以下が、実際の実装です。
import { zodResolver } from "@hookform/resolvers/zod";
import DoneIcon from "@mui/icons-material/Done";
import LockOutlinedIcon from "@mui/icons-material/LockOutlined";
import { Box } from "@mui/material";
import { useForm } from "react-hook-form";
import { useNavigate } from "react-router-dom";

import { AccountFormFooter } from "../../../../components/ui-elements/AccountFormFooter";
import AccountTextField from "../../../../components/ui-elements/AccountTextField";
import { supabase } from "../../../../utils/supabase";
import { resetPasswordFormInputSchema } from "../../types/ResetPasswordIFormInput";

import type { ResetPasswordFormInput } from "../../types/ResetPasswordIFormInput";
import type { SubmitHandler } from "react-hook-form";

export const ResetPasswordInputForm = () => {
  const navigate = useNavigate();

  const {
    handleSubmit,
    control,
    formState: { isSubmitting, errors },
    reset,
  } = useForm<ResetPasswordFormInput>({
    resolver: zodResolver(resetPasswordFormInputSchema),
    defaultValues: { password: "", passwordConfirmation: "" },
  });

  const onSubmit: SubmitHandler<ResetPasswordFormInput> = async (data) => {
    try {
      const { password, passwordConfirmation } = data;

      const { error } = await supabase.auth.updateUser({
        password,
      });

      if (error) {
        throw new Error(error.message);
      }

      navigate("/login", {
        state: { referrer: "login" },
      });
    } catch (err) {
      console.log(err);
    } finally {
      reset();
    }
  };

  return (
    <Box
      component="form"
      sx={{
        display: "flex",
        flexDirection: "column",
        gap: "32px",
        width: "100%",
      }}
      onSubmit={handleSubmit(onSubmit)}
    >
      <AccountTextField
        id="password"
        name="password"
        control={control}
        error={errors.password?.message}
        type="password"
        label="新規パスワード"
        secondaryLabel="パスワードを入力..."
        icon={<LockOutlinedIcon />}
        disabled={isSubmitting}
      />
      <AccountTextField
        id="passwordConfirmation"
        name="passwordConfirmation"
        control={control}
        error={errors.passwordConfirmation?.message}
        type="password"
        label="新規パスワード確認"
        secondaryLabel="パスワードをもう一度入力..."
        icon={<LockOutlinedIcon />}
        disabled={isSubmitting}
      />
      <AccountFormFooter
        disabled={isSubmitting}
        text="パスワードを設定"
        icon={<DoneIcon />}
      />
    </Box>
  );
};
基本的には、これまでの実装と同じです。
updateUserにオブジェクトで入力された新規のpasswordを渡すことでパスワードの再設定が完了です。
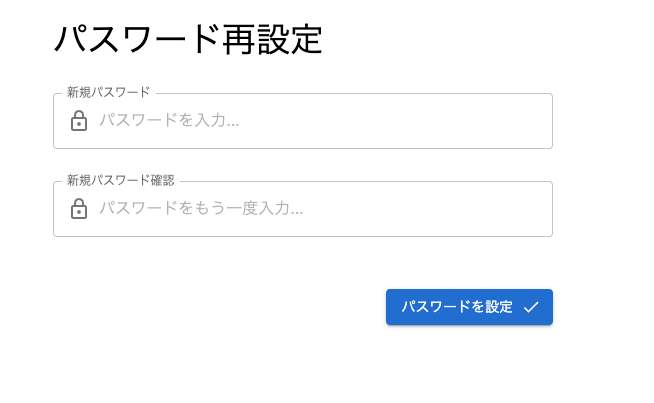
以下は、パスワードの再設定画面のUIです。
おわりに
ここまで読んでくださり、ありがとうございます!
SupabaseのAuthenticationの機能を使用すれば、認証周りは面倒な処理も簡単に実装できると痛感しました。
ぜひ実装してみてください。
参考文献
Discussion