Host Assistantメモ
Home Assitant環境を構築していく。
構築タイプはいくつかある。
- Home Assistant Container
- Home Assistant Supervised
- Home Assistant Core
無難にContainerを選択する。
結局のところ、docker runでイメージを取得することになりそう。
ポート8123で動作するので、 ufw allow 8123/tcp でfirewallを開ける。
まずはMatterデバイスを管理したい。拡張機能はHome AssitantにおいてIntegrationと呼ばれていて、Matterも公式にサポートされている。
ただしMatterは簡単に実装できないため、外部サーバーを立てることになる。
とはいっても導入手順がまとめられている。
結局のところ、docker runでイメージを取得することになりそう。
Matter Serverが起動したら、Home Assitant側でMatter Integrationを追加する。
HEMS / echonet-liteはややこしい。まず公式にはサポートされていない。非公式拡張をまとめる仕組みとしてHACS; Home Assistant Community Storeが広く使われている模様。
GitHubリポジトリからダウンロードする仕組みの都合上、GitHubアカウントが必要な模様。
インストール方法もまとめられている。
結局、コンテナ内に入ってコマンド実行することになりそう。
docker exec -it homeassistant bash
wget -O - https://get.hacs.xyz | bash -
HACS内で検索するとECHONETLiteカスタムコンポーネントが見つかる。
しかし、HEMS / echonet-lite通信特有の設定が必要になる。echonet-liteは3610/ucpを使うため、firewallを開けておく必要がある。また、マルチキャスト通信も使うため、ルーティングテーブルを設定しておく必要がある。
ufw allow 3610/udp
ip route add 224.0.0.0/4 dev eth0
デバイス名は適切なものに変更する必要がある。
後はHACS内でechonetliteをインストールする。上記マルチキャストが有効になっていれば、HEMS / echonet-liteデバイスは自動検出される。
Home Assistantで管理しているデバイスをMatterデバイスとして公開してくれるアドオンがあるらしい。
ポート8482でUIを公開するので、 ufw allow 8482/tcp でfirewallを開ける。またMatter Bridgeとしてはポート5540で公開するので、 ufw allow 5540/tcp でfirewallを開ける。
Home Assistant側で長期アクセストークンを取得すれば、あとは docker run で起動する。
これらのエントリがあるので、ローカル通信は許可されていて、特段firewallを開ける必要はなかったようだ。
# ufw status numbered
Status: active

     To                         Action      From
     --                         ------      ----
[ 1] Anywhere                   ALLOW IN    192.168.1.0/24
...
[ 8] Anywhere (v6)              ALLOW IN    fe80::/64
...
結局、複数のコンテナになるので、docker composeでまとめているんだが、HEMSコントローラーがうまく認識できなくなった。
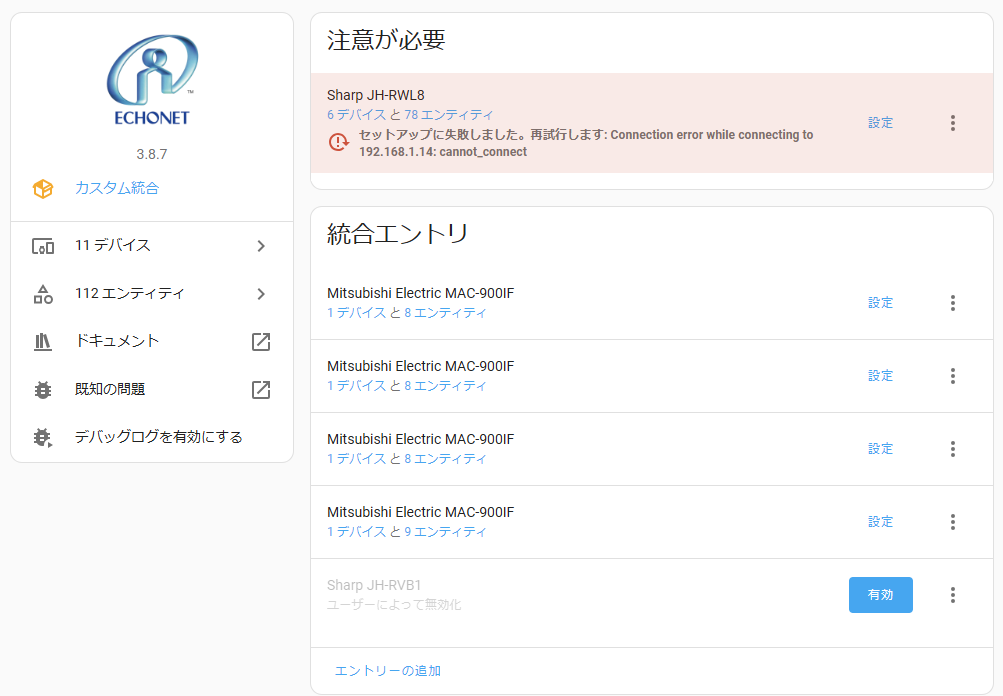
echonetliteはUDPなので接続も何もないし、認証もなく、データを投げつけるだけなのに接続エラーと。このHEMSコントローラーは1台で3ノード(コントローラー、太陽光、蓄電池)を持っているので、そこの順序が入れ違ってマッチングできなくなっているのか? だとするとこのカスタム統合側のバグでしかないんだが、うーん。
これらのエントリがあるので、ローカル通信は許可されていて、特段firewallを開ける必要はなかったようだ。
ということはなくて、Google HomeからHome Assistant Matter Hubへ接続できなくなった。なおApple Homeからは接続できているので、firewallの問題。(と気付くまでずいぶん遠回りした)
ufw allow in on enp1s0 to any port 5540
厳密にはHome Aassistantではないが、iTunes Media Libraryを用意して、そこからAirPlayで音楽再生したい。
forked-daapdから更に派生したOwnToneが現在の最新な模様。
こちらもdocker runすればいいらしい。
電力メーター情報発信サービス(Bルートサービス)を使うことでリアルタイムの買電量と売電量、累計の買電量と売電量などが取得できるようになる。通信プロトコルはWi-SUNを使うため専用のデバイスが必要になる。
Nature Remo E2のようなデバイスもある。
API仕様を見る限り、Cloud APIを呼び出す必要があり、そのためにAPI Tokenも必要がある。
RL7023 Stick-D/DSSのようなデバイスはUIは用意されていないが、Home Assistantと連携できれば十分である。
B-Route Meter Integrationを使うことで連携できる。この拡張はROHMのBP35A1とBP35C2に対応している。実は、RL7023 Stick-D/DSSはBP35C2とコマンド体系が同じなので、そのまま利用できる。
なお、Home Assistant 2025.6.0からasync_forward_entry_setup()が廃止されているため修正が必要になっている。
-await hass.config_entries.async_forward_entry_setup(entry, platform)
+await hass.config_entries.async_forward_entry_setups(entry, [platform])
これは修正された。
HACSは使いたくない。GitHubアカウントを操作されるのが気持ち悪いので。そこで、使っている拡張機能を直接読み込むことにした。
まず使っているものはこの2つ
ディレクトリ構造は /opt/homeassistant/core をルートに
- core
- repos
- echonetlite_homeassistant
- custom_components
- echonetlite
- custom_components
- b-route-meter
- custom_components
- b_route_meter
- custom_components
- echonetlite_homeassistant
- custom_components
- echonetlite
- b_route_meter
- repos
と作る。具体的には
# cd .../core
# mkdir -p repos custom_components
# cd repos
# git clone https://github.com/scottyphillips/echonetlite_homeassistant.git
# git clone https://github.com/yufeikang/b-route-meter.git
# cd ../custom_components
# ln -s ../repos/echonetlite_homeassistant/custom_components/echonetlite .
# ln -s ../repos/b-route-meter/custom_components/b_route_meter .
とgitリポジトリのサブディレクトリへシンボリックリンクを張った。