datastore と仲良くなります
datastore を docker でローカルに立てる
↓↓を使う
適当に exporse する PORT は変えます。
version: "3.9"
services:
  # DSAdmin container
  dsadmin:
    image: "ghcr.io/remko/dsadmin:latest"
    depends_on:
      - datastore
    ports:
      - "30303:8080"
    environment:
      DATASTORE_PROJECT_ID: my-datastore-project
      DATASTORE_EMULATOR_HOST: "datastore:8081"

  # Datastore Emulator container
  datastore:
    image: "gcr.io/google.com/cloudsdktool/cloud-sdk:latest"
    volumes:
      - datastore_data:/opt/datastore/data
    ports:
      - "30300:8081"
    command: [
      "gcloud", "--quiet", "beta", "emulators" ,"datastore", "start",
      "--host-port=0.0.0.0:8081", "--data-dir=/opt/datastore/data"
    ]
    environment:
      CLOUDSDK_CORE_PROJECT: my-datastore-project

volumes:
  datastore_data:
サンプル通りで繋がります。
適当に追加したデータを golang で参照する
適当に入れます。
SDK が emulator を参照するように適当な環境変数を export します。
export DATASTORE_EMULATOR_HOST=localhost:30300
テスト書きます。通ります。
package main
import (
"context"
"testing"
"cloud.google.com/go/datastore"
"github.com/google/go-cmp/cmp"
)
type User struct {
ID string `datastore:"id"`
Name string `datastore:"name"`
}
func TestGet(t *testing.T) {
ctx := context.Background()
projectID := "my-datastore-project"
client, err := datastore.NewClient(ctx, projectID)
if err != nil {
t.Fatal(err)
}
var users []User
if _, err := client.GetAll(ctx, datastore.NewQuery("Users"), &users); err != nil {
t.Fatal(err)
}
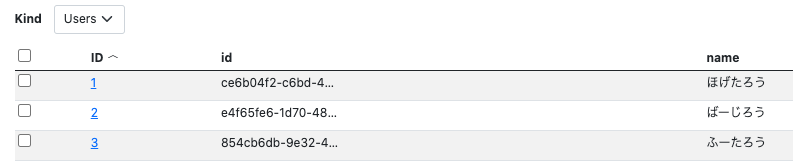
if len(users) != 3 {
t.Fatalf("want=3, act=%d", len(users))
}
expected := []User{
{
"ce6b04f2-c6bd-44fb-b9dd-25ff1ccdaacd",
"ほげたろう",
},
{
"e4f65fe6-1d70-48cf-86cc-e33c9b34d6a5",
"ばーじろう",
},
{
"854cb6db-9e32-48a1-a388-774cd814ea3e",
"ふーたろう",
},
}
if d := cmp.Diff(expected, users); d != "" {
t.Errorf("got = %v, want %v, diff %s", users, expected, d)
}
}
❯ go test -v ./...
=== RUN   TestGet
--- PASS: TestGet (0.24s)
PASS
ok      github.com/somen440/dsample     1.107s
golang でデータを追加する
Put します。
	ctx := context.Background()

	user := &User{
		ID:   uuid.New().String(),
		Name: "テストマン",
	}

	projectID := "my-datastore-project"

	client, err := datastore.NewClient(ctx, projectID)
	if err != nil {
		t.Fatal(err)
	}

	k := datastore.NameKey("Users", uuid.New().String(), nil)
	if _, err := client.Put(ctx, k, user); err != nil {
		t.Fatal(err)
	}
GUI から追加が確認できました。

todo: namespace, index ... etc
namespace をつけてデータ追加する
IncompleteKey を始めとして各種 Key は Namespace 空文字で生成されます。
// IncompleteKey creates a new incomplete key.
// The supplied kind cannot be empty.
// The namespace of the new key is empty.
func IncompleteKey(kind string, parent *Key) *Key {
	return &Key{
		Kind:   kind,
		Parent: parent,
	}
}
つまりこうです。
		k := datastore.IncompleteKey("Users", nil)
		if k.Namespace != "" {
			t.Fatal("namespace is not empty", k.Namespace)
		}
namespace が空文字である場合の生成は前試した通り (Default Namespace) にデータが追加されます。
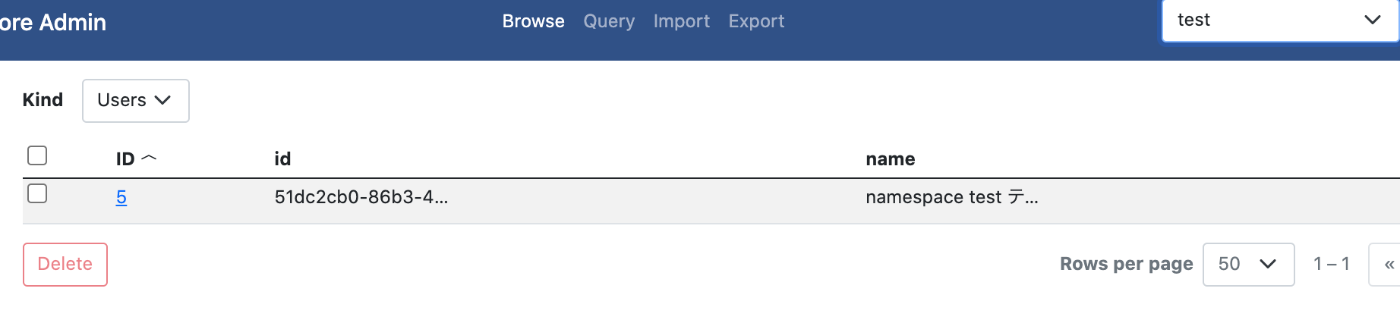
namespace つけます。
		k := datastore.IncompleteKey("Users", nil)
		k.Namespace = "test"

		user := &User{
			ID:   uuid.New().String(),
			Name: "namespace test テストマン",
		}

		if _, err := client.Put(ctx, k, user); err != nil {
			t.Fatal(err)
		}
namespace 増えてます。

増えた namespace にデータ追加されてます。
allocate
Incomplete → allocate でデータストア上有効であることが保証されている安全な ID が取れます。
	ctx := context.Background()

	k := datastore.IncompleteKey("Users", nil)
	k.Namespace = "test_allocate"

	keys, err := client.AllocateIDs(ctx, []*datastore.Key{k})
	if err != nil {
		t.Fatal(err)
	}

	log.Println(keys[0].ID) // e.g. 4644337115725824
allocateIDs の是非についてはここの回答の中の
Yes, allocateIds() should work for the case where you want to get an ID from Datastore mode and use it as both an ID and property
がしっくりきました。
公式リンクです。
競合を防ぐ目的などでも(特に大規模アプリケーションを想定している場合)使っておいた方が無難そうです。
データ追加も問題なかったです。

index
エミュレーターにおける index 定義ファイルのありかは公式より
index.yaml は <project-directory>/WEB-INF/ フォルダにあります。
とのこと。分かりやすく data-dir で出力先にしてるディレクトリを tmp に持ってきます。
-      - datastore_data:/opt/datastore/data
+      - ./tmp/datastore:/opt/datastore/data
...
...
      "--host-port=0.0.0.0:8081", "--data-dir=/opt/datastore/data"
公式には、エミュレーターのデータ出力先のことや諸々書かれています。
要はこういうことです。
❯ tree tmp
tmp
└── datastore
    ├── WEB-INF
    │   ├── appengine-generated
    │   │   └── local_db.bin
    │   └── index.yaml
    └── env.yaml

3 directories, 3 files
index 定義ファイルは空です。
❯ cat tmp/datastore/WEB-INF/index.yaml
indexes:
# AUTOGENERATED
index 拡張確認に datastore Entity を拡張します。
-       ID   string `datastore:"id"`
-       Name string `datastore:"name"`
+       ID      string    `datastore:"id"`
+       Name    string    `datastore:"name"`
+       Number  int       `datastore:"number"`
+       Created time.Time `datastore:"created"`
ここで適当にデータを投入してクエリを投げると結果として取れます。
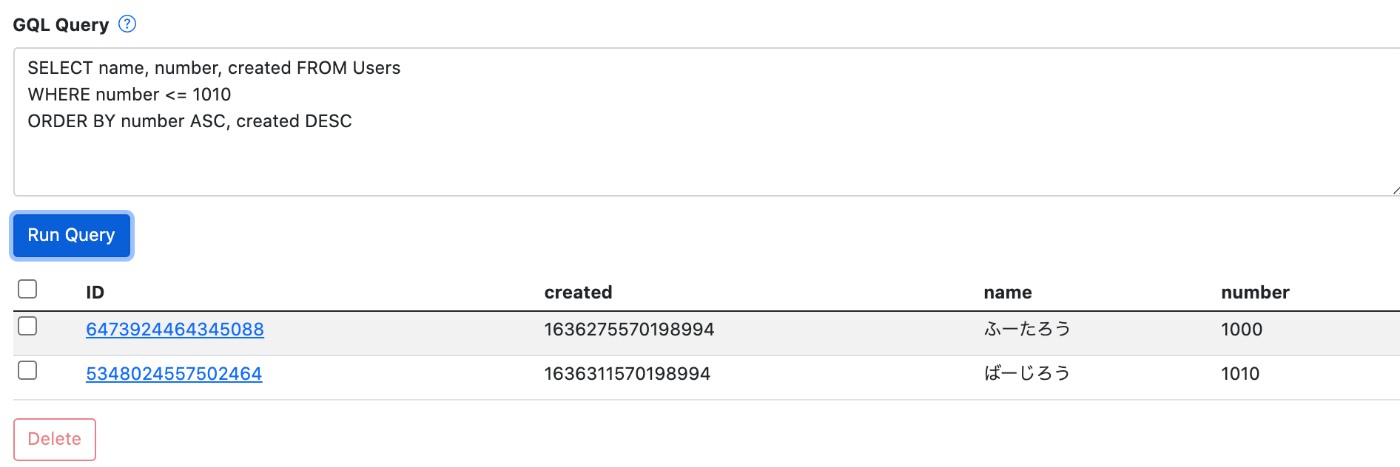
特に index.yml を弄ってないですが AUTOGENERATED とある通り index は自動生成してくるようです。
以下のクエリを叩いているときに出ました。
SELECT* FROM Users
WHERE number <= 1010
ORDER BY number DESC, created DESC
indexes:
# AUTOGENERATED

# This index.yaml is automatically updated whenever the Cloud Datastore
# emulator detects that a new type of query is run. If you want to manage the
# index.yaml file manually, remove the "# AUTOGENERATED" marker line above.
# If you want to manage some indexes manually, move them above the marker line.

- kind: "Users"
  properties:
  - name: "created"
    direction: desc
  - name: "number"
- kind: "Users"
  properties:
  - name: "created"
    direction: desc
  - name: "number"
    direction: desc
- kind: "Users"
  properties:
  - name: "number"
  - name: "created"
    direction: desc
- kind: "Users"
  properties:
  - name: "number"
  - name: "created"
    direction: desc
  - name: "id"
- kind: "Users"
  properties:
  - name: "number"
  - name: "created"
    direction: desc
  - name: "name"
- kind: "Users"
  properties:
  - name: "number"
    direction: desc
  - name: "created"
    direction: desc
コメントで書かれている通り、手動でインデックスを管理したい場合、 AUTOGENERATED の上に記述すれば良いようです。
概ね自動で生成してくれるのは便利です。
index クエリを golang で
先程のクエリを golang で書きます。
SELECT* FROM Users
WHERE number <= 1010
ORDER BY number DESC, created DESC
ASC はそのまま DESC は "-{property}" となるようです。
	ctx := context.Background()

	var users []User
	q := datastore.NewQuery("Users").Filter("number <=", 1010).Order("-number").Order("-created")
	if _, err := client.GetAll(ctx, q, &users); err != nil {
		t.Fatal(err)
	}

	if len(users) != 2 {
		t.Fatalf("want = 2, len(users) = %d", len(users))
	}

	expected := []int{1010, 1000}
	actual := []int{users[0].Number, users[1].Number}
	if !reflect.DeepEqual(expected, actual) {
		t.Fatalf("want = %+v, act = %+v", expected, actual)
	}
無事取れました。
gui 色々
先に紹介した dsadmin はネスト構造をまだサポートしてません。
🚧 Not yet implemented
Editing nested entities
UI for filtering & projecting
シンプルな viewer であれば以下がネスト構造も JSON っぽく見れるようなものをサポートしていて簡単です。
ちなみにいずれも datastore の REST API を用いて実装されています。
datastore emulator も同様に起動すると REST API を提供してくれていて、API を通して import / export などができます。
emulator における projectID の罠
例えば以下のように hoge-project で emulator を起動します。
services:
  datastore:
    image: google/cloud-sdk:latest
    command: ["gcloud", "--project=hoge-project", "beta", "emulators", "datastore", "start", "--consistency=1", "--host-port=0.0.0.0:8812", "--data-dir=/opt/datastore/data"]
すると emulator 環境変数セットは以下のようになります。
---
DATASTORE_DATASET: hoge-project
DATASTORE_EMULATOR_HOST: 0.0.0.0:8812
DATASTORE_EMULATOR_HOST_PATH: 0.0.0.0:8812/datastore
DATASTORE_HOST: http://0.0.0.0:8812
DATASTORE_PROJECT_ID: hoge-project
しかし、起動時に設定した projectID と実行時の projectID が一致せずともエラーとはならず、DATASTORE_EMULATOR_HOST で接続先さえ一致していれば projectID はなんでも受け入れてくれます。
...
client, err := datastore.NewClient(ctx, "hoge-project") // ok
...
client, err := datastore.NewClient(ctx, "foo-project") // ok
...
client, err := datastore.NewClient(ctx, "bar-project") // ok
また、このときちゃんと指定した projectID としてデータを参照/永続化してくれるため、 環境間で projectID を切り替えるような仕組みを用意しているとき に projectID ズレでデータがあると思っていたのにないみたいなことになりかねないので気をつけます。(自戒です)
Tips
- 裏側は Spanner
- 同一の Ancestor を持つ entity は物理的に同一の箇所に置かれる特性をもつ
- Spanner の論理的な分割単位 split を考えると物理的に同一箇所が同一として扱われる
- split が同一の方が Spanner 上の効率が高い
- 例えば、ユーザーを ancestor として子データを持たせるような構造が効率がいい
- ただし、全てのクエリが同じ split に集まると機能を最大限有効化できない
- ユーザーデータが public として他の人も参照出来る場合、ホットスポットになりうる
- db にいかせないためのキャッシュとか split 分けるような工夫が必要になる
参考リンク