🦁
AG-Gridによるインライン新規データ作成機能の実装ガイド
はじめに
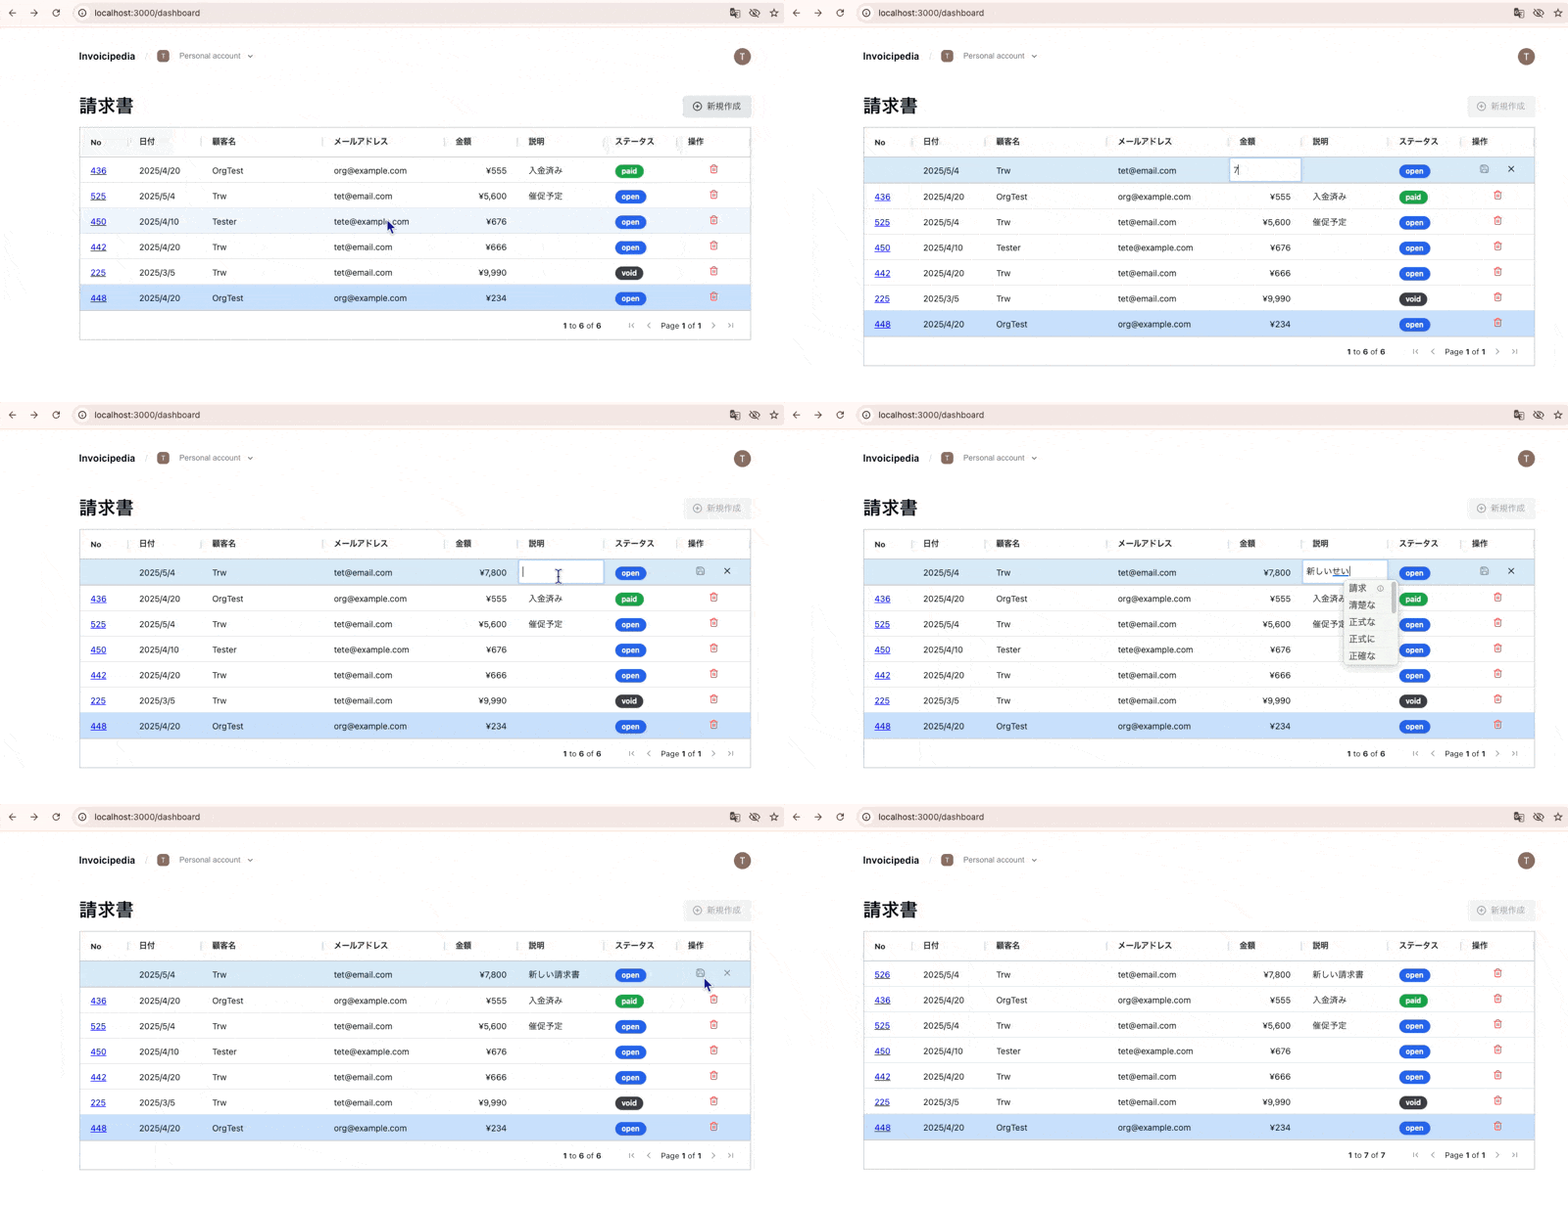
AG-Gridによるインライン新規データ作成機能の実装ガイドです。
新規登録の場合、フォームポップアップを使えば簡単なのですが、
グリッド上に新規行を追加する形での登録UIの実装で苦労しました。
公式ドキュメントにあまり詳しく記載がなかったので、AIの助けを借りつつ実装しました。
以下は実装のまとめになります。

記事の作成もAIを活用しているので、ちょっと文体がそっけないですが、リファレンス資料として見ていただければと思います。
実装プロセスにおける、AI駆動開発の良かった点、苦労した点についての記事はこちらです。
チュートリアル請求書アプリをもっと使いやすく!AG Grid×AIでUIを改良してみた話
1. 全体アーキテクチャ
1.1 主要コンポーネント構成
1.2 データフロー
2. コア実装詳細
2.1 状態管理(useInvoiceGrid.ts)
// グリッドAPIと新規作成状態の管理
const [gridApi, setGridApi] = useState<GridApi | null>(null);
const [hasNewRow, setHasNewRow] = useState(false);

// 新規行追加関数
const addNewRow = useCallback(() => {
  if (customers.length === 0) {
    alert('顧客が登録されていません。先に顧客を登録してください。');
    return;
  }

  if (!gridApi) return;

  // 一時的なIDを生成(負の値)
  const tempId = -Math.floor(Math.random() * 1000000);

  // 新しい行データを作成
  const newRow: InvoiceWithCustomer = {
    id: tempId,
    createTs: new Date(),
    value: 0,
    description: '',
    userId: '',
    organizationId: null,
    customerId: firstCustomer.id,
    status: 'open',
    customer: { ...firstCustomer }
  };

  // ピン留め行として追加
  gridApi.setPinnedTopRowData([newRow]);
  setHasNewRow(true);

  // 金額セルにフォーカス
  setTimeout(() => {
    gridApi.setFocusedCell(0, 'value', 'top');
    gridApi.startEditingCell({
      rowIndex: 0,
      colKey: 'value',
      rowPinned: 'top'
    });
  }, 100);
}, [gridApi, customers]);
2.2 セル値変更ハンドリング
const onCellValueChanged = useCallback(async (event: CellValueChangedEvent<InvoiceWithCustomer>) => {
  const { data, colDef, newValue, oldValue, rowPinned } = event;
  const isTemp = isTemporaryRow(data.id);

  // 金額バリデーション
  if (colDef.field === 'value') {
    const parsedValue = parseIntSafe(newValue);
    if (parsedValue === 0) {
      alert('金額を入力してください。金額が0円の請求書は作成できません。');
      data.value = parseIntSafe(oldValue, 1);
      if (gridApi) {
        gridApi.refreshCells({ force: true });
      }
      return;
    }
  }

  // 一時行の更新処理
  if (isTemp) {
    if (colDef.field === 'createTs') {
      data.createTs = new Date(String(newValue));
    } else if (colDef.field === 'customer.name') {
      // 顧客名の更新処理
      const customerName = String(newValue || '').trim();
      let customer = customers.find(c => c.name === customerName);

      if (!customer) {
        customer = customers.find(c =>
          c.name.toLowerCase() === customerName.toLowerCase()
        );
      }

      if (customer) {
        data.customerId = customer.id;
        data.customer = { ...customer };
        if (gridApi) {
          gridApi.refreshCells({
            force: true,
            columns: ['customer.email']
          });
        }
      }
    }
    // ... 他のフィールドの更新処理
  }
}, [gridApi, customers]);
2.3 カラム定義(columnDefs.ts)
export const createColumnDefs = (
  customers: Array<{ id: number; name: string; email: string }>,
  onCellClick?: (id: number) => void,
  onSaveSuccess?: () => void,
  onCancelSuccess?: () => void
) => {
  return [
    {
      field: 'id',
      headerName: 'No',
      width: 80,
      sortable: true,
      filter: true,
      valueFormatter: (params) => {
        if (isTemporaryRow(params.value)) {
          return '';
        }
        return params.value;
      }
    },
    {
      field: 'createTs',
      headerName: '日付',
      valueFormatter: formatDate,
      editable: true,
      cellEditor: DateEditor,
      sortable: true,
      filter: true,
      width: 120
    },
    // ... 他のカラム定義
  ] as ColDef[];
};
2.4 アクションボタンレンダラー(ActionButtonsRenderer.tsx)
export const ActionButtonsRenderer: React.FC<ActionButtonsRendererProps> = (props) => {
  const { data, onSaveSuccess, onCancelSuccess } = props;
  const [isProcessing, setIsProcessing] = useState(false);
  const [isSaveEnabled, setIsSaveEnabled] = useState(false);

  const isTemp = isTemporaryRow(data.id);

  // 保存ボタンの有効/無効状態を監視
  useEffect(() => {
    if (isTemp) {
      const { description, customerId, value } = data;
      const isValid = description && customerId && value > 0;
      setIsSaveEnabled(isValid);
    }
  }, [data, isTemp]);

  // 保存処理
  const handleSave = async () => {
    setIsProcessing(true);
    try {
      const result = await createInvoiceAction({
        value: data.value,
        description: data.description,
        customerId: data.customerId,
        createTs: data.createTs
      });

      if (result.success) {
        onSaveSuccess?.();
      }
    } finally {
      setIsProcessing(false);
    }
  };

  // キャンセル処理
  const handleCancel = () => {
    if (window.confirm('この行の編集をキャンセルしますか?')) {
      onCancelSuccess?.();
    }
  };

  return (
    <div className="flex gap-2">
      {isTemp && (
        <>
          <Button
            size="sm"
            onClick={handleSave}
            disabled={!isSaveEnabled || isProcessing}
          >
            <Save className="h-4 w-4" />
          </Button>
          <Button
            size="sm"
            variant="outline"
            onClick={handleCancel}
            disabled={isProcessing}
          >
            <X className="h-4 w-4" />
          </Button>
        </>
      )}
    </div>
  );
};
3. ユーティリティ関数(gridUtils.ts)
// 一時行判定
export const isTemporaryRow = (id: number): boolean => {
  return id < 0;
};

// 金額フォーマット
export const formatCurrency = (params: ValueFormatterParams): string => {
  if (params.value === undefined || params.value === null) {
    return '¥0';
  }
  let value = Number(params.value);
  let numStr = value.toLocaleString();
  return `¥${numStr}`;
};

// 日付フォーマット
export const formatDate = (params: ValueFormatterParams): string => {
  if (params.data && isTemporaryRow(params.data.id) && !params.value) {
    return '';
  }
  if (params.value) {
    return new Date(params.value).toLocaleDateString();
  }
  return '';
};
4. 実装のポイント
4.1 データの永続化
- 一時データは負のIDで管理
- 保存時のみDBに永続化
- キャンセル時は一時データを破棄
4.2 バリデーション
- リアルタイムバリデーション
- 必須項目チェック
- データ型の検証
4.3 UI/UX
- ピン留め行による視覚的フィードバック
- 自動フォーカス設定
- エラー時の適切なフィードバック
5. 注意点とベストプラクティス
-
パフォーマンス
- 最小限の再レンダリング
- 効率的なデータ更新
- メモリリークの防止
-
エラーハンドリング
- 適切なエラーメッセージ
- ユーザーフレンドリーなフィードバック
6. まとめ
AG-Gridを使用した新規データ作成機能は、以下の要素で構成されています:
- 状態管理(useInvoiceGrid)
- カラム定義(columnDefs)
- アクションボタン(ActionButtonsRenderer)
- ユーティリティ関数(gridUtils)
これらの要素を適切に組み合わせることで、ユーザーフレンドリーで堅牢な新規データ作成機能を実現できます。
Discussion