Great Expectationsのチュートリアルをやってみた
これは何か
データマネジメントの一環でデータの品質管理を実行するにあたり、ツールの調査を行っていたところ、Great Expectationsというデータ品質管理のOSSに当たったので、勉強目的でチュートリアルを試してみた。
Great Expectationsとは何か
データの品質定義、定義を満たしているかテスト、テスト結果のドキュメンテーション、自動プロファイリングを実行できるOSS。
チュートリアルをやってみた
チュートリアルをベースに、BigQueryのテーブルに対してデータの品質テストを行う。
準備
テーブルの作成
100本ノックのcustomerデータを利用して、customerテーブルをBigQueryに作成した。
| カラム名 | データ型 |
|---|---|
| customer_id | STRING |
| customer_name | STRING |
| gender_cd | STRING |
| gender | STRING |
| birth_day | DATE |
| age | INTEGER |
| postal_cs | STRING |
| address | STRING |
| application_store_cd | STRING |
| application_date | STRING |
| status_cd | STRING |
以下のSQLで、application_dateをNullにしたcustomer_errorテーブルを作成する。
create or replace table `{データセット}.customer_error`
as

SELECT
customer_id,
customer_name,
gender_cd,
gender,
birth_day,
age,
postal_cd,
address,
application_store_cd,
Null as application_date,
status_cd
FROM `{データセット}.customer`
Dockerの起動
以下のようなDockerを用意した。BigQueryのテーブルに対してvalidationをかけたいから、gcloudを環境にインストールしておく。docker-composeとDockerfileは同じ階層に置く。
事前にローカルからGCPへの認証は通しておく。
gcloud auth application-default login
FROM python:3.9-slim

RUN apt-get update -y && \
    apt-get install --no-install-recommends -y -q \
    git libpq-dev python3-dev build-essential && \
    apt-get clean && \
    rm -rf /var/lib/apt/lists/* /tmp/* /var/tmp/*

RUN pip install --upgrade pip && \
    # version 0.14.10
    pip install great_expectations && \
    pip install sqlalchemy==1.4.25

ENV PYTHONIOENCODING=utf-8
ENV LANG C.UTF-8
version: '3.9'

services:
  great_expectations:
    container_name: great_expectations
    build: .
    ports:
      - "8888:8888"
    tty: true
    working_dir: /usr/app
    volumes:
      - ./scr:/usr/app
      - gcloud-config:/root/.config
  gcloud:
    container_name: gcloud
    entrypoint: "gcloud"
    image: google/cloud-sdk:alpine
    volumes:
      - gcloud-config:/root/.config
volumes:
  gcloud-config:
プロジェクト作成
次のコマンドでプロジェクトを作成する。
great_expectations init
自分は既存のものがあるので、以下のようになる。
root@7ea61c3fa821:/usr/app# great_expectations init
Using v3 (Batch Request) API

  ___              _     ___                  _        _   _
 / __|_ _ ___ __ _| |_  | __|_ ___ __  ___ __| |_ __ _| |_(_)___ _ _  ___
| (_ | '_/ -_) _` |  _| | _|\ \ / '_ \/ -_) _|  _/ _` |  _| / _ \ ' \(_-<
 \___|_| \___\__,_|\__| |___/_\_\ .__/\___\__|\__\__,_|\__|_\___/_||_/__/
                                |_|
             ~ Always know what to expect from your data ~

This looks like an existing project that appears complete! You are ready to roll.
成功すると必要な階層とファイルが生成される。
公式ドキュメントによると次のような定義になる。
- great_expectations.yml:プロジェクト全体の設定。データソース定義や各種ファイル配置の設定をここでいじれるっぽい。
- expectations:バリデーション定義したJSONファイルはここに配置される。
- plugins/:カスタムプラグインを定義できるようだが、具体のユースケースは不明。
- uncommitted/:これより以下はgit管理されない。
- uncommitted/config_variables.yml:データストアのクレデンシャルのような秘匿情報を定義。
- uncommitted/data_docs:バリデーション結果やメタデータなどのドキュメントファイルが配置。
- uncommitted/validations:バリデーション結果ファイルが配置。
データソースを登録
今回はBigQueryに接続したいので、以下のように設定。
--no-jupyterをつけないと自動でjupyterが立ち上がる。自分はipやroot設定などを指定して立ち上げたかったので、--no-jupyterを指定して実行した。
root@7ea61c3fa821:/usr/app# great_expectations datasource new --no-jupyter
Using v3 (Batch Request) API

What data would you like Great Expectations to connect to?
    1. Files on a filesystem (for processing with Pandas or Spark)
    2. Relational database (SQL)
: 2

Which database backend are you using?
    1. MySQL
    2. Postgres
    3. Redshift
    4. Snowflake
    5. BigQuery
    6. other - Do you have a working SQLAlchemy connection string?
: 5

To continue editing this Datasource, run jupyter notebook /usr/app/great_expectations/uncommitted/datasource_new.ipynb
root@7ea61c3fa821:/usr/app# jupyter notebook /usr/app/great_expectations/uncommitted/datasource_new.ipynb --allow-root --ip=0.0.0.0
を実行すると、jupyterが立ち上がるので表示されたリンクにアクセスし、datasource_new.ipynbを開く。
datasource_name = "{データソース名}"
connection_string = "bigquery://{プロジェクトID}/{データセットID}"
を変更して、すべてのセルを実行。
エラーなく終われば、データソースの登録に成功しているはず。
great_expectations.ymlを見にいくと、登録したデータソースが存在していた。
datasources:
  "{データソース名}":
    module_name: great_expectations.datasource
    class_name: Datasource
    data_connectors:
      default_runtime_data_connector_name:
        module_name: great_expectations.datasource.data_connector
        class_name: RuntimeDataConnector
        batch_identifiers:
          - default_identifier_name
      default_inferred_data_connector_name:
        include_schema_name: true
        module_name: great_expectations.datasource.data_connector
        class_name: InferredAssetSqlDataConnector
    execution_engine:
      module_name: great_expectations.execution_engine
      class_name: SqlAlchemyExecutionEngine
      connection_string = "bigquery://{プロジェクトID}/{データセットID}"
config_variables_file_path: uncommitted/config_variables.yml
Suiteを作成
SuiteはExpectationの組み合わせを定義するものと認識した。
Suiteを作成するにあたり、いくつかのビルトインのProfilerをというものを使うことができる。
Profilerの種類
- UserConfigurableProfiler
- データセットからSuiteを作成する。いくつかのパラメータを設定するだけで、設定ファイルを直に編集しなくてもProfilerを作成することができる。
- JsonSchemaProfiler
- JSONスキーマからSuiteを作成する。
- Rule-Based Profiler
- YAMLから作成できる? まだ開発中の機能らしい。
UserConfigurableProfiler
UserConfigurableProfilerの設定は次の通り。
- excluded_expectations:suiteに含めたくないexpectationsを指定する。
- ignored_columns:expectationを作成したくないカラムを指定する。
- not_null_only:Falseにすると各カラムのNull含有量について分析し、バリデーションを作成する。Null比率が50%以下だとNot Null、50%以上だとNullとして評価する。TrueだとNull比率に関わらずNot Nullとして評価される。
- primary_or_compound_key:主キーや複合キーを指定すると、ユニークキーかどうかを評価する。
- semantic_types_dict:semantic_typesを指定する。semantic_typeは、各カラムに論理的なデータ型を指定するもの。例えば、IDなど整数値で入っているが、自動で数字として認識させたくない時に指定する。使い方や指定できるsemantic_typeの種類についてはここを見ると良い。
- table_expectations_only:Trueにすると、次の二つのExpectationsが使用できる。
- expect_table_columns_to_match_ordered_list:カラムの値が指定したリストに一致するか
- expect_table_row_count_to_be_between:カラムの値が指定した範囲に収まっているか
- value_set_threshold:expect_column_values_to_be_in_setをどこまでのカラムに適用するかを指定する。uniqueにすると全カラムに適用されるため、比較元データとの完全一致を調べたいのであれば、uniqueにする。
以下のコマンドを実行する。
root@7ea61c3fa821:/usr/app# great_expectations suite new --no-jupyter
Using v3 (Batch Request) API

How would you like to create your Expectation Suite?
    1. Manually, without interacting with a sample batch of data (default)
    2. Interactively, with a sample batch of data
    3. Automatically, using a profiler
: 3
Profilerを使うので3を選択。
他の選択肢については後で調べる。
A batch of data is required to edit the suite - let's help you to specify it.

Select a datasource
    1. sasakky_bigquery
: 1

Which data asset (accessible by data connector "default_inferred_data_connector_name") would you like to use?
    1. {データセット名}.customer
    2. {データセット名}.customer_error

Type [n] to see the next page or [p] for the previous. When you're ready to select an asset, enter the index.
: 1
Profilerには解析用のデータセットが必要であり、ここではそのためにどのデータを使うかが聞かれている。
正しいデータがcustomerで、今回バリデーションしたいのがcustomer_errorの方なので、ここではcustomerを解析してSuiteを作る。
Name the new Expectation Suite [{データセット名}.customer.warning]: customer_suite
今回作成するSuiteの名前をつける。
Great Expectations will create a notebook, containing code cells that select from available columns in your dataset and
generate expectations about them to demonstrate some examples of assertions you can make about your data.

When you run this notebook, Great Expectations will store these expectations in a new Expectation Suite "customer_suite" here:

  file:///usr/app/great_expectations/expectations/customer_suite.json

Would you like to proceed? [Y/n]: Y
Yesを選択すると、expectaions/にSuiteのJSONファイルが作成される。
{
  "data_asset_type": null,
  "expectation_suite_name": "customer_suite",
  "expectations": [],
  "ge_cloud_id": null,
  "meta": {
    "citations": [
      {
        "batch_request": {
          "data_asset_name": "{データセット名}.customer",
          "data_connector_name": "default_inferred_data_connector_name",
          "datasource_name": "sasakky_bigquery",
          "limit": 1000
        },
        "citation_date": "2022-03-19T14:40:37.902540Z",
        "comment": "Created suite added via CLI"
      }
    ],
    "great_expectations_version": "0.14.10"
  }
}
Expectationsを作成
edit_customer_suite.ipynbを編集・実行してExpectationsを作成していく。
ここではJupyter Notebook経由で、Great ExpectationsのPython APIを使用する。
import datetime

import pandas as pd

import great_expectations as ge
import great_expectations.jupyter_ux
from great_expectations.core.batch import BatchRequest
from great_expectations.profile.user_configurable_profiler import UserConfigurableProfiler
from great_expectations.checkpoint import SimpleCheckpoint
from great_expectations.exceptions import DataContextError

context = ge.data_context.DataContext()

batch_request = {'datasource_name': 'sasakky_bigquery', 'data_connector_name': 'default_inferred_data_connector_name', 'data_asset_name': '{自分のデータセット名}.customer', 'limit': 1000}

expectation_suite_name = "customer_suite"

validator = context.get_validator(
    batch_request=BatchRequest(**batch_request),
    expectation_suite_name=expectation_suite_name
)
column_names = [f'"{column_name}"' for column_name in validator.columns()]
print(f"Columns: {', '.join(column_names)}.")
validator.head(n_rows=5, fetch_all=False)
最初のセルでは各種ライブラリのインポート、データをロードしてValidationの作成などを行っている。
ignored_columns = [
    "customer_id",
    "customer_name",
    "gender_cd",
    "gender",
    "birth_day",
    "age",
    "postal_cd",
    "address",
    "application_store_cd",
    # "application_date",
    "status_cd",
]
2番目のセルでは、バリデーションを行う必要がないカラムを選択する。
ここではapplication_dateをチェックしたいのでコメントアウトする。
profiler = UserConfigurableProfiler(
    profile_dataset=validator,
    excluded_expectations=["expect_table_columns_to_match_ordered_list","expect_column_values_to_be_in_set","expect_table_row_count_to_be_between","expect_column_proportion_of_unique_values_to_be_between","expect_column_values_to_be_in_type_list"],
    ignored_columns=ignored_columns,
    not_null_only=False,
    primary_or_compound_key=["customer_id"],
    semantic_types_dict=None,
    table_expectations_only=False,
    value_set_threshold="many",
)
suite = profiler.build_suite()
先ほど説明したUserConfigurableProfilerをインスタンス化して、Suiteを作成する。いくつかカスタマイズしたパラメータを渡す。
print(validator.get_expectation_suite(discard_failed_expectations=False))
validator.save_expectation_suite(discard_failed_expectations=False)

checkpoint_config = {
    "class_name": "SimpleCheckpoint",
    "validations": [
        {
            "batch_request": batch_request,
            "expectation_suite_name": expectation_suite_name
        }
    ]
}
checkpoint = SimpleCheckpoint(
    f"_tmp_checkpoint_{expectation_suite_name}",
    context,
    **checkpoint_config
)
checkpoint_result = checkpoint.run()

context.build_data_docs()

validation_result_identifier = checkpoint_result.list_validation_result_identifiers()[0]
context.open_data_docs(resource_identifier=validation_result_identifier)
最後のセルは、Suiteのディスクへの保存、ロードしたデータに対してValidationの実行、Data Docsの作成などを行う。
バリデーション
Validationを実行してCheckpointを作成する。
ターミナルで次のコマンドを作成する。
great_expectations checkpoint new checkpoint_customer
立ち上がったJupyter Notebookを編集する。
my_checkpoint_name = "checkpoint_customer" # This was populated from your CLI command.

yaml_config = f"""
name: {my_checkpoint_name}
config_version: 1.0
class_name: SimpleCheckpoint
run_name_template: "%Y%m%d-%H%M%S-my-run-name-template"
validations:
  - batch_request:
      datasource_name: sasakky_bigquery
      data_connector_name: default_inferred_data_connector_name
      data_asset_name: {自分のデータセット名}.customer_error
      data_connector_query:
        index: -1
    expectation_suite_name: customer_suite
"""
print(yaml_config)
バリデーションを実行したいデータセットを指定する。ここでは
data_asset_name: {自分のデータセット名}.customer_error
を編集した。
また、以下のコメントアウトを外す。
context.run_checkpoint(checkpoint_name=my_checkpoint_name)
context.open_data_docs()
すべてのセルを実行すると、Data Docsが作られる。
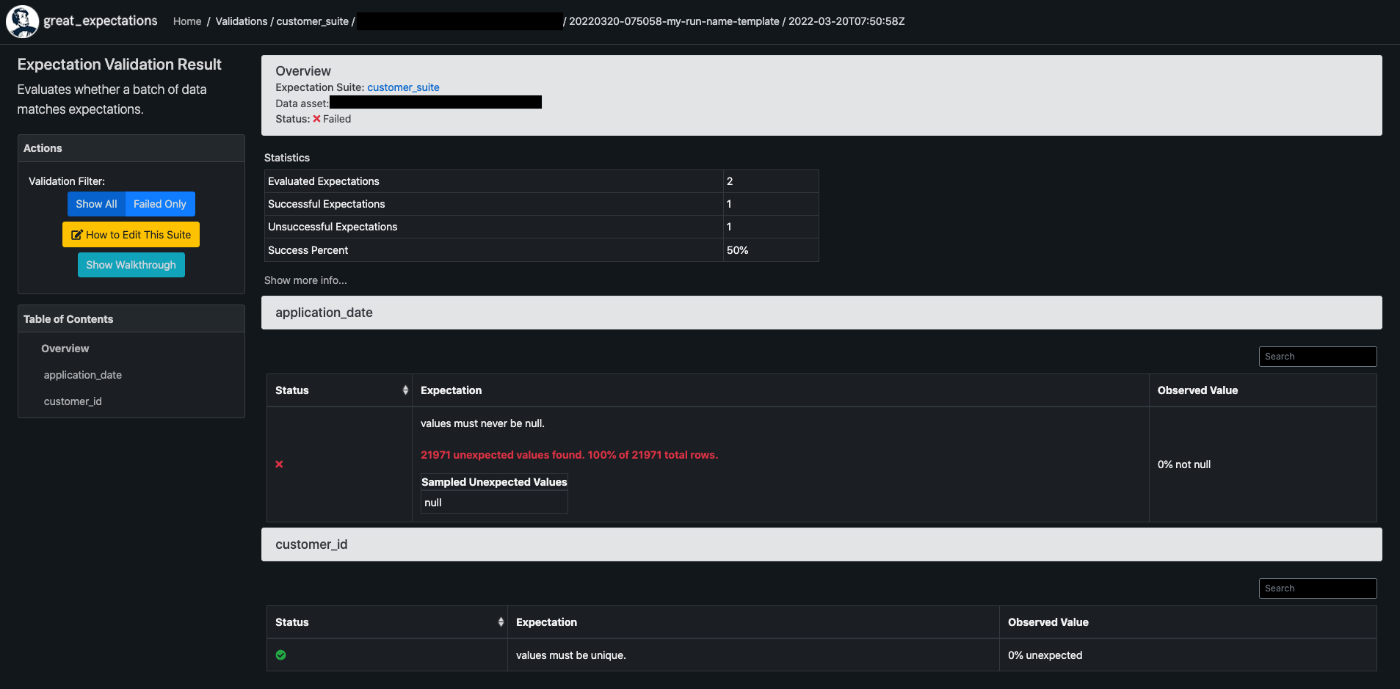
nullが許容されていないapplication_dateカラムに対し、100%nullになっているとfailedしている。
PKに指定したcustomer_idのユニークキー制約はpassしている。
感想
だいたいこんな感じの流れっぽい。日本語のリファレンスが少ないので、ドキュメントを読み込むのに苦労した。
dbtやairflowなどで定期実行する仕組みは、自分でも試してみて別の記事に書きたい。
参考
Discussion