SwiftUIの.background(〜)系まとめ
簡単なまとめ
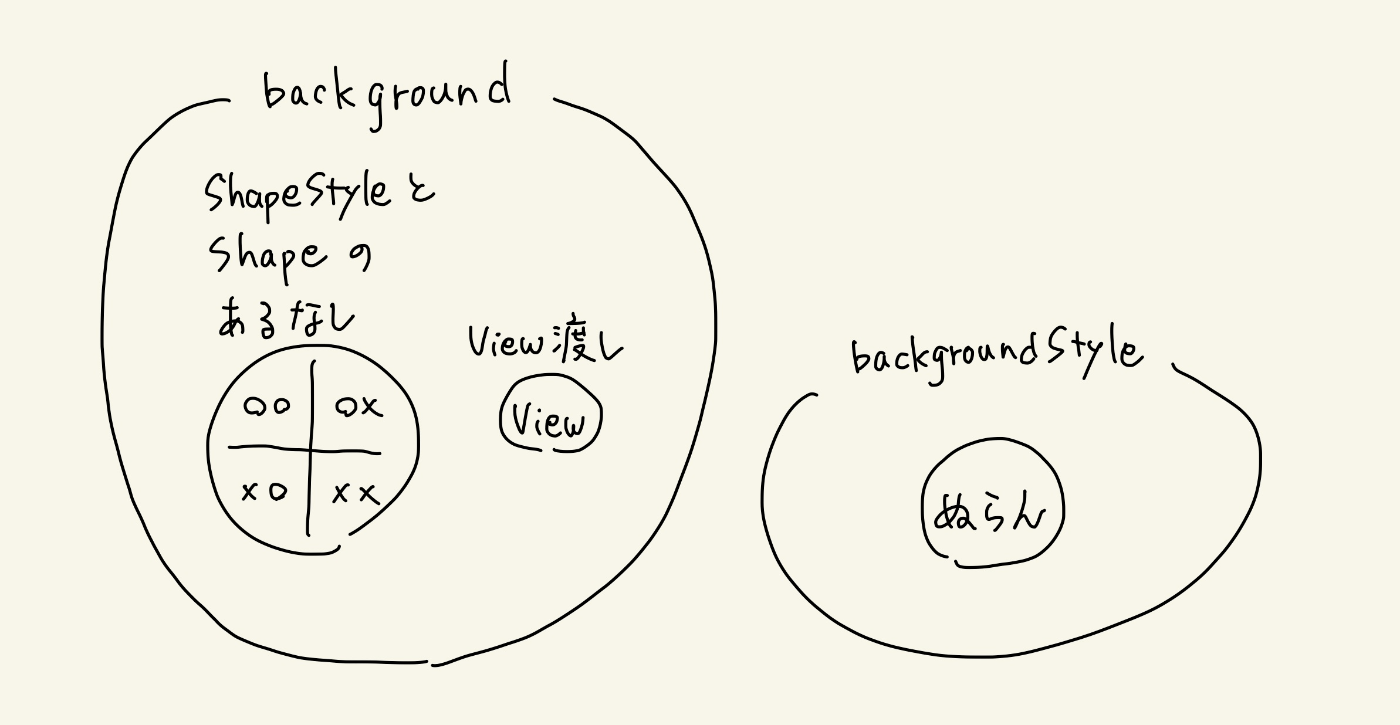
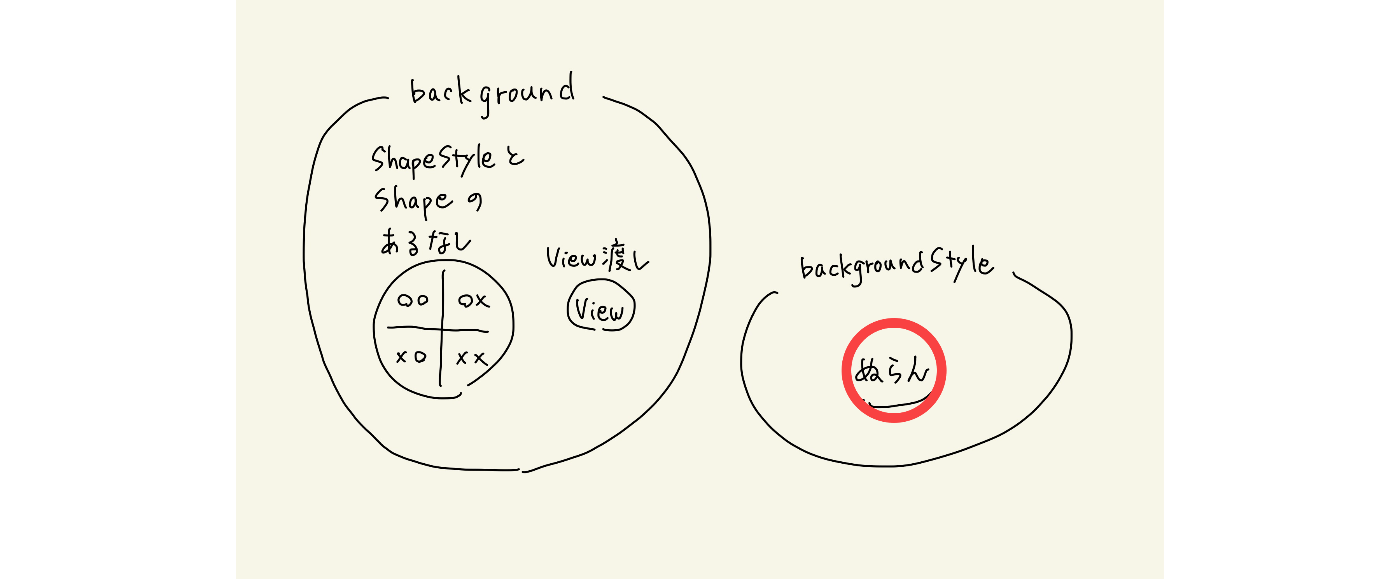
background(〜) : 塗り処理を実行する
- 「塗り方」や「形」を指定して塗るものが4個。これは「塗り方」「形」の有無の組み合わせで4個ある。
- 背景に表示するものをViewを用いて指定するものが1個。
backgroundStyle(〜) : 塗り処理は実行しない
- 「塗り方」を指定するだけのものが1個。その後の塗り指令を行わないと意味がない。
はじめに 1
SwiftUIのViewに対するbackground系モディファイアはいくつか種類がある。この記事では .background(〜) と .backgroundStyle(〜) をまとめる。
環境
Ventura 13.4
Xcode 14.3.1
iPhone 14のシミュレータ
はじめに 2
backgroundと打って候補を表示すると次のように出る。

パッと見たところごちゃっとしているが引数を整理する。
三角が出ている灰色のdeprecatedは無視する。
| style: ShapeStyle |
ignoresSafeAreaEdges: Edge.Set |
in: Shape |
fillStyle: FillStyle |
alignment: Alignment |
content: () -> View |
|
|---|---|---|---|---|---|---|
| background | △ | |||||
| background | ○ | △ | ||||
| background | ○ | △ | ||||
| background | ○ | ○ | △ | |||
| background | △ | ○ | ||||
| backgroundStyle | ○ |
○は必須。
△はデフォルト値ありなので、使用時に省くことが出来る。
上から4つは、ShapeStyle と Shape に注目すると、 有無の組み合わせの4種類 。
全体はこうなる。
軽く整理したが、話を進める前にまずは ShapeStyle と Shape をまとめないといけない。
ShapeStyle
ShapeStyle 自体はプロトコル。
ShapeStyle が担当するのは塗り方。Shapeとあるが形の情報は持たず 塗り方だけを表現するもの らしい。公式によると
A color or pattern to use when rendering a shape.
shapeをレンダリングするときの色やパターン、とのこと。パターンというと抽象的だが画像をそのまま背景に使うことも出来るので、そのあたりの「色よりもちょっと幅広いあれこれ」ですな。
Color.red- グラデーション
- 画像をShapeStyle用に変換したもの (
image(_:sourceRect:scale:)で取得) - Material 後ろが少しだけ透ける、都会のライフスタイルにフィットするアレ
などを ShapeStyle として使うことが出来る。
描画の状況で出てくる .fill() の引数に指定するものが ShapeStyle というのを知ると理解しやすいかもしれない。
ちなみに、文字色を指定する時の .primary も ShapeSyle なので、背景を設定するところで .primary を使うことも出来る。
Shape
Shape 自体はプロトコル。
Shape が担当するのは形。
Shape をつけているものは
struct Rectangle : Shapestruct Circle : Shapestruct Capsule : Shapestruct Path : Shape
など、形あるもの 。
これはわかりやすい。
ShapeStyle/Shapeまとめ
基本的に
-
Shapeは形 -
ShapeStyleは塗り方
細かいこと
次に細かいことをやりたい。
fillStyle
候補を表示した時に燦々と輝く fillStyle がある。
これは塗り方の奇遇、つまりNTTのマークの小さい丸を塗るか塗らないか問題や、アンチエイリアスの設定を扱う。この記事では扱わない。
ignoresSafeAreaEdges
これはセーフエリア(この記事では画面内側の、邪魔がないエリアとする)からはみ出すかの設定。この記事ではほとんど扱わない。
ShapeStyle.background デフォルトバックグラウンド
ライトモード、ダークモードに対応した背景色
本題です
ここから個々のモディファイアの説明を行う。やっと本題である。
まず、background の ShapeStyle と Shape の有無の違いの4つ。
| style: ShapeStyle |
ignoresSafeAreaEdges: Edge.Set |
in: Shape |
fillStyle: FillStyle |
|---|---|---|---|
| □ | △ | ||
| ○ | △ | ||
| □ | ○ | △ | |
| ○ | ○ | △ |
○:必須、△:デフォルト値あり
□:引数なし。塗り情報は ShapeStyle.background を使用。
ShapeStyle の指定がないものはデフォルトのスタイルで塗られる。つまり ShapeStyle.background で塗られる。
ではその4つをやりましょう。
指定なしタイプ

//iOS 15.0
func background(ignoresSafeAreaEdges edges: Edge.Set = .all) -> some View
引数の Edge.Set は省略可能なので .background() と書いた時は全方面にignoresSafeAreaをしていることになる。
デフォルトのバックグラウンド( ShapeStyle.background )で塗る。
ShapeStyle指定タイプ

//iOS 15.0
func background<S>(_ style: S, ignoresSafeAreaEdges edges: Edge.Set = .all) -> some View where S : ShapeStyle
指定した ShapeStyle で塗る。
Shape指定タイプ

//iOS 15.0
func background<S>(in shape: S, fillStyle: FillStyle = FillStyle()) -> some View where S : InsettableShape
形を指定できる。デフォルトのバックグラウンド( ShapeStyle.background )で塗る。
ShapeStyleとShape指定タイプ

//iOS 15.0
func background<S, T>(_ style: S, in shape: T, fillStyle: FillStyle = FillStyle()) -> some View where S : ShapeStyle, T : InsettableShape
形を指定できる。引数で指定した ShapeStyle で塗る。
ShapeStyle と Shape の有無の違いの4つは終了。
View指定タイプ
background の残りの1つは背景Viewを直接書いちゃうタイプ。

//iOS 15.0
func background<V>(alignment: Alignment = .center, @ViewBuilder content: () -> V) -> some View where V : View
| style: ShapeStyle |
ignoresSafeAreaEdges: Edge.Set |
in: Shape |
fillStyle: FillStyle |
alignment: Alignment |
content: () -> View |
|---|---|---|---|---|---|
| △ | ○ |
試したところ、注意点は
-
contentに複数のViewを書くと背景内で前面に積まれていく(下の行に書いたものが前面に表示) -
contentに複数のViewを書いたときのアライメントは、content全体にかかる(個別に動くのではない)
Text("Hello, World!")
    .font(.title)
    .background(alignment: .top) {
        Rectangle()
            .foregroundColor(.red)
            .frame(width: 200, height: 16)
        Rectangle()
            .foregroundColor(.blue)
            .frame(width: 80, height: 100)
    }

最後に backgroundStyle が残った。
backgroundStyle
//iOS 16.0〜
func backgroundStyle<S>(_ style: S) -> some View where S : ShapeStyle
これ自体は 描画をしない 。backgroundStyleの指定をするだけ。
具体的には EnvironmentValues/backgroundStyle にセットされる。
EnvironmentValues/backgroundStyle というものは、セットされている時にデフォルトのシステムバックグラウンドを上書きするそうな。
@available(iOS 16.0, macOS 13.0, tvOS 16.0, watchOS 9.0, *)
extension EnvironmentValues {
    /// An optional style that overrides the default system background
    /// style when set.
    public var backgroundStyle: AnyShapeStyle?
}
次からのサンプルでは背景をcyanにしている。
.backgroundのみ
Text("Hello, world!")
    .frame(maxWidth: 400, maxHeight: 400)
    .background(in: RoundedRectangle(cornerRadius: 200))

デフォルトのバックグラウンド( ShapeStyle.background )で塗られる。ここでは白である。
.backgroundStyleつき
 Text("Hello, world!")
     .frame(maxWidth: 400, maxHeight: 400)
     .background(in: RoundedRectangle(cornerRadius: 200))
     .backgroundStyle(.red)

backgroundStyleを指定したので赤で塗られる。
.backgroundStyleを重ねる
Text("Hello, world!")
    .frame(maxWidth: 400, maxHeight: 400)
    .background(in: RoundedRectangle(cornerRadius: 200))
    .backgroundStyle(.red)
    .background(in: RoundedRectangle(cornerRadius: 125))
    .backgroundStyle(.blue)
    .background(.red, in: RoundedRectangle(cornerRadius: 50))
    .backgroundStyle(.blue)

.backgroundStyle(_:)を指定したので赤で塗られる。
その下に .backgroundStyle(in:) で青を指定したので青で塗られる。
その下に .background(_:in:) で赤を指定。
最後に .backgroundStyle(_:) で青を指定したが塗るものがない。
.backgroundStyleの削除
EnvironmentValues/backgroundStyle をクリアする
.environment(\.backgroundStyle, nil)
というのもある。
Text("Hello, world!")
  .frame(maxWidth: 400, maxHeight: 400)
  .background(in: RoundedRectangle(cornerRadius: 200)) //1
  .backgroundStyle(.blue) //2
  .background(in: RoundedRectangle(cornerRadius: 150)) //3
  .environment(\.backgroundStyle, nil) //4
  .background(in: RoundedRectangle(cornerRadius: 100)) //5

5はデフォルトのbackgroundStyleで塗られる。
4でbackgroundStyleをnilにする。
3はデフォルトのバックグラウンド( ShapeStyle.background )で塗られる。
2はbackgroundStyleをblueにする。
1はblueで塗られる。
Textにに効かない
Text("ABC")
    .backgroundStyle(.blue)
は効かない。
入れ物を作ってから塗り方を指定しないといけない。
Text("ABC")
    .background(in: RoundedRectangle(cornerRadius: 10))
    .backgroundStyle(.blue)
もしくは2つを一度に行う
Text("ABC")
    .background(.blue, in: RoundedRectangle(cornerRadius: 10))
などを使う。
ちなみにこの記事を書くきっかけがこれでした。
感想
名前について、fillStyleはfillOptionなどにして、shapeStyleをfillStyleにしてほしい。
Discussion