Hardhatを使ってEthereumメインネットにNFTをデプロイ・Mintする
イントロダクション
PitPaでエンジニアをしています、hideです。
この記事では、Hardhatを使ってEthereumメインネットにNFTをデプロイし、Mintする方法を紹介します。
対象読者は、EthereumやNFTに興味があり、基本的なスマートコントラクトの知識を持っている方を想定しています。
このチュートリアルを進めるにあたって、HardhatとSolidityに関する基本知識があるとスムーズに進められます。
使用バージョン
hardhat: 2.12.6
Contract作成
// SPDX-License-Identifier: MIT
pragma solidity ^0.8.9;

import "@openzeppelin/contracts/token/ERC721/ERC721.sol";
import "@openzeppelin/contracts/access/Ownable.sol";

contract MyNft is ERC721, Ownable {
  constructor() ERC721("HideGithubNFT", "HIDEGC") {}

  // 今回は自分が使う用につくるので、metadataのURIを自分のgithub pages固定にしている
  // こちらを参考にする場合、自身でURIを用意して書き換えてください
  function _baseURI() internal pure override returns (string memory) {
    return "https://hid3h.github.io/assets/nft/metadata/";
  }

  // 今回は自分が使う用につくるので、mintはownerのみにする
  function safeMint(address to, uint256 tokenId) public onlyOwner {
    _safeMint(to, tokenId);
  }
}
OpenZeppelinのERC721は、EthereumのNFTの標準であるERC-721を実装したスマートコントラクトです。
これにより、開発者は独自のNFTを簡単に作成し、デプロイできます。
継承せずに独自で全部実装しようとすると、実装ミスなどによりセキュリティ上の問題やバグなどが発生してしまう可能性があるので、継承するのが安定です。
テスト作成
import { loadFixture } from "@nomicfoundation/hardhat-network-helpers";
import { expect } from "chai";
import { ethers } from "hardhat";

describe("MyNft", function () {
  // We define a fixture to reuse the same setup in every test.
  // We use loadFixture to run this setup once, snapshot that state,
  // and reset Hardhat Network to that snapshot in every test.
  async function deployFixture() {
    // Contracts are deployed using the first signer/account by default
    const [owner, otherAccount] = await ethers.getSigners();

    const MyNft = await ethers.getContractFactory("MyNft");
    const myNft = await MyNft.deploy();

    return { myNft, owner, otherAccount };
  }

  it("Should have correct token name and symbol", async () => {
    const { myNft } = await loadFixture(deployFixture);

    expect(await myNft.name()).to.equal("HideGithubNFT");
    expect(await myNft.symbol()).to.equal("HIDEGC");
  });

  it("Should mint a new token correctly", async () => {
    const { myNft, owner, otherAccount } = await loadFixture(deployFixture);

    const tokenId = 1;
    await myNft.connect(owner).safeMint(otherAccount.address, tokenId);
    expect(await myNft.ownerOf(tokenId)).to.equal(otherAccount.address);
  });

  it("Should only allow the owner to mint tokens", async () => {
    const { myNft, otherAccount } = await loadFixture(deployFixture);

    const tokenId = 1;
    await expect(myNft.connect(otherAccount).safeMint(otherAccount.address, tokenId)).to.be.revertedWith(
      "Ownable: caller is not the owner"
    )
  });

  it("Should correctly set token URI after minting", async () => {
    const { myNft, owner, otherAccount } = await loadFixture(deployFixture);

    const tokenId = 1;
    await myNft.connect(owner).safeMint(otherAccount.address, tokenId);
    const tokenURI = await myNft.tokenURI(tokenId);
    expect(tokenURI).to.equal("https://hid3h.github.io/assets/nft/metadata/1");
  });
});
このテストコードは、以下のテストケースを実行しています。
- トークンの名前とシンボルが正しいこと
- 新しいトークンが正しく発行されること
- オーナー以外がトークンを発行できないこと
- 発行後にトークンURIが正しく設定されること
実行コマンドは以下です。
npx hardhat test
参考: https://hardhat.org/tutorial/testing-contracts
Ethereumメインネットにデプロイ
hardhat.config.tsにEthereumメインネットワークの情報を追記します。
import { HardhatUserConfig } from "hardhat/config";
import "@nomicfoundation/hardhat-toolbox";
require('dotenv').config();

const ALCHEMY_API_KEY = process.env.ALCHEMY_API_KEY;
const PRIVATE_KEY = process.env.GOERLI_PRIVATE_KEY || "";

const config: HardhatUserConfig = {
  solidity: "0.8.17",
  networks: {
    mainnet: {
      url: `https://eth-mainnet.g.alchemy.com/v2/${ALCHEMY_API_KEY}`,
      accounts: [PRIVATE_KEY]
    }
  },
};

export default config;
ALCHEMY_API_KEY=hoge
PRIVATE_KEY=fuga
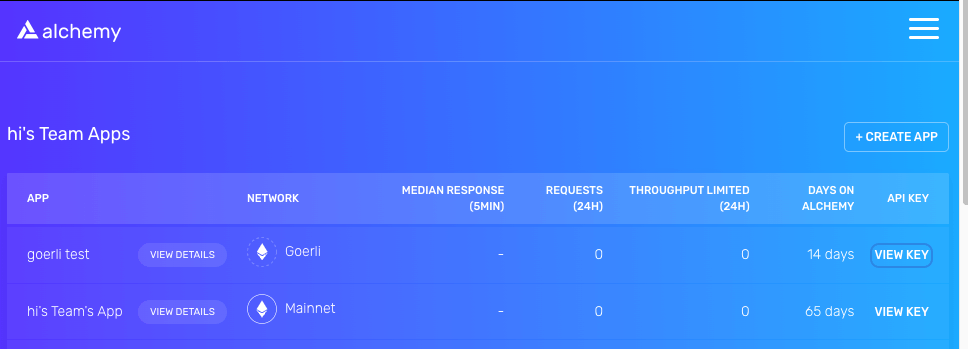
ALCHEMY_API_KEYは、Alchemyでアカウントを作成後、以下の画面でCREATE APPすると入手することができます。

Alchemyは、Ethereumブロックチェーンとやり取りするためのインフラストラクチャプロバイダーで、Ethereumノードへのアクセスを提供しています。
Alchemyを使うことで、自分でEthereumノードを立ち上げなくて済みます。
PRIVATE_KEYは、Ethereumアカウントの秘密鍵をセットします。
MetaMaskを使っている場合は秘密鍵をエクスポートできるので、エクスポートした秘密鍵の文字列をセットします。
コントラクトをデプロイする時に必要なGAS代がこのアカウントから支払われます。
参考: https://hardhat.org/tutorial/deploying-to-a-live-network#deploying-to-remote-networks
import { ethers } from "hardhat";

async function main() {
  const MyNft = await ethers.getContractFactory("MyNft");
  const myNft = await MyNft.deploy();

  await myNft.deployed();

  console.log(`deployed to ${myNft.address}`);
}

// We recommend this pattern to be able to use async/await everywhere
// and properly handle errors.
main().catch((error) => {
  console.error(error);
  process.exitCode = 1;
});
以下でデプロイを実行。
npx hardhat run scripts/deploy.ts --network mainnet
実際にデプロイできたかは、
https://etherscan.io/ でコントラクトアドレスなどで検索するとわかります。
Mint
import { ethers } from "hardhat";
require("dotenv").config();

const contract = require("../artifacts/contracts/MyNft.sol/MyNft.json");

const provider = ethers.provider;
const signer = provider.getSigner();
const abi = contract.abi;

const myNftContract = new ethers.Contract(
  process.env.CONTRACT_ADDRESS || "",
  abi,
  signer
);

async function main() {
  const to = await signer.getAddress();
  const tokenId = 0;
  const nftTxn = await myNftContract.safeMint(to, tokenId);

  await nftTxn.wait();

  console.log(
    `NFT Minted! Check it out at: https://etherscan.io/tx/${nftTxn.hash}`
  );
}

// We recommend this pattern to be able to use async/await everywhere
// and properly handle errors.
main().catch((error) => {
  console.error(error);
  process.exitCode = 1;
});
上記は、NFTトークンの割当先のaddressと、tokenを一意に識別するための数字を指定してmintしています。
mint後には、コンソールにトランザクションのhashが表示されるようにしているので、https://etherscan.io/ で確認することができます。
参考: https://docs.alchemy.com/docs/how-to-mint-an-nft-from-code
おわりに
今回は発行したtokneのURIは、https://hid3h.github.io/assets/nft/metadata/0
となります。
個人用なので、GitHubの個人のリポジトリにjsonファイルを設置しています。
ちなみに費用は
deploy: $60
mint: $1.6
くらいかかりました。
Discussion