nvim-dapでGolangのデバッグ環境構築
最近 Go を書く機会が増えてきました。
そのため、デバッガー使う時だけ vscode を開くのが煩わしくなってきたので、
普段から使っている Neovim で完結したいなと思い、やってみました。
目標
- ブレークポイント貼って開発時にステップ実行できる
- テストのステップ実行ができる
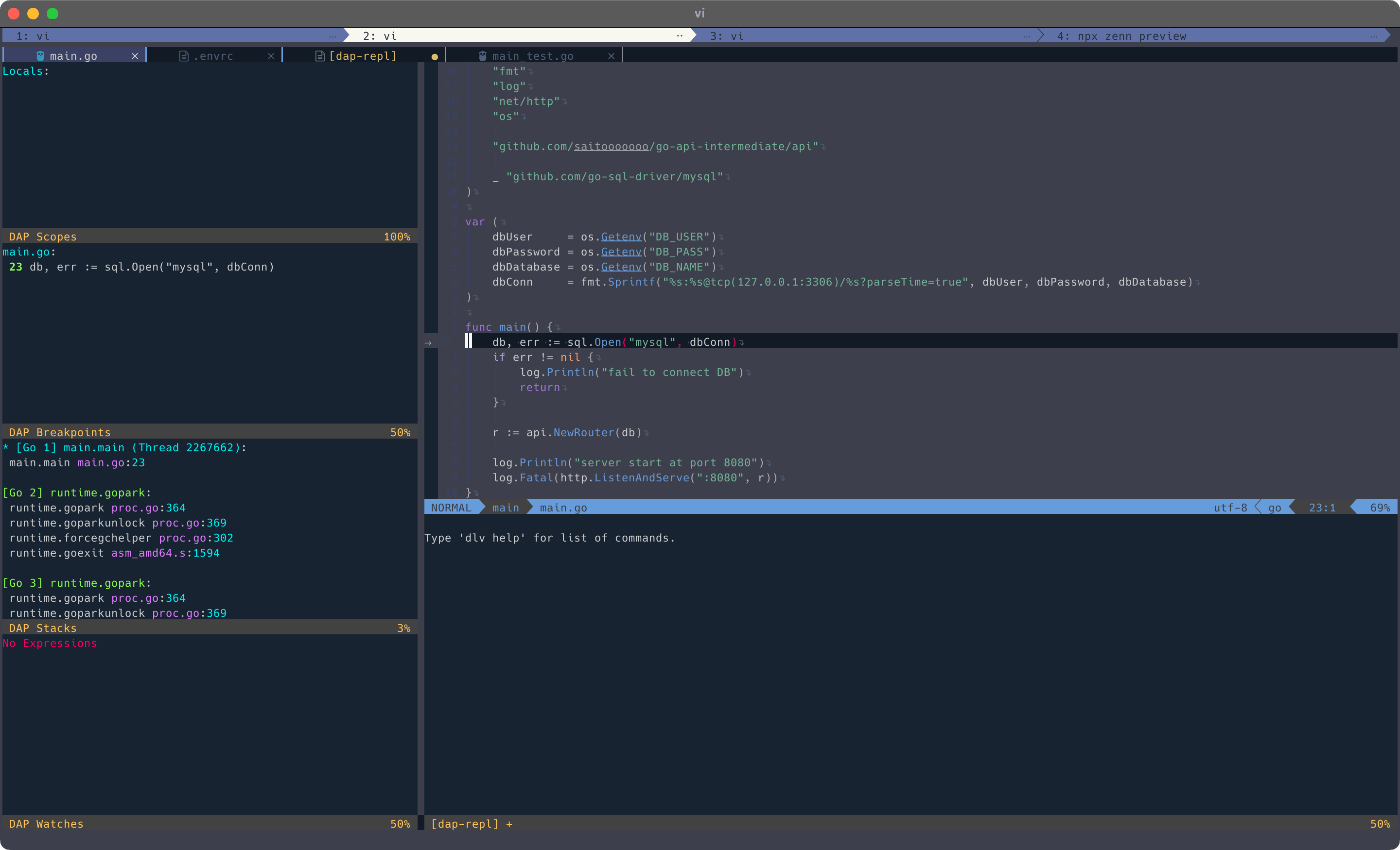
こんなイメージの UI まで構築します。
利用するプラグイン
以下のプラグインを入れます。
それとは別に Delve というものが必要になるのでインストールします。
怪しいものではありません。公式の README に以下のように書いてあります。
Delve は、Go プログラミング言語のデバッガーです
go install github.com/go-delve/delve/cmd/dlv@latest
DAP とは
なお、今回初めて DAP(Debug Adapter Protocol)というものを知り、詳しくないので少し調べてみました。
公式曰く、、、
Debug Adapter Protocol (DAP) は、開発ツール (IDE やエディターなど) とデバッガーの間で使用される抽象プロトコルを定義します。
vscode で簡単にデバッグ環境が作れるのは、このプロトコルを使っているからなのかな??
設定してみる
まずは、プラグインをインストールします。
[[plugins]]
repo = 'mfussenegger/nvim-dap'
hook_add = '''
  source ~/.config/nvim/plugins/nvim-dap.lua
'''

[[plugins]]
repo = 'rcarriga/nvim-dap-ui'

[[plugins]]
repo = 'leoluz/nvim-dap-go'
次に keymap を設定します。
公式に記載されているのと同じ keymap を使用します。
local function map(mode, lhs, rhs, opts)
	local options = {noremap = true}
    if opts then options = vim.tbl_extend('force', options, opts) end
    vim.api.nvim_set_keymap(mode, lhs, rhs, options)
end

map("n", "<F5>", ":lua require'dap'.continue()<CR>", { silent = true})
map("n", "<F10>", ":lua require'dap'.step_over()<CR>", { silent = true})
map("n", "<F11>", ":lua require'dap'.step_into()<CR>", { silent = true})
map("n", "<F12>", ":lua require'dap'.step_out()<CR>", { silent = true})
map("n", "<leader>b", ":lua require'dap'.toggle_breakpoint()<CR>", { silent = true})
map("n", "<leader>bc", ":lua require'dap'.set_breakpoint(vim.fn.input('Breakpoint condition: '))<CR>", { silent = true})
map("n", "<leader>l", ":lua require'dap'.set_breakpoint(nil, nil, vim.fn.input('Log point message: '))<CR>", { silent = true})

-- dap-ui key map
map("n", "<leader>d", ":lua require'dapui'.toggle()<CR>", { silent = true})
map("n", "<leader><leader>df", ":lua require'dapui'.eval()<CR>", { silent = true})

-- dap-go key map
map("n", "<leader>td", ":lua require'dap-go'.debug_test()<CR>", { silent = true })
ここまで設定すると、<leader>bでブレークポイントを貼れるようになっているかと思います。
次は、dap-ui でデバッガー起動時の ui を設定します。
ほぼ公式の通りですが、一部だけ変えています。
dap-ui の設定
require("dapui").setup({
icons = { expanded = "▾", collapsed = "▸", current_frame = "▸" },
mappings = {
-- Use a table to apply multiple mappings
expand = { "<CR>", "<2-LeftMouse>" },
open = "o",
remove = "d",
edit = "e",
repl = "r",
toggle = "t",
},
-- Expand lines larger than the window
-- Requires >= 0.7
expand_lines = vim.fn.has("nvim-0.7") == 1,
-- Layouts define sections of the screen to place windows.
-- The position can be "left", "right", "top" or "bottom".
-- The size specifies the height/width depending on position. It can be an Int
-- or a Float. Integer specifies height/width directly (i.e. 20 lines/columns) while
-- Float value specifies percentage (i.e. 0.3 - 30% of available lines/columns)
-- Elements are the elements shown in the layout (in order).
-- Layouts are opened in order so that earlier layouts take priority in window sizing.
layouts = {
{
elements = {
-- Elements can be strings or table with id and size keys.
{ id = "scopes", size = 0.25 },
"breakpoints",
"stacks",
"watches",
},
size = 40, -- 40 columns
position = "left",
},
{
elements = {
"repl",
},
size = 0.25, -- 25% of total lines
position = "bottom",
},
},
controls = {
-- Requires Neovim nightly (or 0.8 when released)
enabled = true,
-- Display controls in this element
element = "repl",
icons = {
pause = "",
play = "",
step_into = "",
step_over = "",
step_out = "",
step_back = "",
run_last = "↻",
terminate = "□",
},
},
floating = {
max_height = nil, -- These can be integers or a float between 0 and 1.
max_width = nil, -- Floats will be treated as percentage of your screen.
border = "single", -- Border style. Can be "single", "double" or "rounded"
mappings = {
close = { "q", "<Esc>" },
},
},
windows = { indent = 1 },
render = {
max_type_length = nil, -- Can be integer or nil.
max_value_lines = 100, -- Can be integer or nil.
}
})
最後に Go をデバッグするための nvim-dap-go の設定をします。
Delve を呼んで指定した host,port で起動します。
dap.configurations.goの中で<F5>を押した時のデバッグモードの選択項目を作ります。
今回試すアプリが DB 接続時に環境変数を必要としているので、envの中で指定しています。
これで起動時に環境変数がデバッガーに渡るようになります。
dap-go の設定
require("dap-go").setup()
local dap = require("dap")

dap.adapters.go = function(callback, config)
	local stdout = vim.loop.new_pipe(false)
    local handle
    local pid_or_err
    local port = 38697
    local opts = {
		stdio = {nil, stdout},
		args = {"dap", "-l", "127.0.0.1:" .. port},
		detached = true
    }
    handle, pid_or_err = vim.loop.spawn("dlv", opts, function(code)
		stdout:close()
		handle:close()
		if code ~= 0 then
			print('dlv exited with code', code)
		end
    end)
    assert(handle, 'Error running dlv: ' .. tostring(pid_or_err))
    stdout:read_start(function(err, chunk)
		assert(not err, err)
		if chunk then
			vim.schedule(function()
				require('dap.repl').append(chunk)
			end)
		end
    end)
    -- Wait for delve to start
    vim.defer_fn(
		function()
			callback({type = "server", host = "127.0.0.1", port = port})
		end,
		100)
end

dap.configurations.go = {
	{
		type = "go",
		name = "Debug the golang",
		request = "launch",
		program = "${file}",
		env = {
			DB_USER = "docker",
			DB_PASS = "docker",
			DB_NAME = "sampledb"
		}
	},
	{
		type = "go",
		name = "Debug the golang test",
		request = "launch",
		mode = "test",
		program = "${file}",
	},
	{
		type = "go",
		name = "Debug test (go.mod)",
		request = "launch",
		mode = "test",
		program = "./${relativeFileDirname}",
	}
}
試してみる
*.goのデバッグモード起動
*.goを開き<F5>を押して、1 の起動モードを選択するとステップ実行ができるようになっているかと思います。
ちなみにステップ実行は、<F10>に割り当てています。
*_test.goのデバッグモード起動
*_test.goを開き<F5>を押して、3 の起動モードを選択するとステップ実行ができるようになっているかと思います。
最後に
これで Neovim 上で快適なデバッグができそうです!
Discussion