iOS開発
デバッグ
iOSアプリ開発に便利なLLDBのp/po/vコマンドを覚えよう! - Takahiro Octopress Blog
LLDB: Beyond "po" - WWDC 2019 - Videos - Apple Developer
LLDB
スレッドのリストを表示するlist
(lldb) thread list
Process 11439 stopped
* thread #1: tid = 0x171b4, 0x00000001025253f9 Teachme Biz`closure #1 in FooPresenter.didTaskManualDismiss(self=0x00007fbb598aa000, isTaskManualFinished=false) at FooPresenter.swift:232:24, queue = 'com.apple.main-thread', stop reason = breakpoint 1.1
  thread #5: tid = 0x176ce, 0x00000001187d196a libsystem_kernel.dylib`mach_msg_trap + 10, name = 'com.apple.uikit.eventfetch-thread'
  thread #11: tid = 0x177fc, 0x00000001187d196a libsystem_kernel.dylib`mach_msg_trap + 10, name = 'com.apple.NSURLConnectionLoader'
  thread #43: tid = 0x1aecc, 0x00000001187d196a libsystem_kernel.dylib`mach_msg_trap + 10
  thread #44: tid = 0x1aecd, 0x00000001187d304a libsystem_kernel.dylib`__workq_kernreturn + 10
  thread #45: tid = 0x1aee0, 0x00000001187d304a libsystem_kernel.dylib`__workq_kernreturn + 10
  thread #51: tid = 0x1aee5, 0x00000001187d304a libsystem_kernel.dylib`__workq_kernreturn + 10
  thread #52: tid = 0x1aee6, 0x00000001187d304a libsystem_kernel.dylib`__workq_kernreturn + 10
  thread #53: tid = 0x1af4d, 0x00000001187d304a libsystem_kernel.dylib`__workq_kernreturn + 10
  thread #54: tid = 0x1af4f, 0x00000001187d304a libsystem_kernel.dylib`__workq_kernreturn + 10
  thread #55: tid = 0x1af50, 0x00000001187d304a libsystem_kernel.dylib`__workq_kernreturn + 10
  thread #56: tid = 0x1af51, 0x00000001187d304a libsystem_kernel.dylib`__workq_kernreturn + 10
  thread #57: tid = 0x1af53, 0x00000001187d304a libsystem_kernel.dylib`__workq_kernreturn + 10
  thread #58: tid = 0x1af52, 0x00000001187d304a libsystem_kernel.dylib`__workq_kernreturn + 10
  thread #59: tid = 0x1af54, 0x00000001187d304a libsystem_kernel.dylib`__workq_kernreturn + 10
  thread #60: tid = 0x1af7f, 0x00000001187d304a libsystem_kernel.dylib`__workq_kernreturn + 10
スタックトレースを表示する backtrace
(lldb) thread backtrace
* thread #1, queue = 'com.apple.main-thread', stop reason = breakpoint 1.1
  * frame #0: 0x00000001025253f9 Teachme Biz`closure #1 in FooPresenter.didTaskManualDismiss(self=0x00007fbb598aa000, isTaskManualFinished=false) at FooPresenter.swift:232:24
    frame #1: 0x0000000102525db0 Teachme Biz`partial apply for closure #1 in FooPresenter.didTaskManualDismiss(isTaskManualFinished:) at <compiler-generated>:0
    frame #2: 0x00000001025265e0 Teachme Biz`thunk for @escaping @callee_guaranteed @Sendable @async () -> (@out A) at <compiler-generated>:0
    frame #3: 0x0000000102526710 Teachme Biz`partial apply for thunk for @escaping @callee_guaranteed @Sendable @async () -> (@out A) at <compiler-generated>:0
UIKit
(Anual) Update
Updating Your App for iOS 11 - WWDC 2017 - Videos - Apple Developer
Responsiblity
UIKit: Apps for Every Size and Shape - WWDC 2018 - Videos - Apple Developer
Deep Link
Universal Links
iOS9でUniversal Linksが導入されたときの記事
What's new in Universal Links - WWDC20 - Videos - Apple Developer
Supporting Universal Links in Your App | Apple Developer Documentation
Support Universal Links - App Search Programming Guide - Apple Documentation
エントリーポイント
Deep Link
application(_ app: UIApplication, open url: URL, options: [UIApplicationOpenURLOptionsKey : Any] = [:]) -> Bool
Universal Links
application(_:didFinishLaunchingWithOptions:)
※launchOptionsのキーに.userActivityDictionaryを指定して、その中身からuserActivityの内容がとれます。
application(_:continueUserActivity:restorationHandler:)
push notification
didReceiveRemoteNotification: fetchCompletionHandler
or
userNotificationCenter(_:didReceive:withCompletionHandler:)
EmptyView
Overview
Designing For The Empty States
DZNEmptyDataSet
It is (extremely) important to set the dataSetSource and dataSetDelegate to nil, whenever the view is going to be released. This class uses KVO under the hood, so it needs to remove the observer before dealocating the view.
Localize
iOS9 or above
AVFoundation
AVFoundation | Apple Developer Documentation
Media Assets and Metadata | Apple Developer Documentation
Sample-level Reading and Writing | Apple Developer Documentation
Media Playback and Selection | Apple Developer Documentation
Video Settings | Apple Developer Documentation
Media Composition and Editing | Apple Developer Documentation
Using Swift 5 asynchronous feature
AVAsset
AVKit
AVKit | Apple Developer Documentation
Core Media
AVPlayer
addPeriodicTimeObserver(forInterval:queue:using:) | Apple Developer Documentation
seek(to:) | Apple Developer Documentation
動画を再生する
Creating a Movie Player App with Basic Playback Controls | Apple Developer Documentation
動画を最後まで再生したら最初に戻す
Notificationで制御する。
        private var playToEndTimeObserver: NSObjectProtocol?

        playToEndTimeObserver = NotificationCenter.default
            .addObserver(
                forName: .AVPlayerItemDidPlayToEndTime,
                object: nil, queue: .main) { [weak self] _ in
            self?.player?.currentItem?.seek(to: CMTime.zero, completionHandler: nil)
        }
asyncで書く方法もあるがここでは割愛。
Networking
Choosing a Network Debugging Tool
        // handle HTTP server-side error
        if let responseString = String(bytes: responseBody, encoding: .utf8) {
            // The response body seems to be a valid UTF-8 string, so print that.
            print(responseString)
        } else {
            // Otherwise print a hex dump of the body.
            print(responseBody as NSData)
        }
String(bytes: foo, encoding: .utf8) こんなAPIあったのか。
UITableView
deselectRow
override func viewWillAppear(_ animated: Bool) {
    super.viewWillAppear(animated)

    if let indexPath = tableView.indexPathForSelectedRow {
        tableView.deselectRow(at: indexPath, animated: true)
    }
}
deselectRow(at:animated:) | Apple Developer Documentation
Resizing Cells
Auto Layout Guide: Working with Self-Sizing Table View Cells
Capacitor
Release Automation
App Store Connect API
Expanding automation with the App Store Connect API - WWDC20 - Videos - Apple Developer
Automating App Store Connect - WWDC18 - Videos - Apple Developer
Fastlane
TBD
Xcode13・iOS15
UINavigationBarAppearance
Xcode13でビルドすると、ナビゲーションバーの背景色が意図しない挙動になる。
    //objective-C
    if (@available(iOS 15.0, *)) {
        UINavigationBarAppearance *appearance = [UINavigationBarAppearance new];
        appearance.backgroundColor = UIColor.whiteColor;
        UINavigationBar.appearance.standardAppearance = appearance;
        UINavigationBar.appearance.scrollEdgeAppearance = appearance;
    }
Customizing the appearance of UINavigationBar
UITableViewの意図しないマージンの発生
UIButton
Custom Button
複数行対応のUIButton
Title Insets
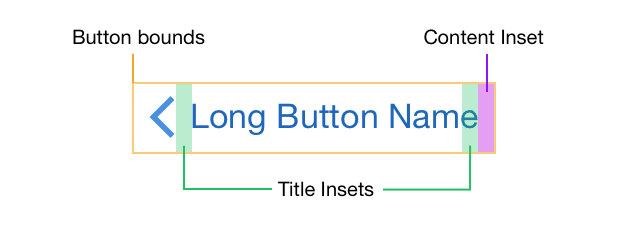
Size Class
When implementing a custom container view controller, you can use this method to change the traits of any embedded child view controllers to something more appropriate for your layout. Making such a change alters other view controller behaviors associated with that child. For example, modal presentations behave differently in a horizontally compact versus horizontally regular environment.
init(traitsFrom:) | Apple Developer Documentation
If the array contains more than one element, the highest-indexed element that contains a given trait is used for that trait.
traitCollection
UIScreen, UIWindow, UIViewController, UIPresentationController, UIViewはUITraitCollectionクラスのインスタンスを traitCollectionプロパティとして保持している。
UITraitCollectionは、 horizontalSizeClass, verticalSizeClass, displayScale, userInterfaceIdiomの情報を持っている。
Readable Content Guide
readableContentGuide | Apple Developer Documentation
設定方法
カスタムセルの場合
Follow Readable Widthにチェックを入れる
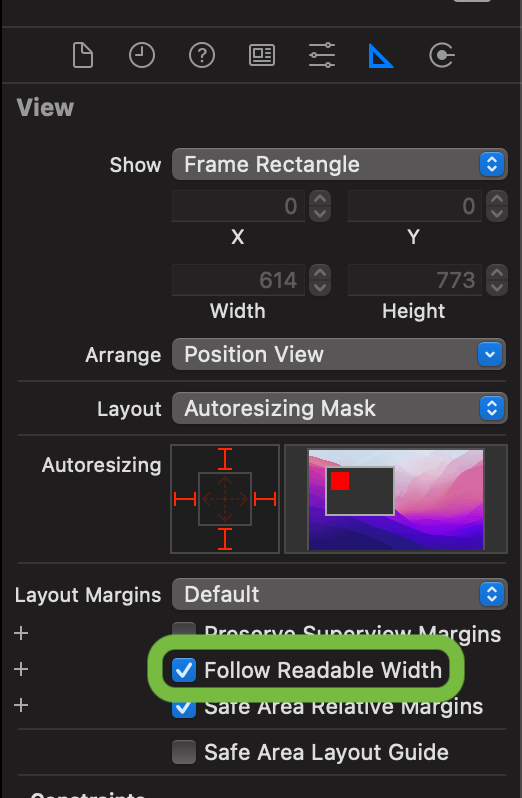
leading,trailingのConstraintsのつける対象は、Relative to marginにチェックを入れる
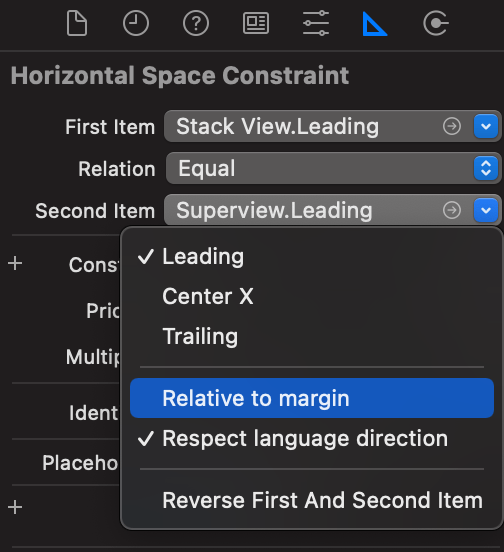
ジェスチャ処理
Xibファイル
Orientation
Declarative Programing
Emoji detection
UITextField
Build Config
Dynamic Type
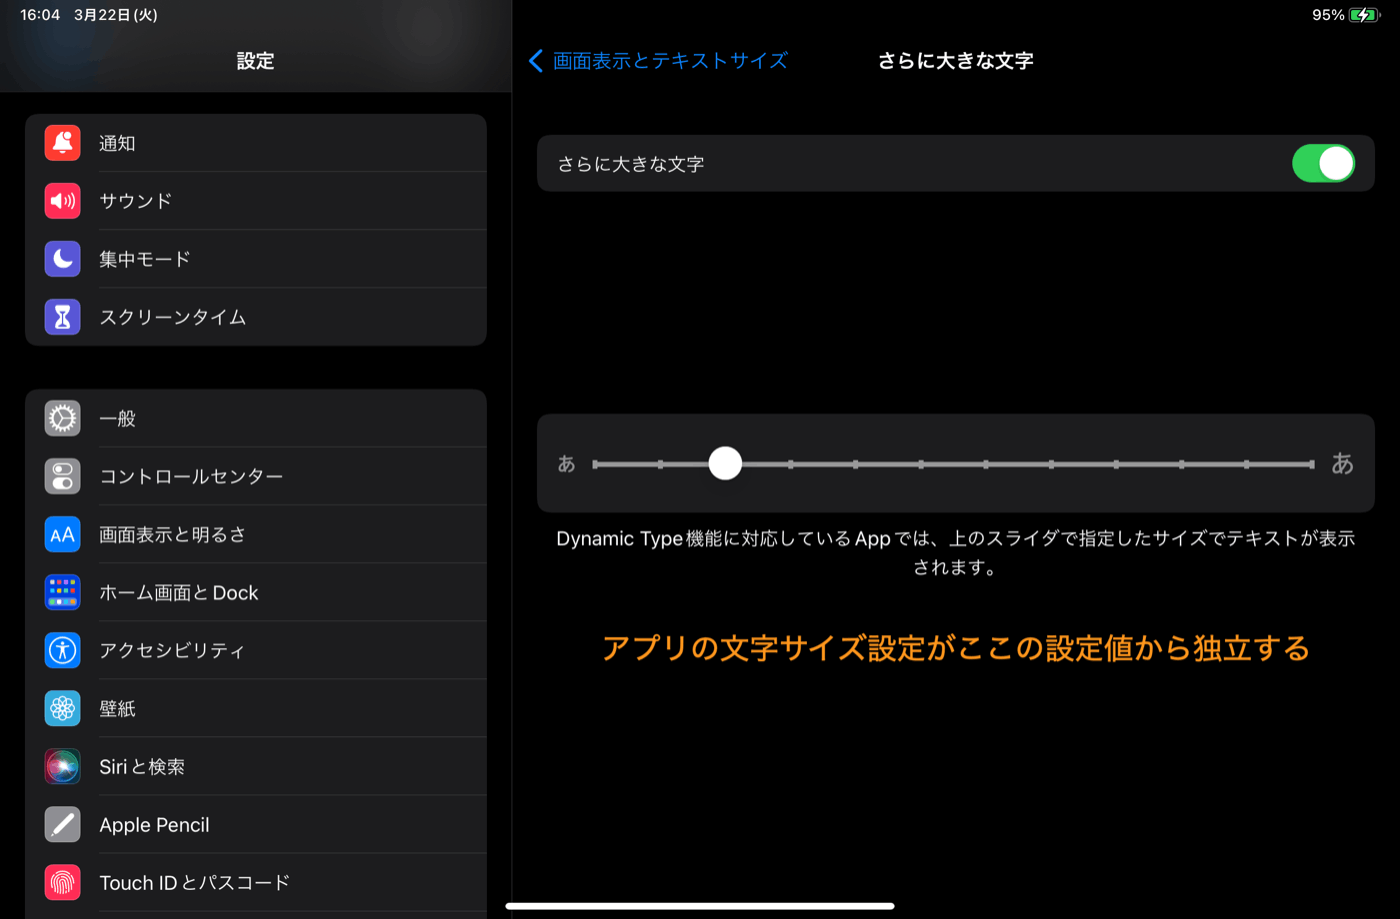
設定値の変化の検出
現在の設定値は
UIApplication.shared.preferredContentSizeCategory
で取得できる。
設定値は、
- 設定アプリ> アクセシビリティ 内で設定する
- Control Centerで文字サイズの設定をする
から変更できる。
この変更の検出が、
ユーザーに選択されたDynamic Type設定はUIContentSizeCategoryという型で、UIApplication.shared.preferredContentSizeCategoryまたは(iOS 8以上では)traitCollection.preferredContentSizeCategoryで取得できます。現時点(iOS 12)で利用できるすべての値は以下のとおりです。
アプリがバックグラウンドにある間に、ユーザーがDynamic Typeの設定を変えると…
- UIContentSizeCategory.didChangeNotificationというnotificationがアプリに送られます。
- iOS 8以上ではtraitCollectionDidChangeメソッドが呼ばれます。UITraitEnvironmentプロトコルのメソッドですが、UIViewやUIViewControllerが実装している…
のように行うことが出来る。
留意点
Control Centerで文字サイズの設定をする際に、「(アプリ名)のみ」 を選ぶと、設定アプリ> アクセシビリティ 内で設定する文字サイズがそのアプリに反映されなくなる。
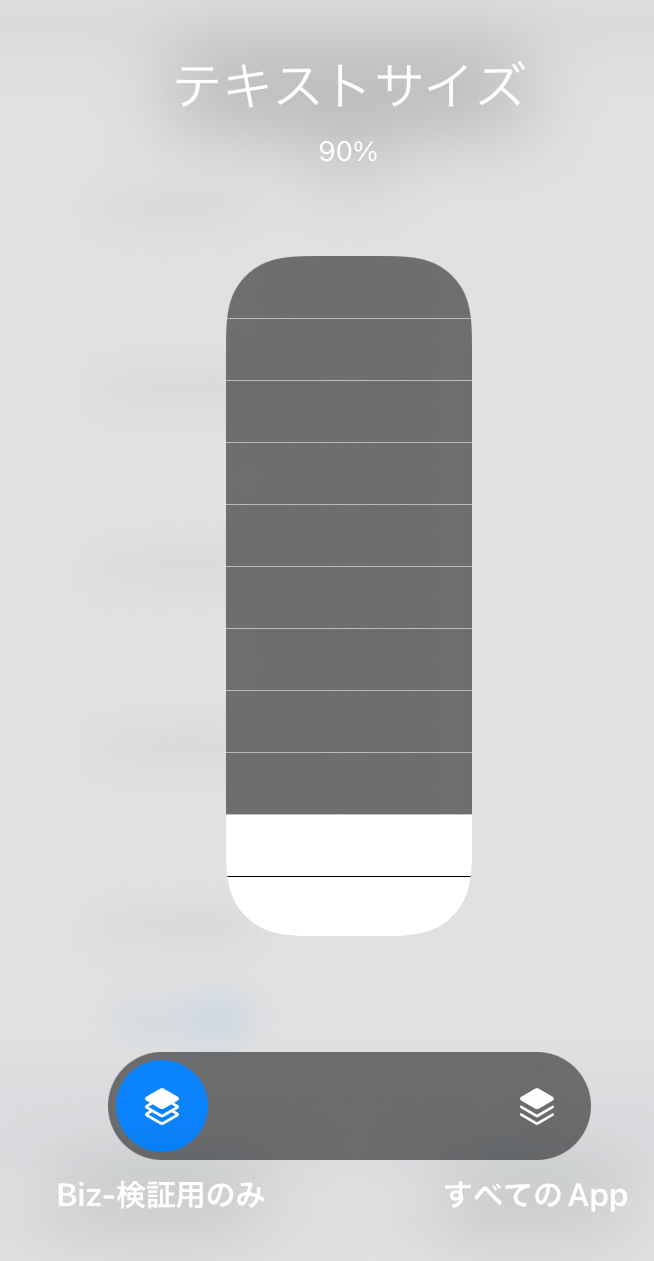
UITextViewにおけるURLの取り扱い
正規表現
Useful Snippets
Mock
Mockolo
Mockoloがうまく動かなくなった件
時間がかかったので備忘録を残しておく。
前提
macOS12.5
Xcode12.4.1をXcodes経由で使用
経緯
元々、XcodeのBuild Phasesでmockoloでモック生成を行っていたのが、最近GeneratedMocks.swiftが削除されてままになりビルドエラーになる事象が発生していた。
応急処置として、スクリプト中のGeneratedMocks.swiftを削除する部分をコメントアウトしていた。
今回、GeneratedMocks.swiftを更新しなければいけない状況になったため、重い腰を上げて取り組むことになった。
やったこと
- AppStore経由でXcodeをインストール
Xcodes経由で導入したXcode(Xcode-13.4.1.appなど)では、うまく動かないという報告があったため。
- コマンドラインツールを上で導入したXcodeのものに変更
$ xcode-select -print-path
/Applications/Xcode-13.4.1.app/Contents/Developer
$ sudo xcode-select --switch /Applications/Xcode.app/Contents/Developer
$ xcode-select -print-path
/Applications/Xcode.app/Contents/Developer
- mint経由でmockoloを入れ直す
$ mint list
🌱 Installed mint packages:
  SwiftLint
    - 0.46.2
    - 0.47.1
  mockolo
    - 1.6.3
    - 1.7.0
$ mint uninstall mockolo
🌱 mockolo was uninstalled
$ mint bootstrap
🌱 Cloning mockolo 1.7.0
🌱 Resolving package
🌱 Building package
Building for production...
[1/7] Copying lib_InternalSwiftSyntaxParser.dylib
[2/7] Compiling TSCclibc process.c
[3/7] Compiling TSCclibc libc.c
remark: Incremental compilation has been disabled: it is not compatible with whole module optimizationremark: Incremental compilation has been disabled: it is not compatible with whole module optimization[4/9] Compiling atomic-counter.c
remark: Incremental compilation has been disabled: it is not compatible with whole module optimization[5/10] Compiling TSCLibc libc.swift
remark: Incremental compilation has been disabled: it is not compatible with whole module optimization[6/11] Compiling ArgumentParserToolInfo ToolInfo.swift
remark: Incremental compilation has been disabled: it is not compatible with whole module optimization[7/12] Compiling TSCBasic Await.swift
remark: Incremental compilation has been disabled: it is not compatible with whole module optimization[8/13] Compiling ArgumentParser BashCompletionsGenerator.swift
[9/13] Compiling TSCUtility Archiver.swift
[10/13] Compiling SwiftSyntax AbsolutePosition.swift
<unknown>:0: error: error opening '/private/var/folders/dx/hbysrw7j7r7gt5p_rjvsgzfw0000gp/T/mint/github.com_uber_mockolo/.build/arm64-apple-macosx/release/SwiftSyntax.swiftmodule' for output: No such file or directory
<unknown>:0: error: error opening '/private/var/folders/dx/hbysrw7j7r7gt5p_rjvsgzfw0000gp/T/mint/github.com_uber_mockolo/.build/arm64-apple-macosx/release/SwiftSyntax.build/SwiftSyntax.d' for output: No such file or directory
warning: next compile won't be incremental; could not write build record to /private/var/folders/dx/hbysrw7j7r7gt5p_rjvsgzfw0000gp/T/mint/github.com_uber_mockolo/.build/arm64-apple-macosx/release/SwiftSyntax.build/master.swiftdepserror: stat error: No such file or directory (2)
error: error: accessing build database "/private/var/folders/dx/hbysrw7j7r7gt5p_rjvsgzfw0000gp/T/mint/github.com_uber_mockolo/.build/arm64-apple-macosx/build.db": disk I/O error
🌱 Encountered error during "swift build -c release -Xswiftc -target -Xswiftc arm64-apple-macosx12.5". Use --verbose to see full output
🌱  Failed to build mockolo 1.7.0 with SPM
$ mint bootstrap
🌱 Cloning mockolo 1.7.0
🌱 Resolving package
🌱 Building package
🌱 Installed mockolo 1.7.0
🌱 Installed 1/2 packages
上記の通り、1回目のmint bootstrapは失敗したものの、めげずにmint bootstrapを繰り返すことでmockoloのインストールは成功した。
これはmint or mockoloの側の修正が必要な気もするけど一旦先に進む。
- ターミナルから、モック生成のコマンドを実行
$ mint run uber/mockolo mockolo -s "${SRCROOT}/Classes" -s "${SRCROOT}/Domain" -s "${SRCROOT}/Application" -d "${SRCROOT}/Classes/Developer/Stub/GeneratedMocks.swift" --macro "DEBUG"
Start...
["Process input mock files..."]
["Took", 7.200241088867188e-05]
["Process source files and generate an annotated/protocol map..."]
MockoloFramework/FileScanner.swift:136: Fatal error: Failed to traverse file:///Classes/ with error Error Domain=NSCocoaErrorDomain Code=260 "The file “Classes” couldn’t be opened because there is no such file." UserInfo={NSURL=file:///Classes/, NSFilePath=/Classes, NSUnderlyingError=0x6000019d5920 {Error Domain=NSPOSIXErrorDomain Code=2 "No such file or directory"}}.
zsh: trace trap  mint run uber/mockolo mockolo -s "${SRCROOT}/Classes" -s "${SRCROOT}/Domain"
エラーが出た旨の表示はなされるものの、GeneratedMocks.swiftの更新自体はできており、ビルドも再びできるようになったので良しとしている。
Half modal
Appcode
Keyboard shortcut
| やりたいこと | キーボードショートカット |
|---|---|
| マウスで複数箇所にキャレットを指定 | ⌥ Shift クリック |
単体テストを実行する
Configurationを編集して、targetを追加する必要がある。
メニューバーのConfigurationのプルダウンメニューから、[Edit Configurations...]を選択

Run/Debug Configurationsウインドウで、+ボタン(Add New Configuration)> [XCTest]を選択
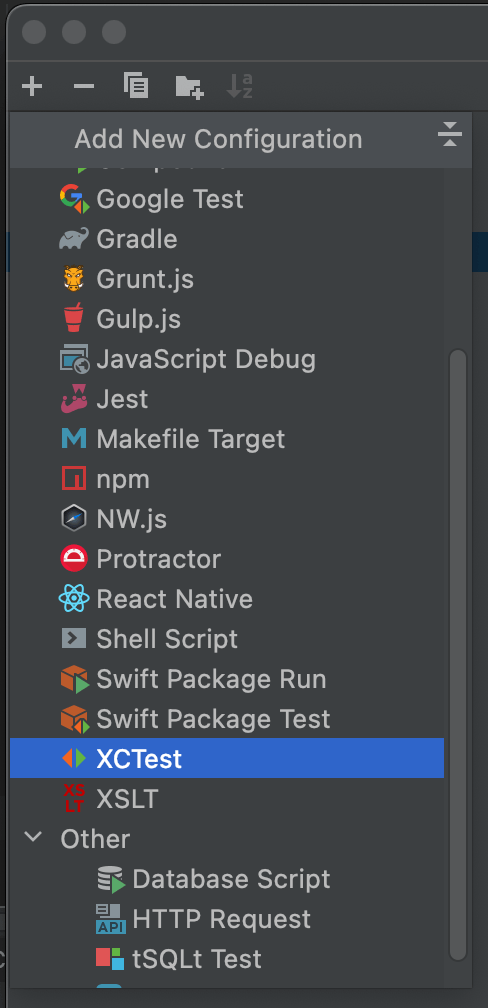
ここまでで、XCTest の All TestsのConfigurationが作成されています。

このとき、xcodeprojフォルダ内に差分が生じています。この差分は削除してもAppCodeの単体テストには影響しません。
Run/Debug Configurationsウインドウを閉じて、メニューバーのConfigurationのプルダウンメニューから[All Tests]を選択します。
シミュレーター実行時と同様に、Run 'All Tests' ( Ctrl R ) や Debug 'All Tests' ( Ctrl D )で単体テストを実行できます。
CI
Swift Package ManagerをXcodeから利用した際に、CI周りの設定をどうするか
ローカルでパッケージを更新した際に、Github Actionsのステップがxcodebuildコマンドを使うところでコケる。
Run scheme_list=$(xcodebuild -list -json -disableAutomaticPackageResolution | tr -d "\n")
  scheme_list=$(xcodebuild -list -json -disableAutomaticPackageResolution | tr -d "\n")
  default=$(echo $scheme_list | ruby -e "require 'json'; puts JSON.parse(STDIN.gets)['project']['targets'][0]")
  echo $default | cat >default
  echo Using default scheme: $default
  shell: /bin/bash -e {0}
xcodebuild: error: Could not resolve package dependencies:
  Package.resolved file is corrupted or malformed; fix or delete the file to continue: unsupported schema version 2
Figma
Figma-export
figma-export colorsなどとコマンドを実行すると、Figmaから色などの設定をiOSプロジェクトに適合した形式で書き出してくれるツール。
figma-export.yamlで設定を行う。
Core Data
マイグレーション
SwiftUIに更新を反映する
SQLiteを覗き見る
- Build SchemeのArguments Passed On Launchに
-com.apple.CoreData.SQLDebug 1を追加して、CoreDataのログをXcodeのコンソールから見えるようにする。 - DB Browser for SQLiteなどのSQLiteビューワで、シミュレーター内のSQLiteのDBファイルの中身を見ることができる。
Unit Tests
Container View Controller
Intrinsic Content Size
UIButtonのImageViewが設定されている場合
TitleがBoldの場合
UILabel
タイトルと境界の間の余白を設定する
@IBDesignable class CustomLabel: UILabel {

    @IBInspectable var topPadding: CGFloat = 10
    @IBInspectable var bottomPadding: CGFloat = 10
    @IBInspectable var leftPadding: CGFloat = 10
    @IBInspectable var rightPadding: CGFloat = 10

    override func drawText(in rect: CGRect) {
        super.drawText(in: rect.inset(by: UIEdgeInsets.init(top: topPadding, left: leftPadding, bottom: bottomPadding, right: rightPadding)))
    }

    override var intrinsicContentSize: CGSize {
        var size = super.intrinsicContentSize
        size.height += (topPadding + bottomPadding)
        size.width += (leftPadding + rightPadding)
        return size
    }
}
できるだけ幅を広げる
KMM
αからβに移行した
Swift Concurrencyを取り込んでいく
Alamofireでもasync awaitしたい
Playgroundでもasync awaitする
Combineから移行する
可変個の非同期処理を行うTask Groupはちゃんと学ばないといけない。目が滑った。
Closureとも併存する
Widget
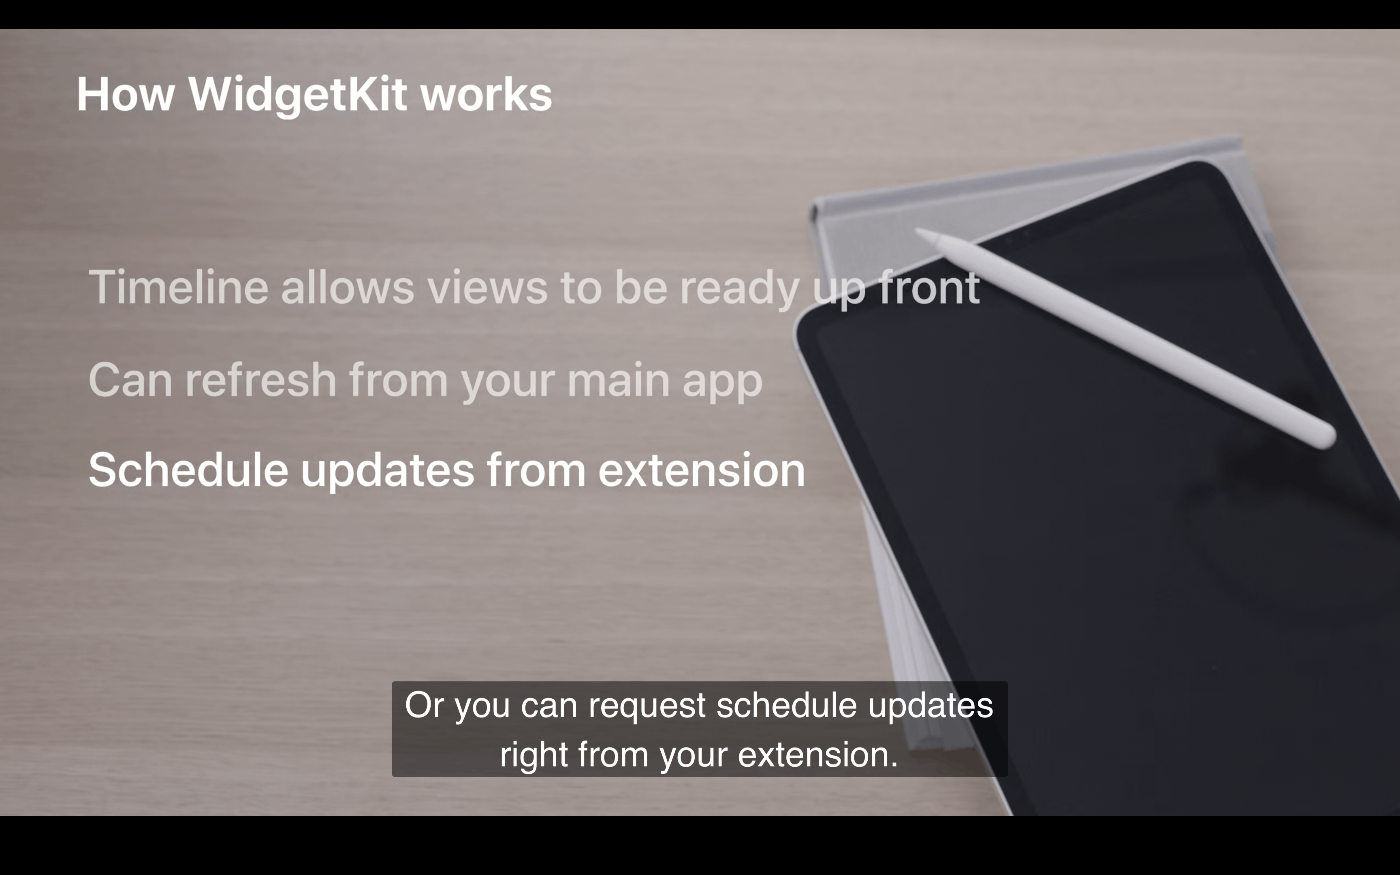
Meet WidgetKit
Widgetの表示がアップデートされる機構の説明。
HIG
In iOS and iPadOS, widgets appear on the Home Screen or in Today View; in macOS, Notification Center displays widgets. Widgets can be small, medium, large, and — in iPadOS only — extra large.
せっかくだから extra largeやりたいなあ。
iOS 16 introduces widgets on the Lock Screen, which let people place rich, glanceable content on their iPhone Lock Screen in a way that’s similar to placing a complication on their Apple Watch face. Lock Screen widgets are also similar to complications in both design and implementation. For guidance, see Platform considerations below.
widgets on the Lock Screenも面白そう。Apple WatchのComplicationに似たものと書いてある。
Creating a Widget Extension (developer.apple.com article)
更新のタイミング
疑問点
- 更新のタイミング
- 新着・更新コーナーの表示に耐えうるものなのか
- Lock screen版では違いがあるのか
Instruments
CoreDataのモニタリング、メソッドの所要時間を計測することができる
⚠️工事中⚠️
UIMenu
UIMenuController
Font color
Github Copilot for Xcode
Nuke
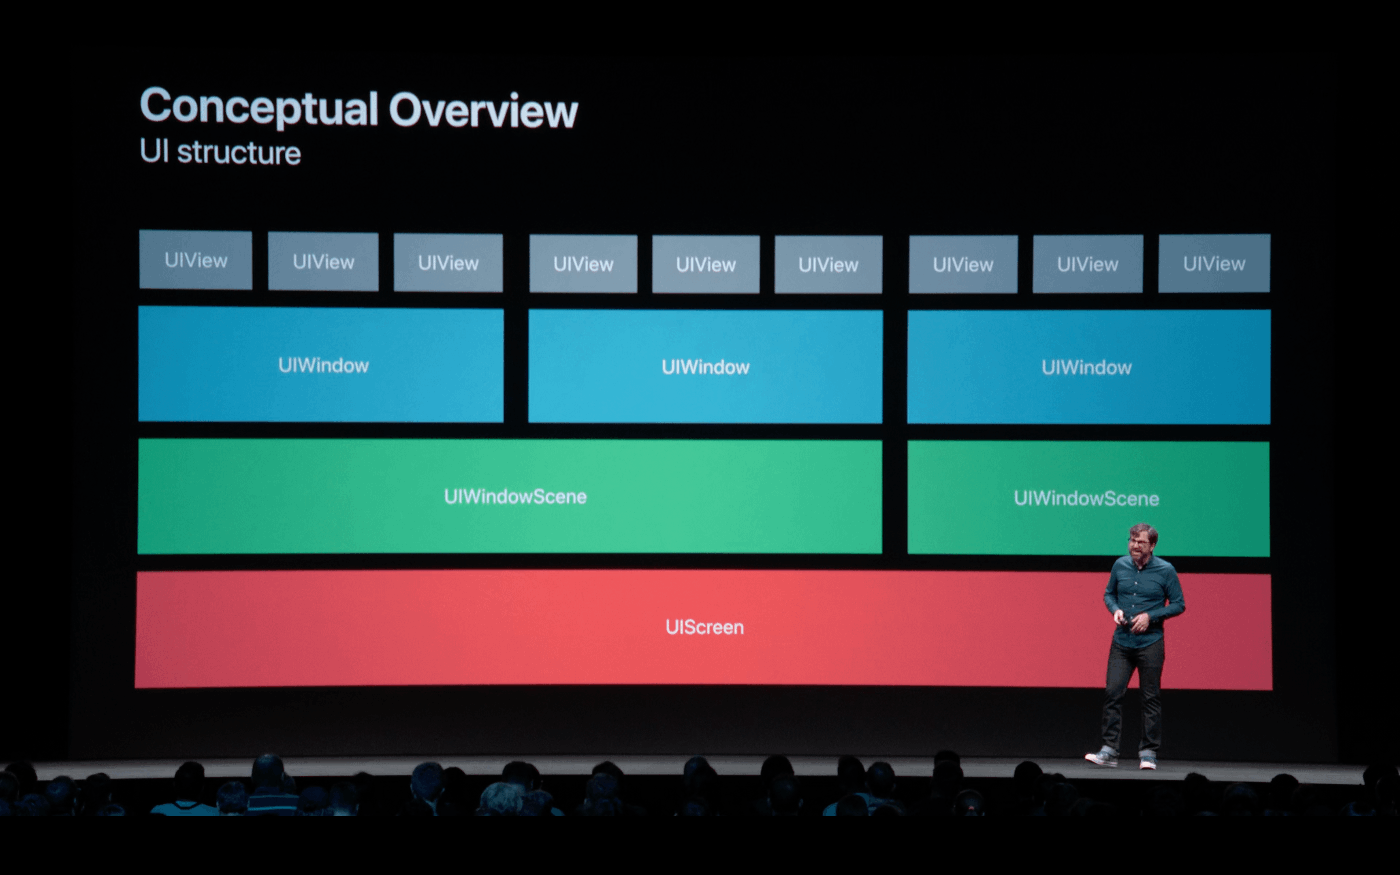
Support Multiple Scenes
Unit Tests
警告に対処する
Crashlyticsで表示するエラーをいい感じに管理したい。
NSError
NSErrorとSwift.Errorの橋渡しを改善するプロポーザル
その他
OGP画像
Webサイト作成者向けに、iMessageでの表示を最適化するためのtips
Self Sizing CellとUIHostingController
Method Swifzzling
スクショの検知・禁止
画面共有
AirPlayを使って、Macの画面を他のMacから操作できるようにする機能を試した。
Intel Macbook ProからReceiverのM1 Pro Macに接続する場合、Receiver側のMacが外部ディスプレイに接続していたとしてもSender側が拡張ディスプレイとして使えるのは1枚のディスプレイだけであった。
コレジャナイ感。
Universal Control
そういえば、同じApple IDでログインしているApple デバイスであれば、カーソル共有する機能が入ったはず。
それがUnivesal Control。
システム設定アプリのディスプレイから設定できたはずなのだが、なぜかメニューが出てこないのだ。Onにしているはずなのに。
appleのサポートページ
によると、インターネット共有をOffにしないといけないらしい。開発用のMacはVPNを検証端末に共有する都合上、インターネット共有をOnにしないといけない。
まあ、今回はこの設定変更には目を瞑ろう。
がしかし、個人用Macからは接続できず、新しい開発用M1 Pro Macからのみ接続することができた。
すぐに個人用Macからも接続できるようになった。
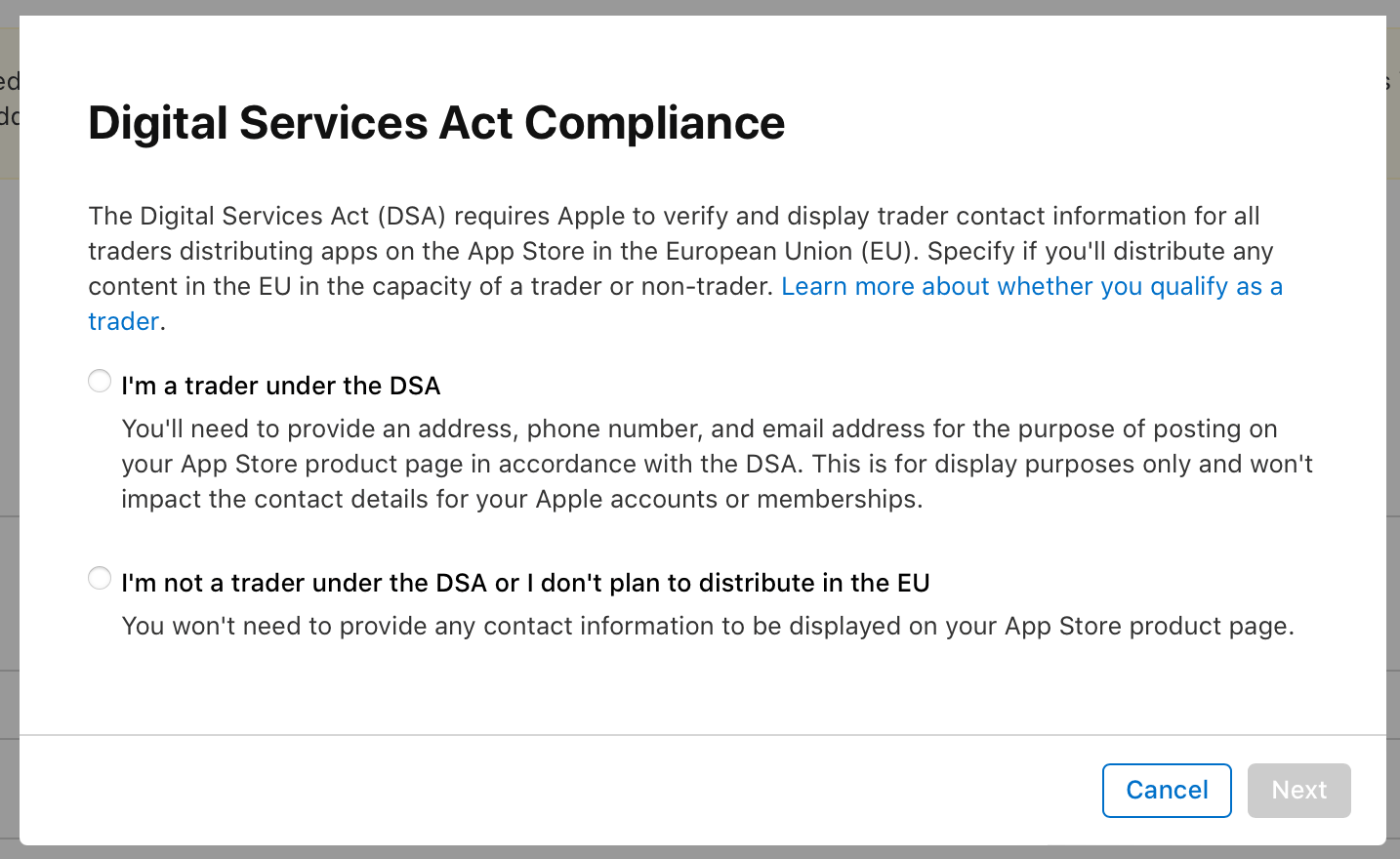
トレーダー要件
App Store Connect上で、アプリの配布地域からヨーロッパのものを全て外した。
App Store CoonectのBusinessで、「トレーダーではない」を選択した。

Camera Control
3rd party appでもカメラコントロールControl Centerから起動できるようにすることが可能らしい。
App store connect API