[キャッチアップ] Capacitor
概要
新しくジョインしたプロダクトで使用している Capacitor をサクサクキャッチアップする
前提
- 本職はフロントエンド
- ネイティブアプリはほぼ知らない
- Macbook Pro (M1) 使用
ゴール
- Capacitor の概要を理解する
- 個人用途で運用している Web アプリ を Capacitor でネイティブアプリ化する
- ストア公開はしないが、自分の iPhone でアプリを利用できる状態にする
- (努力目標) プッシュ通知機能を新たに実装する
まず公式ドキュメントの Getting Started をとにかく読む
紹介
- Capacitor は、iOS、Android、Web 上でネイティブに動作する最新の Web アプリケーションを簡単に構築することができるクロスプラットフォームのネイティブライブラリ
- ネイティブ SDK への完全なアクセスを犠牲にすることなく、Web ファーストで構築が可能
- 最新のウェブアプリをすべての主要なプラットフォームで簡単に実行できるようにすることに完全に焦点を当てている
環境設定
- Capacitor のターゲットは Web/Android/iOS の3種類
- iOS には Xcode が、Android には Android Studio が必要
- いずれにしても Node 14 以上が必要
今回は既存の Web アプリ(React) を iPhone で動かすことを目的にしてるので、Android はスルーして iOS 用の開発環境を構築する
まず手元の Mac のバージョンが古い(12.4) ので、最新(13.2.1) にあげるかぁ。
Mac 更新したので続けて最新版の Xcode をインストール
Xcode のインストールは完了。
多分だけど普通に開発は vscode で行えて、iPhone で動かすためだけに xcode を使えば良いんだと思うのでいったんここまで。
xcode-select のセットアップがいるらしい
xcode-select コマンド実行したらすぐにインストールを案内されたのでインストール。
(結構時間かかった)
指示の通りのコマンド実行したけど既にインストールされてるからOKらしい。
$ xcode-select --install
xcode-select: error: command line tools are already installed, use "Software Update" in System Settings to install updates
今の開発用ディレクトリが確認できる
$ xcode-select -p
/Applications/Xcode.app/Contents/Developer
Homebrew は既に入ってる。バージョンが気になるので一応最新化。
$ brew --upgrade
upgrade だと本体以外のパッケージも最新化されるらしい。ミスった気がするけど大丈夫かな。
iOS のパッケージマネージャーである Cocoapods を入れる。
$ brew install cocoapods
バージョン確認
$ pod --version
1.12.0
Capacitor のインストール
@capacitor/create-app を使えば新規プロジェクトを作ることができるけど、今回は既存プロジェクトのネイティブアプリ化が狙いなので、個別に CLI を使ってセットアップする。
最低限のパッケージをプロジェクトに追加。
コアと CLI があれば始められそう。
$ yarn add @capacitor/core
$ yarn add -D @capacitor/cli
CLI を使って Capacitor のセットアップ
$ npx cap init
$ npx cap init
[?] What is the name of your app?
    This should be a human-friendly app name, like what you'd see in the App Store.
✔ Name … todism
[?] What should be the Package ID for your app?
    Package IDs (aka Bundle ID in iOS and Application ID in Android) are unique identifiers for apps. They must be in
    reverse domain name notation, generally representing a domain name that you or your company owns.
✔ Package ID … com.sasaki.todism
✔ Creating capacitor.config.ts in /Users/shingo.sasaki/todism in 3.91ms
[success] capacitor.config.ts created!

Next steps:
https://capacitorjs.com/docs/getting-started#where-to-go-next
[?] Join the Ionic Community! 💙
    Connect with millions of developers on the Ionic Forum and get access to live events, news updates, and more.
✔ Create free Ionic account? … no
[?] Would you like to help improve Capacitor by sharing anonymous usage data? 💖
    Read more about what is being collected and why here: https://capacitorjs.com/telemetry. You can change your mind at
    any time by using the npx cap telemetry command.
✔ Share anonymous usage data? … no
-
todismという TODO 管理の Web アプリを iOS アプリにする - パッケージIDは名前から取って
com.sasaki.todismに - 完成済みのアプリなので ionic は不要
- データ提供もしない
これで設定ファイルが作成された
import { CapacitorConfig } from '@capacitor/cli';

const config: CapacitorConfig = {
  appId: 'com.sasaki.todism',
  appName: 'todism',
  webDir: 'dist',
  bundledWebRuntime: false
};

export default config;
今回は iOS で利用するので、 iOS 用のパッケージも追加する
$ yarn add @capacitor/ios
iOS 用プロジェクトを作成
$ npx cap add ios
✔ Adding native Xcode project in ios in 24.57ms
✔ add in 24.81ms
✔ Copying web assets from dist to ios/App/App/public in 7.57ms
✔ Creating capacitor.config.json in ios/App/App in 614.04μs
✔ copy ios in 22.04ms
✔ Updating iOS plugins in 1.74ms
✔ Updating iOS native dependencies with pod install in 12.21s
✔ update ios in 12.25s
[success] ios platform added!
Follow the Developer Workflow guide to get building:
https://capacitorjs.com/docs/basics/workflow
iOS アプリのプロジェクトが作られたように見える。
$ git status
On branch develop/capacitor
Changes to be committed:
  (use "git restore --staged <file>..." to unstage)
        new file:   ios/.gitignore
        new file:   ios/App/App.xcodeproj/project.pbxproj
        new file:   ios/App/App.xcodeproj/project.xcworkspace/contents.xcworkspacedata
        new file:   ios/App/App.xcworkspace/contents.xcworkspacedata
        new file:   ios/App/App.xcworkspace/xcshareddata/IDEWorkspaceChecks.plist
        new file:   ios/App/App/AppDelegate.swift
        new file:   ios/App/App/Assets.xcassets/AppIcon.appiconset/AppIcon-20x20@1x.png
        new file:   ios/App/App/Assets.xcassets/AppIcon.appiconset/AppIcon-20x20@2x-1.png
        new file:   ios/App/App/Assets.xcassets/AppIcon.appiconset/AppIcon-20x20@2x.png
        new file:   ios/App/App/Assets.xcassets/AppIcon.appiconset/AppIcon-20x20@3x.png
        new file:   ios/App/App/Assets.xcassets/AppIcon.appiconset/AppIcon-29x29@1x.png
        new file:   ios/App/App/Assets.xcassets/AppIcon.appiconset/AppIcon-29x29@2x-1.png
        new file:   ios/App/App/Assets.xcassets/AppIcon.appiconset/AppIcon-29x29@2x.png
        new file:   ios/App/App/Assets.xcassets/AppIcon.appiconset/AppIcon-29x29@3x.png
        new file:   ios/App/App/Assets.xcassets/AppIcon.appiconset/AppIcon-40x40@1x.png
        new file:   ios/App/App/Assets.xcassets/AppIcon.appiconset/AppIcon-40x40@2x-1.png
        new file:   ios/App/App/Assets.xcassets/AppIcon.appiconset/AppIcon-40x40@2x.png
        new file:   ios/App/App/Assets.xcassets/AppIcon.appiconset/AppIcon-40x40@3x.png
        new file:   ios/App/App/Assets.xcassets/AppIcon.appiconset/AppIcon-512@2x.png
        new file:   ios/App/App/Assets.xcassets/AppIcon.appiconset/AppIcon-60x60@2x.png
        new file:   ios/App/App/Assets.xcassets/AppIcon.appiconset/AppIcon-60x60@3x.png
        new file:   ios/App/App/Assets.xcassets/AppIcon.appiconset/AppIcon-76x76@1x.png
        new file:   ios/App/App/Assets.xcassets/AppIcon.appiconset/AppIcon-76x76@2x.png
        new file:   ios/App/App/Assets.xcassets/AppIcon.appiconset/AppIcon-83.5x83.5@2x.png
        new file:   ios/App/App/Assets.xcassets/AppIcon.appiconset/Contents.json
        new file:   ios/App/App/Assets.xcassets/Contents.json
        new file:   ios/App/App/Assets.xcassets/Splash.imageset/Contents.json
        new file:   ios/App/App/Assets.xcassets/Splash.imageset/splash-2732x2732-1.png
        new file:   ios/App/App/Assets.xcassets/Splash.imageset/splash-2732x2732-2.png
        new file:   ios/App/App/Assets.xcassets/Splash.imageset/splash-2732x2732.png
        new file:   ios/App/App/Base.lproj/LaunchScreen.storyboard
        new file:   ios/App/App/Base.lproj/Main.storyboard
        new file:   ios/App/App/Info.plist
        new file:   ios/App/Podfile
以降は sync コマンドで動悸できるみたい。多分自動化できる。
$ npx cap sync
✔ Copying web assets from dist to ios/App/App/public in 8.09ms
✔ Creating capacitor.config.json in ios/App/App in 882.21μs
✔ copy ios in 21.57ms
✔ Updating iOS plugins in 1.89ms
✔ Updating iOS native dependencies with pod install in 2.24s
✔ update ios in 2.29s
✔ copy web in 1.90ms
✔ update web in 434.54μs
[info] Sync finished in 2.316s
開発ワークフロー
- モバイルデバイスから使用する場合は Web アプリのビルドが必要
- Vite の場合は
yarn build
- Vite の場合は
-
npx cap syncでビルドした Web アプリを同期する- デフォルト設定+Vite だと
dist/index.htmlがエントリーになる
- デフォルト設定+Vite だと
-
npx cap run iosで実機でのテスト -
npx cap open iosで xcode でプロジェクトを開く - 開発が完了したら、あとは配布なりは xcode で行う
iOS (iPhone 14 シミュレーター) での動作確認
$ npx cap run ios
✔ Copying web assets from dist to ios/App/App/public in 10.86ms
✔ Creating capacitor.config.json in ios/App/App in 1.09ms
[info] Inlining sourcemaps
✔ copy ios in 27.33ms
✔ Updating iOS plugins in 1.87ms
✔ Updating iOS native dependencies with pod install in 2.26s
✔ update ios in 2.30s
✔ Please choose a target device: › iPhone 14 (simulator) (476582E2-C6E4-4023-A87D-4524D042A776)
✔ Running xcodebuild in 32.45s
✔ Deploying App.app to 476582E2-C6E4-4023-A87D-4524D042A776 in 29.79s
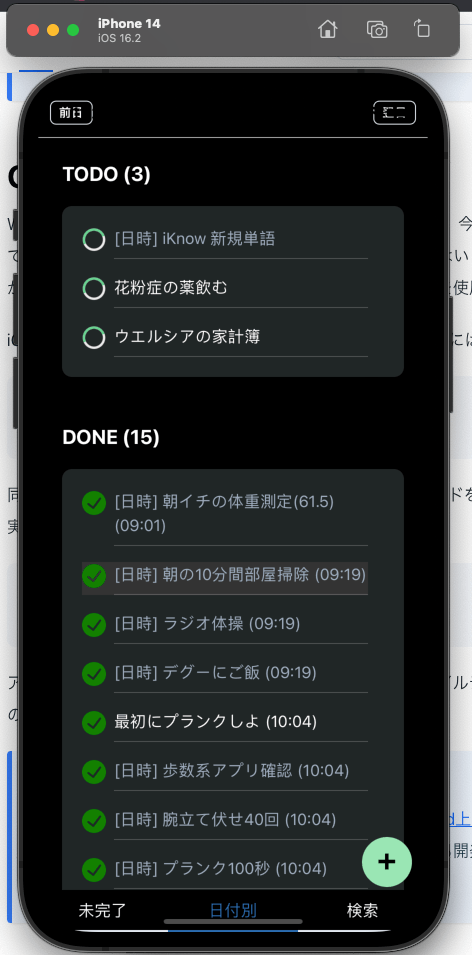
できた。すごすぎる。
iOS のはじめかた
シミュレーターじゃなく実機にインストールしてみたいので xcode を開く。
$ npx cap open ios
xcode の Run ボタンからでも実行できる。
ターゲットをシミュレータにしてる場合はそのまま起動する。
今回は実機デバイスを使いたい。
- Xcode → settings → Accounts から、 Apple ID を追加
- 同画面 Manage Cerificates から、Apple Development の証明書を作成
- Lightning USB で iPhone と Macbook Pro を接続
- Mac 側、iPhone 側それぞれで接続を許可する
- Xcode で認識された iPhone を選択する
- App > Signing & Capabilities より、Team を設定
- iPhone 側で開発モードを有効化
- iPhone 再起動後に xcode 側で Run
- iPhone 側で 設定→一般→VPNとデバイス管理 より、デベロッパを信頼する
で出来た!!
ビルドした Web アプリがそのまま iOS アプリに組み込まれていることを確認するために、Web アプリの方を更新してみる。
→ ブラウザで Web アプリを開くと最新の状態になっているが、iOS アプリの方だと古いママという状態を確認。