Playwright の Fixture について調べたのでメモ
最初に
Playwright でE2Eテストを書いていると、以下のような悩みが出てきます。
- 複数のテストの beforeEach/afterEach や beforeAll/afterAll などで、同じ処理を何度も書いているため再利用したい。(例えば、テスト対象の画面を表示する処理など)
- 同じUIパーツの操作を複数のテストで何度も書いているので再利用したい
- ...etc
こういうときにフィクスチャが便利です。フィクスチャを利用することで効率的に書けたり、テストコードの保守性も向上します。特にフィクスチャのスコープと実行順序で書いたように細かく振る舞いを制御できるのがとても使い勝手がいいなと感じます。
最近よくフィクスチャを使っていて調べたりしていたのでそのメモ書きです。
テストフィクスチャとは
Fixture とはそもそも「固定された物」や「備品、設備」みたいな意味ですが、公式ドキュメントの test-fixtures#introduction の翻訳を引用すると以下のような感じです。
Playwright Test はテストフィクスチャのコンセプトに基づいています。 テストフィクスチャは各テストの環境を構築するために使われ、 テストに必要なものすべてを与えます。 テストフィクスチャはテスト間で分離されます。 フィクスチャを使うと、共通の設定ではなく、その意味に基づいてテストをグループ化することができます。
Playwrightにはビルトインで以下のようのなフィクスチャが用意されています。
built-in-fixtures
| Fixture | Type | Description |
|---|---|---|
| page | Page | このテスト実行のための孤立したページ。 |
| context | BrowserContext | このテスト実行のための分離されたコンテキスト。 ページフィクスチャもこのコンテキストに属します。 コンテキストの設定方法はこちらをご覧ください。 |
| browser | Browser | ブラウザは、リソースを最適化するためにテスト全体で共有されます。 ブラウザの設定方法をご覧ください。 |
| browserName | string | 現在テストを実行しているブラウザの名前。 chromium、firefox、webkitのいずれか。 |
| request | APIRequestContext | このテスト実行用に分離された APIRequestContext インスタンス。 |
フィクスチャベースとそうでない場合の違い
公式ドキュメントに以下のように違いが解説されています。
フィクスチャベースのものはテスト環境自体にフィクスチャとして登録する機構が用意されているので、テストコード内でPage object models などを初期化したりせずに済みます。
ドキュメントにはフィクスチャーの利点が以下のようにまとめられています。
- カプセル化: フィクスチャはセットアップとティアダウンを同じ場所にカプセル化するので、書くのが簡単になる。
- 再利用: 一度定義すれば、すべてのテストで使うことができる。Playwright 組み込みのpageフィクスチャがそうである。
- オンデマンド: 好きなだけフィクスチャを定義でき、Playwright Test はテストに必要なものだけをセットアップし、それ以外はセットアップしない。
- コンポーザブル: 互いに依存し合って、複雑な振る舞いを提供することができる。
- フレキシブル: テストは、他のテストに影響を与えることなく、必要な環境を正確に調整するために、フィクスチャを自由に組み合わせて使うことができる。
- グルーピング: テストを環境を設定する記述でくくる必要がなくなり、代わりにテストの意味ごとに自由にグループ化できる。
フィクスチャの作り方
フィクスチャとして使いたいオブジェクトを用意します。
以下では、Page Object Modelパターンに従った2つのフィクスチャ todoPage と settingsPage を作ります。
TodoPage と SettingsPage のコード
import type { Page, Locator } from '@playwright/test';

export class TodoPage {
  private readonly inputBox: Locator;
  private readonly todoItems: Locator;

  constructor(public readonly page: Page) {
    this.inputBox = this.page.locator('input.new-todo');
    this.todoItems = this.page.getByTestId('todo-item');
  }

  async goto() {
    await this.page.goto('https://demo.playwright.dev/todomvc/');
  }

  async addToDo(text: string) {
    await this.inputBox.fill(text);
    await this.inputBox.press('Enter');
  }

  async remove(text: string) {
    const todo = this.todoItems.filter({ hasText: text });
    await todo.hover();
    await todo.getByLabel('Delete').click();
  }

  async removeAll() {
    while ((await this.todoItems.count()) > 0) {
      await this.todoItems.first().hover();
      await this.todoItems.getByLabel('Delete').first().click();
    }
  }
}
import type { Page } from '@playwright/test';

export class SettingsPage {
  constructor(public readonly page: Page) {
  }

  async switchToDarkMode() {
    // ...
  }
}
以下はフィクスチャの作成部分です。
test.extend()を使って、新しいテストオブジェクトを作ります。
use(フィクスチャ);で登録します。
import { test as base } from '@playwright/test';
import { TodoPage } from './todo-page';
import { SettingsPage } from './settings-page';

// Declare the types of your fixtures.
type MyFixtures = {
  todoPage: TodoPage;
  settingsPage: SettingsPage;
};

// Extend base test by providing "todoPage" and "settingsPage".
// This new "test" can be used in multiple test files, and each of them will get the fixtures.
export const test = base.extend<MyFixtures>({
  todoPage: async ({ page }, use) => {
    // Set up the fixture.
    const todoPage = new TodoPage(page);
    await todoPage.goto();
    await todoPage.addToDo('item1');
    await todoPage.addToDo('item2');

    // Use the fixture value in the test.
    await use(todoPage);

    // Clean up the fixture.
    await todoPage.removeAll();
  },

  settingsPage: async ({ page }, use) => {
    await use(new SettingsPage(page));
  },
});
export { expect } from '@playwright/test';
フィクスチャの使い方
新しく作成したテストオブジェクトを使ってテストケースを記述します。
テスト関数の引数のオブジェクトでフィクスチャが参照できるようになります。
import { test, expect } from './my-test';

test.beforeEach(async ({ settingsPage }) => {
  await settingsPage.switchToDarkMode();
});

test('basic test', async ({ todoPage, page }) => {
  await todoPage.addToDo('something nice');
  await expect(page.getByTestId('todo-title')).toContainText(['something nice']);
});
フィクスチャのオーバライド
独自のフィクスチャを作ることに加えて、既存のフィクスチャをオーバーライドすることもできます。 以下の例では、baseURL に自動的に遷移するように page フィクスチャをオーバーライドしています。
import { test as base } from '@playwright/test';

export const test = base.extend({
  page: async ({ baseURL, page }, use) => {
    await page.goto(baseURL);
    await use(page);
  },
});
これでtestOptions.baseURL のような他の組み込みフィクスチャに依存できるようになります。こうすると設定ファイルでbaseURLを設定することができますし、テストファイルでtest.use()を使ってローカルに設定することもできます。
test.use({ baseURL: 'https://playwright.dev' });
フィクスチャをオーバーライドして、ベースとなるフィクスチャを完全に別のものに置き換えることもできます。 たとえば、testOptions.storageState フィクスチャをオーバーライドして、独自のデータを提供することができます。
import { test as base } from '@playwright/test';

export const test = base.extend({
  storageState: async ({}, use) => {
    const cookie = await getAuthCookie();
    await use({ cookies: [cookie] });
  },
});
フィクスチャのスコープと実行順序
主なルールは以下のようになっています。
フィクスチャ名: [
    async ({ 依存したいフィクスチャ名 }, use) => {

        // セットアップ時(テスト実行前)の処理

        await use(フィクスチャとして使いたいオブジェクト)

        // ティアダウン時(テスト実行後)の処理
    },
    { scope: 'worker' | 'test', auto: true | false },
],
-
セットアップとディアダウンの実行
フィクスチャ内のawait use()が起点となり、その前に書かれたコードがセットアップ時(テスト実行前)に実行される。その後ろに書かれたコードがティアダウン時(テスト実行後)に実行される。 -
依存関係の設定
フィクスチャー定義の引数に依存させたいフィクスチャを指定できる。
例えばフィクスチャーAがフィクスチャーBに依存している場合、Bは常にAの前にセットアップされ、Aの後に取り壊される。 -
スコープの設定
{ scope: 'worker'},にするとフィクスチャの有効範囲をワーカープロセス単位にできる。
{ scope: 'test'},にするとフィクスチャの有効範囲をテスト単位にできる。
テスト単位のスコープが設定されたフィクスチャはテストが終わるたびに破棄されるが、ワーカ単位のスコープが設定されたフィクスチャは、テストを実行するワーカープロセスがシャットダウンされたときにのみ破棄される。 -
自動実行の設定
{auto: true}にすると、テストを実行するだけで自動的にフィクスチャの内容も実行される。
{auto: false}にすれば、テスト側から意図的に呼び出さない限り実行されない。
import { test as base } from '@playwright/test'

type WorkerFixture = {
    workerFixture: string
    autoWorkerFixture: string
}

type TestFixture = {
    autoTestFixture1: string
    autoTestFixture2: string
    manualTestFixture1: string
    manualTestFixture2: {
        print: () => void
    }
    unusedFixture: string
}

const test = base.extend<TestFixture, WorkerFixture>({
    workerFixture: [
        async ({ browser }, use) => {
            console.log('>> workerFixture > set up')

            await use('workerFixture')

            console.log('>> workerFixture > tear down')
        },
        { scope: 'worker' },
    ],

    autoWorkerFixture: [
        async ({ browser }, use) => {
            console.log('>> autoWorkerFixture > set up')

            await use('autoWorkerFixture')

            console.log('>> autoWorkerFixture > tear down')
        },
        { scope: 'worker', auto: true },
    ],

    autoTestFixture1: [
        async ({ autoTestFixture2 }, use) => {
            console.log('>> autoTestFixture1 > set up')

            await use('autoTestFixture1')

            console.log('>> autoTestFixture1 > tear down')
        },
        { scope: 'test', auto: true },
    ],

    autoTestFixture2: [
        async ({}, use) => {
            console.log('>> autoTestFixture2 > set up')

            await use('autoTestFixture2')

            console.log('>> autoTestFixture2 > tear down')
        },
        { scope: 'test', auto: true },
    ],

    manualTestFixture1: [
        async ({}, use) => {
            console.log('>> manualTestFixture1 > set up')

            await use('manualTestFixture1')

            console.log('>> manualTestFixture1 > tear down')
        },
        { scope: 'test', auto: false },
    ],

    manualTestFixture2: [
        async ({}, use) => {
            const manualTestFixture2 = {
                print: () => {
                    console.log('>> printed manualTestFixture2')
                },
            }

            console.log('>> manualTestFixture2 > set up')

            await use(manualTestFixture2)

            console.log('>> manualTestFixture2 > tear down')
        },
        { scope: 'test', auto: false },
    ],

    unusedFixture: [
        async ({ page }, use) => {
            console.log('>> unusedFixture > set up')

            await use('unusedFixture')

            console.log('>> unusedFixture > tear down')
        },
        { scope: 'test' },
    ],
})

test.beforeAll(async () => {
    /* ... */
    console.log('>> beforeAll')
})
test.beforeEach(async ({ page }) => {
    /* ... */
    console.log('>> beforeEach')
})
test('test1', async ({ page, manualTestFixture2 }) => {
    /* ... */
    console.log('>> test1')
    manualTestFixture2.print()
})
test.afterEach(async () => {
    /* ... */
    console.log('>> afterEach')
})
test.afterAll(async () => {
    /* ... */
    console.log('>> afterAll')
})
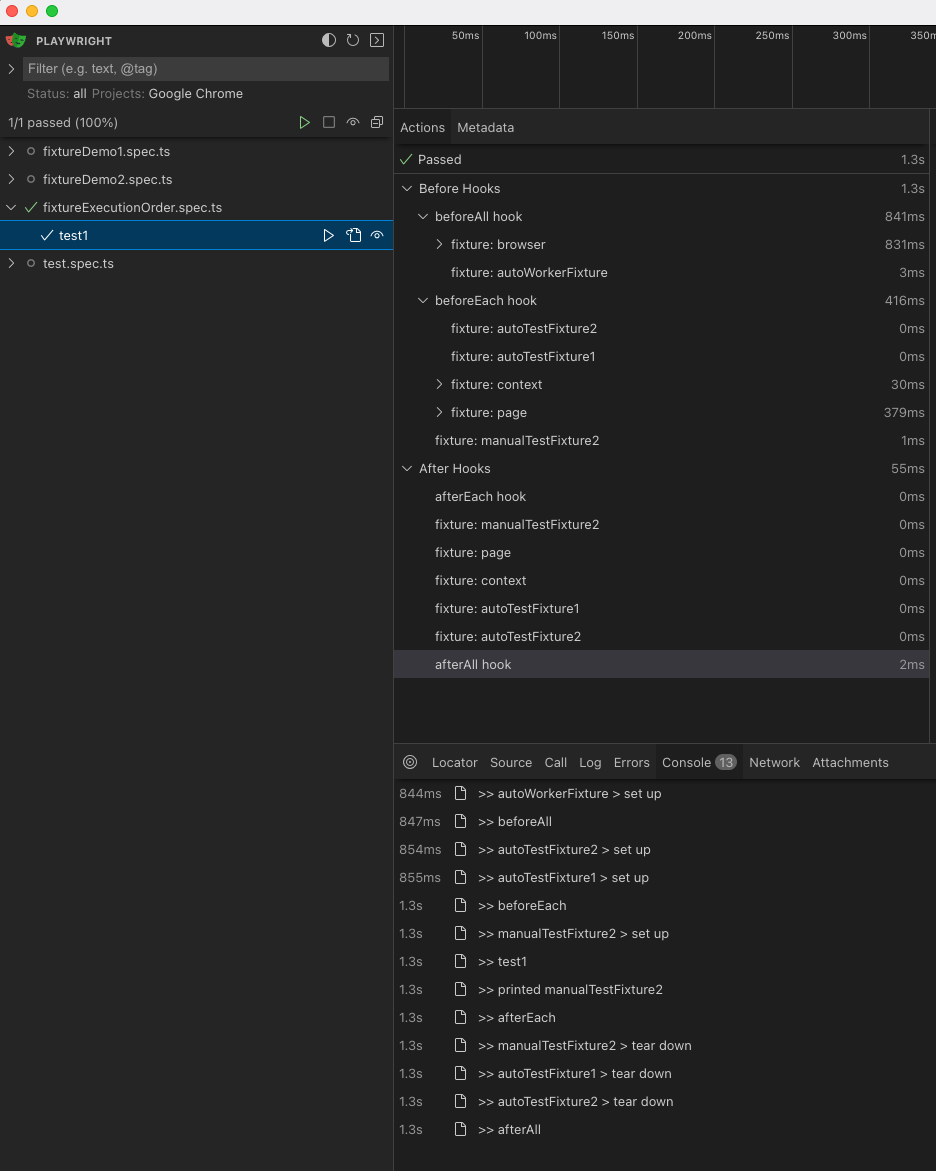
実際にUIモードで起動して実行させると以下のようになります。

流れとしては以下のようになってます。
- [Before Hooks]が実行される
- [beforeAll]が実行される
-
browserフィクスチャが起動 -
workerFixtureフィクスチャは{auto: false}なので実行されず -
autoWorkerFixtureフィクスチャは{auto: true}なのでセットアップ処理が自動実行される - [beforeEach hook]が実行される
-
autoTestFixture1フィクスチャは{auto: true}なので自動実行されるが、依存先にautoTestFixture2フィクスチャが指定されているので、先にautoTestFixture2フィクスチャのセットアップ処理が実行される -
contextフィクスチャが実行される -
pageフィクスチャが実行される -
manualTestFixture1フィクスチャは{auto: false}なので実行されない -
manualTestFixture2フィクスチャは{auto: false}だが、テスト実行の依存関係に指定されているのでセットアップ処理が実行される
-
- テストが実行される(
>> test1) - テスト内で
manualTestFixture2.print()が呼ばれているので>> printed manualTestFixture2が出力される
-
- [beforeAll]が実行される
- [After Hooks]が実行される
- [afterEach hook]が実行される
-
manualTestFixture2フィクスチャのティアダウンが実行される -
contextフィクスチャのティアダウンが実行される -
pageフィクスチャのティアダウンが実行される -
autoTestFixture1フィクスチャのティアダウンが実行される -
autoTestFixture2フィクスチャのティアダウンが実行される - [afterAll hook]が実行される
-
- [afterEach hook]が実行される
カスタムフィクスチャのマージ
複数のテストフィクスチャをマージして使うことができます。
import { mergeTests } from '@playwright/test';
import { test as dbTest } from 'database-test-utils';
import { test as a11yTest } from 'a11y-test-utils';

export const test = mergeTests(dbTest, a11yTest);
import { test } from './fixtures';

test('passes', async ({ database, page, a11y }) => {
  // use database and a11y fixtures.
});
ボックスフィクスチャ
通常、カスタムフィクスチャは、UI モード、トレースビューア、さまざまなテストレポートで、個別のステップとして報告されます。 また、テストランナーからのエラーメッセージにも表示されます。 頻繁に使われるフィクスチャの場合、これはたくさんのノイズとなってしまいます。 フィクスチャーのステップを "boxing"(ボックス化)することによって、UIに表示されないようにすることができます。
import { test as base } from '@playwright/test';

export const test = base.extend({
  helperFixture: [async ({}, use, testInfo) => {
    // ...
  }, { box: true }],
});
これは興味のないヘルパーフィクスチャに便利です。 たとえば、いくつかの共通データをセットアップする自動フィクスチャは、テストレポートから安全に隠すことができます。
Discussion
テストフィクスチャとはのequest→request?ありがとうございます。
タイポしていたので修正しました。