令和元年から始めるiOSでbitriseを使ったiTunes Connectのアップロード迄のチュートリアル
モバイルアプリ開発のCIに特化したサービスbitriseを令和元年にCircleCIから乗り換える為に検証をしてみました。
CircleCIに比べてUIや設定がわかりやすくとてもおすすめです。
bitriseの良い所
- circleCI likeのyml設定でworkflow定義ができる
- ローカル実行もお手軽
- よしなにやってくる感が半端ない(fastlaneファイルやPodfileがあると自動で設定をしてくれる。しかも精度は結構良い)
今回はiTunes Connectにアップロードする迄の手順になります。
尚私は自動化は得意ですがアプリは得意ではないのであしからず。
対象者
- iOSの申請処理に人生無駄しているんじゃないか?って疑問のお持ちの方
- xcodebuildしたら食パンが焼けそうな程ホッカホカになる方
- fastlaneを導入しているがドキュメントを読んで頭がアポーンとなる方
bitriseのアカウントを作成する
bitriseからアカウントを作成してくださいmm
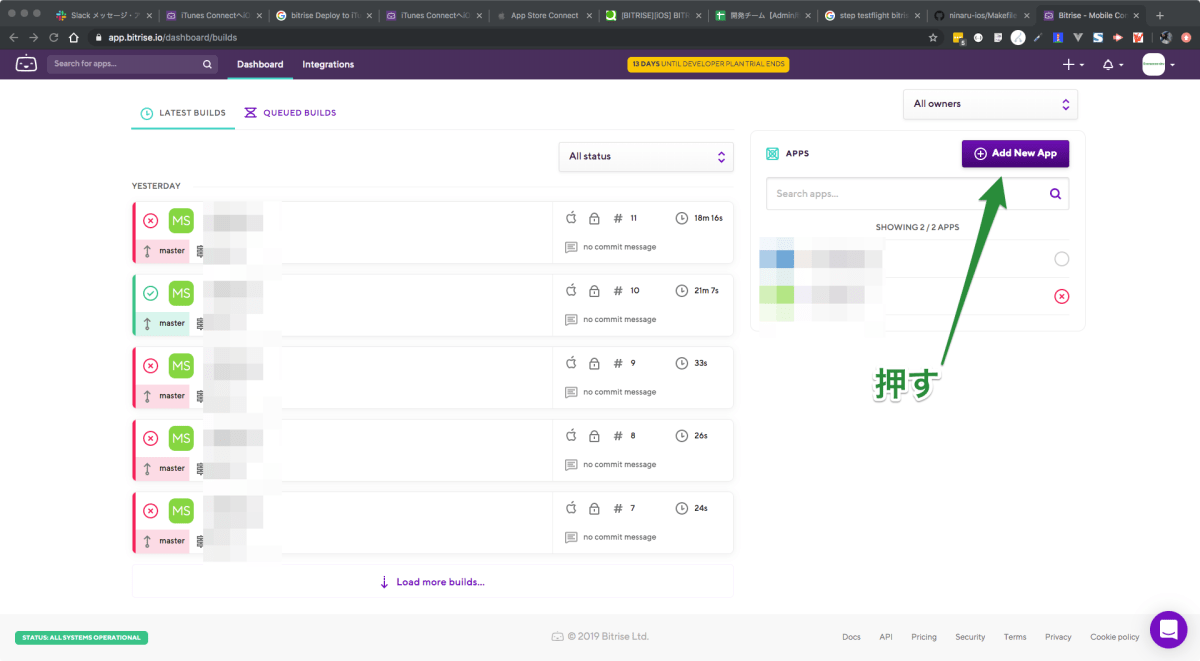
アプリを新規登録する
ポチッと
CIしたいgithubリポジトリを選択する
ポチポチっと

ポチポチっと

bitriseがgithubリポジトリにアクセスするssh pubkeyを登録する
手動でもできるらしいですが今回はbitriseに流されます。

ポチポチっと
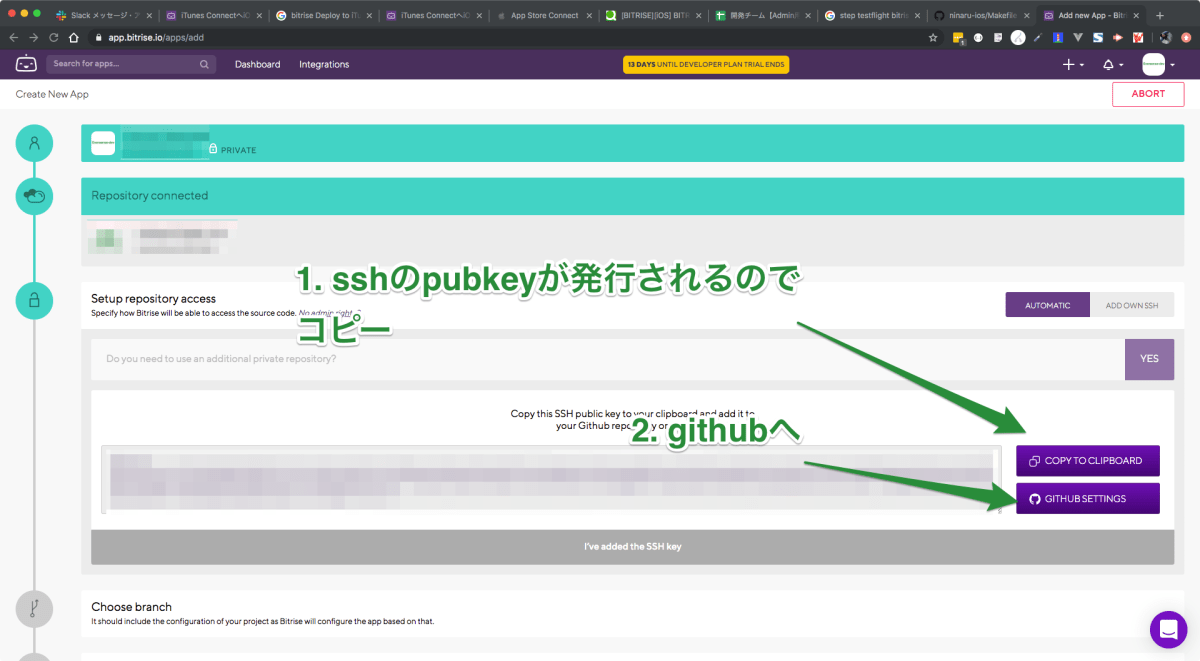
ポチッとして管理しやすいタイトルをつけてください。

Githubでの登録が終わった後にbitrise側の画面に戻りsshコネクションをできるか確認するボタンがあるので押してください。次に進めます。
githubで対象ビルドをしたいブランチを選択する
カタカタっと

bitriseさんがリポジトリの内容を解析し始めますのでしばしお待ちを

初めてのビルドをしてみる
いきなりビルドするのが怖い方はこれで多分設定は完了しているので押さなくても大丈夫?だと思います
ポチッと

初めてのビルドを見てみる
そんな簡単にビルドが通るわけもなくFailedになりました。
まぁそんなものでしょう

Workflowをビジュアルエディターで確認してください
見てください。このわかりやすさ。むひょーって感じです

ただ令和に生きる私達エンジニアは.ymlか.tomlがいにしえの.iniでないと信用できない生き物なのでymlを見てみましょう
設定ファイルbitrise.ymlを確認する
リポジトリの状態によりけりですが今回は
- fastlane導入済
- podfileでライブラリの管理をしている
という状態をbitriseが認識して設定ファイルをこんな感じで書き出してくれています
---
format_version: '8'
default_step_lib_source: https://github.com/bitrise-io/bitrise-steplib.git
project_type: ios
trigger_map:
- push_branch: "*"
  workflow: primary
- pull_request_source_branch: "*"
  workflow: primary
workflows:
  primary:
    steps:
    - activate-ssh-key@4.0.3:
        run_if: '{{getenv "SSH_RSA_PRIVATE_KEY" | ne ""}}'
    - git-clone@4.0.14: {}
    - cache-pull@2.0.1: {}
    - script@1.1.5:
        title: Do anything with Script step
    - certificate-and-profile-installer@1.10.1: {}
    - cocoapods-install@1.7.2: {}
    - xcode-archive@2.5.0:
        inputs:
        - project_path: "$BITRISE_PROJECT_PATH"
        - scheme: "$BITRISE_SCHEME"
        - export_method: "$BITRISE_EXPORT_METHOD"
    - deploy-to-bitrise-io@1.6.0: {}
    - cache-push@2.2.0: {}
app:
  envs:
  - opts:
      is_expand: false
    BITRISE_PROJECT_PATH: {your projectname}.xcworkspace
  - opts:
      is_expand: false
    BITRISE_SCHEME: {your projectname}
  - opts:
      is_expand: false
    BITRISE_EXPORT_METHOD: app-store
ちゃんと理解はしていませんがおそらくこんな感じです
workflows
workflow名
今回でいうと primary がワークフロー名です
複数のworkflowが登録できるのでbitriseでテストだけ回すとかの場合は test みたいなworkflowsを定義して複数のworkflowを定義できます。
{workflow名}.steps
そのワークフロー実行の実行するstepを定義します
直感的な感じなのでそこまで迷わないと思います。
今回でいうと
-
activate-ssh-key@4.0.3githubのssh疎通確認をするよ -
git-clone@4.0.14bitrise環境化に対象リポジトリをgit cloneするよ -
cache-pull@2.0.1すでにあったらcacheでpullするよ -
script@1.1.5scriptでshell書けるよ -
certificate-and-profile-installer@1.10.1Provisioning Profileのインストールをするよ(fastlane gym的なやつ) -
cocoapods-install@1.7.2cocoapodで管理しているライブラリをインストールするよ -
xcode-archive@2.5.0xcodeでパッケージ作るよ
というフローが自動で作成されました。
app
bitrise側のビルド環境設定のようです。
今回はビルド実行時の環境変数の設定のみが書き出されています
-
BITRISE_PROJECT_PATH.xcworkspaceの配置場所です。リポジトリのルートディレクトリに.xcworkspaceが配置されていない構成でもbitriseが勝手に見つけ出してくれて解析してくれます。やるなbitrise -
BITRISE_SCHEMEアプリのschemeですね -
BITRISE_EXPORT_METHODアプリのbuild設定ですね
workflowをSuccessするためにymlの設定をゴニョゴニョしてみる(ローカルで)
bitrise環境下でも良いのですがローカルのほうがdebugしやすいのでローカルでbitriseが動かせるようにしてみましょう
bitrise CLIを入手する
タターン
brew install bitrise
bitriseの設定をする
とにかくbitriseは説明が丁寧なので流されてください。(変えたい所はよしなにしながら)
bitrise setup
その後 bitriseに記載されてある bitrise.yml をコピーしてリポジトリのルートディレクトリに配置してください
ローカルでworkflowを実行する
workflow primaryをローカル環境で実行します
bitrise run primary
errorになるはず(を期待している)なので確認してみます
error: No profile for team 'xxxxx' matching 'match AppStore 'xxxxxx' found: Xcode couldn't find any provisioning profiles matching 'xxxxx/match AppStore xxxxxxx'. Install the profile (by dragging and dropping it onto Xcode's dock item) or select a different one in the General tab of the target editor. (in target 'xxxxx')

** ARCHIVE FAILED **
You can find the last couple of lines of Xcode's build log above, but the full log is also available in the raw-xcodebuild-output.log
The log file is stored in $BITRISE_DEPLOY_DIR, and its full path is available in the $BITRISE_XCODE_RAW_RESULT_TEXT_PATH environment variable
(value: /var/folders/jf/70qqyjsn63bb94s614np8qlm0000gn/T/deploy656013722/raw-xcodebuild-output.log)
Archive failed, error: exit status 65
|                                                                              |
+---+---------------------------------------------------------------+----------+
| x | xcode-archive@2.5.0 (exit code: 1)                            | 18.33 sec|
+---+---------------------------------------------------------------+----------+
| Update available: 2.5.0 -> 2.6.0                                             |
| Issue tracker: https://github.com/bitrise-steplib/steps-xcode-archive/issues |
| Source: https://github.com/bitrise-steplib/steps-xcode-archive               |
+---+---------------------------------------------------------------+----------+
証明書がうまく読み込めていませんね。
コード署名ファイル(provisioning profie)の設定を行う
bitriseでのコード署名ファイルの設定は大きく分けて2つあります
- 署名ファイルの手動アップロードによる方法 iOSコード署名ファイルの管理 - 手動プロビジョニング
- bitrise doc iOSコード署名ファイルの管理 - 自動プロビジョニング
今回はコード署名ファイルを自動収集してみます
codesigndocによる自動プロビジョニングを行う
bitrise doc iOSコード署名ファイルの管理 - 自動プロビジョニング
で書かれている通りターミナルを開いてインストールしましょう
bash -l -c "$(curl -sfL https://raw.githubusercontent.com/bitrise-tools/codesigndoc/master/_scripts/install_wrap-xcode.sh)"
叩くとこんな感じの質問をされます。ビルドターゲットはprojectのものを選択したいので10を選択します
Select the Scheme you usually use in Xcode
Please select from the list:
[1] : Crashlytics
[2] : Fabric
[3] : Firebase
[4] : FirebaseAnalytics
[5] : FirebaseCore
[6] : FirebaseInstanceID
[7] : Google-Mobile-Ads-SDK
[8] : GoogleAppMeasurement
[9] : GoogleUtilities
[10] : {project}
[11] : nanopb
[12] : Pods-{project}
(type in the option's number, then hit Enter) [1] : 10
codesignindocでエラーになる場合はApple developperから該当する証明書をDLして設定した後に
bitrise側のWorkflowタグを押してCodeSigningというタブを開いて証明書をアップロードをしてください(この場合は手動なので下の項目は必要ないと思います)

次の設問はbuild targetをどれにするか?なのでapp-storeを選択します
App was signed with NON xcode managed profile when archiving,
only NOT xcode managed profiles are allowed to sign when exporting the archive.
Removing xcode managed CodeSignInfo groups
Select the ipa export method
Please select from the list:
[1] : development
[2] : app-store
[3] : ad-hoc
[4] : enterprise
(type in the option's number, then hit Enter) [1] : 2
他のプロビジョニングプロファイルも収集するか?と効かれるのでNOにします
Do you want to collect another ipa export code sign files
(select NO to finish collecting codesign files and continue) [yes/NO]:
その後KeyChainの登録の為のMacからパスワードを効かれるのでローカルMacのパスワードを入力していきます(多分10回位効かれるので常に許可で)
コード署名ファイルをbitriseにアップロードするか?
アップロードするのでyes
Do you want to upload the provisioning profiles and certificates to Bitrise? [yes/no] :
「bitriseのAccessTokenを入力しろ」といわれるので設定する
bitrise > security ページからPersonalAccessTokenを生成できるので生成して入力する
Please copy your personal access token to Bitrise.
(To acquire a Personal Access Token for your user, sign in with that user on bitrise.io, go to your Account Settings page,
and select the Security tab on the left side.) :
bitrise管理化のどのプロジェクトと証明書をマッチさせるのか?を選択する
Select the app which you want to upload the privisioning profiles
Please select from the list:
[1] : xxxxxx1 (git@github.com:xxxx/xxxxx.git)
[2] : xxxxxx2 (git@github.com:xxxx/xxxxx.git)
[3] : xxxxxx3 (git@github.com:xxxx/xxxxx.git)
署名ファイルを紐付けたいプロジェクトを選択してください。これでcodesigndocの設定は以上になります
ローカルでworkflowを実行する(2回目)
次こそはSuccessを!!!
bitrise run primary
通りました(ヒャッハーーーーーー)
.
.
.
+------------------------------------------------------------------------------+
|                               bitrise summary                                |
+---+---------------------------------------------------------------+----------+
|   | title                                                         | time (s) |
+---+---------------------------------------------------------------+----------+
| - | activate-ssh-key@4.0.3                                        | 0.71 sec |
+---+---------------------------------------------------------------+----------+
| - | git-clone@4.0.14                                              | 0.60 sec |
+---+---------------------------------------------------------------+----------+
| Update available: 4.0.14 -> 4.0.17                                           |
+---+---------------------------------------------------------------+----------+
| - | cache-pull@2.0.1                                              | 1.15 sec |
+---+---------------------------------------------------------------+----------+
| Update available: 2.0.1 -> 2.1.0                                             |
+---+---------------------------------------------------------------+----------+
| ✓ | Do anything with Script step                                  | 0.78 sec |
+---+---------------------------------------------------------------+----------+
| - | certificate-and-profile-installer@1.10.1                      | 0.81 sec |
+---+---------------------------------------------------------------+----------+
| ✓ | cocoapods-install@1.7.2                                       | 5.74 sec |
+---+---------------------------------------------------------------+----------+
| Update available: 1.7.2 -> 1.8.0                                             |
+---+---------------------------------------------------------------+----------+
| ✓ | xcode-archive@2.5.0                                           | 2.0 min  |
+---+---------------------------------------------------------------+----------+
| Update available: 2.5.0 -> 2.6.0                                             |
+---+---------------------------------------------------------------+----------+
| - | deploy-to-bitrise-io@1.6.0                                    | 0.78 sec |
+---+---------------------------------------------------------------+----------+
| Update available: 1.6.0 -> 1.7.1                                             |
+---+---------------------------------------------------------------+----------+
| - | cache-push@2.2.0                                              | 0.59 sec |
+---+---------------------------------------------------------------+----------+
| Total runtime: 2.2 min                                                       |
+------------------------------------------------------------------------------+
bitrise.ymlを弄ってみる
ここまでやるとなんとなく感じがつかめてくると思いますのでbitrise.ymlをこねくり回してみます。
やることは下記です
- workflow名をdeployに変更
- iTunes Connectにアップロードするstepを追加する
- workflowが完了したらSlack通知をする
bitrise.ymlを変更してやってみましょう
---
format_version: '8'
default_step_lib_source: https://github.com/bitrise-io/bitrise-steplib.git
project_type: ios
trigger_map:
- push_branch: "*"
  # workflow名をdeployに変更
  workflow: deploy
- pull_request_source_branch: "*"
  # workflow名をdeployに変更
  workflow: deploy
workflows:
  # workflow名をdeployに変更
  deploy:
    steps:
    - activate-ssh-key@4.0.3:
        run_if: '{{getenv "SSH_RSA_PRIVATE_KEY" | ne ""}}'
    - git-clone@4.0.14: {}
    - cache-pull@2.0.1: {}
    - script@1.1.5:
        title: Do anything with Script step
    - certificate-and-profile-installer@1.10.1: {}
    - cocoapods-install@1.7.2: {}
    - xcode-archive@2.5.0:
        inputs:
        - project_path: "$BITRISE_PROJECT_PATH"
        - scheme: "$BITRISE_SCHEME"
        - export_method: "$BITRISE_EXPORT_METHOD"
    - deploy-to-bitrise-io@1.6.0: {}
    - cache-push@2.2.0: {}

    # ここから追記
    - deploy-to-itunesconnect-deliver@2.16.2:
        inputs:
        - password: "$ITUNES_CONNECT_PASSWORD"
        - app_id: "$ITUNES_CONNECT_APP_APPLE_ID"
        - skip_app_version_update: 'yes'
        - itunescon_user: "$ITUNES_CONNECT_USER_APPLE_ID"
    - slack@2.6.4:
        inputs:
        - channel: "#engineer"
        - icon_emoji: ":bitrise:"
        - message: |-
            workflow deploy finished

            *App*
            $BITRISE_APP_TITLE ($BITRISE_APP_URL)
            *Build URL*
            $BITRISE_BUILD_URL
        - webhook_url: https://hooks.slack.com/services/xxxxx/xxxxxx
app:
  envs:
  - opts:
      is_expand: false
    BITRISE_PROJECT_PATH: {your projectname}.xcworkspace
  - opts:
      is_expand: false
    BITRISE_SCHEME: {your scheme}
  - opts:
      is_expand: false
    BITRISE_EXPORT_METHOD: app-store
ん?待て。まさかslackのwebhookURLをベタ書きしてコミットしようとしていませんか?
bitriseでは .bitrise.secrets.yml というファイルで秘密情報を管理できます。iTunes Connectのアカウント情報も一緒に管理化に置きましょう
このファイルを置いて実行をするとbitrise側のsecretで管理されるようになります。
envs:
  - ITUNES_CONNECT_PASSWORD: xxxxxx
  - ITUNES_CONNECT_APP_APPLE_ID: {iTunes ConnectのアプリID}
  - ITUNES_CONNECT_USER_APPLE_ID: xxxxxxx
  - SLACK_WEBHOOK_URL: "https://hooks.slack.com/services/xxx/xxxx/xxxxxxxx"
というわけで出来上がったbitrise.yml
---
format_version: '8'
default_step_lib_source: https://github.com/bitrise-io/bitrise-steplib.git
project_type: ios
trigger_map:
- push_branch: "*"
  # workflow名をdeployに変更
  workflow: deploy
- pull_request_source_branch: "*"
  # workflow名をdeployに変更
  workflow: deploy
workflows:
  # workflow名をdeployに変更
  deploy:
    steps:
    - activate-ssh-key@4.0.3:
        run_if: '{{getenv "SSH_RSA_PRIVATE_KEY" | ne ""}}'
    - git-clone@4.0.14: {}
    - cache-pull@2.0.1: {}
    - script@1.1.5:
        title: Do anything with Script step
    - certificate-and-profile-installer@1.10.1: {}
    - cocoapods-install@1.7.2: {}
    - xcode-archive@2.5.0:
        inputs:
        - project_path: "$BITRISE_PROJECT_PATH"
        - scheme: "$BITRISE_SCHEME"
        - export_method: "$BITRISE_EXPORT_METHOD"
    - deploy-to-bitrise-io@1.6.0: {}
    - cache-push@2.2.0: {}

    # ここから追記
    - deploy-to-itunesconnect-deliver@2.16.2:
        inputs:
        - password: "$ITUNES_CONNECT_PASSWORD"
        - app_id: "$ITUNES_CONNECT_APP_APPLE_ID"
        - skip_app_version_update: 'yes'
        - itunescon_user: "$ITUNES_CONNECT_USER_APPLE_ID"
    - slack@2.6.4:
        inputs:
        - channel: "#engineer"
        - icon_emoji: ":bitrise:"
        - message: |-
            workflow deploy finished

            *App*
            $BITRISE_APP_TITLE ($BITRISE_APP_URL)
            *Build URL*
            $BITRISE_BUILD_URL
        - webhook_url: "$SLACK_WEBHOOK_URL"
app:
  envs:
  - opts:
      is_expand: false
    BITRISE_PROJECT_PATH: {your projectname}.xcworkspace
  - opts:
      is_expand: false
    BITRISE_SCHEME: {your scheme}
  - opts:
      is_expand: false
    BITRISE_EXPORT_METHOD: app-store
では実行してみましょう
bitrise run deploy
アプリ側の設定によりけりですがこれでitune Connect迄アップロードができたかと思います。
ここまでやってみたらbitriseの感じがだいぶつかめると思うので色々な事ができると思います。
最後に
CircleCIからbitriseに乗り換えてみましたが、アプリに特化したCIサービスということで
やはり便利でした。
みなさんも楽しいbitrise生活を楽しんで見てください。
Discussion