Learn Next.js App Router Course を雑にまとめる
対象ページ
✍️メモ
- Practice は取り組まないとエラーになる。
リポジトリ
/app/ui: Contains all the UI components for your application, such as cards, tables, and forms. To save time, we've pre-styled these components for you.
https://nextjs.org/learn/dashboard-app/getting-started
componentsディレクトリはこれからはuiディレクトリになっていくのか?
テイルウィンドで遊ぼう!以下のコードをコピーし、次の<p>要素の上に貼り付けます
<div
  className="h-0 w-0 border-b-[30px] border-l-[20px] border-r-[20px] border-b-black border-l-transparent border-r-transparent"
/>
vercelの三角形のロゴが表示される。
Provide a way to make CSS classes locally scoped to components by default, enabling better modularity and reducing the risk of styling conflicts.
CSS クラスをデフォルトでコンポーネントにローカルにスコープする方法を提供し、モジュール性を向上させ、スタイルの競合のリスクを軽減します。
https://nextjs.org/learn/dashboard-app/css-styling
この言語化も良きですね。
className={clsx(
        'inline-flex items-center rounded-full px-2 py-1 text-xs',
        {
          'bg-gray-100 text-gray-500': status === 'pending',
          'bg-green-500 text-white': status === 'paid',
        },
      )}
オブジェクトのtrueのキーが文字列として出力される。
あんまりこの書き方をしてこなかった。
clsxは今まで下記の書き方でした。
className={clsx(
        'inline-flex items-center rounded-full px-2 py-1 text-xs',
          status === 'pending' && 'bg-gray-100 text-gray-500',
        status === 'paid' &&    'bg-green-500 text-white'
      )}
参考
Sass which allows you to import .css and .scss files.
https://nextjs.org/learn/dashboard-app/css-styling
Sassもimportできる
Next.js automatically optimizes fonts in the application when you use the next/font module. It does so by downloading font files at build time and hosting them with your other static assets.
https://nextjs.org/learn/dashboard-app/optimizing-fonts-images
fontのデータをビルド時に静的アセットとして作成してパフォを向上させている。
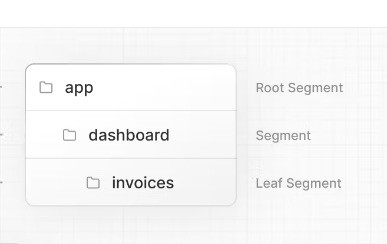
segment より深い階層のものを leaf segment っていう呼称があるのかー。
Furthermore, in a production, whenever <Link> components appear in the browser's viewport, Next.js automatically prefetches the code for the linked route in the background
Next.js がリンクされたルートのコードをバックグラウンドで自動的にプリフェッチします。
https://nextjs.org/learn/dashboard-app/navigating-between-pages
以前からこの挙動でしたっけ?
ホバー時にプリフェッチする挙動からビューポートに入った時にプリフェッチする挙動にいつから変わったのか🤔
However… there is one disadvantage of using this JavaScript pattern: what happens if one data request is slower than all the others?
https://nextjs.org/learn/dashboard-app/fetching-data
Promise.all でいずれかのAPIのレスポンスが極端に遅い場合、それを待つ必要がある。
With dynamic rendering, your application is only as fast as your slowest data fetch.
https://nextjs.org/learn/dashboard-app/static-and-dynamic-rendering
データフェッチのタイミングは並行していても、レンダリングは最も遅いAPIレスポンスに引っ張られることが課題。
URL パスに影響を与えずにルートを整理する
URL に影響を与えずにルートを整理するには、グループを作成して関連するルートをまとめます。括弧内のフォルダーは URL から省略されます (例(marketing): または(shop))。
https://nextjs.org/docs/app/building-your-application/routing/route-groups
Fixing the loading skeleton bug with route groups
Right now, your loading skeleton will apply to the invoices and customers pages too. This is because in Next.js, files nest inside each other. Since loading.tsx is a level higher than /invoices/page.tsx and /customers/page.tsx, it's also applied to those pages.
https://nextjs.org/learn/dashboard-app/streaming
ほかのセグメントでも必要なLayout.tsxだけ外に出しておける。
個々のカードのデータをフェッチすることはできますが、カードが読み込まれるときにポップ効果が発生する可能性があり、ユーザーにとって視覚的に不快になる可能性があります。
https://nextjs.org/learn/dashboard-app/streaming
視覚的に不快にならない程度のエリアでsuspenseを利用する。
Where you place your Suspense boundaries will depend on a few things:
How you want the user to experience the page as it streams.
What content you want to prioritize.
If the components rely on data fetching.
ストリーミング中にユーザーにページをどのように体験してもらいたいか。
どのコンテンツを優先したいか。
コンポーネントがデータの取得に依存している場合。
https://nextjs.org/learn/dashboard-app/streaming
現時点では、ルート内で動的関数noStore()(たとえば、cookies()、など) を呼び出すと、ルート全体が動的になります。
実際には、ほとんどのルートは完全に静的または動的ではありません。静的コンテンツと動的コンテンツの両方を含むルートがある場合があります。たとえば、ソーシャル メディア フィードがあるとします。投稿は静的ですが、投稿に対する「いいね!」は動的になります。または、商品の詳細は静的ですが、ユーザーのカートは動的である e コマース サイト。
PPR はどのように機能しますか?
PPR は React の同時 API を活用します、サスペンスを使用します。何らかの条件が満たされるまで (データがロードされるなど)、アプリケーションのレンダリング部分を延期します。
フォールバックは、他の静的コンテンツとともに初期静的ファイルに埋め込まれます。ビルド時 (または再検証中) に、ルートの静的な部分が事前にレンダリングされ、残りの部分はユーザーがルートを要求するまで延期されます。
コンポーネントを Suspense でラップしても、コンポーネント自体が動的になるのではなく (以前にunstable_noStoreこの動作を実現していたことを思い出してください)、Suspense はルートの静的部分と動的部分の間の境界として使用されることに注意してください。
PPR の優れた点は、それを使用するためにコードを変更する必要がないことです。Suspense を使用してルートの動的部分をラップしている限り、Next.js はルートのどの部分が静的でどの部分が動的であるかを認識します。
ここがしっくりきていない。
"use client";

export default function Pagination({ totalPages }: { totalPages: number }) {...}

function PaginationNumber({})

function PaginationArrow({})
client component にしてしまったら、以降も全てclient component なので、1つのファイルにまとめるのは良いかもしれない。
Behind the scenes, Server Actions create a POST API endpoint. This is why you don't need to create API endpoints when using Server Actions.
https://nextjs.org/learn/dashboard-app/mutating-data
Server Actions は実際にはAPIを作成してフェッチしているということですかね。
このページのフォームはhooksもイベントハンドラもないからclient componentである必要はない。
現に、"use client"なしでも動く。
// Passing an id as argument won't work ❌
<form action={updateInvoice(id)}>
=>
<form action={updateInvoice}>
      <input type="hidden" name="id" value={invoice.id} />   // hiddenのinput でidをactionに渡す。
    </form>
import { deleteInvoice } from '@/app/lib/actions';

// ...

export function DeleteInvoice({ id }: { id: string }) {
  return (
    <form action={deleteInvoice}>
      <input type="hidden" name="id" value={id} />
      <button className="rounded-md border p-1">
        <TrashIcon className="w-4" />
      </button>
    </form>
  );
}
deleteボタンの書き方が以前とはまるで異なる。
onClickイベントだとclient component になるからか。
Note how redirect is being called outside of the try/catch block. This is because redirect works by throwing an error which would be caught by the catch block. To avoid this, you can call redirect after try/catch
https://nextjs.org/learn/dashboard-app/error-handling
redirect は try/catch の後にかく。
reset: エラー境界をリセットする機能です。実行されると、関数はルート セグメントの再レンダリングを試みます。
https://nextjs.org/learn/dashboard-app/error-handling
pageの引数で取得できる。
notFound will take precedence over error.tsx
https://nextjs.org/learn/dashboard-app/error-handling
errorよりnotfoundが優先される。
For example, this plugin warns if you have images without alt text, use the aria-* and role attributes incorrectly, and more.
altテキストのない画像がある場合、 aria-* と role 属性が間違って使用されている場合などに警告します。
https://nextjs.org/learn/dashboard-app/improving-accessibility
まじでアクセシビリティは何もわかっていません。。
そうなんだーという感じ。
We will be using NextAuth.js to add authentication to your application. NextAuth.js abstracts away much of the complexity involved in managing sessions, sign-in and sign out, and other aspects of authentication. While you can manually implement these features, the process can be time-consuming and error-prone. NextAuth.js simplifies the process, providing a unified solution for auth in Next.js applications.
https://nextjs.org/learn/dashboard-app/adding-authentication
NextAuth使うのかー。auth系のライブラリーだとApp Routerの標準になるのかな。
import type { NextAuthConfig } from 'next-auth';

export const authConfig = {
  providers: [],
  pages: {
    signIn: '/login',
  },
  callbacks: {
    authorized({ auth, request: { nextUrl } }) {
      const isLoggedIn = !!auth?.user;
      const isOnDashboard = nextUrl.pathname.startsWith('/dashboard');
      if (isOnDashboard) {
        if (isLoggedIn) return true;
        return false; // Redirect unauthenticated users to login page
      } else if (isLoggedIn) {
        return Response.redirect(new URL('/dashboard', nextUrl));
      }
      return true;
    },
  },
} satisfies NextAuthConfig;
satisfies 使ってる!感動!こんなん感じで使うんや。
<form
          action={async () => {
            'use server';
            await signOut();
          }}
        >
https://nextjs.org/learn/dashboard-app/adding-authentication
Server components 内でもuse server を書くことができる。
無名関数でもuse server をかける。
コンストラクターを使用して動的な OG イメージを作成することもできます
ImageResponse
https://nextjs.org/docs/app/api-reference/functions/image-response
But what if you want to add a custom title for a specific page? You can do this by adding a metadata object to the page itself. Metadata in nested pages will override the metadata in the parent.
しかし、特定のページにカスタム タイトルを追加したい場合はどうすればよいでしょうか? metadataこれを行うには、ページ自体にオブジェクトを追加します。ネストされたページのメタデータは、親のメタデータをオーバーライドします。
https://nextjs.org/learn/dashboard-app/adding-metadata
overrideされるんや。けっこう使いやすそうなインターフェース。
The %s in the template will be replaced with the specific page title.
テンプレート内のは、%s特定のページ タイトルに置き換えられます。
https://nextjs.org/learn/dashboard-app/adding-metadata
%sと書くとtitleを差し替えてくれるのか!便利。
export const metadata: Metadata = {
  title: {
    template: '%s | Acme Dashboard',
    default: 'Acme Dashboard',
  },
  description: 'The official Next.js Learn Dashboard built with App Router.',
  metadataBase: new URL('https://next-learn-dashboard.vercel.sh'),
};

export const metadata: Metadata = {
  title: 'Invoices',
};
The document title.

@example

"My Blog"
<title>My Blog</title>

{ default: "Dashboard", template: "%s | My Website" }
<title>Dashboard | My Website</title>

{ absolute: "My Blog", template: "%s | My Website" }
<title>My Blog</title>
ALL DONE

このページもハンズオンのクオリティ高い。