【MNIST】手書き数字の読み取り
GeminiさんによるとAIによる手書き文字の読み取りは可能とのことなので、教えてもらったことを書いておく。
使うライブラリはMNIST、モデルはCNN。
- MNIST:手書きの数字を認識担当 取り扱い範囲は0~9までの数字のみ
- CNN:GPUによる高速処理担当 リアルタイム処理が可能
依存関係
TensorFlow Lite
pythonやってた時になんか使ったなーといううっすらとした記憶が。
AndroidStudioのプロジェクトにTensorFlowを導入することで、CNNモデルをアプリに統合できるようです。
- ライブラリ追加
[versions]
tensorflowLite = "2.15.0"
tensorflowLiteSupport = "0.4.3"
tensorflowLiteGpu = "2.15.0"

[libraries]
tensorflow-lite = { module = "org.tensorflow:tensorflow-lite", version.ref = "tensorflowLite" }
tensorflow-lite-support = { group = "org.tensorflow", name = "tensorflow-lite-support", version.ref = "tensorflowLiteSupport" }
tensorflow-lite-gpu = { group = "org.tensorflow", name = "tensorflow-lite-gpu", version.ref = "tensorflowLiteGpu" }
- Synk Now!!!
- 依存関係追加(Module:appの方)
dependencies {

     //Tensorflow
    implementation(libs.tensorflow.lite)
    implementation(libs.tensorflow.lite.support) // BitmapからTensor変換用
    implementation(libs.tensorflow.lite.gpu) // GPUサポート
Sync Now!!!!
MNISTで学習済みモデルを準備
さらっと書きましたが、ここはPythonを使います🫥
手順は以下のようです。
- VSCodeでPythonを使いMNISTデータセットでCNNモデルを学習させる
- minist.tfliteというファイルができる
私にできるのだろうか。。。という不安でドキドキしながらVScode立ち上げました。
久々にpython触ったら、コパイロットさんが無料になったのでしょうか?
プロンプトにやりたこと入力したら、勝手にコード作ってくれました。
ありがとうございます❤️
コパイロット作成(学習部分の数値を少し修正しました)コード
import tensorflow as tf
from keras import layers, models
from tensorflow.keras.datasets import mnist
import numpy as np

# MNISTデータセットの読み込み
(x_train, y_train), (x_test, y_test) = mnist.load_data()

# データの前処理
x_train = x_train.reshape(-1, 28, 28, 1).astype("float32") / 255.0
x_test = x_test.reshape(-1, 28, 28, 1).astype("float32") / 255.0

# ラベルデータのOne-hotエンコーディング
y_train = tf.keras.utils.to_categorical(y_train, 10)
y_test = tf.keras.utils.to_categorical(y_test, 10)

# CNNモデル構築
model = models.Sequential([
    layers.Conv2D(32, (3, 3), activation='relu', input_shape=(28, 28, 1)),
    layers.MaxPooling2D((2, 2)),
    layers.Conv2D(64, (3, 3), activation='relu'),
    layers.MaxPooling2D((2, 2)),
    layers.Conv2D(64, (3, 3), activation='relu'),
    layers.Flatten(),
    layers.Dense(64, activation='relu'),
    layers.Dense(10, activation='softmax')
])

# モデルのコンパイル
model.compile(optimizer='adam',
              loss='categorical_crossentropy',
              metrics=['accuracy'])

# モデルの学習
model.fit(x_train, y_train, epochs=10, batch_size=128, validation_data=(x_test, y_test))

# モデルの評価
converter = tf.lite.TFLiteConverter.from_keras_model(model)
tflite_model = converter.convert()

# TFLiteモデルの保存
with open("mnist.tflite", "wb") as f:
    f.write(tflite_model)

print("おーるおっけー!ファイルできた°˖☆◝(⁰▿⁰)◜☆˖°")
そんなわけで、無事「nmist.tflite」ファイルが出来上がりました!!!°˖☆◝(⁰▿⁰)◜☆˖°
UI作成
先にUI作ります。
長いので別記事にしました^^;
手書き画面を作るはこちら
手書きをBitmapに変換
UIが完成したら、手書きした文字をBitmapに変換する関数を作ります。
UI側からパスのリスト、キャンバスの幅、高さの情報をもらい、処理した結果をBitmapで返えすという処理になります。
fun convertToBitmap(
    paths: List<PathData>,
    width: Int,
    height: Int
):Bitmap {
    val bitmap = createBitmap(width, height)  //bitmapを準備
    val canvas =Canvas(bitmap)      //キャンバスを生成、描画するのは上で作成したbitmap
    canvas.drawColor(Color.WHITE)    //キャンバスを白で塗りつぶす

    val paint=Paint().apply {       //描画の仕方
        isAntiAlias = true          //なめらか
        style = Paint.Style.STROKE  //線で描画
        strokeCap = Paint.Cap.ROUND //線端の形状を丸く
    }

    //確定済みのパスをキャンバスに描画
    paths.forEach { path ->
        paint.color = path.color.toArgb()   //Composeの色をAndroidの色に変換
        paint.strokeWidth = path.strokeWidth//太さはpathsの太さをそのまま使う
        canvas.drawPath(path.path.asAndroidPath(), paint)   //ComposeのパスをAndroidのパスに変換
    }
    return bitmap
}
どんなふうにBitmapに変換され方確認したいなーという方は、こちらの方法でPNGファイルを作成することができます。
BitmapをPNGファイルで保存
Bitmapの拡張関数を作ります。
//bitmapを保存
fun Bitmap.saveToFile(context: Context,name:String = "digit.png") {
    val pictures = context.getExternalFilesDir(Environment.DIRECTORY_PICTURES)
    val file = File(context.cacheDir,name)  //Todo:後でこちらに変更
    FileOutputStream(file).use { out ->
        this.compress(Bitmap.CompressFormat.PNG,100,out)
    }
    Log.d("ck", "saveToFile: ${file.absolutePath}")
}
UI側にボタンを1つ作り、onClickイベントに、以下を設定。
onClick = {
    val bmp = convertToBitmap(paths,width,height)
    bmp.saveToFile(context)  //デフォルトのファイル名=digit.png
}
ファイルの場所はログキャットで確認しましょう!(タグ名は「ck」)
エミュレータで実行している方は、「Shift」キーを2回押すと、機能検索ウィンドウが表示されるので、検索ボックスに「device」などと入力。
Device Explorerをクリックします。

こんな感じでDevice Explorerが開くので、ログキャットで確認した場所までたどり着きます。
ファイルはダブルクリックで内容を確認できます。

ご参考程度ですが、UIへの実装例を以下に提示します。
ボタンを作って、onClickイベントで呼び出します。
pathsはviewModelを使って作成したと想定してます。
@Composable
fun TestCanvas() {
    val viewModel = viewModel<TestViewModel>()
    val paths = viewModel.paths
    var canvasSize by remember { mutableStateOf(IntSize.Zero) }
    Box(
        modifier = Modifier.onGloballyPositioned { canvasSize = it.size }
    ){
        Canvas(・・・){・・・}
    }
    Button(
        onClick = {
            val bmp = convertToBitmap(paths,canvasSize.width,canvasSize.height)
         }
    ) {
        Text(text = "bitmap作成", fontSize = 24.sp)
    }
}
.tfliteモデルをAndroidに追加
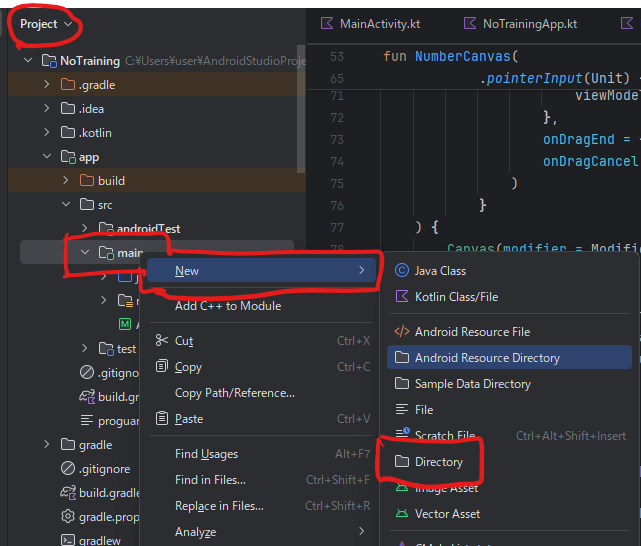
pythonで作成したmnist.tfliteファイルを置くためのassetsフォルダを作成。
- フォルダのビューをProjectに変更し、app>src>maiを右クリック
- 表示されたメニューからNew→Directoryを選択
- assetsと名前を付ける
-
mnist.tfliteをassetsフォルダに入れる

こうなっていればOK

モデルで推論
bitmap化した数字の画像をmnistモデルに渡して、推論させます!
class DigitClassifier(context: Context) {
    private var interpreter: Interpreter

    init {
        val model = FileUtil.loadMappedFile(context,"mnist.tflite") //mnist.tfliteを読み込み
        val options = Interpreter.Options()         //実行時オプション
        interpreter = Interpreter(model,options)    //推論器生成
    }

    //推論実行
    fun classify(inputByteBuffer: ByteBuffer):Pair<Int,Float> {
        val output = Array(1) { FloatArray(10) }    //各数字の確率の配列

        //推論実行 tensorImage→出力バッファ
        interpreter.run(inputByteBuffer,output)
        val maxIndex = output[0].indices.maxByOrNull { output[0][it] } ?: -1    //一番確率が高い数字を取得
        return maxIndex to output[0][maxIndex]  //index(数字)と値(確率)を返す
    }
}
動かしてみます!
黄色の部分に数字を手書きして、「答え合わせ」ボタンをクリックすると、その下に推論した数字が表示されるという仕組みになっています。
私の数字がへたくそすぎて、mnistさんが正確に把握してくれない問題があったりしますが、まぁまぁの出来になりました。
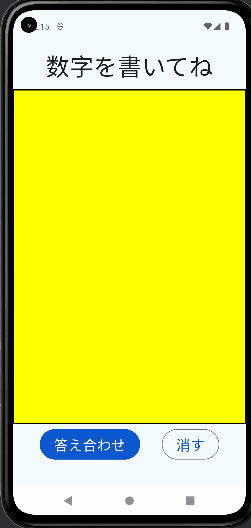
なお、mnistは数字を1つずつしか判断することができないので、openCVというライブラリを使って数字を切り分ける処理をしています。
Discussion