【論文】CodeAct
はじめに
- 論文: [2402.01030] Executable Code Actions Elicit Better LLM Agents
- LangGraph実装例: langchain-ai/langgraph-codeact
次に読む論文リスト
- [2402.07744] Towards Unified Alignment Between Agents, Humans, and Environment: LLMエージェントの実世界での利用における3つの役割エージェント、ユーザー、環境に言及
- [2309.10691] MINT: Evaluating LLMs in Multi-turn Interaction with Tools and Language Feedback: マルチターンのやり取りの評価
概要
CodeActというアークテクチャが注目を浴びている。
一言で言えば、"LLMが実行可能なPythonコードをアクションとして生成できる"フレームワーク。
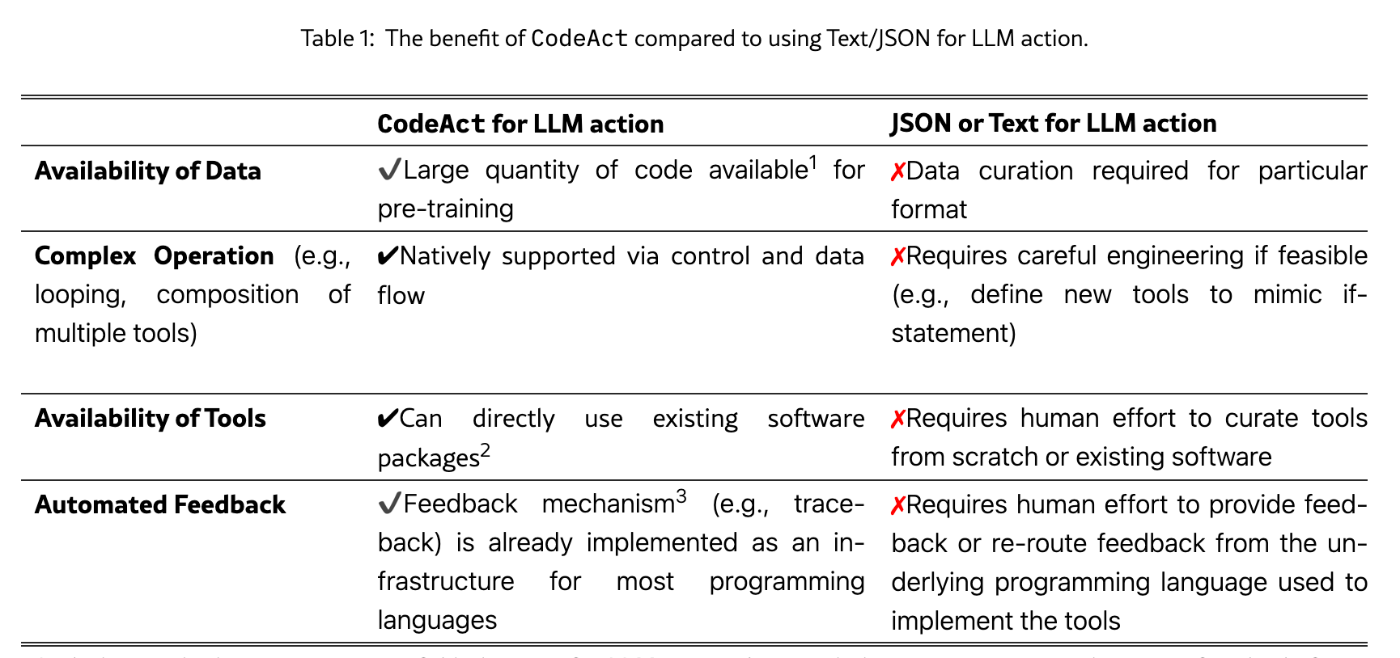
従来手法はエージェントにテキストやJSONを出力させ、それを利用してアクションを実行していた(下図左)。

これに対してCodeAct(上図右)は直接実行可能なPythonコードを生成する。
この発想の転換の有用なポイントは、これまでツール間の繋ぎこみをLLMの推論に頼っていたところを、全てコードベースで繋げられるようになったこと。
私はCodeActについては、Biomni論文で採用されていたことで存在を知った。
調べてみるとManusにも採用されていたり、LangGraphが実装していたり、注目を浴びているみたいだ。
用語集
- M3ToolEval: ウェブブラウジング、金融、旅行計画、科学、情報処理といった多様なドメインにまたがる82問のhuman-curatedベンチマーク。各ドメインには、専用に設計されたユニークなツールセットが付随。
- CodeActInstruct: エージェントと環境のやり取りを含むinstruction finetuning dataset。
- CodeActAgent: Llama-2 7BおよびMistral 7BをCodeActInstructと一般的な会話データでファインチューニングして得られたモデル
- Instruction tuning: ファインチューニングの中でも指示追従型データを使って行うもの
所感
論文読んだ後
コードを読んだ後
(保留中)
LangGraphの実装を読んだ後
特徴
- 動的調整
Pythonインタプリタと統合されており、コードアクションを実行後、その結果などの観測情報に基づいて以前のアクションを動的に修正したり、新しいアクションを生成できる(マルチターン対話)。 - 既存ソフトウェアの活用
手作業でツールを作る必要なく、既存のPythonパッケージを直接利用できる。また、多くのソフトウェアに実装されているエラーメッセージなどの自動フィードバック機構を活用し、自己デバッグによってタスク解決性能を向上できる。 - コードの事前学習知識
今日のLLMはコードを含むデータで事前学習されており、構造化プログラミングに慣れているため、CodeActの導入コストが低い。 - 制御フローとデータフロー
JSONや定型テキストに比べ、コードは中間結果の変数保存や複数ツールの組み合わせ(if文、forループなど)を1つのコード内で自然に表現できる。これにより、複雑なタスクも事前学習されたプログラミング知識を活用して効率的に実行できる。
結果
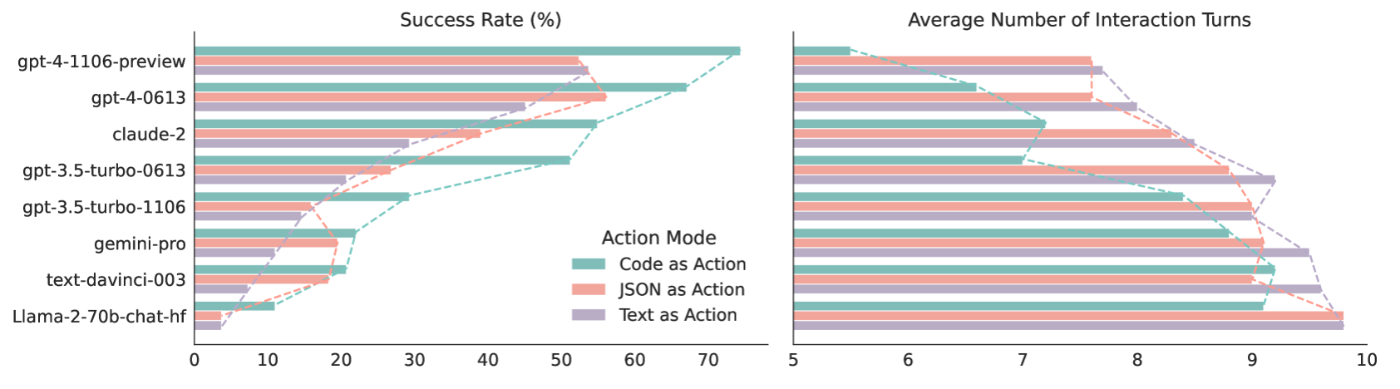
CodeActの利点である「制御フローとデータフロー」が発揮されないような1アクション1ツールしか使わない「原子的ツール使用(atomic tool use)」では17種類のLLMとの比較でベースラインと同等かそれ以上。
独自で構築したより複雑なタスク multiple calls to multiple tools in multi-turn interactions (M3ToolEval) では「制御フローとデータフロー」の特徴が遺憾なく発揮された。M3ToolEvalでは複数のツールを複数回呼び出したり、ツール間の調整や組み合わせが求められる。このような問題設計でCodeActの問題解決能力はベースラインに対して最大20pt上回り、必要なアクション数も最大30%削減された。
CodeActの利点
翻訳 by GPT-5

CodeAct
いよいよCodeActの詳細に踏み込んでいく。
下図は、LLMエージェントの実世界での利用を想定している。ここではAgent、User、Environmentの3つのロールで表現している。

著者らはInteraction(相互作用)とは「エージェントと外部の存在(ユーザーまたは環境)との間の情報交換」であると定義している。
エージェントはユーザー(例:自然言語による指示)または環境(例:コード実行結果)から観測(入力)を受け取り、必要に応じてchain-of-thought(Weiら, 2022)を通して行動を計画し、自然言語でユーザーへ、または環境へとアクション(出力)を送る。CodeActは、エージェントと環境とのやり取りにおけるすべてのアクションをPythonコードで統一する。CodeActでは、環境に送られる各アクションはPythonコードの断片であり、エージェントはコード実行の出力(例:結果やエラー)を観測として受け取る。
とのこと。
Pythonパッケージを利用するマルチターンのインタラクションのサンプル

GPT-5による解説↓
左上列
1. User
• MPGデータセット(https://huggingface.co/datasets/scikit-learn/auto-mpg)を使って以下を依頼:
• データダウンロード&読み込み
• 欠損値チェック
• 訓練・テスト分割
• 回帰モデルを学習し、mpgとcar nameを入力に使用
• MPGを予測するモデルを構築
2. CodeActAgent
• pandasでデータ取得・前処理、scikit-learnで回帰モデル構築のコードを生成
• 手順:
1. データ読み込み(pandas)
2. 欠損値処理
3. 特徴量と目的変数の分離
4. 訓練・テスト分割
5. モデル学習(LinearRegression)
6. 予測&評価(MSEとR²)
3. Environment(実行結果)
• 実行時にエラー発生:
• ValueError: could not convert string to float: '?'
• データ中に?文字が含まれ、数値変換できない。
4. CodeActAgent(自己デバッグ)
• エラーメッセージを解析し、?を含む行を削除するコードを追加して再実行。
⸻
中央左列
5. Environment(実行結果)
• テストセットでの評価結果:
• Mean squared error: 10.7109
• R² score: 0.7901(モデルはデータと比較的よく適合)
6. User
• 「トレーニングセットでもMSEとR²を計算して」と依頼。
7. CodeActAgent
• 訓練データ用のMSEとR²を計算するコードを生成。
8. Environment(実行結果)
• トレーニングセットでの評価結果:
• Mean squared error: 10.9796
• R² score: 0.8260
9. CodeActAgent
• 訓練データでの性能を説明。
⸻
中央右列
10. User
• 「回帰係数を可視化して」と依頼。model.coef_とmodel.feature_names_in_を使うよう指示。
11. CodeActAgent
• matplotlibを使い、特徴量ごとの回帰係数を棒グラフ表示するコードを生成。
12. Environment(実行結果)
• 棒グラフ(640x480サイズ)が表示される。
13. CodeActAgent
• グラフの内容を説明(各特徴量がx軸、回帰係数がy軸)。
⸻
右上列
14. User
• 「x軸ラベルを45度回転して見やすくして」と依頼。
15. CodeActAgent(初回試行)
• plt.bar()にtick_labels引数を渡すコードを生成。
16. Environment(実行結果)
• エラー発生:Rectangle.set() got an unexpected keyword argument ‘tick_labels’
• → tick_labelsはbar()の引数として無効。
17. CodeActAgent(自己デバッグ1回目)
• tick_params()を使う方法に修正。
18. CodeActAgent(自己デバッグ2回目以降)
• set_xticks()ではなくxticks()を使う方法に修正(3回の自己デバッグを経て完成)。
19. Environment(実行結果)
• x軸ラベルが45度回転した棒グラフが表示される。
20. User
• [Stops Interaction] でやり取りを終了。
⸻
まとめ
• 前半:データ取得・前処理・モデル学習・評価(テストと訓練両方)
• 中盤:モデル解釈(回帰係数の可視化)
• 後半:グラフの見た目改善(x軸ラベル回転)+自己デバッグ連続実行
• 特徴:
• 環境からのエラーを解析し、自動でコード修正
• 段階的なユーザー要求への対応
• 実行と修正を繰り返すマルチターン対話
CodeActAgent
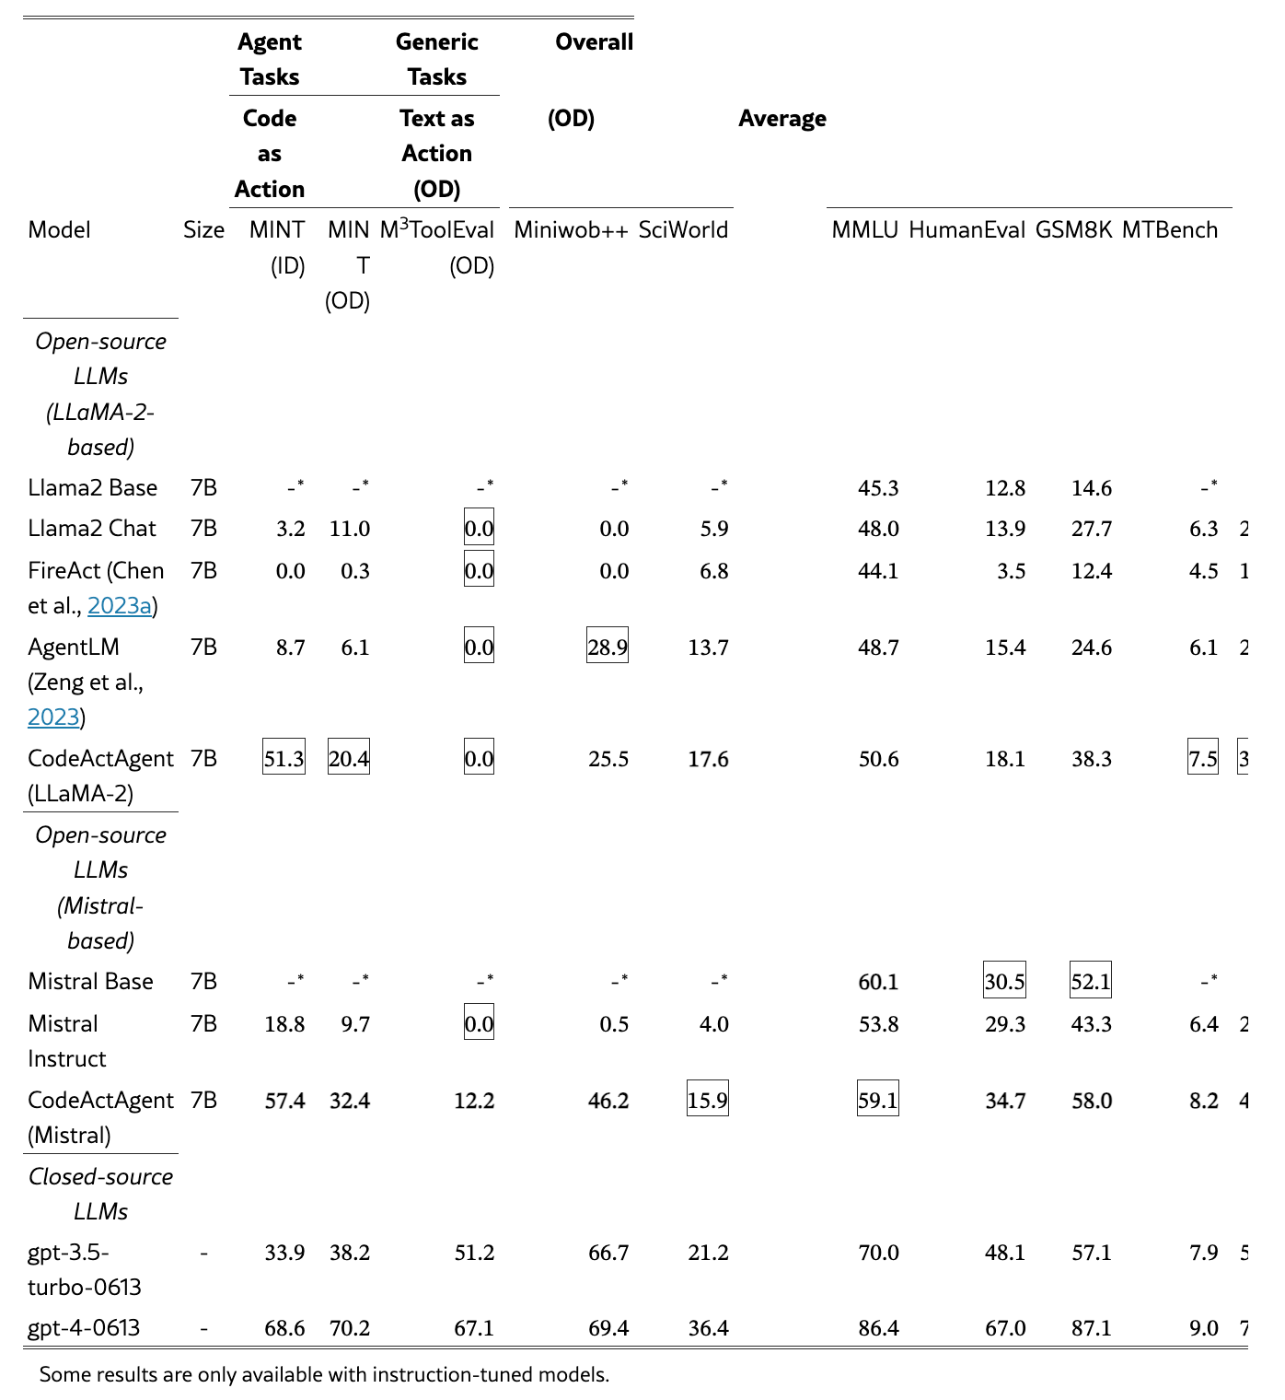
Llama-2 7BおよびMistral 7BをCodeActInstructと一般的な会話データでファインチューニングしてCodeActAgentを得た。
Appendix A: 問題解決のためのコード生成を用いる研究との比較
問題解決のためにコード生成を行う研究は過去にも存在した。
- Code4Struct (Wangら, 2023c):構造化予測
- PaL (Gaoら, 2023):数学的推論
- Meta-GPT (Hongら, 2023):マルチエージェント協調
- code-as-policy (Liangら, 2022):ロボット制御
- ViperGPT (Surísら, 2023):視覚的質問応答
- Voyager (Wangら, 2023a):ゲームプレイ
- Data Interpreter (Hongら, 2024):データサイエンスタスク
これらがCodeActと根本的に異なるのは、コードの実行結果を観測して修正することができない点。
要点まとめ (by GPT-5)
- 従来法: 単一ターン・静的コード生成 → 失敗後の動的修正不可、プロンプト作成コスト大
- CodeAct: マルチターン・動的修正可能、観測結果を即時反映、幅広いタスク対応
- Voyagerとの違い: Voyagerは関数単位の固定計画+重いプロンプト設計、CodeActは行動単位での逐次調整が可能
- OpenCodeInterpreterとの違い: デバッグ特化だが汎用タスク適用性は不明
Appendix E: Example Prompt for CodeAct
CodeActのプロンプト例。Appendix Fのツール説明を加えることももちろんできる。
<|im_start|>system
A chat between a curious user and an artificial intelligence assistant. The assistant gives helpful, detailed, and polite answers to the user’s questions.
The assistant can interact with an interactive Python (Jupyter Notebook) environment and receive the corresponding output when needed. The code should be enclosed using "<execute>" tag, for example: <execute> print("Hello World!") </execute>.
The assistant should attempt fewer things at a time instead of putting too much code in one <execute> block. The assistant can install packages through PIP by <execute> !pip install [package needed] </execute> and should always import packages and define variables before starting to use them.
The assistant should stop <execute> and provide an answer when they have already obtained the answer from the execution result. Whenever possible, execute the code for the user using <execute> instead of providing it.
The assistant’s response should be concise, but do express their thoughts.
<|im_end|>
日本語訳
<|im_start|>system
好奇心旺盛なユーザーと人工知能アシスタントの間の会話です。アシスタントは、ユーザーの質問に対して、有益で詳細かつ丁寧な回答を行います。
アシスタントは、対話型Python(Jupyter Notebook)環境と連携し、必要に応じて対応する出力を受け取ることができます。コードは "<execute>" タグで囲みます。例:<execute> print("Hello World!") </execute>。
アシスタントは、1つの<execute>ブロックに大量のコードを入れるのではなく、少ない処理を段階的に試みるべきです。
アシスタントは、<execute> !pip install [必要なパッケージ] </execute> によってPIP経由でパッケージをインストールでき、使用を開始する前に必ずパッケージのインポートと変数の定義を行います。
アシスタントは、実行結果からすでに答えが得られた場合は<execute>を終了し、回答を提示します。可能な限り、コードを提示するのではなく<execute>で実行してください。
アシスタントの応答は簡潔でありながら、自身の考えも表現します。
<|im_end|>
Appendix FM3ToolEval Prompt
ou have access to the following tools:
{{Tool Definition}}
{{Formatting Instruction}}
Now, let’s get started!
Instruction: {{Example: Find the current price of Legendary Wand.}}
Answer in the format of ’xx.xx’ (e.g., 12.34).
You can optionally express your thoughts using natural language before your action. For example, ’Thought: I want to use tool_name to do something. Action: <your action to call tool_name> End Action’.
Note that your output should always contain either ’Action:’ or ’Answer:’, but not both.
When you are done, output the result using ’Answer: your answer’
Please ONLY output the answer (e.g., single number), without any other text.
日本語訳
あなたは次のツールにアクセスできます:
{{ツール定義}}
{{フォーマット指示}}

では、始めましょう!
指示: {{例: Legendary Wandの現在価格を調べよ。}}
回答は「xx.xx」という形式で答えてください(例: 12.34)。

アクションを実行する前に、任意で自然言語による思考を表現しても構いません。
例:「Thought: tool_nameを使って〜を行いたい。Action: <tool_nameを呼び出すためのアクション> End Action」

注意:出力には必ず「Action:」か「Answer:」のどちらかを含めてください。**両方は不可**です。
完了したら「Answer: あなたの答え」という形式で結果を出力してください。

必ず答えのみ(例:単一の数値)を出力し、その他のテキストは含めないでください。
AppendixF.1: Example of {{Tool Definition}}
以下はウェブブラウジングのツール定義
[1] click_url: Clicks on a URL. A clickable URL looks like [Clickable ’<url_argument>’] in the webpage.
Arguments: url (str).
Returns the rendered content of the webpage after clicking the URL showing on the current rendered page.
Signature: click_url(url: str) -> str
[2] go_to_previous_page: Goes back to the previous page. It has no arguments.
After going back to the previous page, return the rendered content of the webpage.
Signature: go_to_previous_page() -> str
[3] scroll_down: Scrolls down the view. It has no arguments.
Returns the rendered content of the webpage after scrolling down.
Signature: scroll_down() -> str
[4] scroll_up: Scrolls up the view. It has no arguments.
Returns the rendered content of the webpage after scrolling up.
Signature: scroll_up() -> str
[5] view: Return the current view in string format of the rendered webpage. It has no arguments.
Returns the rendered content of the webpage.
You should call this when you want to see the rendered content of the current webpage.
Signature: view() -> str
[6] calculator: Evaluates the given expression and returns the result. Accepts a calculation expression as input. For example, "2 + (3 * 4)" will return 14.
Signature: calculator(expression: str) -> float
日本語訳
[1] click_url: URLをクリックする。クリック可能なURLは、ウェブページ上で [Clickable ’<url_argument>’] の形式で表示される。
引数: url (str)
戻り値: 現在表示中のページでURLをクリックした後のウェブページのレンダリング結果。
シグネチャ: click_url(url: str) -> str
[2] go_to_previous_page: 前のページに戻る。引数はなし。
戻り値: 前のページに戻った後のウェブページのレンダリング結果。
シグネチャ: go_to_previous_page() -> str
[3] scroll_down: 画面を下にスクロールする。引数はなし。
戻り値: 下にスクロールした後のウェブページのレンダリング結果。
シグネチャ: scroll_down() -> str
[4] scroll_up: 画面を上にスクロールする。引数はなし。
戻り値: 上にスクロールした後のウェブページのレンダリング結果。
シグネチャ: scroll_up() -> str
[5] view: 現在表示中のウェブページを文字列形式で返す。引数はなし。
戻り値: 現在のウェブページのレンダリング結果。ページの表示内容を確認したいときに呼び出す。
シグネチャ: view() -> str
[6] calculator: 与えられた式を計算して結果を返す。計算式を入力として受け取る。
例: "2 + (3 * 4)" は 14 を返す。
シグネチャ: calculator(expression: str) -> float
Appendix F.3: Formatting Instruction for Code as Action
You can use the tools by outputing a block of Python code that invoke the tools.
You may use for-loops, if-statements, and other Python constructs when necessary.
Be sure to print the final answer at the end of your code.
You should begin your tool invocation with ’Action:’ and end it with ’End Action’.
Example: ’Action:
tool_name(argument_1)
End Action’
日本語訳
ツールを使用するには、ツールを呼び出す Pythonコードのブロック を出力する。
必要に応じて for ループや if 文などの Python 構文を使ってよい。
最終的な答えはコードの最後で print すること。
ツール呼び出しは Action: で始め、End Action で終える。
例: Action:
tool_name(argument_1)
End Action
コード
が、エージェントの実装にフレームワーク(e.g. LangGraph, Google ADK)は使ってない?
フロントもChainlitなどのOSSではなく、自前のChatUIを使っている。
すごいな。
腰据えて読む必要があるので保留。
チュートリアルで使われているdemo.pyを読んでみる。
SYSTEM_MESSAGE = """A chat between a curious user and an artificial intelligence assistant. The assistant gives helpful, detailed, and polite answers to the user's questions.
The assistant can interact with an interactive Python (Jupyter Notebook) environment and receive the corresponding output when needed. The code should be enclosed using "<execute>" tag, for example: <execute> print("Hello World!") </execute>.
The assistant should attempt fewer things at a time instead of putting too much code in one <execute> block. The assistant can install packages through PIP by <execute> !pip install [package needed] </execute> and should always import packages and define variables before starting to use them.
The assistant should stop <execute> and provide an answer when they have already obtained the answer from the execution result. Whenever possible, execute the code for the user using <execute> instead of providing it.
The assistant's response should be concise, but do express their thoughts.
"""

# NOTE: You may also include the following information in the system message if you have pre-defined tools for the assistant to execute.
# Tool function available (already imported in <execute> environment):
# [1] google_search(query: str, num_results: int = 1) -> dict
# Search google for the given query. You should rely on this to get most up-to-date information. Do not make things up.
# For example: \"<execute>\"google_search(\"Hello world\") \"</execute>\"
# [2] get_url_content(url: str) -> str
# Get content from URL. You can use this when you want to access more information from an URL.
# [3] get_url_html(url: str) -> str
# Get HTML from URL (could be messy).
日本語訳
SYSTEM_MESSAGE ="""好奇心旺盛なユーザーと人工知能アシスタントとのチャットです。アシスタントはユーザーの質問に対して、役立つ、詳細で、丁寧な回答を提供します。
アシスタントは、必要に応じてインタラクティブなPython(Jupyterノートブック)環境と対話し、対応する出力を受け取ることができます。コードは「<execute>」タグで囲む必要があります。例:<execute> print("Hello World!") </execute>
アシスタントは、1つの<execute>ブロックに多くのコードを入れるのではなく、一度に少ない処理を試みるべきです。アシスタントは<execute> !pip install [必要なパッケージ] </execute>を使用してPIP経由でパッケージをインストールでき、使用を開始する前に常にパッケージをインポートし、変数を定義する必要があります。
アシスタントは、実行結果から既に答えを得た場合は<execute>を停止し、回答を提供すべきです。可能な限り、コードを提供する代わりに<execute>を使用してユーザーのためにコードを実行してください。
アシスタントの応答は簡潔であるべきですが、自分の考えは表現してください。
"""

# Note: アシスタントが実行するための事前定義されたツールがある場合、システムメッセージに以下の情報を含めることもできます。
# 利用可能なツール機能(<execute>環境に既にインポート済み):
# [1] google_search(query: str, num_results: int = 1) -> dict
# 指定されたクエリでGoogleを検索します。最新の情報を取得するためにこれに頼るべきです。でっち上げは避けてください。
# 例:<execute>google_search("Hello world")</execute>
# [2] get_url_content(url: str) -> str
# URLからコンテンツを取得します。URLからより多くの情報にアクセスしたい場合に使用できます。
# [3] get_url_html(url: str) -> str
# URLからHTMLを取得します(雑然としている可能性があります)。
LangGraph実装
LangChainコミュニティによるLangGraphでのCodeAct実装がLangChainから公開されている。
langchain-ai/langgraph-codeact
本家と打って変わってかなりシンプルな実装。
call_modelノードとsandboxノードのみ。
call_modelノードではLLMの出力からextract_and_combine_codeblocksでPythonコードに相当する部分のみを抽出し、sandboxノードに遷移する(コードがなければ終了)。
def call_model(state: StateSchema) -> Command:
    messages = [{"role": "system", "content": prompt}] + state["messages"]
    response = model.invoke(messages)
    # Extract and combine all code blocks
    code = extract_and_combine_codeblocks(response.content)
    if code:
        return Command(goto="sandbox", update={"messages": [response], "script": code})
    else:
        # no code block, end the loop and respond to the user
        return Command(update={"messages": [response], "script": None})
プロンプトは、以下のベースのテキストにツールの説明を加えたもの(Pythonコードかテキストを返す)。
You will be given a task to perform. You should output either
- a Python code snippet that provides the solution to the task, or a step towards the solution. Any output you want to extract from the code should be printed to the console. Code should be output in a fenced code block.
- text to be shown directly to the user, if you want to ask for more information or provide the final answer.

In addition to the Python Standard Library, you can use the following functions:
日本語訳
あなたは、あるタスクを与えられます。あなたは次のいずれかを出力してください。
- Pythonのコードスニペット:そのタスクの解法、または解法へ向けた一歩を示すもの。コードから得たい出力は、必ずコンソールにprintしてください。コードはフェンス付きコードブロックで出力します。
- テキスト:追加情報を尋ねる場合、または最終的な答えを提示する場合に、ユーザーへ直接表示する文章。

Python標準ライブラリに加えて、あなたは次の関数を使用できます:
sandboxノードはstateに保存されたscriptを取り出し、eval_fnの定義に従いコードを実行する。
def sandbox(state: StateSchema):
    existing_context = state.get("context", {})
    context = {**existing_context, **tools_context}
    # Execute the script in the sandbox
    output, new_vars = eval_fn(state["script"], context)
    new_context = {**existing_context, **new_vars}
    return {
        "messages": [{"role": "user", "content": output}],
        "context": new_context,
    }
eval_fnには例えば以下のeval関数などをセットできる。
def eval(code: str, _locals: dict[str, Any]) -> tuple[str, dict[str, Any]]:
    # Store original keys before execution
    original_keys = set(_locals.keys())

    try:
        with contextlib.redirect_stdout(io.StringIO()) as f:
            exec(code, builtins.__dict__, _locals)
        result = f.getvalue()
        if not result:
            result = "<code ran, no output printed to stdout>"
    except Exception as e:
        result = f"Error during execution: {repr(e)}"

    # Determine new variables created during execution
    new_keys = set(_locals.keys()) - original_keys
    new_vars = {key: _locals[key] for key in new_keys}
    return result, new_vars
要するにexec() でcode: strを実行している。
LangChain Sandbox
安全にPythonコードを実行できる環境
langchain-ai/langchain-sandbox: Safely run untrusted Python code using Pyodide and Deno
これは良いものを知った。