PySTAC を使って Sentinel-1 のデータを AWS からダウンロードする
概要
PySTACを用いてSentinel-1のデータを検索し、Boto3またはAWS CLIを用いてAWSからデータをダウンロードする。
環境
- Ubuntu 20.04.5 LTS
- Docker 20.10.18
- QGIS 3.10.4
環境構築
以下のDockerfileを準備する。
FROM python:3.9

RUN curl "https://awscli.amazonaws.com/awscli-exe-linux-x86_64.zip" -o "awscliv2.zip" && \
    unzip awscliv2.zip && \
    ./aws/install

RUN pip install --upgrade pip
RUN pip install pystac-client \
    numpy \
    pandas \
    matplotlib \
    rasterio \
    rioxarray \
    geojson \
    geopandas \
    boto3

WORKDIR /workspace
Dockerfileが配置されているディレクトリにおいて、以下のコマンドを実行する。
docker build -t pystac-aws .
docker run -it pystac-aws /bin/bash
PySTAC によるデータ検索
AOI の作成
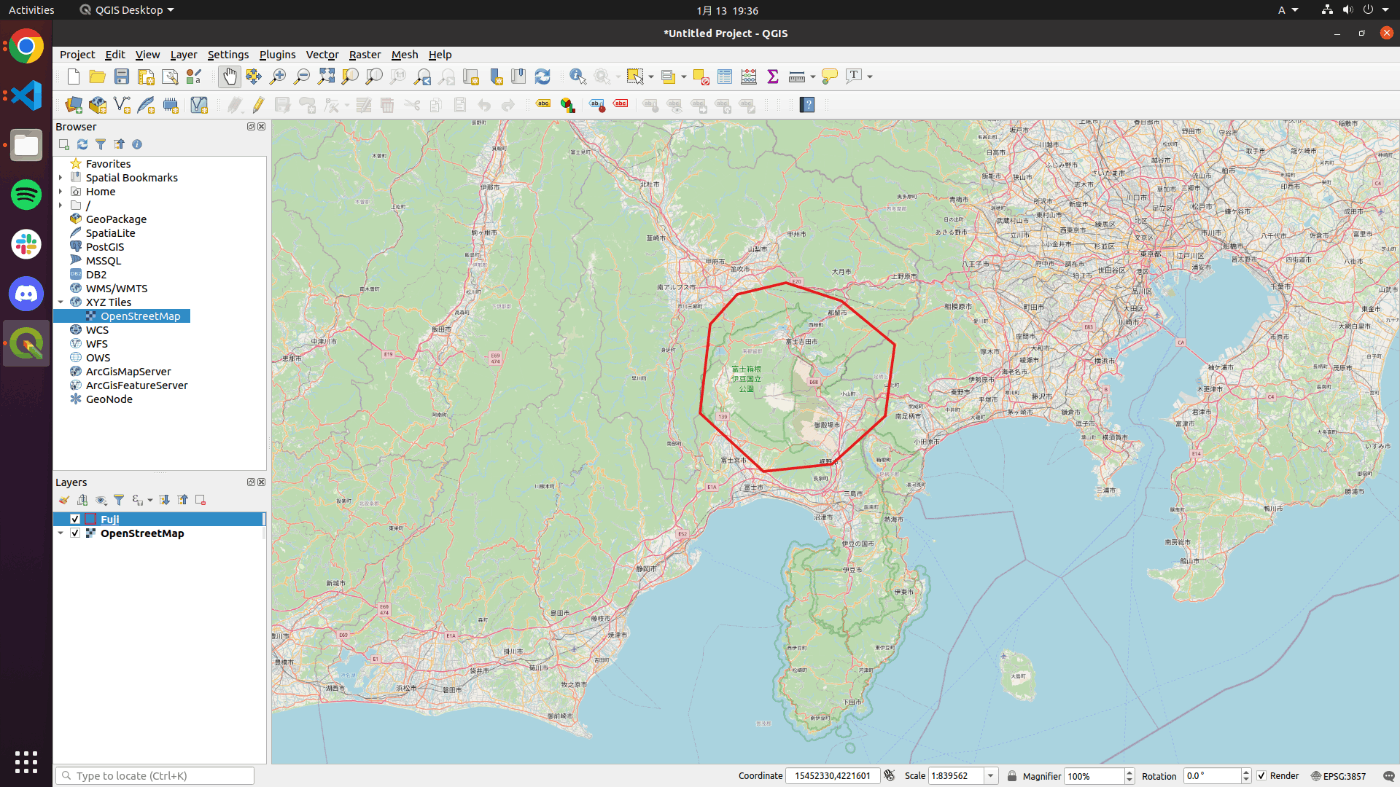
データ検索のためのAOIを作成する。今回はQGISを用いて富士山周辺をAOIとし、fuji.shpを作成した。fuji.dbf, fuji.prj, fuji.shp, fuji.shxを/workspace以下に配置する。

Shapefile から GeoJSONへ の変換
geopandas でshapefileをgeojsonに変換するを参考に、fuji.shpからfuji.geojsonを作成する。fuji.geojsonを/workspace以下に配置する。
データ検索
以下のsearch.pyを準備し、/workspace以下に配置する。
from pathlib import Path

import geojson
from geojson.geometry import Geometry
from pystac_client import Client


def read_geojson(path: str) -> Geometry:
    with open(path) as f:
        gj = geojson.load(f)
    return gj["features"][0]["geometry"]


API_ENDPOINT = "https://earth-search.aws.element84.com/v1"

COLLECTIONS = ["sentinel-1-grd"]

MAX_ITEMS = 1

AOI = read_geojson("fuji.geojson")

DATETIME = ["2023-12-01", "2024-12-01"]


if __name__ == "__main__":
    catalog = Client.open(API_ENDPOINT)

    results = catalog.search(
        collections=COLLECTIONS,
        max_items=MAX_ITEMS,
        intersects=AOI,
        datetime=DATETIME,
    )

    print(f"{results.matched()} items found")

    for item in results.items():
        print(f"{item.id}")
        for asset_key in item.assets:
            asset = item.assets[asset_key]
            print(f"{asset_key}: {asset.href} ({asset.media_type})")
以下を実行する。
root@b230b595a17f:/workspace# python search.py
すると以下の出力が得られる。
6 items found
S1A_IW_GRDH_1SDV_20240106T205153_20240106T205218_051991_06485E
safe-manifest: s3://sentinel-s1-l1c/GRD/2024/1/6/IW/DV/S1A_IW_GRDH_1SDV_20240106T205153_20240106T205218_051991_06485E_EC5F/manifest.safe (application/xml)
schema-product-vh: s3://sentinel-s1-l1c/GRD/2024/1/6/IW/DV/S1A_IW_GRDH_1SDV_20240106T205153_20240106T205218_051991_06485E_EC5F/annotation/rfi/rfi-iw-vh.xml (application/xml)
schema-product-vv: s3://sentinel-s1-l1c/GRD/2024/1/6/IW/DV/S1A_IW_GRDH_1SDV_20240106T205153_20240106T205218_051991_06485E_EC5F/annotation/rfi/rfi-iw-vv.xml (application/xml)
schema-calibration-vh: s3://sentinel-s1-l1c/GRD/2024/1/6/IW/DV/S1A_IW_GRDH_1SDV_20240106T205153_20240106T205218_051991_06485E_EC5F/annotation/calibration/calibration-iw-vh.xml (application/xml)
schema-calibration-vv: s3://sentinel-s1-l1c/GRD/2024/1/6/IW/DV/S1A_IW_GRDH_1SDV_20240106T205153_20240106T205218_051991_06485E_EC5F/annotation/calibration/calibration-iw-vv.xml (application/xml)
schema-noise-vh: s3://sentinel-s1-l1c/GRD/2024/1/6/IW/DV/S1A_IW_GRDH_1SDV_20240106T205153_20240106T205218_051991_06485E_EC5F/annotation/calibration/noise-iw-vh.xml (application/xml)
schema-noise-vv: s3://sentinel-s1-l1c/GRD/2024/1/6/IW/DV/S1A_IW_GRDH_1SDV_20240106T205153_20240106T205218_051991_06485E_EC5F/annotation/calibration/noise-iw-vv.xml (application/xml)
thumbnail: s3://sentinel-s1-l1c/GRD/2024/1/6/IW/DV/S1A_IW_GRDH_1SDV_20240106T205153_20240106T205218_051991_06485E_EC5F/preview/quick-look.png (image/png)
vh: s3://sentinel-s1-l1c/GRD/2024/1/6/IW/DV/S1A_IW_GRDH_1SDV_20240106T205153_20240106T205218_051991_06485E_EC5F/measurement/iw-vh.tiff (image/tiff; application=geotiff; profile=cloud-optimized)
vv: s3://sentinel-s1-l1c/GRD/2024/1/6/IW/DV/S1A_IW_GRDH_1SDV_20240106T205153_20240106T205218_051991_06485E_EC5F/measurement/iw-vv.tiff (image/tiff; application=geotiff; profile=cloud-optimized)
以降ではこの出力で得られたvv: s3://sentinel-s1-l1c/GRD/2024/1/6/IW/DV/S1A_IW_GRDH_1SDV_20240106T205153_20240106T205218_051991_06485E_EC5F/measurement/iw-vv.tiff (image/tiff; application=geotiff; profile=cloud-optimized)をダウンロードする。
Sentinel-1 データのダウンロード
アクセスキーの発行
アクセスキーはAWSのリクエスタ支払いに必要なため発行する。AWS上でIAMユーザーを作成し、アクセスキーを発行し、以下のような~~~_accessKeys.csvをダウンロードする。
Access key ID,Secret access key
ABCD1234, 1234ABCD
Boto3 によるダウンロード
以下のdownload.pyを準備し、/workspace以下に配置する。
from typing import Tuple

import boto3


def make_bucket_and_key(s3_uri: str) -> Tuple[str, str]:
    bucket = s3_uri.split("/")[2]
    key = "/".join(s3_uri.split("/")[3:])
    return bucket, key


AWS_ACCESS_KEY_ID = "ABCD1234"
AWS_SECRET_ACCESS_KEY = "1234ABCD"

S3_URI = "s3://sentinel-s1-l1c/GRD/2024/1/6/IW/DV/S1A_IW_GRDH_1SDV_20240106T205153_20240106T205218_051991_06485E_EC5F/measurement/iw-vv.tiff"

DOWNLOAD_FILENAME = "iw-vv.tiff"


if __name__ == "__main__":
    s3 = boto3.client(
        "s3",
        aws_access_key_id=AWS_ACCESS_KEY_ID,
        aws_secret_access_key=AWS_SECRET_ACCESS_KEY,
    )

    bucket, key = make_bucket_and_key(S3_URI)

    s3.download_file(
        Bucket=bucket,
        Key=key,
        Filename=DOWNLOAD_FILENAME,
        ExtraArgs={"RequestPayer": "requester"},
    )
以下を実行する。
root@b230b595a17f:/workspace# python download.py
AWS CLI によるダウンロード
以下を実行する。ここで、Access KeyとSecret Access Keyは発行したアクセスキーを入力する。
root@b230b595a17f:/workspace# aws configure
AWS Access Key ID [None]: ABCD1234
AWS Secret Access Key [None]: 1234ABCD
Default region name [None]:
Default output format [None]:
root@b230b595a17f:/workspace# aws s3 cp s3://sentinel-s1-l1c/GRD/2024/1/6/IW/DV/S1A_IW_GRDH_1SDV_20240106T205153_20240106T205218_051991_06485E_EC5F/measurement/iw-vv.tiff . --request-payer
データ確認
以下のように、AOIと重なっているSentinel-1の画像をダウンロードできていることが分かる。

参考文献
- PySTAC Client Documentation
- AWSのオープンデータとPythonを使って、宇宙から地球を覗いてみよう!
- STAC APIとPythonで衛星データの取得を行う
- Python Boto3を使用してAWS S3からファイルをダウンロードする方法
- Boto3 documentation
- 【AWS】アクセスキーの作成/登録
- AWS CLI の最新バージョンを使用してインストールまたは更新を行う
- Sentinel-1 - Registry of Open Data on AWS
- AWS CLIでS3を操作する - AWSをはじめからていねいに
- Using Requester Pays buckets for storage transfers and usage
- S3用のAWS CLIコマンド、s3 と s3api についてできることの違いを調べてみた
- AWS S3 の使い方 (aws-cli, boto3)
- How to use boto3 (or other Python) to list the contents of a RequesterPays S3 bucket?
- geopandas でshapefileをgeojsonに変換する
- Boto3(AWS SDK for Python)の利用する認証情報
- How to download Sentinel2 L1C using AWS Python SDK (boto3)
Discussion