chiselでスーパスカラを実装 その3
はじめに
現在chiselを使って仮想CPUを自作しており、スーパスカラ実行に挑戦しています。
前回EXステージを対応させましたが、今回はその続き、EXステージの出口部分です。
構成
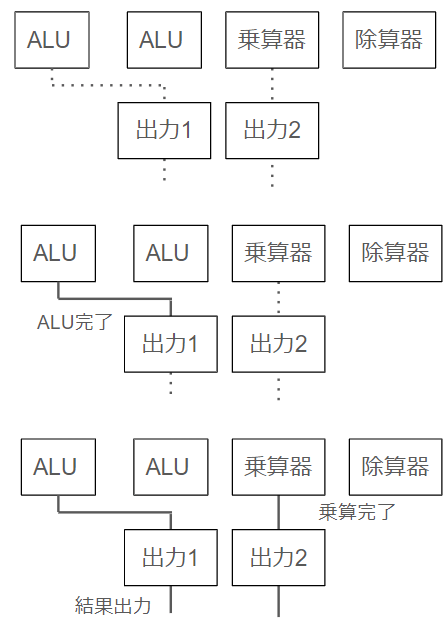
EXステージの実行部分までの構成は以下のようになっています。

今回は、各ユニットが計算した結果を次のステージへ受け渡せるような形に整える部分を実装していきます。
要件
以下を満たす必要があります。
-
出力の絞り込み
- 今回は2指令を同時に処理していくという構成です。ただ、EXステージにおいては指令によて使う演算ユニットが異なるため、計4つのユニットを用意しており、このうちのいくつかが動いているということになります。
- 次のステージへ信号を渡すことを考えて、これらを再度2つの出力信号にまとめ直します。
-
タイミングの調整
- 各実行ユニットは、演算にかかる時間が異なります(ALUは2サイクル、乗算、除算は4サイクルに設定)。
- 2つの指令に対する処理が両方完了したら次のステージに信号を渡すようにします。
- 先に終わった方から次に渡していくという方法も考えられますが(効率を考えたらその方がよさそうですが)、処理が複雑になるので現段階ではここで「足並みを揃える」ことにします。

実装
概要
これを実現するためのユニット「SignalExtractor」を作成します。
- 入力は4信号
- 各信号には各演算ユニットの出力信号と実行状況が含まれる
- 出力は2信号 + 実行状況
- 前者は入力4信号のうちの2つの出力信号
- 両方のユニットで実行が完了したら後者がOnになる
内部では上記1、2を満たすための処理を行います。
詳細
以下の処理を行います。
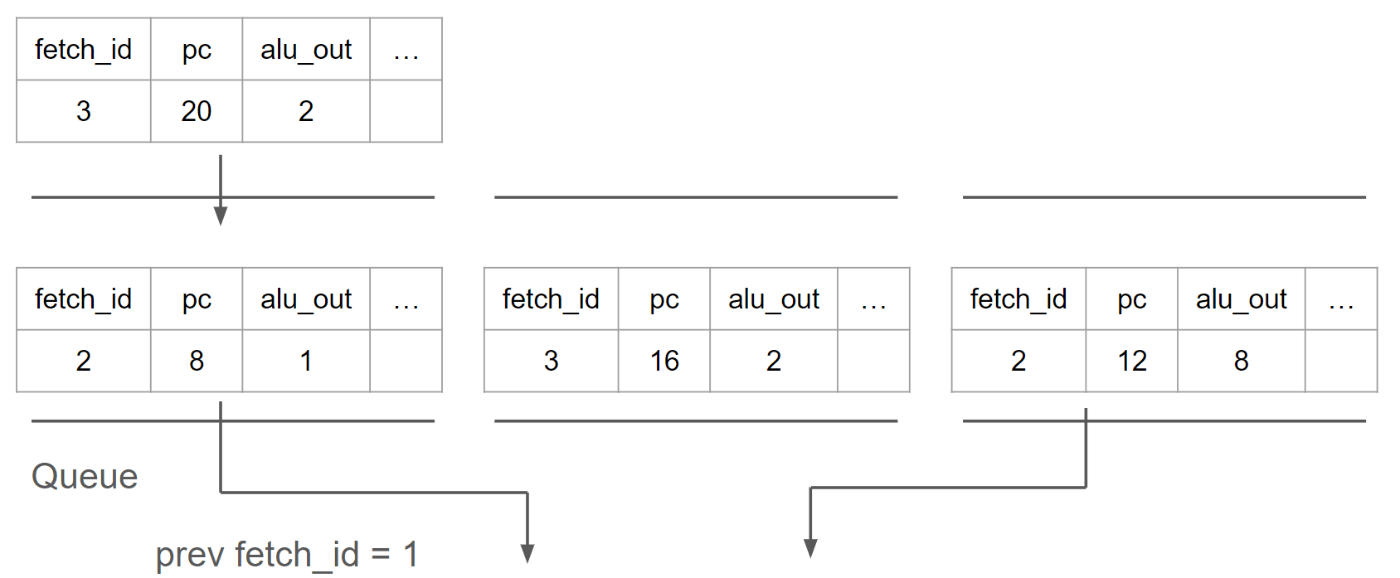
- 同時に処理している2つの信号を特定するid(fetch_id)を付与
- 最初の2指令にfetch_id = 1、次の2指令にfetch_id = 2、・・・
- これはIFステージで算出し、各ステージを渡っていく
- 各ユニットの出力をキューに接続。実行が完了したらキューに入れる。
- キューの末尾の信号のfetch_idをチェック。前回処理した次の値の指令か(※)を判定。
- ※を満たす信号が2つになったら、それらを取り出して「完了信号」を立てる
- 実行が完了したらキューに入るので、※を満たす信号数 = 実行が終わったユニット数

コード
class SignalExtractor extends Module {
  val io = IO(new Bundle {
    val inputs = Input(Vec(EX_UNIT_NUM, new EXUnitOutput)) //EX_UNIT_NUM = 4
    val results = Output(Vec(FETCH_NUM, new EXOutSignals)) //FETCH_NUM = 2
    val execState = Output(new EXOpState)
  })

  io.execState.start := io.inputs(0).result.fetch_id > 0.U
  io.execState.execComplete := false.B
  io.execState.onExec := true.B

  val lastHandledId = RegInit(0.U(WORD_LEN.W))
  val isNext = RegInit(VecInit(Seq.fill(EX_UNIT_NUM)(false.B)))

  //Input to buffer
  val inBufs = Seq.fill(EX_UNIT_NUM)(Module(new Queue(gen = new EXUnitOutput, entries = INST_BUF_DEPTH)))

  for(i <- 0 until EX_UNIT_NUM){
    inBufs(i).io.enq.bits:= io.inputs(i)
    inBufs(i).io.enq.valid := io.inputs(i).result.execState.execComplete  //1
    inBufs(i).io.deq.ready := false.B

    when(!isNext(i)){
      isNext(i) := inBufs(i).io.deq.bits.result.fetch_id === (lastHandledId + 1.U) //2
    }
  }

  //Init results
  for(i <- 0 until FETCH_NUM){
    io.results(i) := inBufs(i).io.deq.bits.result
  }

  //Decide which output to use
  for(i <- 0 until EX_UNIT_NUM){
    when(isNext(i)){ //3
      val idx = countInSubVec(isNext, i) - 1.U
      io.results(idx) := inBufs(i).io.deq.bits.result
    }
  }

  when(PopCount(isNext) === FETCH_NUM.U){  //4
    io.execState.execComplete := true.B //6
    io.execState.onExec := false.B

    lastHandledId := lastHandledId + 1.U

    Seq.tabulate(EX_UNIT_NUM){i =>
      isNext(i) := false.B
      inBufs(i).io.deq.ready := true.B  //5
    }
  }
  io.execState.onExec := (!io.execState.execComplete) && io.execState.start
}
1: 右辺は対応する実行ユニットで実行が完了するとオンになる信号。実行が完了したらキューに入れる
2: キューの末尾の信号のfetch_idが次に処理する値の場合にisNextフラグを立てる
3: isNextが立っているキューの出力を(SignalExtractorの)出力に接続。
countInSubVec(isNext, i) はisNextの要素0~iまでの1の数を返すヘルパ関数
4: isNextの1の要素が2つになったら(=今回処理する指令の処理が2つとも完了したら)
5: 当該指令を取り出し
6: 初期化処理。
- 完了信号を立て、次の指令の取り出しに移る。
- 「前回処理したfetch_id」をインクリメントし、各種フラグをリセット
テスト
まずは基本的なパターン
1番目、2番目の実行ユニット(ALU)に指令を入れて、2周期後に取り出されることを確認
  def testFunc(ext:SignalExtractor, idx1:Int, idx2:Int) = {

    for(i <- 0 until EX_UNIT_NUM){
      if (i == idx1){
        ext.io.inputs(i).result.pc.poke(0)
        ext.io.inputs(i).result.fetch_id.poke(1.U)
        ext.io.inputs(i).result.execState.execComplete.poke(true.B)
      }
      else if (i == idx2){
        ext.io.inputs(i).result.pc.poke(4)
        ext.io.inputs(i).result.fetch_id.poke(1.U)
        ext.io.inputs(i).result.execState.execComplete.poke(true.B)
      }
    }
    //内部バッファに入力
    ext.clock.step(1)
    //isNextの判定
    ext.clock.step(1)

    ext.io.results(0).pc.expect(0)
    ext.io.results(1).pc.expect(4)

    ext.reset.poke(true.B)
    ext.clock.step(1)
    ext.reset.poke(false.B)
  }

  "extracted signal" should "be correct" in {
    test(new SignalExtractor){ ext =>
      testFunc(ext, 0, 1)
    }
  }
次は1つ飛ばして1番目、3番目のユニットで実行した場合。この場合も特に出力2に実行ユニットNo3のデータが格納されることを確認
  "extracted signal" should "be correct2" in {
    test(new SignalExtractor){ ext =>
      testFunc(ext, 0, 2)
    }
  }
完了信号が適切なタイミングで立つことも確認
  "execState" should "be correct" in {
    test(new SignalExtractor){ ext =>

      ext.io.inputs(0).result.pc.poke(0)
      ext.io.inputs(0).result.fetch_id.poke(1.U)
      ext.io.inputs(0).result.execState.execComplete.poke(true.B)
      ext.io.inputs(1).result.pc.poke(4)
      ext.io.inputs(1).result.fetch_id.poke(1.U)
      ext.io.inputs(1).result.execState.execComplete.poke(true.B)

      ext.io.execState.execComplete.expect(false.B)
      ext.io.execState.onExec.expect(true.B)

      ext.clock.step(1)
      ext.clock.step(1)

      ext.io.execState.execComplete.expect(true.B)
      ext.io.execState.onExec.expect(false.B)
    }
  }
2つのユニットが同時に終わらない場合にちゃんと待ち合わせること
  "execState" should "be correct for async complete" in {
    test(new SignalExtractor){ ext =>

      ext.io.inputs(0).result.pc.poke(0)
      ext.io.inputs(0).result.fetch_id.poke(1.U)
      ext.io.inputs(0).result.execState.execComplete.poke(true.B)
      ext.io.inputs(1).result.pc.poke(4)
      ext.io.inputs(1).result.fetch_id.poke(1.U)
      ext.io.inputs(1).result.execState.execComplete.poke(false.B)

      ext.io.execState.execComplete.expect(false.B)
      ext.io.execState.onExec.expect(true.B)

      ext.clock.step(1)

      ext.io.execState.execComplete.expect(false.B)
      ext.io.execState.onExec.expect(true.B)

      ext.io.inputs(1).result.execState.execComplete.poke(true.B)

      ext.clock.step(1)
      ext.clock.step(1)

      ext.io.results(0).pc.expect(0)
      ext.io.results(1).pc.expect(4)
      ext.io.execState.execComplete.expect(true.B)
      ext.io.execState.onExec.expect(false.B)
    }
  }
他にも連続して指令が処理された場合などもテストしました。
(システムが複雑になるほどユニットテストの重要性を実感しました)
最後に
次はMEMステージの実装(並列化)に移ります。
コードは以下にあります。


Discussion