[AWS Hands-on for Beginners]Serverlessのハンズオンを実際にやってみたよ(4)
Amazon API Gateway ハンズオン② API Gateway と Lambda を組み合わせる
それでは、続きをやっていきましょう。
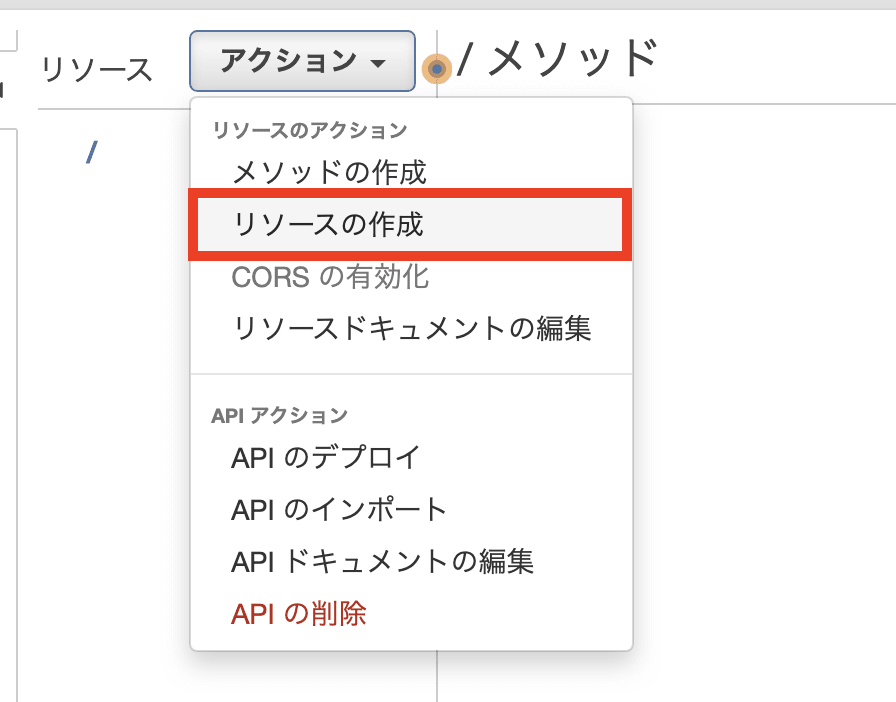
今回は、新たにリソースを作っていきます。
アクション>リソースの作成をクリックします。
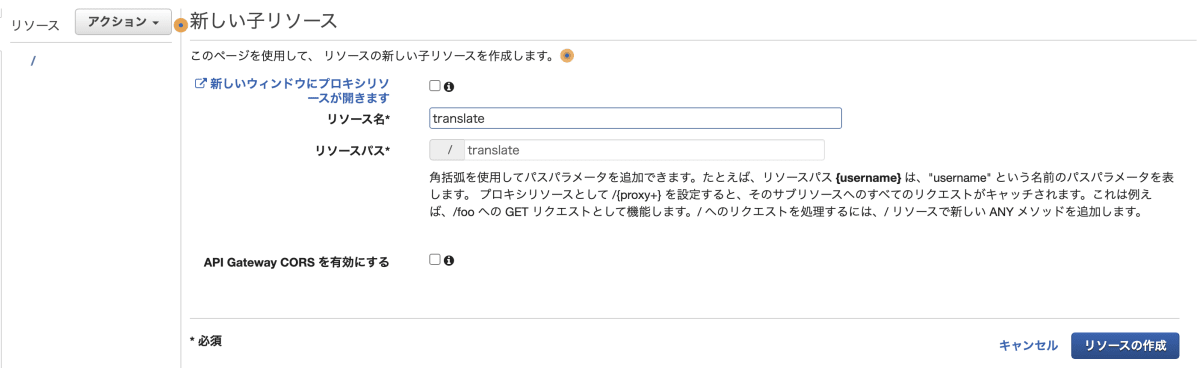
リソース名に名前を入力します。
今回はtranslateと入力しています。
次に、メソッドを作成します。
アクション>メソッドの作成をクリックします。
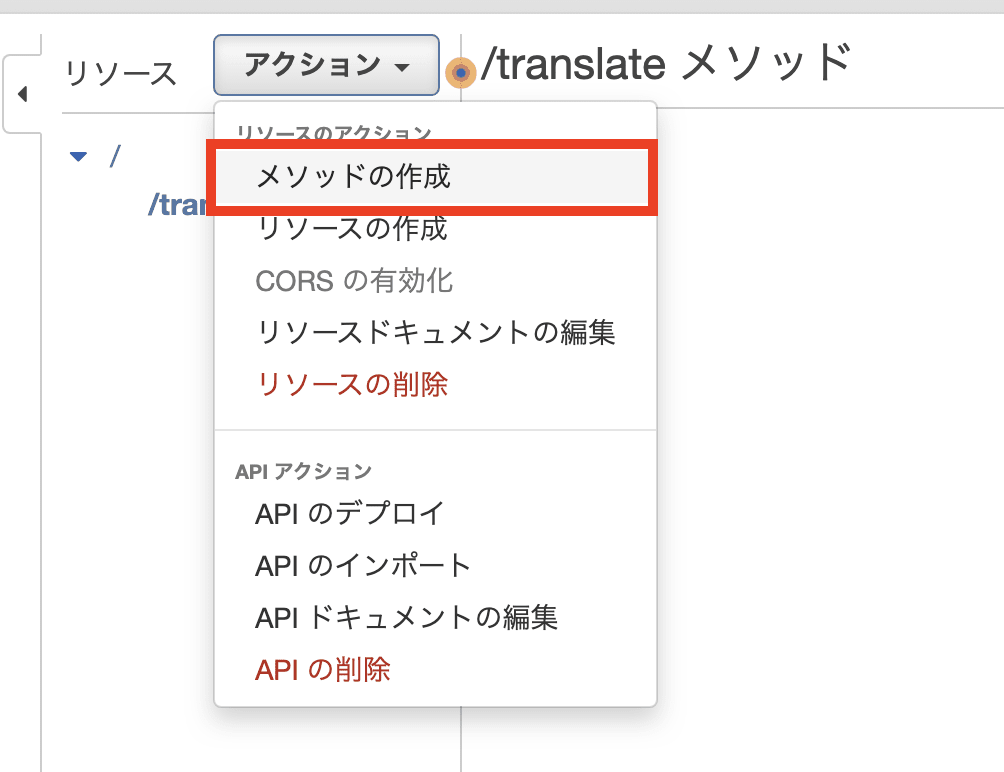
メソッドが作成されると、/translateが表示されているので、GETを選択します。

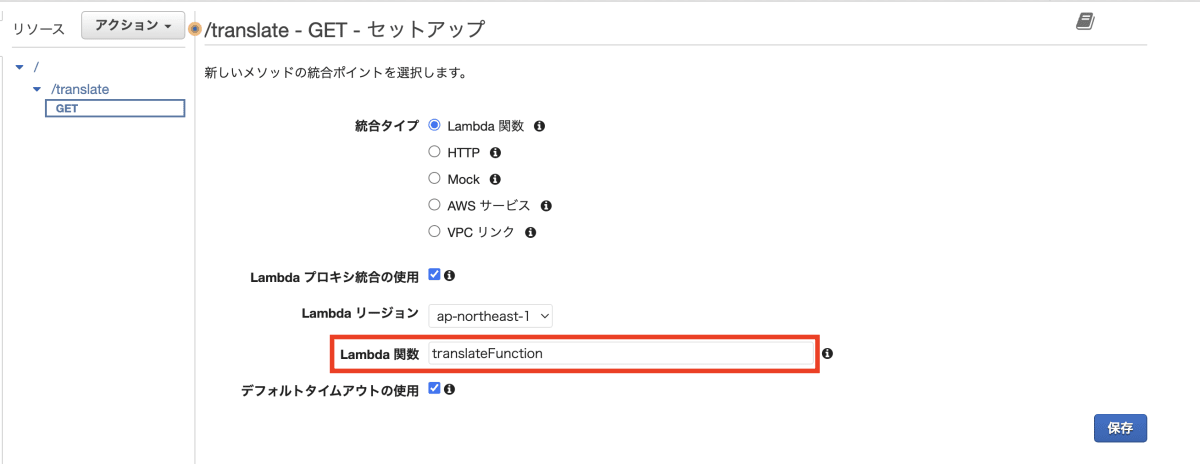
GETのセットアップを行います。
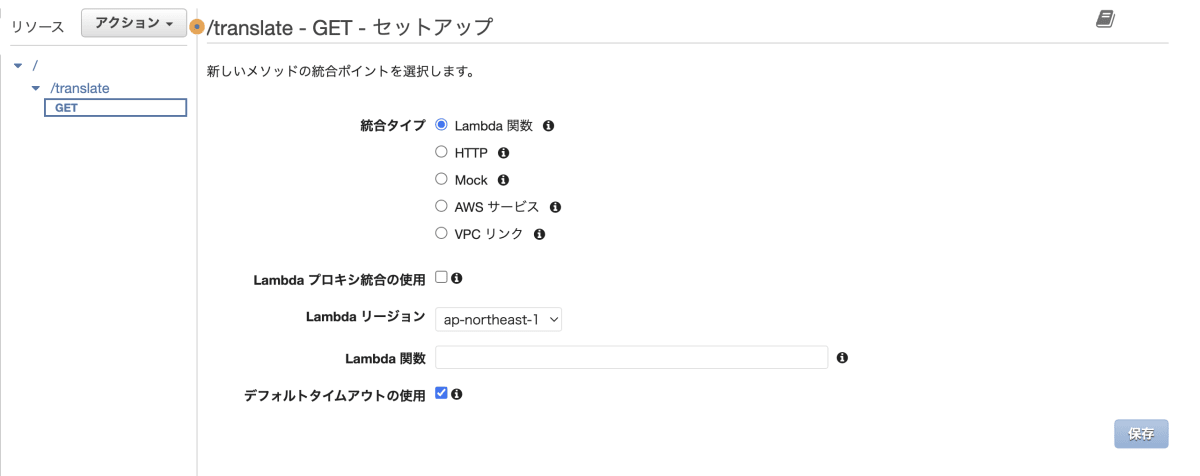
統合タイプについては、そのままLambda 関数を選択します。
それ以外の設定はそのままで、Lambda 関数については、前に作成したtranslateFunctionを入力します。
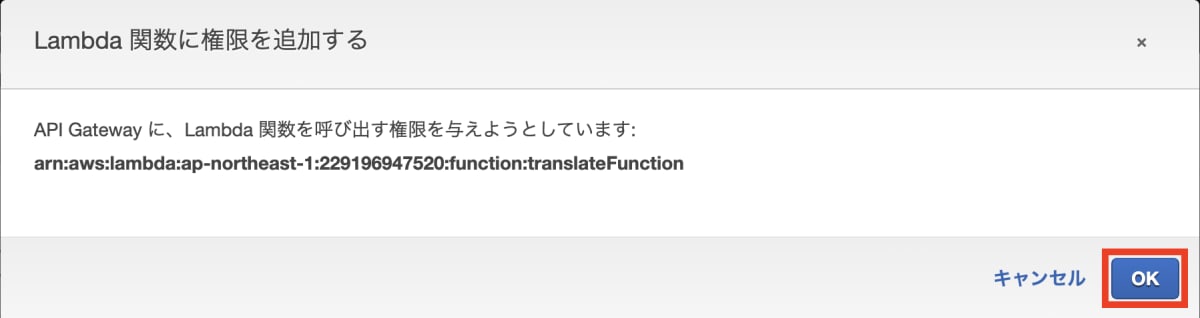
Lambda 関数に権限を追加する画面が表示されますが、そのままOKボタンをクリックします。
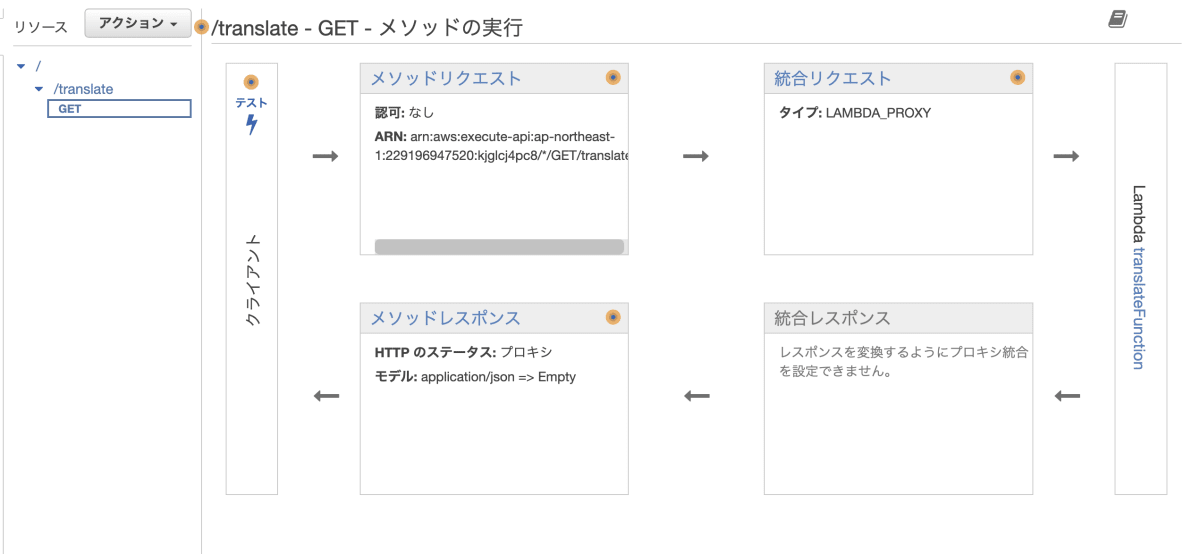
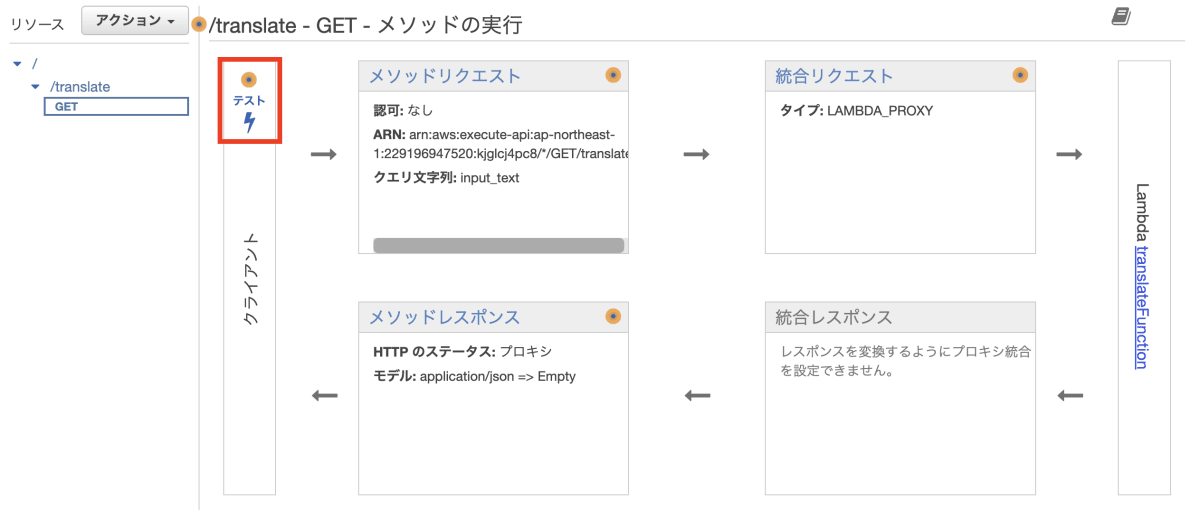
GET メソッドの実行画面が表示されます。
メソッドリクエストをクリックします。
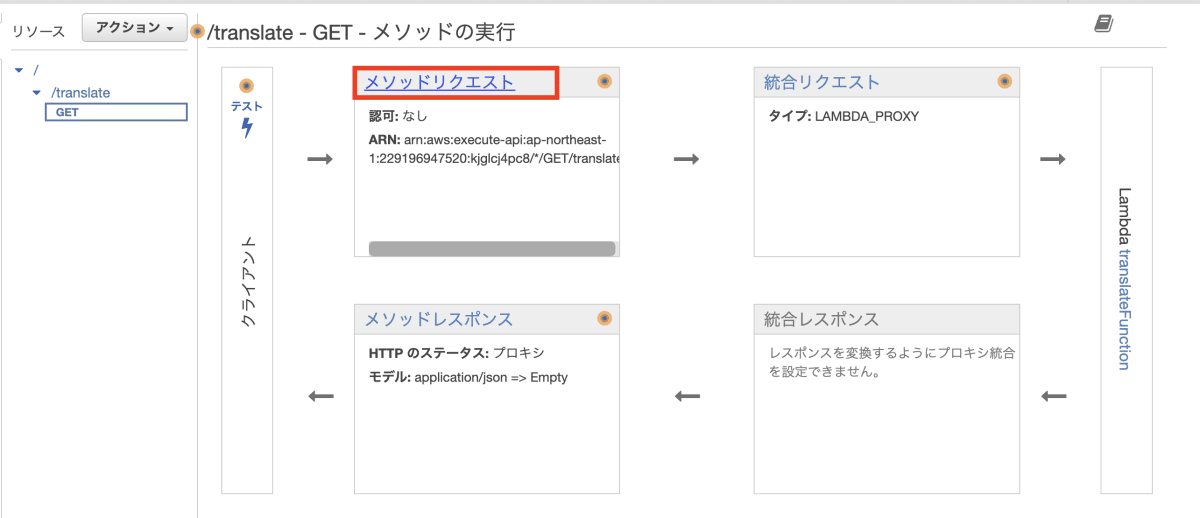
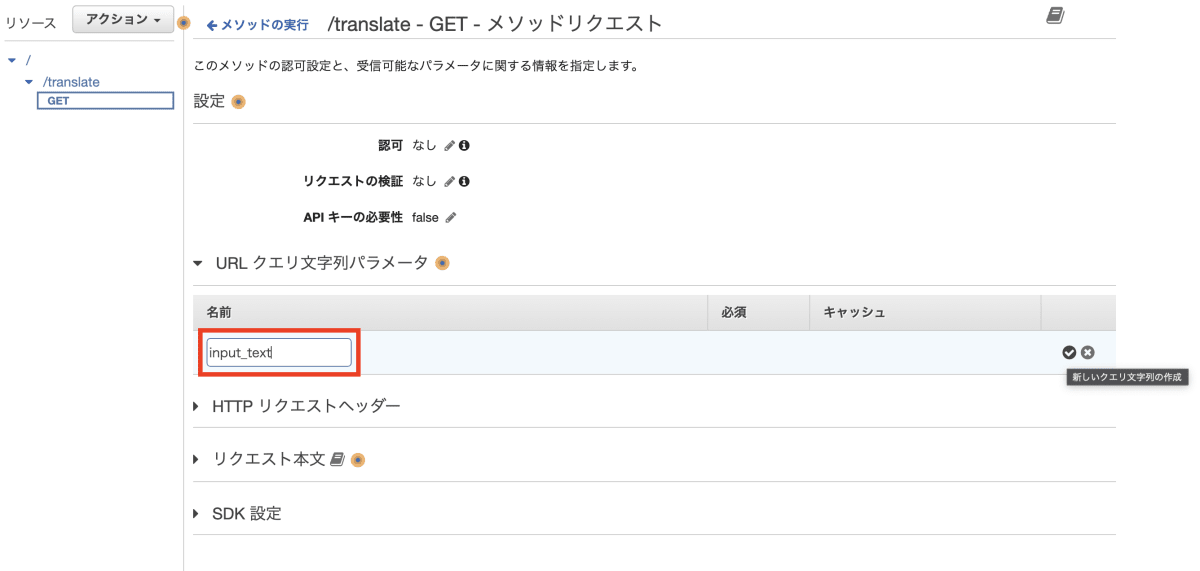
URL クエリ文字列パラメータを展開して、クエリ文字列の追加のリンクをクリックします。

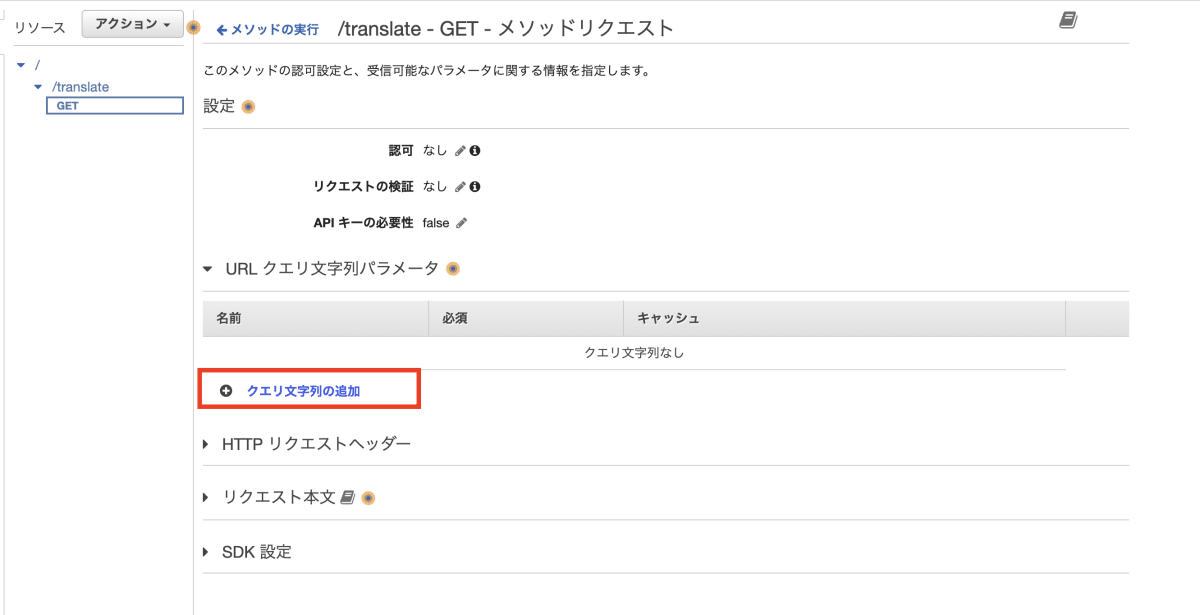
リクエストパラメータとして、input_textと入力します。
次にテストのためにソースコードを少し修正します。
テストをクリックします。

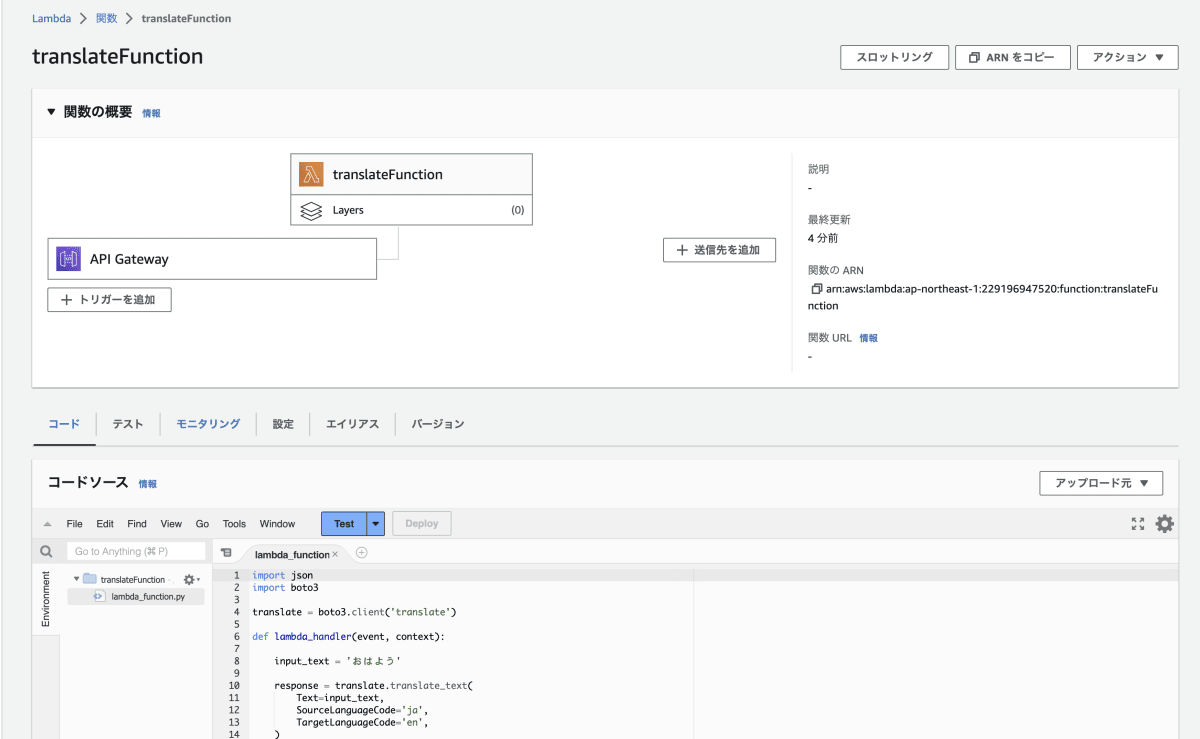
レスポンスを調整する必要があるため、下記のように修正します。
import json
import boto3

translate = boto3.client('translate')

def lambda_handler(event, context):

  input_text = 'おはよう'

  response = translate.translate_text(
    Text=input_text,
    SourceLanguageCode='ja',
    TargetLanguageCode='en',
  )

  output_text = response.get('TranslatedText')

  return {
    'statusCode': 200,
    'body': json.dumps({
      'input_text': input_text,
      'output_text': output_text
    }, ensure_ascii=False),
+    'isBase64Encoded': False,
+    'headers': {}
  }
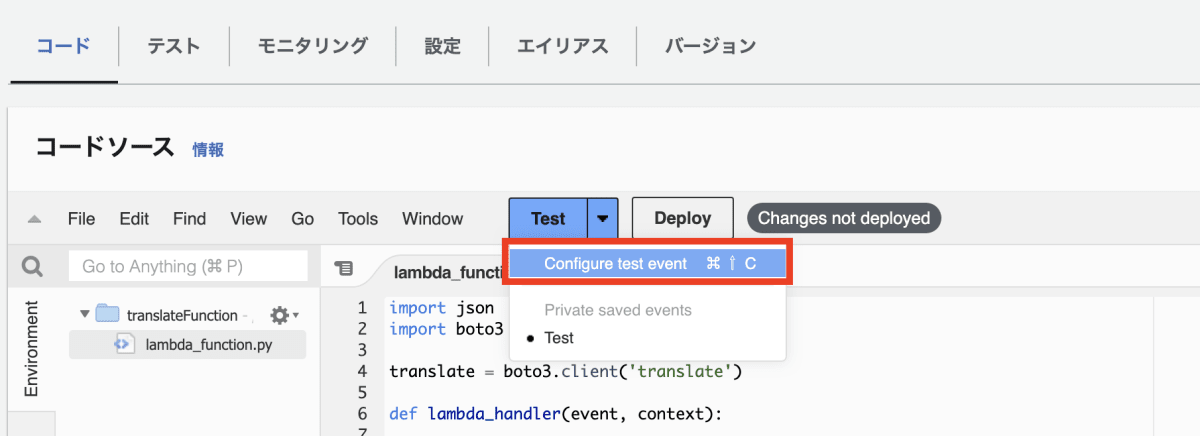
次にテストの設定を行います。
Test>Configure test eventをクリックします。
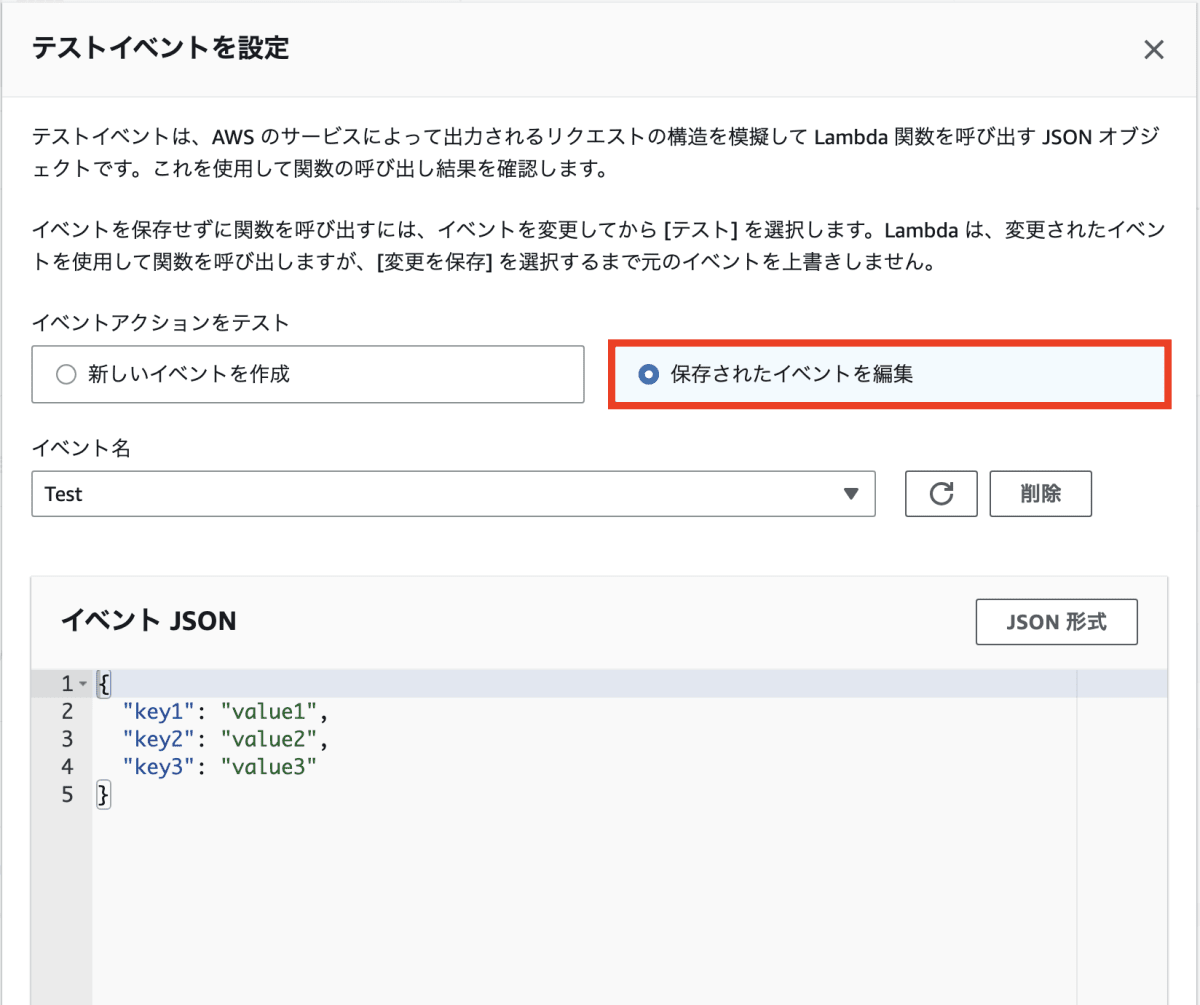
すでにあるテストイベントの設定を編集します。
元々保存されたイベントを編集が選択されていますが、新しいイベントを作成を選択します。
テンプレート - オプションからapiと入力すると、API Gateway AWS Proxyを選択します。
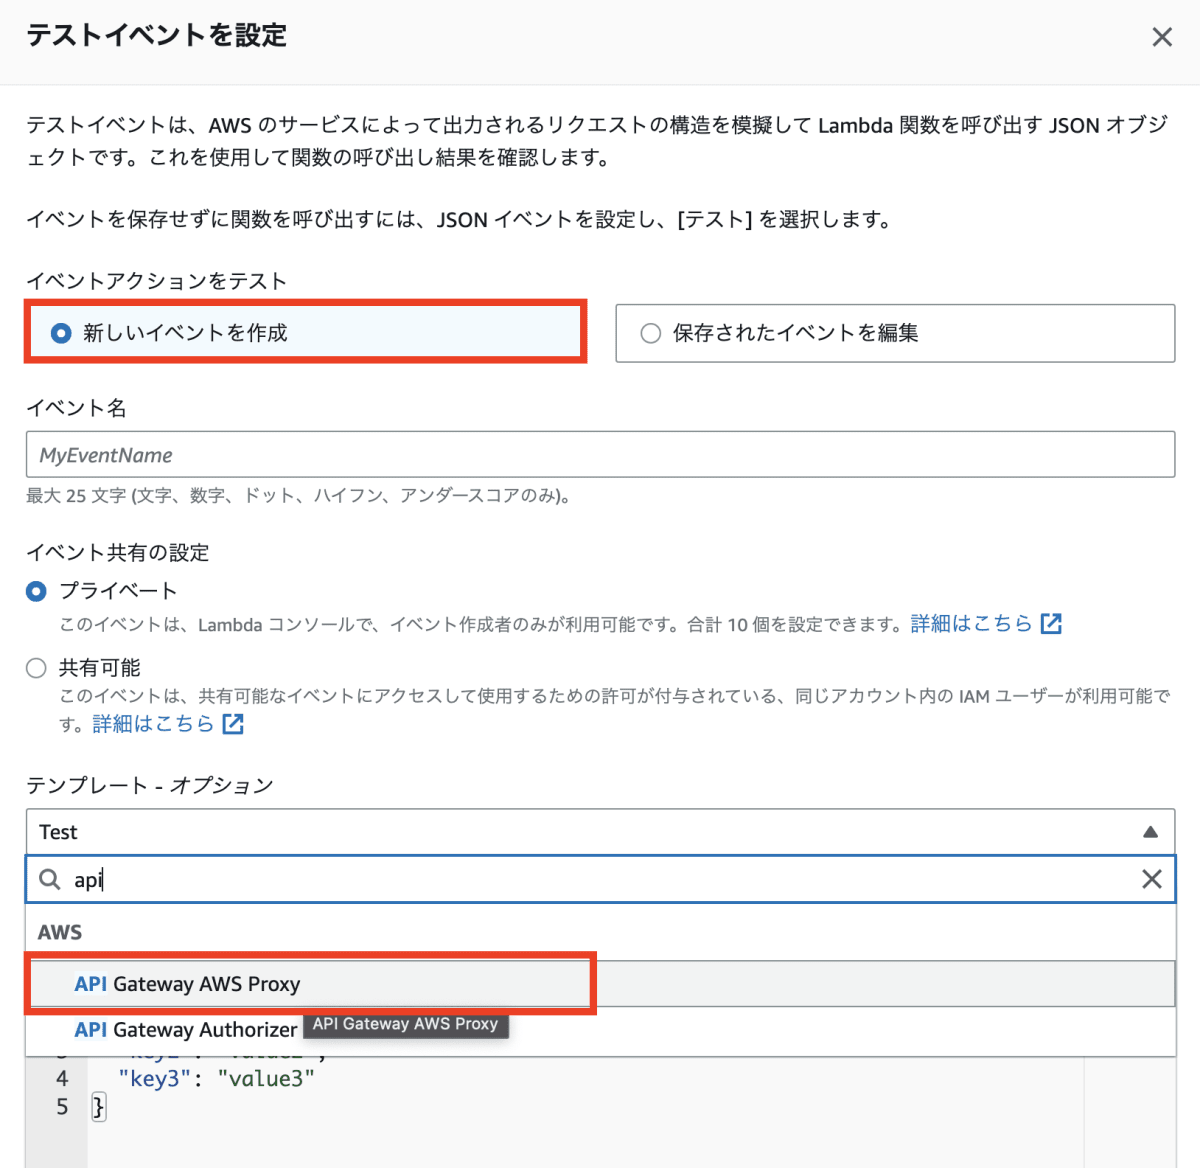
API Gateway Proxyのテンプレートは下記になります。(思ってたより長かった・・)
{
  "body": "eyJ0ZXN0IjoiYm9keSJ9",
  "resource": "/{proxy+}",
  "path": "/path/to/resource",
  "httpMethod": "POST",
  "isBase64Encoded": true,
  "queryStringParameters": {
    "foo": "bar"
  },
  "multiValueQueryStringParameters": {
    "foo": [
      "bar"
    ]
  },
  "pathParameters": {
    "proxy": "/path/to/resource"
  },
  "stageVariables": {
    "baz": "qux"
  },
  "headers": {
    "Accept": "text/html,application/xhtml+xml,application/xml;q=0.9,image/webp,*/*;q=0.8",
    "Accept-Encoding": "gzip, deflate, sdch",
    "Accept-Language": "en-US,en;q=0.8",
    "Cache-Control": "max-age=0",
    "CloudFront-Forwarded-Proto": "https",
    "CloudFront-Is-Desktop-Viewer": "true",
    "CloudFront-Is-Mobile-Viewer": "false",
    "CloudFront-Is-SmartTV-Viewer": "false",
    "CloudFront-Is-Tablet-Viewer": "false",
    "CloudFront-Viewer-Country": "US",
    "Host": "1234567890.execute-api.us-east-1.amazonaws.com",
    "Upgrade-Insecure-Requests": "1",
    "User-Agent": "Custom User Agent String",
    "Via": "1.1 08f323deadbeefa7af34d5feb414ce27.cloudfront.net (CloudFront)",
    "X-Amz-Cf-Id": "cDehVQoZnx43VYQb9j2-nvCh-9z396Uhbp027Y2JvkCPNLmGJHqlaA==",
    "X-Forwarded-For": "127.0.0.1, 127.0.0.2",
    "X-Forwarded-Port": "443",
    "X-Forwarded-Proto": "https"
  },
  "multiValueHeaders": {
    "Accept": [
      "text/html,application/xhtml+xml,application/xml;q=0.9,image/webp,*/*;q=0.8"
    ],
    "Accept-Encoding": [
      "gzip, deflate, sdch"
    ],
    "Accept-Language": [
      "en-US,en;q=0.8"
    ],
    "Cache-Control": [
      "max-age=0"
    ],
    "CloudFront-Forwarded-Proto": [
      "https"
    ],
    "CloudFront-Is-Desktop-Viewer": [
      "true"
    ],
    "CloudFront-Is-Mobile-Viewer": [
      "false"
    ],
    "CloudFront-Is-SmartTV-Viewer": [
      "false"
    ],
    "CloudFront-Is-Tablet-Viewer": [
      "false"
    ],
    "CloudFront-Viewer-Country": [
      "US"
    ],
    "Host": [
      "0123456789.execute-api.us-east-1.amazonaws.com"
    ],
    "Upgrade-Insecure-Requests": [
      "1"
    ],
    "User-Agent": [
      "Custom User Agent String"
    ],
    "Via": [
      "1.1 08f323deadbeefa7af34d5feb414ce27.cloudfront.net (CloudFront)"
    ],
    "X-Amz-Cf-Id": [
      "cDehVQoZnx43VYQb9j2-nvCh-9z396Uhbp027Y2JvkCPNLmGJHqlaA=="
    ],
    "X-Forwarded-For": [
      "127.0.0.1, 127.0.0.2"
    ],
    "X-Forwarded-Port": [
      "443"
    ],
    "X-Forwarded-Proto": [
      "https"
    ]
  },
  "requestContext": {
    "accountId": "123456789012",
    "resourceId": "123456",
    "stage": "prod",
    "requestId": "c6af9ac6-7b61-11e6-9a41-93e8deadbeef",
    "requestTime": "09/Apr/2015:12:34:56 +0000",
    "requestTimeEpoch": 1428582896000,
    "identity": {
      "cognitoIdentityPoolId": null,
      "accountId": null,
      "cognitoIdentityId": null,
      "caller": null,
      "accessKey": null,
      "sourceIp": "127.0.0.1",
      "cognitoAuthenticationType": null,
      "cognitoAuthenticationProvider": null,
      "userArn": null,
      "userAgent": "Custom User Agent String",
      "user": null
    },
    "path": "/prod/path/to/resource",
    "resourcePath": "/{proxy+}",
    "httpMethod": "POST",
    "apiId": "1234567890",
    "protocol": "HTTP/1.1"
  }
}
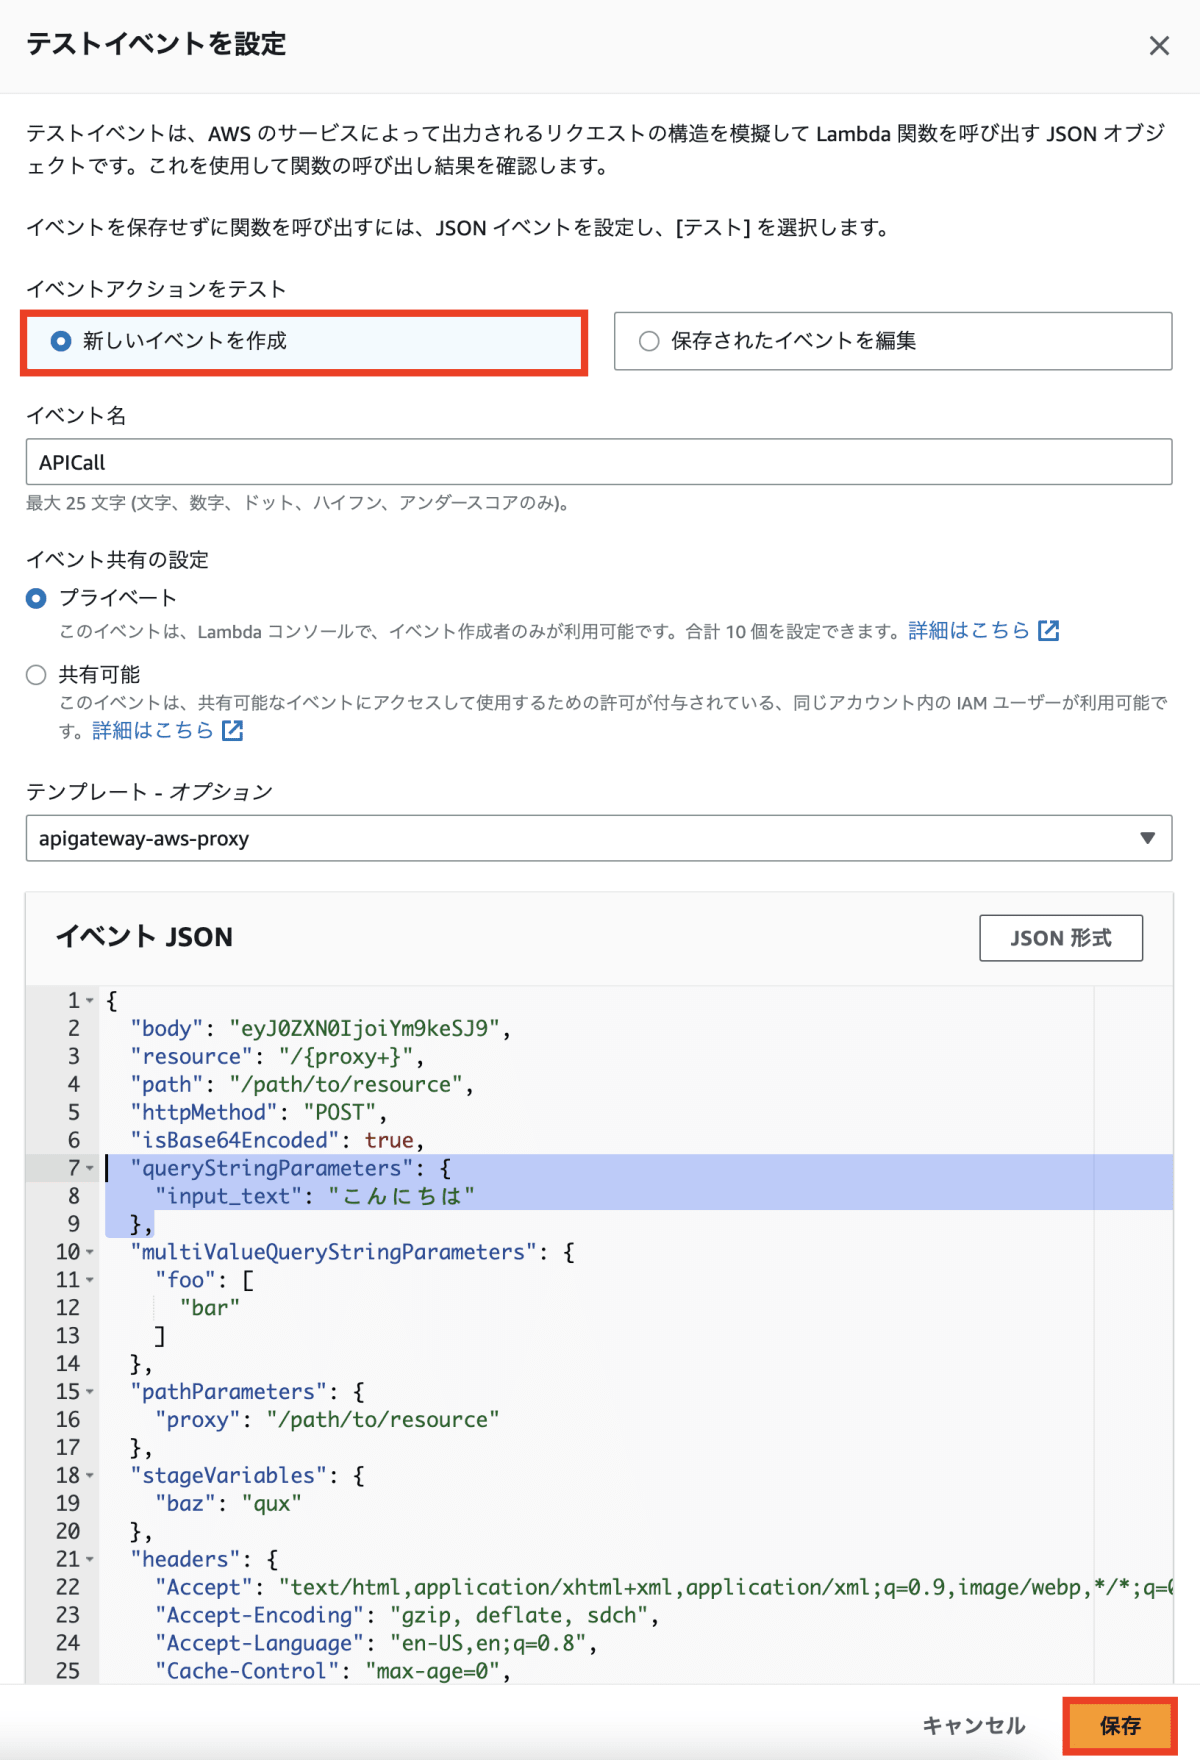
今回は、この部分の一部を修正します。
{
  "body": "eyJ0ZXN0IjoiYm9keSJ9",
  "resource": "/{proxy+}",
  "path": "/path/to/resource",
  "httpMethod": "POST",
  "isBase64Encoded": true,
  "queryStringParameters": {
-    "foo": "bar"
+    "input_text": "こんにちは"
  },
.
.
.
あとはテストイベント名を入力すれば、完成です。
保存ボタンをクリックします。
関数の中身をもう少し修正します。
クエリパラメータから入力値をもらい、それを変数に格納するようにします。
これでひとまず完成かな。
def lambda_handler(event, context):

-    input_text = 'おはよう'
+    input_text = event['queryStringParameters']['input_text']
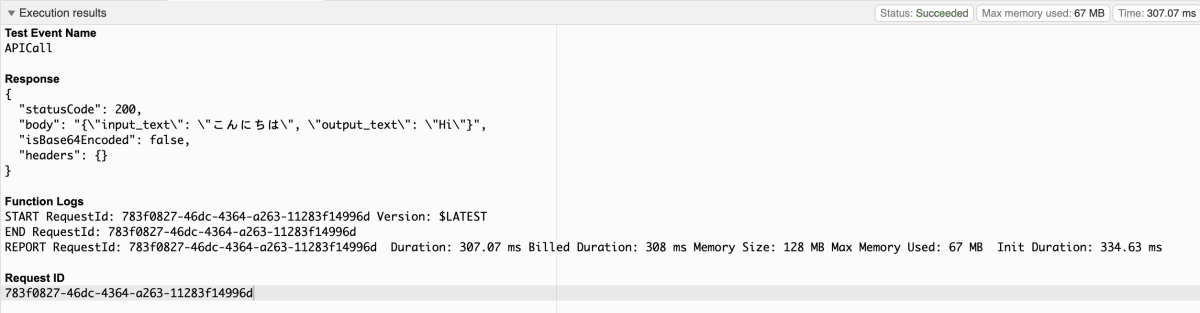
テストを実行してみると、一応、ちゃんと返ってきた!
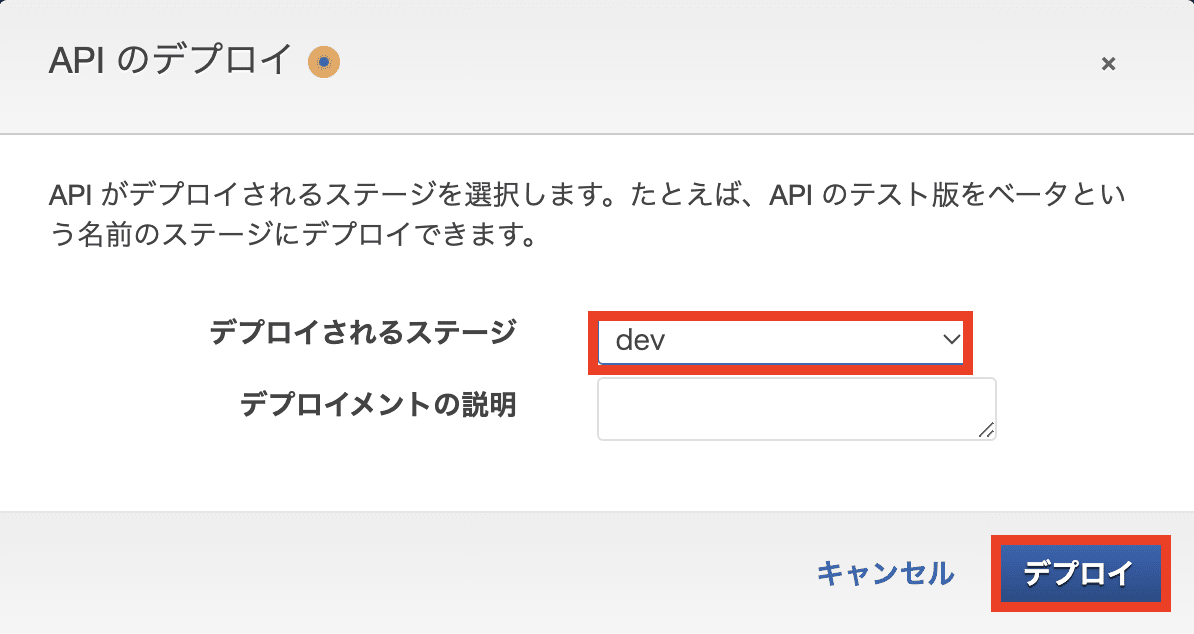
ここまでできたら、最後にAPI のデプロイを行います。
アクション>APIPのデプロイをクリックします。

デプロイされるステージはdevを選択し、デプロイボタンをクリックします。
画面上部にURLが表示されています。
このURLにアクセスしてみましょう。
うまく行っているかなーー・・

Internal Server Error !?
あ、そうか、パラメータを渡してないからか。

というわけで、クエリパラメータを下記のような感じで入力してみます。
https:〜/dev/translate?input_text=おはよう
すると、予定通り、ちゃんと変換されて返ってくることが確認できました!!

Discussion