AWS Amplifyのハンズオンやってみた(2)
はじめに
この記事はAWS Amplifyのハンズオンをやってみた(1)のつづきです。
下記リンクの03 AWS Amplify のハンズオン(環境構築、CLI 編)の動画を見ながら作業しています。
それでは、AWS Cloud9 の画面から再スタートです。
nodejsのバージョンを確認

nodejs のバージョンを確認します。
node -v

私が試したときは、v16.19.1でした
Amplify CLI のインストール
下記のコマンドを実行してAmplify CLIをインストールします。
npm install -g @aws-amplify/cli
実行した結果が下記になります。
$ npm install -g @aws-amplify/cli

added 26 packages, and audited 27 packages in 14s

7 packages are looking for funding
  run `npm fund` for details

found 0 vulnerabilities
npm notice
npm notice New major version of npm available! 8.19.3 -> 9.6.2
npm notice Changelog: https://github.com/npm/cli/releases/tag/v9.6.2
npm notice Run npm install -g npm@9.6.2 to update!
npm notice
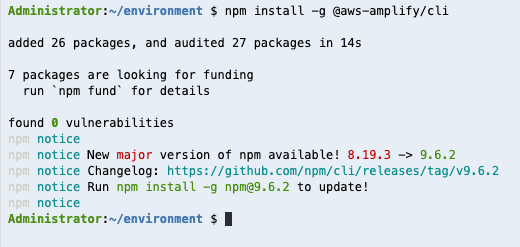
警告が出ていますが、今はそのままにしておきます。
次に、下記のコマンドを実行します。
amplify configure
amplify configure
Follow these steps to set up access to your AWS account:

Sign in to your AWS administrator account:
https://console.aws.amazon.com/
Press Enter to continue
Unable to open https://console.aws.amazon.com/: spawn xdg-open ENOENT
Have you installed `xdg-utils` on your machine?
Administrator 権限を持つ AWS アカウントにサインインしなさいと言われます。
今回のハンズオンでは Administrator 権限のアカウントで作業しているので、そのまま続けます。
次の警告はなんでしょう?
下記のサイトでもインストールをするように記載されているので、そのままEnterを押します。
次にリージョンを聞かれます。
今回は東京リージョンap-northeast-1を選択します。
Specify the AWS Region
? region:  (Use arrow keys)
❯ us-east-1
  us-east-2
  us-west-1
  us-west-2
  eu-north-1
  eu-south-1
  eu-west-1
(Move up and down to reveal more choices)
Specify the AWS Region
? region:  ap-northeast-1
Follow the instructions at
https://docs.amplify.aws/cli/start/install/#configure-the-amplify-cli

to complete the user creation in the AWS console
https://console.aws.amazon.com/iamv2/home#/users/create
Press Enter to continue
Unable to open https://docs.amplify.aws/cli/start/install/#configure-the-amplify-cli: spawn xdg-open ENOENT
Have you installed `xdg-utils` on your machine?
あれ?まだ警告が出ているので、いったんキャンセルしてインストールします(勝手にインストールしてくれるのかと思ってた。。)
sudo yum -y install xdg-utils
途中でインストールするかどうかを聞かれるのでyでEnterを押します。
Administrator:~/environment $ sudo yum install xdg-utils
Loaded plugins: extras_suggestions, langpacks, priorities, update-motd
amzn2-core                                                                                                                                                                                                 | 3.7 kB  00:00:00
244 packages excluded due to repository priority protections
Resolving Dependencies
--> Running transaction check
---> Package xdg-utils.noarch 0:1.1.0-0.17.20120809git.amzn2 will be installed
--> Processing Dependency: desktop-file-utils for package: xdg-utils-1.1.0-0.17.20120809git.amzn2.noarch
--> Running transaction check
---> Package desktop-file-utils.x86_64 0:0.23-2.amzn2 will be installed
--> Finished Dependency Resolution

Dependencies Resolved

==================================================================================================================================================================================================================================
 Package                                                  Arch                                         Version                                                             Repository                                        Size
==================================================================================================================================================================================================================================
Installing:
 xdg-utils                                                noarch                                       1.1.0-0.17.20120809git.amzn2                                        amzn2-core                                        70 k
Installing for dependencies:
 desktop-file-utils                                       x86_64                                       0.23-2.amzn2                                                        amzn2-core                                        68 k

Transaction Summary
==================================================================================================================================================================================================================================
Install  1 Package (+1 Dependent package)

Total download size: 138 k
Installed size: 474 k
Is this ok [y/d/N]: y
Downloading packages:
(1/2): desktop-file-utils-0.23-2.amzn2.x86_64.rpm                                                                                                                                                          |  68 kB  00:00:00
(2/2): xdg-utils-1.1.0-0.17.20120809git.amzn2.noarch.rpm                                                                                                                                                   |  70 kB  00:00:00
----------------------------------------------------------------------------------------------------------------------------------------------------------------------------------------------------------------------------------
Total                                                                                                                                                                                             596 kB/s | 138 kB  00:00:00
Running transaction check
Running transaction test
Transaction test succeeded
Running transaction
  Installing : desktop-file-utils-0.23-2.amzn2.x86_64                                                                                                                                                                         1/2
  Installing : xdg-utils-1.1.0-0.17.20120809git.amzn2.noarch                                                                                                                                                                  2/2
  Verifying  : desktop-file-utils-0.23-2.amzn2.x86_64                                                                                                                                                                         1/2
  Verifying  : xdg-utils-1.1.0-0.17.20120809git.amzn2.noarch                                                                                                                                                                  2/2

Installed:
  xdg-utils.noarch 0:1.1.0-0.17.20120809git.amzn2

Dependency Installed:
  desktop-file-utils.x86_64 0:0.23-2.amzn2

Complete!
改めてやり直しました。
下のリンクを別タブで開きます。
Specify the AWS Region
? region:  ap-northeast-2
Follow the instructions at
https://docs.amplify.aws/cli/start/install/#configure-the-amplify-cli

to complete the user creation in the AWS console
https://console.aws.amazon.com/iamv2/home#/users/create
Press Enter to continue
こんな画面が表示されるので、使用を開始するボタンをクリックします。

IAM Identity Center(AWS Single Sign-on の後継サービス)画面に遷移しました。
さっそく有効化してみます。

IAM ユーザーの作成画面に戻ります!
適当に名前を入力して次へボタンをクリックします。

許可のオプションについては、ポリシーを直接アタッチするを選択し、許可ポリシーはAdministratorAccessにチェックを入れて次へボタンをクリックします。

AdministratorAccessのポリシーがアタッチされていることが確認できたら、ユーザーの作成ボタンをクリックします。
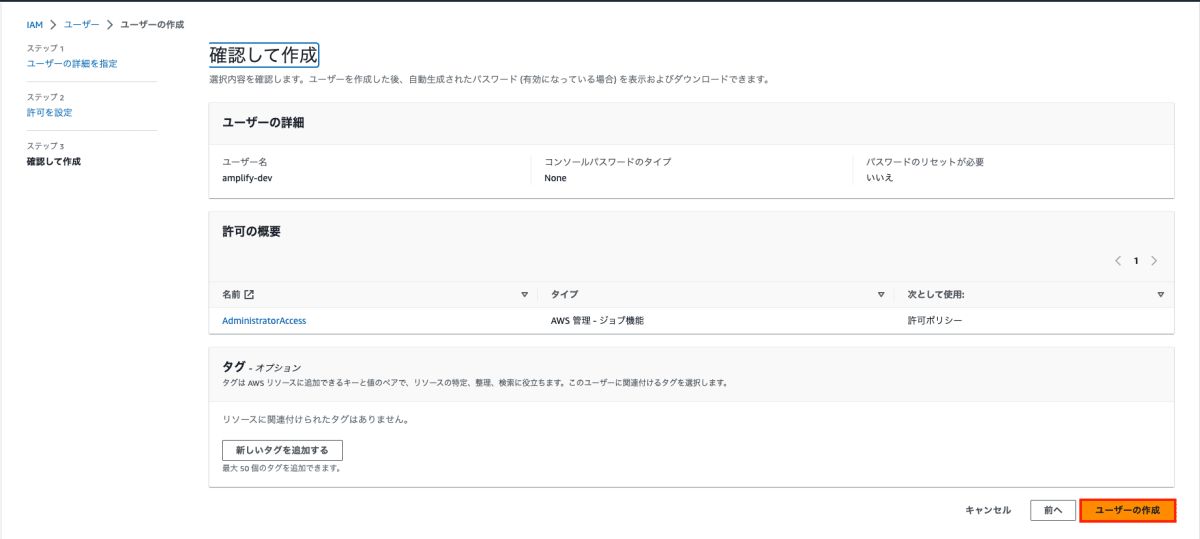
これでユーザーが作成できました。
次に作成したユーザーを選択します。

セキュリティ認証情報タブにある、アクセスキーで、アクセスキーを作成ボタンをクリックします。

主要なベストプラクティスと代替案にアクセスする画面でコマンドラインインターフェースを選択して、次へボタンをクリックします。

上記のレコメンデーションを理解し、アクセスキーを作成しますにチェックを入れなきゃいけないみたい。。


アクセスキーが作成できました。
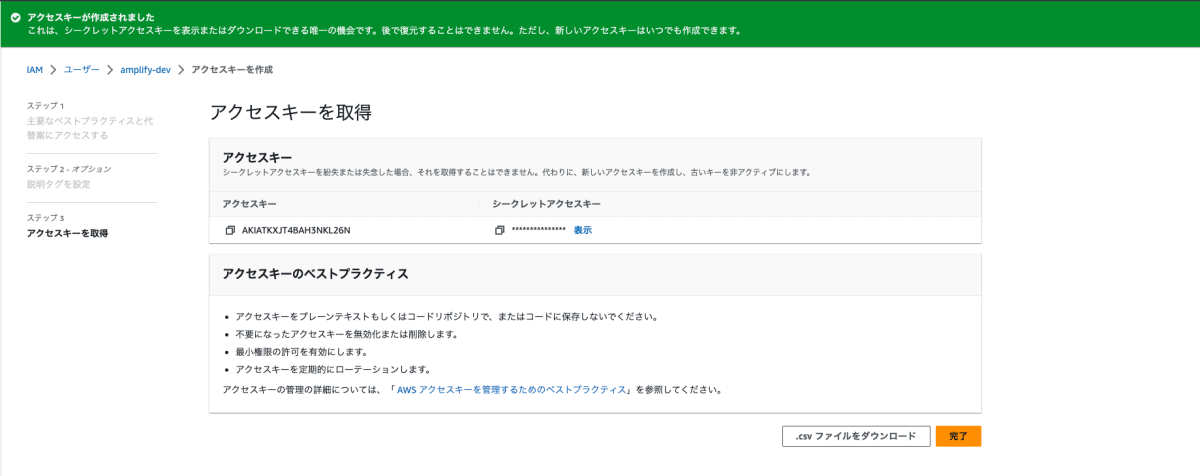
これで完了なので、完了ボタンをクリックします。
Cloud9 の画面に戻りま〜す。
アクセスキー ID、シークレットアクセスキーを聞かれているので、さっき作成したアクセスキー ID、シークレットアクセスキーを入力します。
入力というより、コピペかな。
Enter the access key of the newly created user:
? accessKeyId:  [hidden]
Profile Nameを聞かれるので、今回はデフォルトのまま進めます。Enterを押します。
This would update/create the AWS Profile in your local machine
? Profile Name:  (default)
Successfully set up the new user.
よし、ここまで完了しました。
React アプリの雛形を作成する
ここからは React アプリの雛形を作成していきます。
途中Ok to proceed?と聞かれるのでyを入力してEnterを押します。
npx create-react-app react-amplified
$ npx create-react-app react-amplified
Need to install the following packages:
  create-react-app@5.0.1
Ok to proceed? (y) y
npm WARN deprecated tar@2.2.2: This version of tar is no longer supported, and will not receive security updates. Please upgrade asap.

Creating a new React app in /home/ec2-user/environment/react-amplified.

Installing packages. This might take a couple of minutes.
Installing react, react-dom, and react-scripts with cra-template...


added 1419 packages in 1m

231 packages are looking for funding
  run `npm fund` for details

Initialized a git repository.

Installing template dependencies using npm...

added 62 packages, and changed 1 package in 10s

231 packages are looking for funding
  run `npm fund` for details
Removing template package using npm...


removed 1 package, and audited 1481 packages in 3s

231 packages are looking for funding
  run `npm fund` for details

6 high severity vulnerabilities

To address all issues (including breaking changes), run:
  npm audit fix --force

Run `npm audit` for details.

Created git commit.

Success! Created react-amplified at /home/ec2-user/environment/react-amplified
Inside that directory, you can run several commands:

  npm start
    Starts the development server.

  npm run build
    Bundles the app into static files for production.

  npm test
    Starts the test runner.

  npm run eject
    Removes this tool and copies build dependencies, configuration files
    and scripts into the app directory. If you do this, you can’t go back!

We suggest that you begin by typing:

  cd react-amplified
  npm start

Happy hacking!
これでプロジェクトの作成が完了しました。
次に、今作成したプロジェクトへ移動します。
cd react-amplified
動作の確認をするために、下記を実行してみます。
npm start
実行できたので、プレビューして確認してみます。
ompiled successfully!

You can now view react-amplified in the browser.

  Local:            http://localhost:8080
  On Your Network:  http://172.31.40.155:8080

Note that the development build is not optimized.
To create a production build, use npm run build.

webpack compiled successfully
Preview > Preview Running Applicationを選択します。

おおっ!React の初期画面が表示されましたね。
動作の確認ができたので、ctrl + Cでアプリの実行を停止します。

次に、下記コマンドを実行します。
amplify init
プロジェクト名を聞かれますが、今回はハンズオンなのでデフォルトで進めます。Enterを押します。
 $ amplify init
Note: It is recommended to run this command from the root of your app directory
? Enter a name for the project (reactamplified)
次に設定ですね。そのままデフォルトでやっていきます。
Yを入力してEnterを押してください。
Project information
| Name: reactamplified
| Environment: dev
| Default editor: Visual Studio Code
| App type: javascript
| Javascript framework: react
| Source Directory Path: src
| Distribution Directory Path: build
| Build Command: npm run-script build
| Start Command: npm run-script start

? Initialize the project with the above configuration? (Y/n)
次は認証方法ですが、さきほど profile を作成したので、AWS profileを使用します。
? Select the authentication method you want to use: (Use arrow keys)
❯ AWS profile
  AWS access keys
先ほど作成したdefaultプロファイルをそのまま選択します。
途中聞かれるところがあるので、Nのまま進めます。
? Select the authentication method you want to use: AWS profile

For more information on AWS Profiles, see:
https://docs.aws.amazon.com/cli/latest/userguide/cli-configure-profiles.html

? Please choose the profile you want to use (Use arrow keys)
❯ default
? Please choose the profile you want to use default
Adding backend environment dev to AWS Amplify app: d1n5z4hdirjae0

Deployment completed.
Deployed root stack reactamplified [ ======================================== ] 4/4
        amplify-reactamplified-dev-40… AWS::CloudFormation::Stack     CREATE_COMPLETE                Sun Mar
        AuthRole                       AWS::IAM::Role                 CREATE_COMPLETE                Sun Mar
        DeploymentBucket               AWS::S3::Bucket                CREATE_COMPLETE                Sun Mar
        UnauthRole                     AWS::IAM::Role                 CREATE_COMPLETE                Sun Mar

✔ Help improve Amplify CLI by sharing non sensitive configurations on failures (y/N) · no
Deployment state saved successfully.
✔ Initialized provider successfully.
✅ Initialized your environment successfully.

Your project has been successfully initialized and connected to the cloud!

Some next steps:
"amplify status" will show you what you've added already and if it's locally configured or deployed
"amplify add <category>" will allow you to add features like user login or a backend API
"amplify push" will build all your local backend resources and provision it in the cloud
"amplify console" to open the Amplify Console and view your project status
"amplify publish" will build all your local backend and frontend resources (if you have hosting category added) and provision it in the cloud

Pro tip:
Try "amplify add api" to create a backend API and then "amplify push" to deploy everything
次に Amplify のライブラリをインストールしていきます。
npm install aws-amplify
$ npm install aws-amplify
npm WARN deprecated source-map-url@0.4.1: See https://github.com/lydell/source-map-url#deprecated
 certain circumstances, which is known to be problematic.  See https://v8.dev/blog/math-random for details.
npm WARN deprecated uuid@3.4.0: Please upgrade  to version 7 or higher.  Older versions may use Math.random() in certain circumstances, which is known to be problematic.  See https://v8.dev/blog/math-random for details.
npm WARN deprecated uuid@3.4.0: Please upgrade  to version 7 or higher.  Older versions may use Math.random() in certain circumstances, which is known to be problematic.  See https://v8.dev/blog/math-random for details.
npm WARN deprecated uuid@3.4.0: Please upgrade  to version 7 or higher.  Older versions may use Math.random() in certain circumstances, which is known to be problematic.  See https://v8.dev/blog/math-random for details.
npm WARN deprecated uuid@3.4.0: Please upgrade  to version 7 or higher.  Older versions may use Math.random() in certain circumstances, which is known to be problematic.  See https://v8.dev/blog/math-random for details.
npm WARN deprecated uuid@3.4.0: Please upgrade  to version 7 or higher.  Older versions may use Math.random() in certain circumstances, which is known to be problematic.  See https://v8.dev/blog/math-random for details.
npm WARN deprecated uuid@3.4.0: Please upgrade  to version 7 or higher.  Older versions may use Math.random() in certain circumstances, which is known to be problematic.  See https://v8.dev/blog/math-random for details.
npm WARN deprecated uuid@3.4.0: Please upgrade  to version 7 or higher.  Older versions may use Math.random() in certain circumstances, which is known to be problematic.  See https://v8.dev/blog/math-random for details.
npm WARN deprecated uglify-es@3.3.9: support for ECMAScript is superseded by `uglify-js` as of v3.13.0
added 1144 packages, and audited 2625 packages in 1m
249 packages are looking for funding  run `npm fund` for details
6 high severity vulnerabilities

To address all issues (including breaking changes), run:
  npm audit fix --force

Run `npm audit` for details.
src/index.jsを Cloud9 上で開いて、下記の構文を import 文の末尾に追加します。
〜
import { Amplify } from 'aws-amplify';
import awsExports from './aws-exports';
Amplify.configure(awsExports);
追加前のindex.js

追加後のindex.js

これで Amplify のすべての設定が完了しました。
いやー長かったな。
でも無事にここまではトラブルなくできました。
リンク
Amplify のチュートリアル
Discussion