Argo WorkflowをKubernetesにインストールして、ワークフローを作成する
内容
ArgoCD WorkflowをKubernetesクラスターにインストールする方法を紹介します。
その後、簡単なワークフローを実行し、正常動作することを確認します
インストール
CLIをインストールする
まずは、ArgoCD Workflowを実行するためのCLIをインストールします。
GitHubのリリースページ( https://github.com/argoproj/argo-workflows/releases )に沿って、インストールを進めてください。正常にインストールが完了したかどうかを以下のコマンドで確認できます。
$ argo version
argo: refs/tags/v3.4.4
  BuildDate: unknown
  GitCommit: refs/tags/v3.4.4
  GitTreeState: clean
  GitTag: refs/tags/v3.4.4
  GoVersion: go1.19.5
  Compiler: gc
  Platform: darwin/arm64
Kubernetesクラスターを構築する
次に、Argo Workflowをインストールするクラスターを作成します。GKEやEKSのようなクラウドベンダー上に構築しても問題ありませんが、テスト目的の場合は、kindやminikubeのようなローカル環境で構築することをおすすめします。今回はkindで構築していきます。
$ kind create cluster --name=argo-workflow
これで、テスト用のKubernetesクラスターが作成されます。
ArgoCD Workflowをクラスターにインストールする
$ kubectl create namespace argo
namespace/argo created

$ kubectl apply -n argo -f https://github.com/argoproj/argo-workflows/releases/download/v3.4.7/install.yaml
customresourcedefinition.apiextensions.k8s.io/clusterworkflowtemplates.argoproj.io created
customresourcedefinition.apiextensions.k8s.io/cronworkflows.argoproj.io created
customresourcedefinition.apiextensions.k8s.io/workflowartifactgctasks.argoproj.io created
customresourcedefinition.apiextensions.k8s.io/workfloweventbindings.argoproj.io created
customresourcedefinition.apiextensions.k8s.io/workflows.argoproj.io created
customresourcedefinition.apiextensions.k8s.io/workflowtaskresults.argoproj.io created
customresourcedefinition.apiextensions.k8s.io/workflowtasksets.argoproj.io created
customresourcedefinition.apiextensions.k8s.io/workflowtemplates.argoproj.io created
serviceaccount/argo created
serviceaccount/argo-server created
role.rbac.authorization.k8s.io/argo-role created
clusterrole.rbac.authorization.k8s.io/argo-aggregate-to-admin created
clusterrole.rbac.authorization.k8s.io/argo-aggregate-to-edit created
clusterrole.rbac.authorization.k8s.io/argo-aggregate-to-view created
clusterrole.rbac.authorization.k8s.io/argo-cluster-role created
clusterrole.rbac.authorization.k8s.io/argo-server-cluster-role created
rolebinding.rbac.authorization.k8s.io/argo-binding created
clusterrolebinding.rbac.authorization.k8s.io/argo-binding created
clusterrolebinding.rbac.authorization.k8s.io/argo-server-binding created
configmap/workflow-controller-configmap created
service/argo-server created
priorityclass.scheduling.k8s.io/workflow-controller created
deployment.apps/argo-server created
deployment.apps/workflow-controller created
これでinstallが完了しました。
Auth modeをserverに切り替える
初期設定の状態の場合、認証がclientで行われるように設定されているため、サーバーモードに切り替えます。
$ kubectl patch deployment \
  argo-server \
  --namespace argo \
  --type='json' \
  -p='[{"op": "replace", "path": "/spec/template/spec/containers/0/args", "value": [
  "server",
  "--auth-mode=server"
]}]'
ワークフローを実行する
次に、インストールしたArgo Workflow上でテストワークフローを実行しましょう。
$ argo submit -n argo https://raw.githubusercontent.com/argoproj/argo-workflows/master/examples/hello-world.yaml
Name:                hello-world-6p5f7
Namespace:           argo
ServiceAccount:      unset (will run with the default ServiceAccount)
Status:              Pending
Created:             Mon May 08 13:14:57 +0900 (now)
Progress:
※ArgoProjのexampleのyamlファイルを利用します。
ワークフローの実行結果を確認する
最後に、ワークフローの実行結果を確認します。CLIで確認する方法とUIから確認する方法があるため、両方で実行します。
CLIで確認する
# 一覧を取得
$ argo list -n argo
NAME                STATUS      AGE   DURATION   PRIORITY   MESSAGE
hello-world-6p5f7   Succeeded   53s   10s        0

# 最新の実行結果を詳細に取得
$ argo get -n argo @latest

Name:                hello-world-6p5f7
Namespace:           argo
ServiceAccount:      unset (will run with the default ServiceAccount)
Status:              Succeeded
Conditions:
 PodRunning          False
 Completed           True
Created:             Mon May 08 13:14:57 +0900 (2 minutes ago)
Started:             Mon May 08 13:14:57 +0900 (2 minutes ago)
Finished:            Mon May 08 13:15:07 +0900 (2 minutes ago)
Duration:            10 seconds
Progress:            1/1
ResourcesDuration:   6s*(1 cpu),6s*(100Mi memory)

STEP                  TEMPLATE  PODNAME            DURATION  MESSAGE
 ✔ hello-world-6p5f7  whalesay  hello-world-6p5f7  7s

# タスクの実行ログを取得
$  argo logs -n argo @latest
hello-world-6p5f7:  _____________
hello-world-6p5f7: < hello world >
hello-world-6p5f7:  -------------
hello-world-6p5f7:     \
hello-world-6p5f7:      \
hello-world-6p5f7:       \
hello-world-6p5f7:                     ##        .
hello-world-6p5f7:               ## ## ##       ==
hello-world-6p5f7:            ## ## ## ##      ===
hello-world-6p5f7:        /""""""""""""""""___/ ===
hello-world-6p5f7:   ~~~ {~~ ~~~~ ~~~ ~~~~ ~~ ~ /  ===- ~~~
hello-world-6p5f7:        \______ o          __/
hello-world-6p5f7:         \    \        __/
hello-world-6p5f7:           \____\______/
hello-world-6p5f7: time="2023-05-08T04:15:04.280Z" level=info msg="sub-process exited" argo=true error="<nil>"
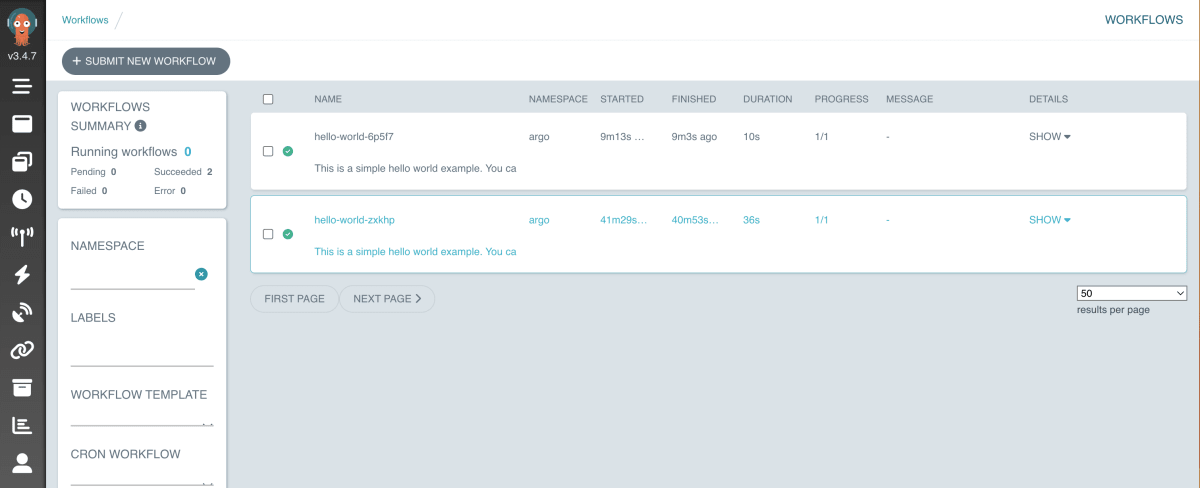
UIから確認する
# ポートフォワードを実行する
$ kubectl -n argo port-forward deployment/argo-server 2746:2746
上記でポートフォワードした管理画面に以下のURLでアクセスし、Workflowsのページにアクセスすると、今まで実行したワークフロー一覧が確認できます。
https://localhost:2746
まとめ
以上で、Argo Workflowのインストールと実行が完了しました。Kubernetesは既存のCronJobやJobでタスクを管理しようとするとめんどくさいことも多いので、今回紹介したArgo WorkflowやTektonでワークフロー管理をすることをおすすめします。
note
勉強法やキャリア構築法など、エンジニアに役立つ記事をnoteで配信しています。
Discussion