初学者でもできる!NPMのパッケージを作ってみよう!(TypeScript, npm, package)
はじめに
日々趣味やお仕事でnpm install ~やyarn add ~をする中、これらってどういう仕組みなんだろう🤔とふと思いました。
自分が不便に思っているもので何かパッケージにするようなものあるかなぁ~と考えたところ最近購入したSwitchBotが目に入り「そういやこれのRestAPIを簡易的に呼べるパッケージでも作ったら便利かな」と考え
switchbotSDK
こちらを制作しました!
これを制作した上で学習した事を書いていきます。
現在OSSとしてswitchbotSDKに公開していますのでコントリビュートや修正点の意見など募集しております!
注意書き
この記事では以下のことについては扱いません。
今回はTypeScriptを用いて実装しています。
プロジェクトを立ち上げる。
今回はyarnではなくnpmを利用していきます。
基本的に基本部分の作成を完成として進めていきます。
まず仕様をまとめておきます。
- パッケージを利用する際は
import { TestPackage } from 'TestPackage';のように呼び出して用いれるようなもの - 自動でNPM、GitHub Packagesに公開する
パッケージ名を考える
正直ここが一番難しいです。
パッケージ名なんて適当で良くない?と思われるかもしれませんが今回はNPMに公開する前提で考えていきますので実はそうもいきません、、
理由としましては、NPMに存在している既存の名前のものが使用できないからです。
それを踏まえて考える方法を書いていきます。
まず最初にNPMに登録します。
NPM
登録が終わりましたら次はターミナル上で追加します。
$ npm adduser
Username: NPMに登録したユーザネーム(小文字)
Password: NPMに登録したパスワード
Email: NPMに登録したメールアドレス

// 以下のように表示されれば成功です。
Logged in as finalstream on https://registry.npmjs.org/.
ここまで出来たらパッケージ名を考えます。
以下のコマンドを使用することで現在その名前のパッケージがあるかを確認することができます。
被りがなければエラーがでます。
$ npm info パッケージ名
NPMのページから検索で確認することもできますのでそちらも有効活用しましょう!
パッケージを作成する
決まったパッケージ名のフォルダを作成しましょう。
今回はhellopackageという名前で進めていきます。
フォルダ作成
$ mkdir hellopackage
// 作ったファイルに移動する
$ cd hellopackage
つぎにGithubでリポジトリを作成します。
パッケージ名と同じ名前のリポジトリを作成しましょう。
今回TypeScriptで作成していくのでTypeScriptを導入していきます。
$ npm install typescript
他にも開発しやすいようLint系も導入しましょう!
$ npm install --dev @types/jest @typescript-eslint/eslint-plugin @typescript-eslint/parser

$ npm install --dev eslint eslint-config-prettier eslint-plugin-jest eslint-plugin-prettier

$ npm install --dev jest prettier ts-jes ts-node
hellopackageの中にnode_modulesが出来ているのを確認します。
確認できましたら以下のコマンドでtsconfig.jsonを生成します。
$ .\node_modules\.bin\tsc --init
次にpackage.jsonを生成します。
$ npm init

package name	フォルダ名がデフォルトで入りますのでEnterを押します。
version	特に作っていたとかがなければ`0.0.1` や `0.1.0`を入れましょう。
description	パッケージの説明文を入力します。
entry point	`./dist/index.js` と入力してください。
test command	`test`と入力しましょう。
git repository	先ほど作成したGithubのリポジトリを入力します。
keywords	TypeScriptで作成するので `TypeScript`と入力しましょう。
license	ライセンスを指定します。特に決まりがなければ `MIT` と入力しましょう。
生成したファイルを編集する
生成した順通りにファイルを編集していきます。
めちゃくちゃに長いので変更した点を抜粋しています。
基本的にはここらへん有効化してればいいかなというところを外しているのでこのオプションが欲しい!などありましたら自由にコメントアウトを外してください。
{
    "compilerOptions": {
        /* Visit https://aka.ms/tsconfig.json to read more about this file */

        /* Projects */
        ~

        /* Language and Environment */
+       "target": "es2017" /* Set the JavaScript language version for emitted JavaScript and include compatible library declarations. */,
        ~

        /* Modules */
+        "module": "commonjs" /* Specify what module code is generated. */,
+        "rootDir": "./src" /* Specify the root folder within your source files. */,
        // "moduleResolution": "node",                       /* Specify how TypeScript looks up a file from a given module specifier. */
+        "baseUrl": "." /* Specify the base directory to resolve non-relative module names. */,
        ~

        /* JavaScript Support */
        ~
+        "outDir": "./dist" /* Specify an output folder for all emitted files. */,
        // "removeComments": true,                           /* Disable emitting comments. */
        ~

	/* Emit */
+        "declaration": true /* Generate .d.ts files from TypeScript and JavaScript files in your project. */,
        // "declarationMap": true,                           /* Create sourcemaps for d.ts files. */
        // "emitDeclarationOnly": true,                      /* Only output d.ts files and not JavaScript files. */
        // "sourceMap": true,                                /* Create source map files for emitted JavaScript files. */
        // "outFile": "./",                                  /* Specify a file that bundles all outputs into one JavaScript file. If `declaration` is true, also designates a file that bundles all .d.ts output. */
+        "outDir": "./dist" /* Specify an output folder for all emitted files. */,
        // "removeComments": true,                           /* Disable emitting comments. */
~
+        "newLine": "lf" /* Set the newline character for emitting files. */,
~

        /* Interop Constraints */
        // "isolatedModules": true,                          /* Ensure that each file can be safely transpiled without relying on other imports. */
        // "allowSyntheticDefaultImports": true,             /* Allow 'import x from y' when a module doesn't have a default export. */
+        "esModuleInterop": true /* Emit additional JavaScript to ease support for importing CommonJS modules. This enables `allowSyntheticDefaultImports` for type compatibility. */,
        // "preserveSymlinks": true,                         /* Disable resolving symlinks to their realpath. This correlates to the same flag in node. */
+        "forceConsistentCasingInFileNames": true /* Ensure that casing is correct in imports. */,

        /* Type Checking */
+        "strict": true /* Enable all strict type-checking options. */,
        ~

        /* Completeness */
        // "skipDefaultLibCheck": true,                      /* Skip type checking .d.ts files that are included with TypeScript. */
+        "skipLibCheck": true /* Skip type checking all .d.ts files. */
    }
}
次にpackage.jsonを編集していきます。
{
+    "name": "@全部小文字でgithubのID/hellopackage",
    "version": "0.0.1",
    "description": "パッケージの説明",
+    "author": "作者の名前",
    "license": "MIT",
    "main": "./dist/index.js",
+    "types": "./dist/index.d.ts",
    "repository": {
        "type": "git",
        "url": "git+https://github.com/githubのID/hellopackage.git"
    },
    "keywords": [
        "typescript"
    ],
    "bugs": {
        "url": "https://github.com/githubのID/hellopackage/issues"
    },
    "homepage": "https://github.com/githubのID/hellopackage#readme",
+    "publishConfig": {
+        "registry": "https://npm.pkg.github.com/"
+    },
    "scripts": {
+        "build": "tsc",
+        "tsc:type": "tsc --noEmit",
+        "prepublishOnly": "npm run build",
+        "lint": "eslint --ext .ts ./src/",
+        "format": "prettier --write \"./src/**/*.ts\"",
+        "test": "npm run tsc:type && npm run lint && npm run test:jest",
+        "test:jest": "jest"
    },
    "dependencies": {
        "typescript": "^4.5.4"
    },
    "devDependencies": {
        "@types/jest": "^27.0.1",
        "@typescript-eslint/eslint-plugin": "^4.28.2",
        "@typescript-eslint/parser": "^4.28.2",
        "eslint": "^7.30.0",
        "eslint-config-prettier": "^8.3.0",
        "eslint-plugin-jest": "^24.1.3",
        "eslint-plugin-prettier": "^3.4.0",
        "jest": "^27.0.6",
        "nock": "^13.2.1",
        "prettier": "^2.3.2",
        "ts-jest": "^27.0.3",
        "ts-node": "^10.0.0"
    }
}
Lintを整える
開発のしやすいようにLintの設定、テストの設定をします。
ファイルを作成し記述して中身を記述していきます。
module.exports = {
    parser: '@typescript-eslint/parser',
    parserOptions: {
        project: './tsconfig.eslint.json',
        sourceType: 'module',
    },
    plugins: ['@typescript-eslint/eslint-plugin'],
    extends: [
        'plugin:@typescript-eslint/recommended',
        'plugin:prettier/recommended',
    ],
    root: true,
    env: {
        node: true,
        jest: true,
    },
    ignorePatterns: ['.eslintrc.js'],
    rules: {
        '@typescript-eslint/interface-name-prefix': 'off',
        '@typescript-eslint/explicit-function-return-type': 'off',
        '@typescript-eslint/explicit-module-boundary-types': 'off',
        '@typescript-eslint/no-explicit-any': 'off',
    },
};
eslintrc.js
jest.config.js
{
    "endOfLine": "auto",
    "singleQuote": true,
    "semi": true,
    "trailingComma": "all",
    "tabWidth": 4
}
module.exports = {
    rootDir: './src',
    testMatch: ['**/test/**/*.+(ts)', '**/?(*.)+(spec|test).+(ts)'],
    transform: {
        '^.+\\.(ts|tsx)$': 'ts-jest',
    },
    collectCoverageFrom: ['**/*.(t|j)s'],
    coverageDirectory: '../coverage',
    testEnvironment: 'node',
};
/node_modules
/dist
.DS_Store
.env
{
    "extends": "./tsconfig.json",
    "include": ["./src/**/*.ts", "./src/test/**/*.ts"]
}
VSCodeで自動フォーマットを有効化する
自動フォーマットをしてくれると効率が倍になるので設定していきます。
.vscodeディレクトリを作成し、その中にsettings.jsonを作成します。
$ mkdir .vscode
cd .vscode
.vscode/$ touch settings.json
作成したら記述していきます。
{
    "editor.formatOnSave": true,
    "editor.formatOnPaste": true,
    "editor.formatOnType": true,
    "editor.defaultFormatter": "esbenp.prettier-vscode",
    "editor.codeActionsOnSave": {
        "source.fixAll.eslint": true
    }
}
NPMの設定を行う
現在の状態だとNPMに上げた際にソースコードや設定ファイルなど余計なものまで上がってしまいます。
.dist、package.jsonが上がっていれば問題なく動くのでそれ以外をignoreします。
.npmignoreを追加していきます。
.vscode
src
node_modules
tsconfig.json
tsconfig.eslint.json
.eslintrc.js
.eslintignore
.gitignore
.prettierrc
jest.config.js
開発を始める!
ここまでで開発環境のセッティングができました。
ここからはすごく簡単です。
まずsrcディレクトリを作成します。
$ mkdir src
$ cd src
テスト用にtestsディレクトリを作成します。
$ mkdir tests
エントリーポイントindex.tsを作成します。
$ touch index.ts
パッケージ内容を記載するhellopackage.tsを作成します。
$ touch hellopackage.ts
パッケージを作る
作成したhellopackage.tsに実装していきたいコードを書いていきます。
今回はコンストラクタに代入された文字をコンソールに出力するクラスを作っていきます。
export class HelloPackage {
    #_text: string;
    constructor(text: string) {
        this.#_text = text;
    }

    // 出力
    public print(): void {
        console.log(this.#_text);
    }

    // 反転出力
    public async reversePrint(): void {
        console.log(this.#_text.split("").reverse().join(""));
    }
}
エントリーポイントに登録する
export { HelloPackage } from './hellopackage';
なんとこれで終わりです!
NPM、GithubPackageに上げる
作成したパッケージは実は npm publish というコマンドで上げることができるのですがパッケージはメンテナンスしていく必要があります。
そのため今回はローカル環境で上げるのではなくGithubActionsを用いて上げるようにします。
トップディレクトリに.github、その中にworkflowsというディレクトリを作成します。
その中にCI/CD用のnpm_publish.yaml、publish.yamlファイルを作成します。
GithubActions用のディレクトリを作成します。
$ mkdir .github
$ cd .github
.github/$ mkdir workflows
CI/CDのためのymlファイルを作成します。
.github/workflows/$ touch npm_publish.yaml
.github/workflows/$ touch publish.yaml
作成したらそれぞれ中身を記述していきます。
NPMに公開する
name: npm_publish

env:
    CI: true

on:
    push:
        branches:
            - main
        tags:
            - '!*'

jobs:
    publish:
        name: Setup
        runs-on: ubuntu-latest
        steps:
            - name: checkout
              uses: actions/checkout@v2

            # Nodeのバージョンを指定
            - name: setup node
              uses: actions/setup-node@v1
              with:
                  node-version: 14.x
                  registry-url: https://registry.npmjs.org
                  scope: '@rimltempest'
              env:
                  NODE_AUTH_TOKEN: ${{ secrets.NPM_TOKEN }}

            - name: npm installを行う
              run: npm install

            - name: npm上のバージョンを確認する
              run: npx can-npm-publish --verbose
              env:
                  NODE_AUTH_TOKEN: ${{ secrets.NPM_GENERATE_TOKEN }}

            # トランスパイルを実行
            - name: build
              run: npm build

            # npmに公開する
            - name: publish
              run: npm publish --access=public
              env:
                  NODE_AUTH_TOKEN: ${{ secrets.NPM_GENERATE_TOKEN }}
Github Releaseに公開する
name: publish

env:
    CI: true

on:
    push:
        branches:
            - main
        tags:
            - '!*'

jobs:
    publish:
        name: Setup
        runs-on: ubuntu-latest
        steps:
            - name: checkout
              uses: actions/checkout@v2

            # Nodeのバージョンを指定
            - name: setup node
              uses: actions/setup-node@v1
              with:
                  node-version: 14.x
                  registry-url: https://npm.pkg.github.com

            - name: npm installを行う
              run: npm install

            - name: github release上のバージョンを確認する
              run: npx can-npm-publish --verbose
              env:
                  NODE_AUTH_TOKEN: ${{ secrets.GITHUB_TOKEN }}

            # トランスパイルを実行
            - name: build
              run: npm build

            # パッケージとして公開する
            - name: publish
              run: npm publish
              env:
                  NODE_AUTH_TOKEN: ${{ secrets.GITHUB_TOKEN }}

            # バージョン情報を環境変数として設定
            - name: set version to env
              run: node -p -e '`VERSION=${require("./package.json").version}`' >> $GITHUB_ENV

            # バージョン情報持つタグを付与する
            - name: add version tag
              uses: pkgdeps/git-tag-action@v2
              with:
                  version: ${{ env.VERSION }}
                  github_token: ${{ secrets.GITHUB_TOKEN }}
                  github_repo: ${{ github.repository }}
                  git_commit_sha: ${{ github.sha }}
                  git_tag_prefix: 'v'
ここまで出来たらNPMを開きます。
AccessTokensを開きます。
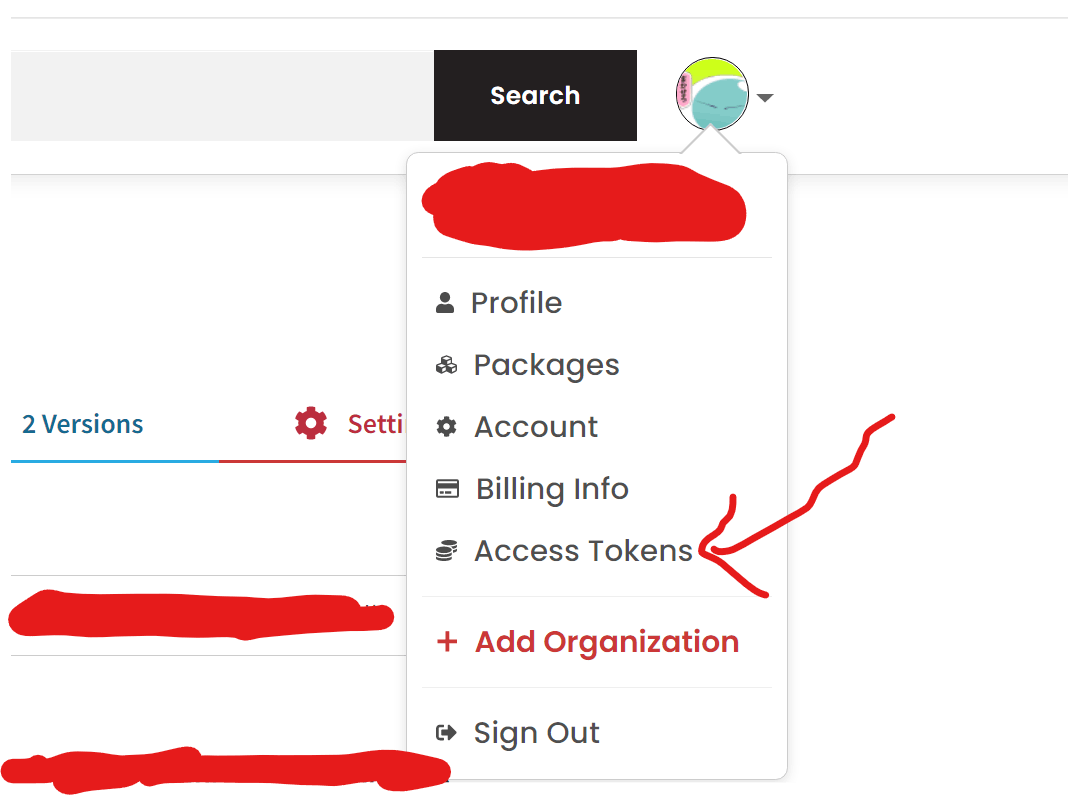
generateTokenを押し出てきたトークンをコピーします。

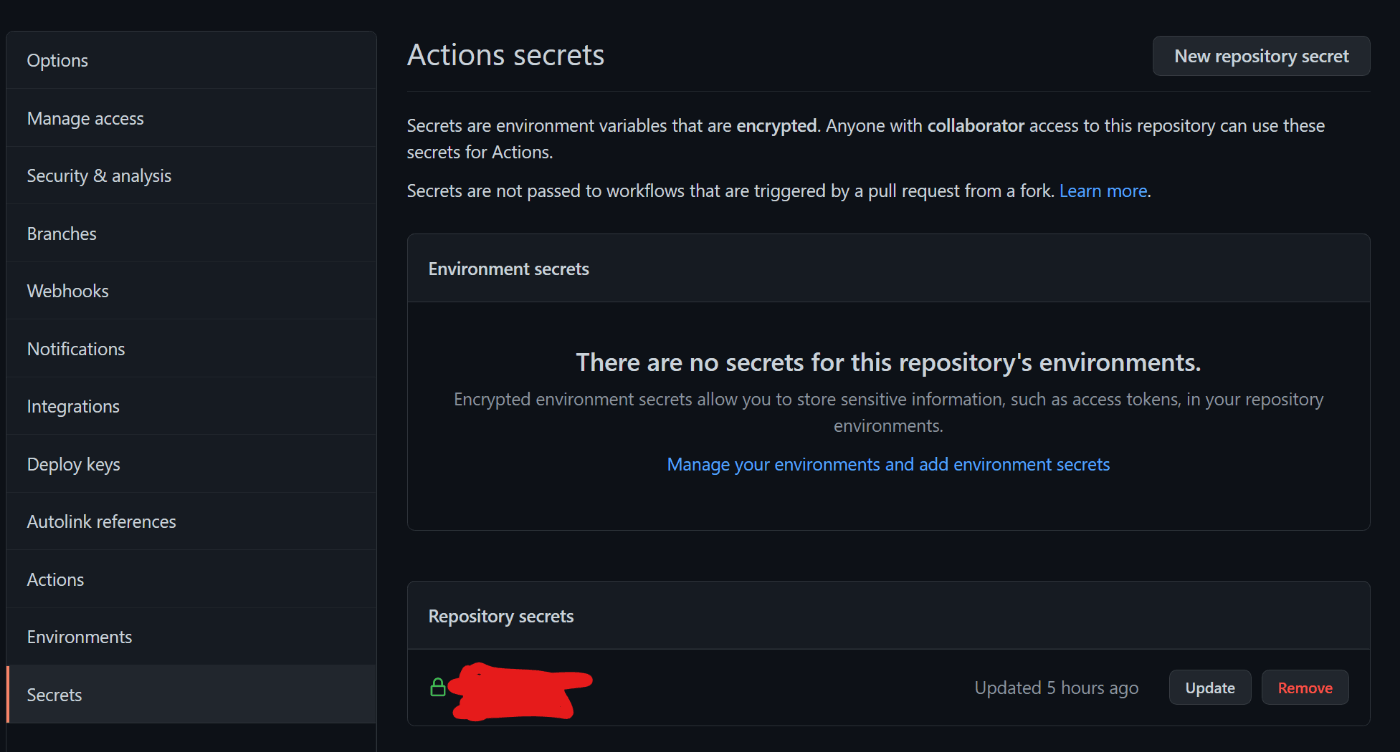
次にGithubを開きます。
作成したリポジトリに飛びます。
セッティングを押します。

右上のNewRepositorySecretを押します。
シークレットID、シークレットKeyの入力欄がでるのでIDはNPM_GENERATE_TOKENでKeyはNPMからコピーしてきたAccessTokenを貼りましょう。
保存すると画面下のようにシークレットIDが表示されるので間違いがないか確認します。
※ 一連の流れを確かめやすいようIDをNPM_GENERATE_TOKENとしていますが公開する用や本番環境などには誰にもわからないようなIDをつけましょう。
公開する
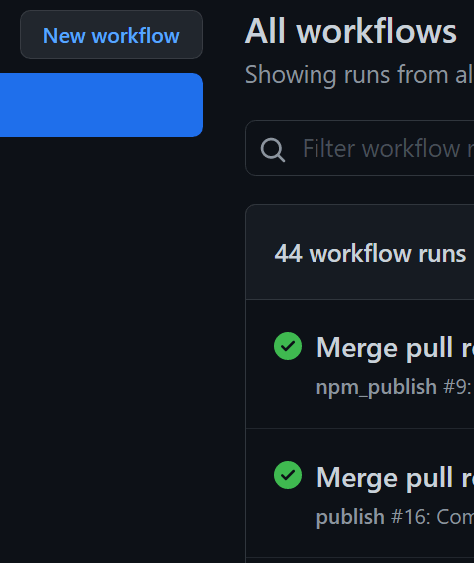
これらが終わったらmainブランチにpushしましょう。
このようにチェックマークがついていたら成功です!
このようにリリースのところにはNPMのロゴとパッケージ名が表示されます。

最後にNPMで@自分のgithubID/hellopackage で検索すると表示されます!
おわりに
お疲れさまでした。
長くなってしまいしたが参考になれば幸いです!
初学者の自分からするとパッケージがこんなに簡単に作成できることが知れてびっくりしました!
便利なパッケージを作成できるように日々勉強して力をつけていきたいです。
最後まで読んでいただきありがとうございました!
Discussion
誤字等を修正致しましたm(_ _)m
2022/01/09 19:48:00