Bun、Nuxt 3、Quasarでフロントの開発環境を構築
はじめに
新しくフロントエンド環境を構築する必要があったため、新規で環境構築するのでブログ化して手順を残しておこうと思います。
既存でVue3、Nuxt3でUIをQuasarで構築されたアプリケーションがあるので、
設定について困ったら参考にしつつ、起動するまでに至りました。
立ち上げに必要な要素に絞って解説していきたいと思います。
また、チャレンジ要素としてランタイムに非常に高速と言われているBunを使用してみました。
本記事ではパッケージマネージャとしての使い方が主になっています。
1. Bunのインストール
以下のコマンドでインストールします。
他にもnpmやbrewのコマンドや、dockerイメージも用意されています。
curl -fsSL https://bun.sh/install | bash
source ~/.bashrc
2. Nuxt 3プロジェクトの作成
bunやQuasarにもプロジェクト生成のコマンドはありますが、プロジェクト構成をNuxtベースにしたかったので、Nuxtでプロジェクトを作成します。
途中の選択でbunを選択します。
一応の前提としてNodejsがインストールされている必要がります。
npx nuxi init my-nuxt-app
✔ Which package manager would you like to use?
○ npm
○ pnpm
○ yarn
○ bun

※※※ bunを選択 ※※※

◐ Installing dependencies...
bun install v1.1.20 (ae194892)

$ nuxt prepare
✔ Types generated in .nuxt

+ nuxt@3.12.4
+ vue@3.4.34

610 packages installed [8.88s]
✔ Installation completed.

✔ Initialize git repository?
● Yes / ○ No

※※※ Yesを選択 ※※※
Yes

ℹ Initializing git repository...

hint: Using 'master' as the name for the initial branch. This default branch name
hint: is subject to change. To configure the initial branch name to use in all
hint: of your new repositories, which will suppress this warning, call:
hint:
hint:   git config --global init.defaultBranch <name>
hint:
hint: Names commonly chosen instead of 'master' are 'main', 'trunk' and
hint: 'development'. The just-created branch can be renamed via this command:
hint:
hint:   git branch -m <name>
Initialized empty Git repository in /path/to/app/my-nuxt-app/.git/

✨ Nuxt project has been created with the v3 template. Next steps:
 › cd my-nuxt-app
 › Start development server with bun run dev
bunだと下記のようにbun xもしくはbunxというコマンドで同様のインストールが可能です。
bun x nuxi init my-nuxt-app
3. 依存パッケージのインストール
プロジェクトに必要な依存関係はbun installでインストールします。
cd my-nuxt-app
bun install
bun run devコマンドで初期作成時のNuxtページが表示されます。
bun run --bun dev
--bunもしくは-bを指定する事でbunランタイムを使用して起動します。
指定しないとNode.jsで動作します。
yarn同様package.jsonのscriptsに記述することで、bun runコマンドとして実行可能です。
- プロジェクト生成時点のpackage.josn
{
  "name": "nuxt-app",
  "private": true,
  "type": "module",
  "scripts": {
    "build": "nuxt build",
    "dev": "nuxt dev",
    "generate": "nuxt generate",
    "preview": "nuxt preview",
    "postinstall": "nuxt prepare"
  },
  "dependencies": {
    "nuxt": "^3.12.4",
    "vue": "latest"
  }
}
scriptsを見てみるとNuxtのコマンドであることがわかります。
ちょっと速度計測
bunのスピードを体感したいので、この段階で、node_modulesを削除してインストールの時間を計測してみました。
PCの性能にもよると思いますので参考まで。
- npm:27秒(初回のみ60秒)
npm install
~~~ 中略 ~~~
added 643 packages, and audited 645 packages in 27s
- bun:5.0秒(初回のみ10秒)
bun install
~~~ 中略 ~~~
609 packages installed [7.59s]
それぞれ10回以上は実行してみた感じ、おおよそこの時間に集約しました。
実行の際には、node_modulesおよびnpmではpackage-lock.json、bunではbun.lockbファイルを削除してから実行しています。
初回としているのはメモリのキャッシュ的な関係なのか、少し時間を置くとインストールの時間が極端に遅くなります。
インストールされたパッケージの数が違うのが若干気になりますが、それぞれ起動はしました。
4. Quasarのインストール
Quasarは、Vue.jsベースのUIフレームワークです。
bun addコマンドでインストールします。
bun add quasar @quasar/extras

bun add v1.1.20 (ae194892)

$ nuxt prepare
✔ Types generated in .nuxt                                                                                                                           12:54:36

installed quasar@2.16.6
installed @quasar/extras@1.16.12

2 packages installed [1.65s]
5. アプリケーションのディレクトリ構造の設定
実装するコードはsrcというディレクトリを作ってその下に置くようにしました。
nuxt.config.tsのsrcDirで指定できます。
srcディレクトリ下に以下のファイルとディレクトリを移動します。
- public
- server
- app.vue
以降vueファイルやsassファイルはsrc下からのパスで表現します。
6. Quasarのスタイル設定
Quasarを使用するための設定を行います。
nuxt.config.tsの設定
まず、nuxt.config.tsにQuasarの設定を追加します。
import { defineNuxtConfig } from 'nuxt/config';
import { quasar } from '@quasar/vite-plugin';

export default defineNuxtConfig({
  compatibilityDate: '2024-07-28',
  devtools: { enabled: true },
  ssr: false,
  srcDir: 'src/',
  css: [
    '@quasar/extras/material-icons/material-icons.css',
    '@quasar/extras/material-icons-outlined/material-icons-outlined.css',
    '~/css/app.sass'
  ],
  build: {
    transpile: ['quasar']
  },
  vite: {
    plugins: [
      quasar({
        sassVariables: 'css/quasar.variables.sass'
      })
    ],
    css: {
      preprocessorOptions: {
        sass: {
          additionalData: '@import "@/css/quasar.variables.sass"\n'
        }
      }
    }
  }
});
参照しているsassファイルは後ほど出てきます。
Quasarプラグインの作成
次に、plugins/quasar.tsファイルを作成し、以下の内容を追加します。
import { Quasar, Dialog, Loading, Notify } from 'quasar';

export default defineNuxtPlugin((nuxtApp) => {
  nuxtApp.vueApp.use(Quasar, {
    plugins: {
        Dialog,
        Loading,
        Notify
    }
  });
});
必要に応じてpluginsにプラグインを追加できます。
ここではDialog、Loading、Notifyを追加しました。
7. レイアウト作成
app.vueとlayouts/default.vueファイルを設定して、Quasarベースのレイアウトを実装します。
app.vueの設定
<template>
  <NuxtLayout>
    <NuxtPage />
  </NuxtLayout>
</template>
レイアウトの作成
layouts/default.vueファイルを作成し、Nuxtページのデフォルトのレイアウトを実装します。
Quasarのレイアウトを実装します。
Quasarの公式にレイアウトのビルダーページがあるので、ヘッダーフッター、サイドバーのあるレスポンシブなレイアウトが簡単に実装できます。
<template>
  <q-layout view="hHh lpR fFf">
    <q-header elevated class="bg-primary text-white">
      <q-toolbar>
        <q-btn dense flat round icon="menu" @click="toggleLeftDrawer" />

        <q-toolbar-title>
          <q-avatar>
            <img src="https://cdn.quasar.dev/logo-v2/svg/logo-mono-white.svg" />
          </q-avatar>
          Title
        </q-toolbar-title>
      </q-toolbar>
    </q-header>

    <q-drawer show-if-above v-model="leftDrawerOpen" side="left" bordered>
      <!-- drawer content -->
    </q-drawer>

    <q-page-container>
      <router-view />
    </q-page-container>
  </q-layout>
</template>

<script>
import { ref } from 'vue';

export default {
  setup() {
    const leftDrawerOpen = ref(false);

    return {
      leftDrawerOpen,
      toggleLeftDrawer() {
        leftDrawerOpen.value = !leftDrawerOpen.value;
      }
    };
  }
};
</script>
css/app.sass
@import './quasar.variables.sass'
@import 'quasar/src/css/index.sass' // node_modules内のquasarから
css/quasar.variable.sass
Quasarでプロジェクトを作成した際のデフォルトの色設定を持ってきました。
後々で色をカスタマイズできます。
$primary   : #1976D2
$secondary : #26A69A
$accent    : #9C27B0

$dark      : #1D1D1D
$dark-page : #121212

$positive  : #21BA45
$negative  : #C10015
$info      : #31CCEC
$warning   : #F2C037
8. 個別ページ作成
Nuxtの構成にしたがってpagesディレクトリ下に作成していきます。
とりあえずトップページだけ作ります。
pages/index.vue
ルーティングはNuxt準拠しているので、pages下に実装していきます。
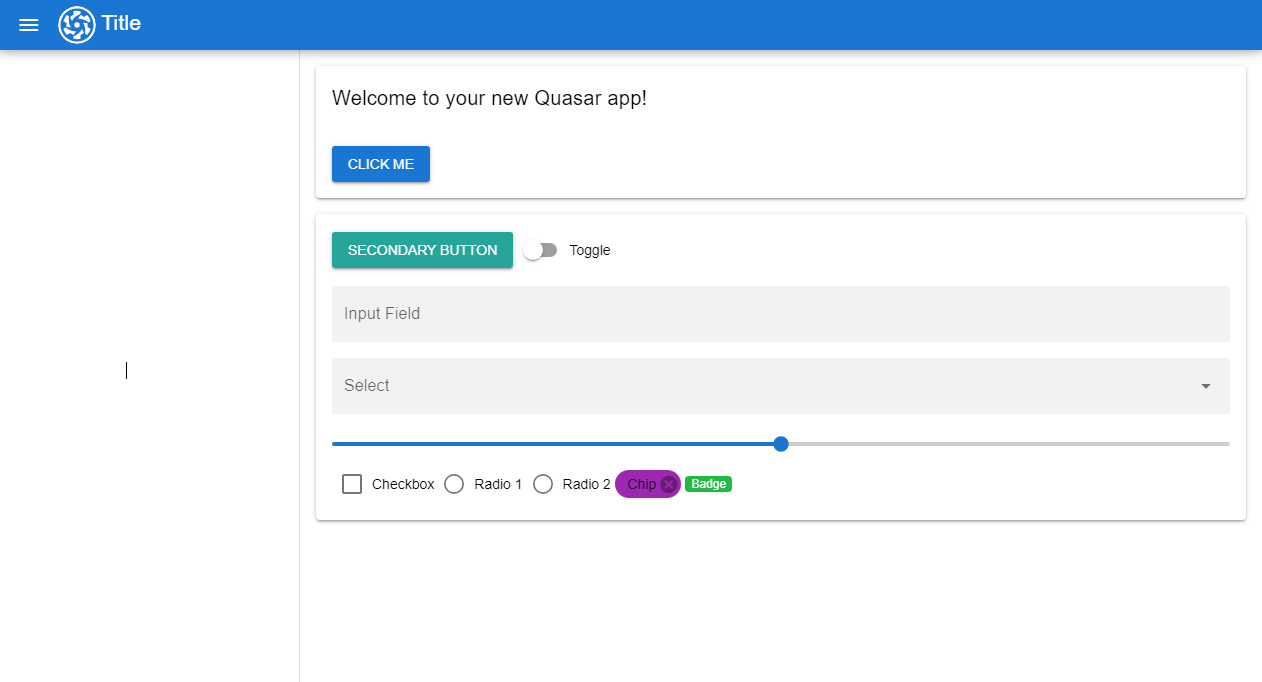
中身はQuasarのコンポーネントを適当に組み込んでいます。
<script setup lang="ts">
  import { ref } from 'vue';

  const toggleValue = ref(false);
  const inputValue = ref('');
  const selectedOption = ref(null);
  const sliderValue = ref(50);
  const checkboxValue = ref(false);
  const radioValue = ref(null);
</script>

<template>
  <q-card class="q-ma-md">
    <q-card-section class="text-h6">Welcome to your new Quasar app!</q-card-section>
    <q-card-section>
      <q-btn color="primary" label="Click me" />
    </q-card-section>
  </q-card>

  <q-card class="q-ma-md">
    <q-card-section>
      <q-btn color="secondary" label="Secondary Button" class="q-mb-md" />
      <q-toggle v-model="toggleValue" label="Toggle" class="q-mb-md" />
      <q-input filled v-model="inputValue" label="Input Field" class="q-mb-md" />
      <q-select
        filled
        v-model="selectedOption"
        :options="[{ label: 'Option 1', value: 1 }, { label: 'Option 2', value: 2 }]"
        label="Select"
        class="q-mb-md"
      />
      <q-slider v-model="sliderValue" label="Slider" />
      <q-checkbox v-model="checkboxValue" label="Checkbox" />
      <q-radio v-model="radioValue" val="1" label="Radio 1" />
      <q-radio v-model="radioValue" val="2" label="Radio 2" />
      <q-chip removable color="accent">Chip</q-chip>
      <q-badge color="positive" label="Badge" />
    </q-card-section>
  </q-card>
</template>
9. 動作確認
bun run devで起動します。
bun run dev -b

$ nuxt dev
Nuxt 3.13.2 with Nitro 2.9.7

  ➜ Local:    http://localhost:3000/
  ➜ Network:  use --host to expose

  ➜ DevTools: press Shift + Alt + D in the browser (v1.5.2)

✔ Vite client built in 85ms
Deprecation Warning: The legacy JS API is deprecated and will be removed in Dart Sass 2.0.0.

More info: https://sass-lang.com/d/legacy-js-api
✔ Vite server built in 500ms
✔ Nuxt Nitro server built in 2099 ms
ℹ Vite client warmed up in 922ms

無事起動できました!
起動までの時間は8秒程度で、-bを付けてbunで起動した時間の差は1秒未満と誤差程度でした。
速度計測2
この状態でパッケージのインストールにかかる時間の計測をしてみました。
- npm:38秒(初回のみ120秒)
-
bun:5.8秒(初回のみ9.2秒)
差が広がっていっています。
アプリの規模が大きくなるにつれて差が
10. プロジェクトのビルド
プロジェクトをビルド
bun run generate
bun run -b generate // bunを使用
ビルドについてはbunを使用した場合の方が1秒ほど遅い傾向がありました。
devと大差なく、いずれも7~8秒程度。
ディレクトリ構造
プロジェクトのディレクトリ構造は以下のようになります。
├── node_module
├── src
│   ├── app.vue
│   ├── css
│   ├── components
│   ├── composables
│   ├── layouts
│   ├── pages
│   ├── plugins
│   ├── public
│   └── server
├── .gitignore
├── bun.lockb
├── nuxt.config.ts
├── package.json
├── README.md
└── tsconfig.json
package.json
一通り実装できた最終系のpackage.jsonです。
{
  "name": "nuxt-app",
  "private": true,
  "type": "module",
  "scripts": {
    "build": "nuxt build",
    "dev": "nuxt dev",
    "devo": "bun run -b dev",
    "generate": "nuxt generate",
    "preview": "nuxt preview",
    "postinstall": "nuxt prepare"
  },
  "dependencies": {
    "@openapitools/openapi-generator-cli": "^2.13.4",
    "@quasar/extras": "^1.16.12",
    "@quasar/vite-plugin": "^1.7.0",
    "nuxt": "^3.12.4",
    "quasar": "^2.16.6",
    "vue": "latest"
  },
  "devDependencies": {
    "sass": "^1.77.8",
    "typescript": "^5.5.4"
  }
}
まとめ
NuxtとQuasarを統合して、bunでアプリを起動することができました。
Quasarのスタイルを読み込ませるのにてこずりました。
パッケージ管理としてのbunは速度が目に見えて速いのでかなり良いと思いました。
一方でビルドについてはそれほど差がないこともわかりました。
今回の構成で作成したプロジェクトのリポジトリです。
デプロイ時の課題
本記事執筆次点では未解決のため詳細は割愛しますが、
AWS Amplyfyを用いたデプロイにおいて、標準のビルド環境にはbunが入っていないため、ビルド中にbunをインストールする必要があります。
また、Amplifyのビルドにおいてbun installが失敗します。
一旦npm installで代用していますが、デプロイ時にもbunが使えるようであれば、
インストールの時間を差し引いてもデプロイ時間の短縮が見込めますので実現したいです。
コマンドだけで何ともならない場合は、カスタムビルドイメージを作成して対応することになりそうです。
AWS Amplifyのエラー内容
esbuildのバージョンが良くない風なエラーですが、これのためにpackage.jsonにesbuildを追加したくない気持ち。。
/path/node_modules/@nuxt/vite-builder/node_modules/vite/node_modules/esbuild/install.js:133
throw new Error(`Expected ${JSON.stringify(versionFromPackageJSON)} but got ${JSON.stringify(stdout)}`);
^
Error: Expected "0.21.5" but got "0.23.1"
at validateBinaryVersion (/path/node_modules/@nuxt/vite-builder/node_modules/vite/node_modules/esbuild/install.js:133:11)
at /path/node_modules/@nuxt/vite-builder/node_modules/vite/node_modules/esbuild/install.js:283:5
参考資料
bun+nuxt Quasarレイアウトビルダー
Discussion