🦓
[Laravel]AWS EC2へデプロイする
はじめに
Laravelで作成したアプリをAWS EC2へデプロイしていきます。
環境
PHP 8.x
Laravel 10.x
MySQL 8.x
Nginx
tl;dr
AWSルートアカウントを作成した上で進めていきます。
- EC2インスタンスを作成する
- SSHキーペアを作成する
- インストール
- nginx
- php
- composer
- node
- mysql
- DBを作成する
- gitリポジトリをcloneする
- 環境変数を設定する
- パッケージをインストールする
- APP_KEYを生成する
- DBをマイグレーションする
- フロントをビルドする
- nginxを設定する
EC2インスタンスを作成する
右上のリージョンを「東京」にします。
AWSコンソールからEC2を検索し、EC2のダッシュボードに入ります。
「インスタンスを起動」をクリックします。
名前:アプリ名
マシンイメージ:

インスタンスタイプ:t2.micro
キーペア:キーペアを作成をクリックし、名前を入力したら「キーペアを作成」をクリックし、.pemのファイルをダウンロードされます。
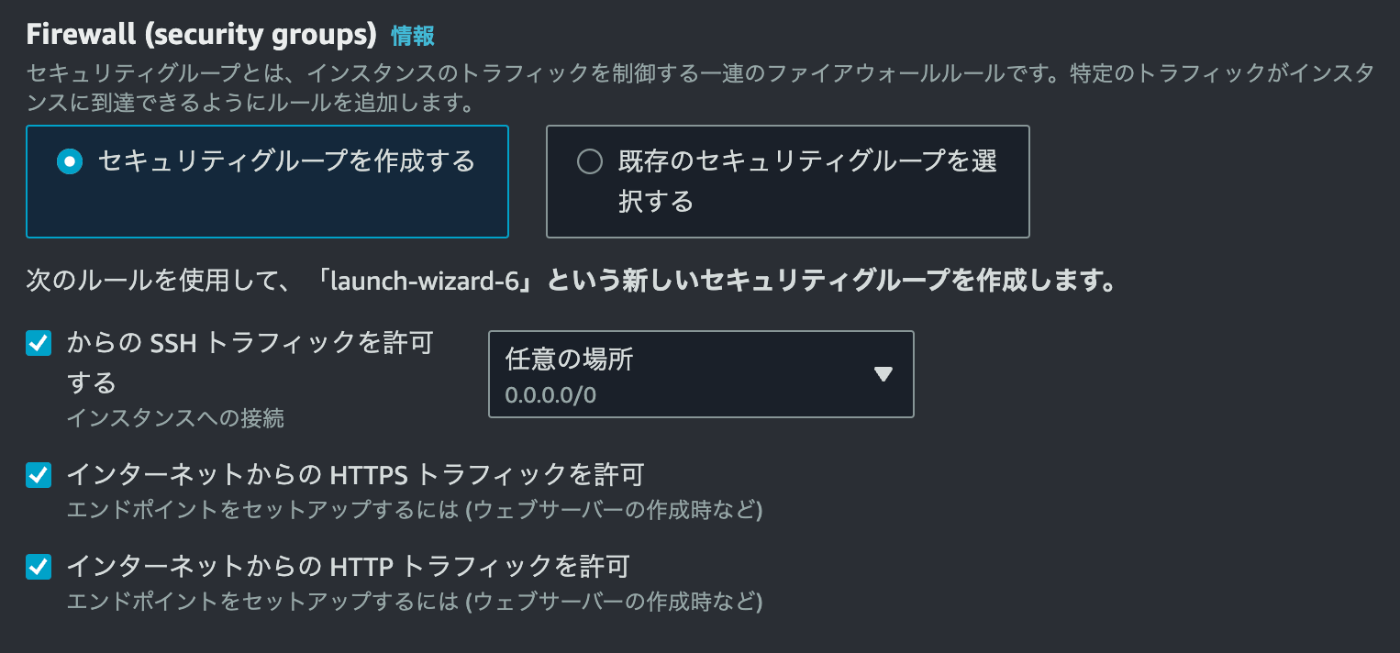
ネットワーク設定:
ストレージ設定:デフォルトのまま
「インスタンスを起動」をクリックします。
SSHキーペアを作成する
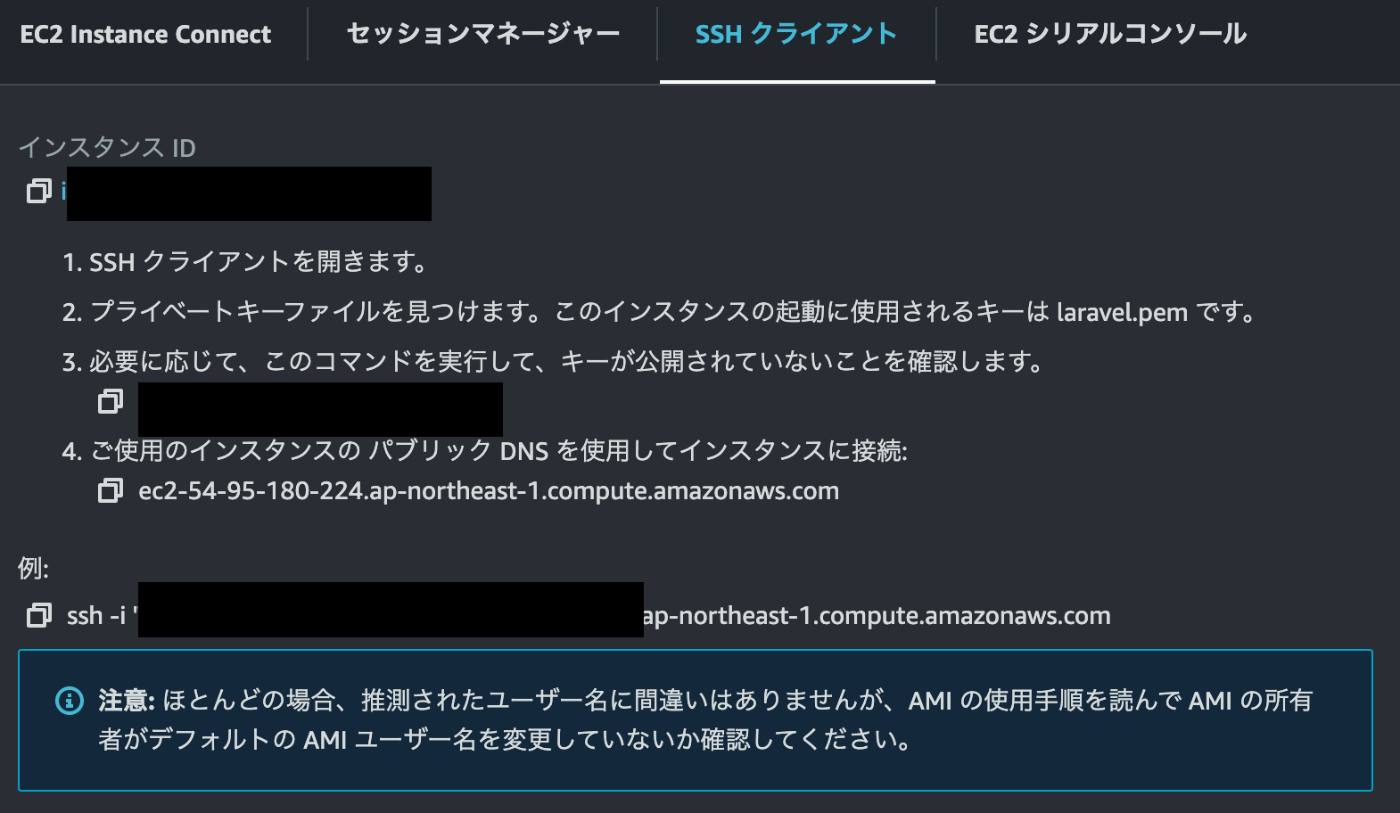
インスタンスを作成されましたら、右上の「接続」をクリックします。
「SSHクライエント」をクリックします。
手順通りに進めます。
PCのコマンドに移動します。
// ファイルを.sshにコピーする
➜  ~ mv laravel.pem ~/.ssh
// 権限を設定する
➜  .ssh chmod 400 laravel.pem
// EC2に入る
➜  .ssh ssh -i "laravel.pem" ec2-user@ec2-5*******.ap-northeast-1.compute.amazonaws.com
The authenticity of host 'ec2-5******.ap-northeast-1.compute.amazonaws.com (**.**.***)' can't be established.
ED25519 key fingerprint is SHA256:Rb/*****.
This key is not known by any other names.
Are you sure you want to continue connecting (yes/no/[fingerprint])? yes
Warning: Permanently added 'ec2-5******.ap-northeast-1.compute.amazonaws.com' (ED25519) to the list of known hosts.
   ,     #_
   ~\_  ####_        Amazon Linux 2
  ~~  \_#####\
  ~~     \###|       AL2 End of Life is 2025-06-30.
  ~~       \#/ ___
   ~~       V~' '->
    ~~~         /    A newer version of Amazon Linux is available!
      ~~._.   _/
         _/ _/       Amazon Linux 2023, GA and supported until 2028-03-15.
       _/m/'           https://aws.amazon.com/linux/amazon-linux-2023/
パッケージをアップデートします。
[ec2-user@ip-****** ~]$sudo yum update
nginxをインストールする
[ec2-user@ip-****** ~]$ sudo amazon-linux-extras install nginx1
...
// スタートする
[ec2-user@ip-****** ~]$ sudo systemctl start nginx
[ec2-user@ip-****** ~]$ sudo systemctl status nginx
● nginx.service - The nginx HTTP and reverse proxy server
   Loaded: loaded (/usr/lib/systemd/system/nginx.service; disabled; vendor preset: disabled)
   Active: active (running) since Fri 2023-10-20 13:13:28 UTC; 5s ago
  Process: 6598 ExecStart=/usr/sbin/nginx (code=exited, status=0/SUCCESS)
  Process: 6594 ExecStartPre=/usr/sbin/nginx -t (code=exited, status=0/SUCCESS)
  Process: 6593 ExecStartPre=/usr/bin/rm -f /run/nginx.pid (code=exited, status=0/SUCCESS)
 Main PID: 6600 (nginx)
   CGroup: /system.slice/nginx.service
           ├─6600 nginx: master process /usr/sbin/nginx
           └─6601 nginx: worker process

// インスタンス起動時に自動起動するように設定
[ec2-user@ip-****** ~]$ sudo systemctl enable nginx
Created symlink from /etc/systemd/system/multi-user.target.wants/nginx.service to /usr/lib/systemd/system/nginx.service.
php8.1をインストールする
[ec2-user@ip-****** ~]$ sudo amazon-linux-extras install php8.1
...
// アプリに合わせて必要なパッケージをインストールする
[ec2-user@ip-****** ~]$ sudo yum install php-ctype php-curl php-dom php-fileinfo php-filter php-hash php-mbstring php-opcache php-pdo php-session php-tokenizer php-xml
// php-fpmを起動する
[ec2-user@ip-****** ~]$ sudo systemctl start php-fpm.service
[ec2-user@ip-****** ~]$ sudo systemctl enable php-fpm
Created symlink from /etc/systemd/system/multi-user.target.wants/php-fpm.service to /usr/lib/systemd/system/php-fpm.service.
[ec2-user@ip-172-31-0-59 ~]$ sudo systemctl status php-fpm
● php-fpm.service - The PHP FastCGI Process Manager
   Loaded: loaded (/usr/lib/systemd/system/php-fpm.service; enabled; vendor preset: disabled)
   Active: active (running) since Fri 2023-10-20 13:26:28 UTC; 16s ago
 Main PID: 8694 (php-fpm)
   Status: "Processes active: 0, idle: 5, Requests: 0, slow: 0, Traffic: 0req/sec"
   CGroup: /system.slice/php-fpm.service
           ├─8694 php-fpm: master process (/etc/php-fpm.conf)
           ├─8695 php-fpm: pool www
           ├─8696 php-fpm: pool www
           ├─8697 php-fpm: pool www
           ├─8698 php-fpm: pool www
           └─8699 php-fpm: pool www
...
// インスタンス起動時に自動起動するように設定
[ec2-user@ip-****** ~]$ sudo systemctl enable php-fpm
composerをインストールする
公式にあるコマンドをコピーします。
php -r "copy('https://getcomposer.org/installer', 'composer-setup.php');"
php -r "if (hash_file('sha384', 'composer-setup.php') === 'e21205b207c3ff031906575712edab6f13eb0b361f2085f1f1237b7126d785e826a450292b6cfd1d64d92e6563bbde02') { echo 'Installer verified'; } else { echo 'Installer corrupt'; unlink('composer-setup.php'); } echo PHP_EOL;"
php composer-setup.php
php -r "unlink('composer-setup.php');"
[ec2-user@ip-****** ~]$ php -r "if (hash_file('sha384', 'composer-setup.php') === 'e21205b207c3ff031906575712edab6f13eb0b361f2085f1f1237b7126d785e826a450292b6cfd1d64d92e6563bbde02') { echo 'Installer verified'; } else { echo 'Installer corrupt'; unlink('composer-setup.php'); } echo PHP_EOL;"
Installer verified
[ec2-user@ip-****** ~]$ php composer-setup.php
All settings correct for using Composer
Downloading...

Composer (version 2.6.5) successfully installed to: /home/ec2-user/composer.phar
Use it: php composer.phar

[ec2-user@ip-****** ~]$ php -r "unlink('composer-setup.php');"
// パスを通す
[ec2-user@ip-****** ~]$ sudo mv composer.phar /usr/local/bin/composer
[ec2-user@ip-****** ~]$ composer --version
Composer version 2.6.5 2023-10-06 10:11:52
nodeをインストールする
// nvmをインストールする
[ec2-user@ip-****** ~]$ curl https://raw.githubusercontent.com/creationix/nvm/master/install.sh | bash
  % Total    % Received % Xferd  Average Speed   Time    Time     Time  Current
                                 Dload  Upload   Total   Spent    Left  Speed
100 15916  100 15916    0     0  63236      0 --:--:-- --:--:-- --:--:-- 63410
=> Downloading nvm from git to '/home/ec2-user/.nvm'
=> Cloning into '/home/ec2-user/.nvm'...
remote: Enumerating objects: 360, done.
remote: Counting objects: 100% (360/360), done.
remote: Compressing objects: 100% (306/306), done.
remote: Total 360 (delta 41), reused 167 (delta 28), pack-reused 0
Receiving objects: 100% (360/360), 220.29 KiB | 11.01 MiB/s, done.
Resolving deltas: 100% (41/41), done.

// パスを通す
[ec2-user@ip-****** ~]$ source ~/.bashrc
// nodeをインストールする
[ec2-user@ip-****** ~]$ nvm install node
Downloading and installing node v21.0.0...
Downloading https://nodejs.org/dist/v21.0.0/node-v21.0.0-linux-x64.tar.xz...
######################################################################### 100.0%
Computing checksum with sha256sum
Checksums matched!
manpath: can't set the locale; make sure $LC_* and $LANG are correct
Now using node v21.0.0
Creating default alias: default -> node (-> v21.0.0)
MySQLをインストールする
まずはデフォルトで入っているMariaDBをアンインストールします。
MariaDBをアンインストールする
[ec2-user@ip-****** ~]$ sudo yum list installed | grep mariadb
Failed to set locale, defaulting to C
mariadb-libs.x86_64                   1:5.5.68-1.amzn2.0.1           installed
[ec2-user@ip-****** ~]$ sudo yum remove mariadb-libs
Failed to set locale, defaulting to C
Loaded plugins: extras_suggestions, langpacks, priorities, update-motd
Resolving Dependencies
--> Running transaction check
---> Package mariadb-libs.x86_64 1:5.5.68-1.amzn2.0.1 will be erased
--> Processing Dependency: libmysqlclient.so.18()(64bit) for package: 2:postfix-2.10.1-6.amzn2.0.3.x86_64
--> Processing Dependency: libmysqlclient.so.18(libmysqlclient_18)(64bit) for package: 2:postfix-2.10.1-6.amzn2.0.3.x86_64
--> Running transaction check
---> Package postfix.x86_64 2:2.10.1-6.amzn2.0.3 will be erased
--> Finished Dependency Resolution
...
MySQLをインストールする
// mysqlリポジトリをダウンロードする
[ec2-user@ip-****** ~]$ sudo yum localinstall https://dev.mysql.com/get/mysql80-community-release-el7-3.noarch.rpm -y
// GPG鍵を更新する
[ec2-user@ip-****** ~]$ sudo rpm --import https://repo.mysql.com/RPM-GPG-KEY-mysql-2022
// mysqlをインストールする
[ec2-user@ip-****** ~]$ sudo yum install mysql-community-server
// 起動する
[ec2-user@ip-****** ~]$ sudo systemctl start mysqld.service
[ec2-user@ip-****** ~]$ sudo systemctl status mysqld.service
● mysqld.service - MySQL Server
   Loaded: loaded (/usr/lib/systemd/system/mysqld.service; enabled; vendor preset: disabled)
   Active: active (running) since Fri 2023-10-20 13:16:06 UTC; 5s ago
     Docs: man:mysqld(8)
           http://dev.mysql.com/doc/refman/en/using-systemd.html
  Process: 6847 ExecStartPre=/usr/bin/mysqld_pre_systemd (code=exited, status=0/SUCCESS)
 Main PID: 6918 (mysqld)
   Status: "Server is operational"
   CGroup: /system.slice/mysqld.service
           └─6918 /usr/sbin/mysqld
...
// インスタンス起動時に自動起動するように設定
[ec2-user@ip-****** ~]$ sudo systemctl enable mysqld.service
DBを作成する
テストデプロイのため、EC2内にDBを作成することにしました。
// rootユーザーのPWを取得する
[ec2-user@ip-****** ~]$ sudo cat /var/log/mysqld.log | grep -e 'A temporary password is generated for root@localhost'
2023-10-20T13:16:02.048585Z 6 [Note] [MY-010454] [Server] A temporary password is generated for root@localhost: ******
[ec2-user@ip-****** ~]$ mysql_secure_installation

Securing the MySQL server deployment.

Enter password for user root: // 取得したPWを入力する
[ec2-user@ip-****** ~]$ mysql_secure_installation

Securing the MySQL server deployment.

Enter password for user root:

The existing password for the user account root has expired. Please set a new password.

New password:

Re-enter new password:
The 'validate_password' component is installed on the server.
The subsequent steps will run with the existing configuration
of the component.
Using existing password for root.

Estimated strength of the password: 100
Change the password for root ? ((Press y|Y for Yes, any other key for No) : Y

New password:

Re-enter new password:

Estimated strength of the password: 100
// 対話形式でDB設定する
Do you wish to continue with the password provided?(Press y|Y for Yes, any other key for No) : Y
By default, a MySQL installation has an anonymous user,
allowing anyone to log into MySQL without having to have
a user account created for them. This is intended only for
testing, and to make the installation go a bit smoother.
You should remove them before moving into a production
environment.

Remove anonymous users? (Press y|Y for Yes, any other key for No) : Y
Success.


Normally, root should only be allowed to connect from
'localhost'. This ensures that someone cannot guess at
the root password from the network.

Disallow root login remotely? (Press y|Y for Yes, any other key for No) : Y
Success.

By default, MySQL comes with a database named 'test' that
anyone can access. This is also intended only for testing,
and should be removed before moving into a production
environment.


Remove test database and access to it? (Press y|Y for Yes, any other key for No) : Y
 - Dropping test database...
Success.

 - Removing privileges on test database...
Success.

Reloading the privilege tables will ensure that all changes
made so far will take effect immediately.

Reload privilege tables now? (Press y|Y for Yes, any other key for No) : Y
Success.

All done!
// DBに入る
[ec2-user@ip-****** ~]$ mysql -u root -p
Enter password:
Welcome to the MySQL monitor.  Commands end with ; or \g.
Your MySQL connection id is 14
Server version: 8.0.34 MySQL Community Server - GPL

Copyright (c) 2000, 2023, Oracle and/or its affiliates.

Oracle is a registered trademark of Oracle Corporation and/or its
affiliates. Other names may be trademarks of their respective
owners.

Type 'help;' or '\h' for help. Type '\c' to clear the current input statement.

// DBを作成する
mysql> create database laravel;
Query OK, 1 row affected (0.01 sec)

// 作成されたことを確認する
mysql> show databases;
+--------------------+
| Database           |
+--------------------+
| information_schema |
| laravel            |
| mysql              |
| performance_schema |
| sys                |
+--------------------+
5 rows in set (0.02 sec)

mysql> exit
Bye
gitリポジトリをcloneする
github用sshキーペアを作成し、github上に登録します。
[ec2-user@ip-****** ~]$ ssh-keygen -t rsa
Generating public/private rsa key pair.
Enter file in which to save the key (/home/ec2-user/.ssh/id_rsa):
Enter passphrase (empty for no passphrase):
Enter same passphrase again:
Your identification has been saved in /home/ec2-user/.ssh/id_rsa.
Your public key has been saved in /home/ec2-user/.ssh/id_rsa.pub.
The key fingerprint is:
....
[ec2-user@ip-****** ~]$ cd .ssh
[ec2-user@ip-****** .ssh]$ cat id_rsa.pub
ssh-rsa ******
// 表示されたキーをgithubに追加する

[ec2-user@ip-****** ~]$ ssh -T git@github.com
Hi ******! You've successfully authenticated, but GitHub does not provide shell access.
リポジトリをcloneします。
// ディレクトリを作成する
[ec2-user@ip-****** ~]$ mkdir /var/www
[ec2-user@ip-****** ~]$ cd /var/www
// パッミーションを設定する
[ec2-user@ip-****** www]$ sudo chown ec2-user:nginx /var/www
[ec2-user@ip-****** www]$ sudo chmod 2775 /var/www
[ec2-user@ip-****** www]$ sudo usermod -a -G nginx ec2-user
// cloneする
[ec2-user@ip-****** www]$ git clone git@github.com:******
Cloning into '******'...
環境変数を設定する
// .env.exampleをコピーする
[ec2-user@****** laravel]$ cp .env.example .env
[ec2-user@****** laravel]$ sudo vi .env
// DB名、ユーザー名、パスワードを入力する
パッケージをインストールする
[ec2-user@ip-****** laravel]$ composer install --optimize-autoloader --no-dev
Installing dependencies from lock file
Verifying lock file contents can be installed on current platform.
Package operations: 77 installs, 0 updates, 0 removals
...
APP_KEYを生成する
[ec2-user@ip-****** laravel]$ php artisan key:generate

   INFO  Application key set successfully.
DBをマイグレーションする
[ec2-user@ip-****** laravel]$ php artisan migrate

   INFO  Preparing database.

  Creating migration table ......................................... 51ms DONE

   INFO  Running migrations.

  2014_10_12_000000_create_users_table ............................. 50ms DONE
  2014_10_12_100000_create_password_reset_tokens_table ............. 60ms DONE
  2019_08_19_000000_create_failed_jobs_table ....................... 44ms DONE
  2019_12_14_000001_create_personal_access_tokens_table ............ 62ms DONE
....
フロントをビルドする
[ec2-user@ip-****** laravel]$ npm install
...

[ec2-user@ip-****** laravel]$ npm run build

> @ build /var/www/laravel
> vite build

vite v4.4.11 building for production...
✓ 51 modules transformed.
public/build/manifest.json              0.26 kB │ gzip:  0.13 kB
public/build/assets/app-96078871.css   45.49 kB │ gzip:  8.73 kB
public/build/assets/app-cf14b97d.js   131.24 kB │ gzip: 44.32 kB
✓ built in 3.89s
nginxを設定する
[ec2-user@ip-****** laravel]$ sudo vi /etc/nginx/nginx.conf
ドキュメントにあるものを使います。
etc/nginx/nginx.conf
server {
    listen 80;
    listen [::]:80;
    server_name example.com;
    root /var/www/アプリ名/public;

    add_header X-Frame-Options "SAMEORIGIN";
    add_header X-Content-Type-Options "nosniff";

    index index.php;

    charset utf-8;

    location / {
        try_files $uri $uri/ /index.php?$query_string;
    }

    location = /favicon.ico { access_log off; log_not_found off; }
    location = /robots.txt  { access_log off; log_not_found off; }

    error_page 404 /index.php;

    location ~ \.php$ {
        fastcgi_pass unix:/var/run/php/php8.1-fpm.sock;
        fastcgi_param SCRIPT_FILENAME $realpath_root$fastcgi_script_name;
        include fastcgi_params;
    }

    location ~ /\.(?!well-known).* {
        deny all;
    }
}
// 設定をチェックする
[ec2-user@ip-****** laravel]$ sudo nginx -t
nginx: the configuration file /etc/nginx/nginx.conf syntax is ok
nginx: configuration file /etc/nginx/nginx.conf test is successful
// nginxを再起動する
[ec2-user@ip-****** laravel]$ sudo systemctl restart nginx
終わりに
LaravelアプリをEC2へディプロイしてみました!
SSLの設定をしていないので、「http://******」 からパブリックIPアドレスでアクセスしてみてください。
Elastic IPアドレスを設定しても良いです。
Discussion