Python (.py) をJupyterのセルっぽく実行する +α
前置き (飛ばしてOK)
VSCodeでは、Jupyter拡張機能を入れることで、Jupyter Notebookを実行することができます。
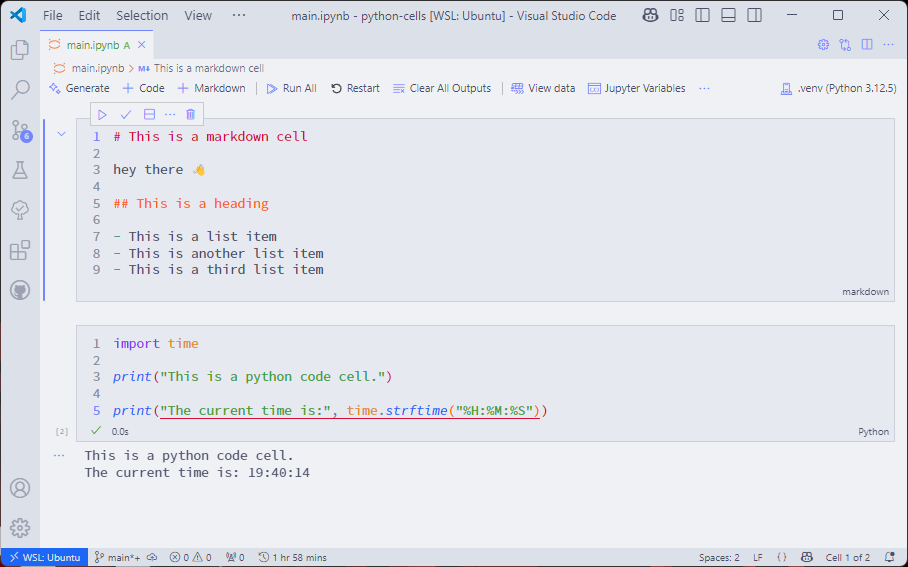
Jupyter Notebookは.ipynbという拡張子で保存されますが、中身を見るとJSONで保存されています。
実行ごとに増えるexecution_countや、環境固有のkernelspecなども情報として含まれており、Git管理とは相性が悪い部分があります(そう思ったことがある人は少なくないはず!)。
Jupyter Notebookの中身
{
 "cells": [
  {
   "cell_type": "markdown",
   "id": "2ec2d522",
   "metadata": {},
   "source": [
    "# This is a markdown cell\n",
    "\n",
    "hey there 👋\n",
    "\n",
    "## This is a heading\n",
    "\n",
    "- This is a list item\n",
    "- This is another list item\n",
    "- This is a third list item"
   ]
  },
  {
   "cell_type": "code",
   "execution_count": 2,
   "id": "9d736ad9",
   "metadata": {},
   "outputs": [
    {
     "name": "stdout",
     "output_type": "stream",
     "text": [
      "This is a python code cell.\n",
      "The current time is: 19:40:14\n"
     ]
    }
   ],
   "source": [
    "import time\n",
    "\n",
    "print(\"This is a python code cell.\")\n",
    "\n",
    "print(\"The current time is:\", time.strftime(\"%H:%M:%S\"))"
   ]
  }
 ],
 "metadata": {
  "kernelspec": {
   "display_name": ".venv",
   "language": "python",
   "name": "python3"
  },
  "language_info": {
   "codemirror_mode": {
    "name": "ipython",
    "version": 3
   },
   "file_extension": ".py",
   "mimetype": "text/x-python",
   "name": "python",
   "nbconvert_exporter": "python",
   "pygments_lexer": "ipython3",
   "version": "3.12.5"
  }
 },
 "nbformat": 4,
 "nbformat_minor": 5
}
Export as Python Script
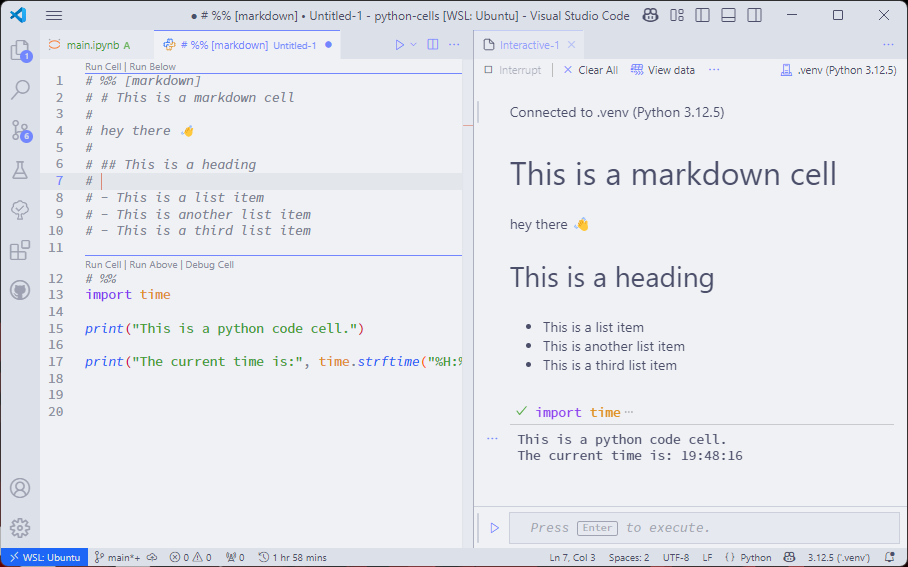
VSCodeでは、Jupyter Notebookを純粋なPythonファイルにエクスポートすることができます。
このPythonファイルには実行回数もカーネルの情報も含まれていないため、Gitとの相性も良いです。何よりJupyter Notebookのプレビューができない環境でも読めるのが良いです。
2025/04/30時点では閲覧中のJupyter Notebookから「...」→「Export」でPython Scriptを選択することでエクスポートできます。
エクスポート後のPythonファイルは以下のようになっています。
エクスポート前にセルとして区切られていたブロックは、# %%というコメントで分割されています。
# %% [markdown]とすることでMarkdownセルとして認識させることができます。
# %% [markdown]
# # This is a markdown cell
#
# hey there 👋
#
# ## This is a heading
#
# - This is a list item
# - This is another list item
# - This is a third list item

# %%
import time

print("This is a python code cell.")

print("The current time is:", time.strftime("%H:%M:%S"))
もちろん各セルを個別に実行させることができます。
詳しくはJupyter code cellsを参照してください。
(+α) 最初以外のセルにも「Run Below」ボタンをつける
上記の画像の通り、各セルには「Run Cell」ボタンがあり、各セルを個別に実行することがあります。
その他に、最初のセルであればそれ以降を実行する「Run Below」ボタンが、それ以外のセルであればそれ以前を実行する「Run Above」が与えられています。
しかし、最初のセル以降にも「Run Below」ボタンが欲しくなるときがあります。
事前に関数として処理をまとめ、関数の処理が書かれているセルを変えたついでに関数を呼んでいる箇所も再実行したい場合などがそれです。
ドキュメントにも「Run Below」ボタンを追加するオプションが詳しく書かれておらず諦めムードでしたが何とか発見したので共有します(この記事はこれを共有するために書いた記事です)。
jupyter.interactiveWindow.codeLens.commandsという設定にjupyter.runcellandallbelowを加えることでどのセルにも「Run Below」ボタンを出させることが可能です。ここを設定することでデバッグのボタンを消すことなどもできます。
{
  "jupyter.interactiveWindow.codeLens.commands": "jupyter.runcell, jupyter.runallcellsabove, jupyter.runcellandallbelow, jupyter.debugcell"
}
デフォルト値
{
  "jupyter.interactiveWindow.codeLens.commands": "jupyter.runcell, jupyter.runallcellsabove, jupyter.debugcell"
}
詳しい処理は以下に書いてありますが、jupyter.runallcellsaboveは最初のみ「Run Below」、それ以降は「Run Above」ボタンを追加するような仕様になっているようです(🤔)。
Discussion